Table of Contents
Advertisement
Quick Links
Advertisement
Table of Contents

Related Manuals for KETRON KETRON


Summary of Contents for KETRON KETRON
- Page 1 USER MANUAL...
-
Page 2: Important Safety Precautions
IMPORTANT SAFETY PRECAUTIONS CAUTION: TO REDUCE THE RISK OF ELECTRIC SHOCK, DO NOT REMOVE COVER (OR BACK). NO USER-SERVICEABLE PARTS INSIDE. REFER SERVICING TO QUALIFIED SERVICE PERSONNEL. The lightning flash with arrowhead symbol, within equilateral triangle, is intended to alert the user to the presence of uninsulated “dangerous voltage” within the product’s enclosure that may be of sufficient magnitude to constitute a risk of electric shock to persons. -
Page 3: Playing The Demo Songs
IMPORTANT SAFETY PRECAUTIONS Do not expose this apparatus to drips or splashes. An apparatus with Class I construction shall be connect- ed to an AC outlet with a protective grounding connec- Do not place any objects filled with liquids, such as tion. -
Page 4: Table Of Contents
Bass Bank ..........127 Arp & Licks ..........128 Voicetron ............ 25 Live Guitar ..........129 Master ............. 27 AUDYA FACTORY STYLES ......130 Master ............27 Drum Set ........... 133 Main View ..........28 MIDI Implementation ......150 Main View ..........28 Control Change ........ -
Page 5: Introduction
Introduction Thank you for purchasing Ketron Audya Advanced Music Station. In this “User Manual” you can find the descriptions of all the main functions to get started by using the keyboard. Before using the unit, we strongly recommend you to read this manual thoroughly to ensure that you understand the operation of its many useful and convenient functions. -
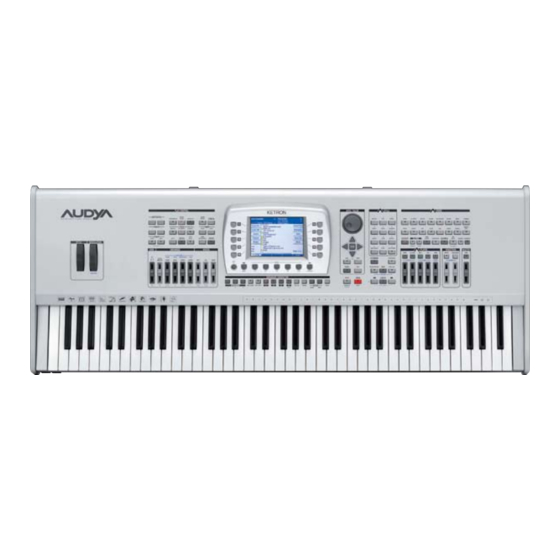
Page 6: Top Panel
Ketron - Audya - frontale - COLORE - 03/07/2008 Ketron - Audya - frontale - NERO - 03/07/2008 PLAY CONTROL DATA / VALUE... -
Page 7: Rear Panel
Introduction Rear panel All the connections to external devices are on the rear panel. In the figure below, each number corresponds to its description. 0 q w 1 Headphone 9 Line In Standard stereo jack for the headphone. The Standard RCA connectors for line right/left input Master volume adjusts also the headphone output (RIGHT, LEFT) of stereo devices with line level level. -
Page 8: Audio Connections
Connections AUDIO connections Stereo jack connection to a PA system. LINE INPUT 1 and 2 MAIN OUT L/R INPUT L INPUT R MIXER MAIN OUT RIGHT/LEFT AMPLIFIED SPEAKERS Connecting 4 auxiliary outputs to a mixer and to a PA system. MAIN OUT L/R LINE INPUT 1, 2, 3 and 4 INPUT L... -
Page 9: Midi Connection
Connections Connecting one or two microphones and one headphones. MICRO 2 STEREO HEADPHONES MICRO 1 MIDI connection MIDI connection to an external interface connected to a computer. AUDIO/MIDI USB INTERFACE (or FIREWIRE) MIDI IN MIDI OUT MIDI IN MIDI OUT COMPUTER WITH A DAW APPLICATION (Cubase, Pro Tools, SONAR, Logic,... -
Page 10: Video Connection
Connections VIDEO connection Connecting a VGA monitor. VGA MONITOR VIDEO PORT USB connection USB connection to a computer. COMPUTER CONNECTED VIA USB USB DEVICE... - Page 11 Connections USB connection procedure Connect the USB cable to the USB DEVICE port of Audya, and to the USB port of a computer. After a while, “USB connected” will appear on the display of Audya (Figure A). All the functions on the front panel are disabled.
-
Page 12: Display And Function Keys
Display and function buttons Display The heart of Audya is the display. The F1-F5 function buttons to the left, the F6-F10 function buttons to the right and the five User buttons below the display allow you to select the items displayed in the various screens. -
Page 13: User Buttons
Display and function buttons User buttons In addition to the FILL and BREAK selection in Arranger mode and other assignable user functions (see User Assignable on page 113), the five User buttons can access many functions. For example, while in the different operative modes (MENU, DISK, PLAYLIST, STYLE VIEW, DRUM MIXER and so on), these five User buttons allow the selection of further pages that open their own settings menus. -
Page 14: Selecting Voices
Selecting voices Selecting voices You can find three rows of eight buttons each in the VOICE section on the front panel. The first two rows allow the selection of the voice families, ordered by a common use (see a full list of the voices at the end of this manual). - Page 15 Selecting voices Selecting a INS voice Press the RAM INS / SUPERSOLO button of the third row in the VOICE section. The display will show a list of the SUPERSOLO voices stored on the hard disk (Figure Select one voice by using the CURSOR §...
- Page 16 Selecting voices Adding a second voice to the right hand (2nd VOICE) Press the 2nd VOICE button on the third row in the VOICE section. According to the PRESET or PROGRAM voice, you will add a second voice to the sound of the right hand.
-
Page 17: Selecting The Style
Selecting the styles Selecting styles The numeric keypad of the STYLE section allows the selection of twelve style families, divided into various musical genres. Selecting a PRESET style Select one style family by pressing one of the twelve buttons of the keypad in the STYLE section. -
Page 18: Play Control
Play Control Play Control The PLAY CONTROL section contains all the control functions so you can start playing the keyboard and modify the settings accordingly to your own way of playing. TRANSPOSER By pressing the [-] and [+] buttons you can transpose the overall pitch in 24 semitones up or down (1 semitone step), including the Arranger (except the drum). - Page 19 Play Control BASS The MANUAL, TO LOWEST and BASSIST buttons set the following modes, respectively. MANUAL: sets the manual bass for the left hand. TO LOWEST: sets the lowest note of the chord to the root. For example, when you want to play a bass pedal within a chord progression.
-
Page 20: Mixer
Mixer Mixer The Mixer section features nine vertical faders. NOTE The first fader at left allows to control the USER When the DRAWBARS mode is on, the nine faders of functions (see “User Assignable” on page 52). the Mixer will adjust the footage of the organ. For The remaining eight faders control the volumes details see on page 16 and on page 31. -
Page 21: Player
Player Player The Player section is a complete multimedia NOTE environment for live performances. It’s a mixer When a track of the Player is playing, the corresponding consisting of five faders allowing volume control LED flashes. The five buttons above the faders switch on/off NOTE in order to select the tracks for the mix. - Page 22 Player DJ LOOP screen where you start playback of the selected audio loop (Figure 20). The fader below adjusts the volume of the track. To navigate in this screen use the cursor buttons, the ENTER and EXIT buttons as described for the WAVE screen. looping tracks, prepared for several music NORM/IMM function (normal/immediate jump).
- Page 23 Player Press the MP3 button. NOTE Select one MP3 file from the list. Press the START button (USER 5). Press the just press the ENTER button when you select the files. START button on the panel, the WAVE track stops Be sure that the CROSSFADE LED is off.
- Page 24 Player New player features MP3 player now has a mixer. Once selected, you can access to the mixer MENU. By pressing the F10 button (3 NEXT) you can access the corresponding window of the MIXER (Figure where you can set the following parameters using the CURSOR Ó...
-
Page 25: Voicetron
Voicetron Voicetron The Voicetron section has one volume fader for MICRO and one volume fader for VOCALIZER, both with on/off LED button. Once you connect a microphone to the MICRO 1 connector and/or MICRO 2 connector, you can access to a wide range of options for the voice processing. - Page 26 Voicetron Setting a VOCALIZER effect Press the VOCALIZER button. The screen where to choose the VOICETRON PRESETS will appear (Figure 32). Press the F1-F10 buttons to set one of the VOICETRON PRESETS, that is an effect for the microphone connected to MICRO 1 input. Press the CURSOR Ó...
-
Page 27: Master
Master Master The Master fader is located at right of the Voicetron section and adjusts the global volume of the instrument. It features a FADE function which enables an automatic fade-out during playback, that is a gradual smooth volume reduction to zero. Figure 34 FADE By pressing the FADE button, the LED flashes... -
Page 28: Main View
Main View Main View The new MAIN VIEW interface allows to display all the items of the main screen in a more easy- to-operate way. Activating the MAIN VIEW Press the MENU button on the front panel to open the screen MENU as shown in Figure Press the F4 button corresponding to KEYBOARD CONTROL as shown by the arrow in... -
Page 29: Autoswitch Time
Main View Autoswitch Time Strictly pertaining to the new MAIN VIEW interface, the AUTOSWITCH TIME function allows to set the switching time up to 60 seconds before the MAIN VIEW switches from other environments. For example, after you choose a style or an instrument, the display switch automatically to the MAIN VIEW after the AUTOSWITCH TIME set by this parameter. -
Page 30: Main View Description
Main View Main View description Hereunder, you can see the organization of the graphical layout of the MAIN VIEW window. MAIN VIEW Window BPM Tempo It shows the BPM Tempo set for the style or the current filely loaded in the Player. - Page 31 Main View F3/F4 – The F3 button (or F4) opens the default window for MIDI files selection. It also shows the value of the volume set on the MIDI Player (Figure 44). More details on “MIDI Player (MAIN VIEW)” section of this manual. F5 –...
-
Page 32: Midi Player (Main View)
Main View MIDI Player (MAIN VIEW) From the MAIN VIEW window you can select directly one of the MIDI files stored on disc and display the karaoke lyrics, if present. Selecting MIDI files from MAIN VIEW In the MAIN VIEW window, press the F3 button (or F4). -
Page 33: Wave Player (Main View)
Main View WAVE Player (MAIN VIEW) From the MAIN VIEW window you can select directly the WAV file on disc. Selecting a WAV file from the MAIN VIEW The default MAIN VIEW window allows the selection of MIDI files. For this reason it’s necessary to press the WAVE button of the Player. -
Page 34: Mp3/Sfx Player (Main View)
Main View MP3/SFX Player (MAIN VIEW) From the MAIN VIEW window you can select directly the MP3 or SFX files on disc. Selecting an MP3/SFX file from MAIN VIEW The default MAIN VIEW window allows the selection of MIDI files. For this reason it’s necessary to press the MP3 button or SFX button of the Player. -
Page 35: Dj Loop Player (Main View)
Main View DJ LOOP Player (MAIN VIEW) From the MAIN VIEW window you can select Selecting a DJ LOOP from MAIN VIEW The default MAIN VIEW window allows the selection of MIDI files. For this reason it’s will appear (Figure 60). -
Page 36: Program
Program Program For each button of the VOICES section you can create and store a PROGRAM sound. You can modify a PROGRAM by pressing the EDIT button and a button of the VOICES section. Creating a PROGRAM Press the PROGRAM button. Press a button of the VOICES section, for example PIANO. - Page 37 Program F2/F7–VOLUME By pressing the F2 or F7 buttons you will highlight repeatdly the voice of which you want adjust the volume. Use the DATA/VALUE wheel or the CURSOR Ó Á buttons to adjust the volume from 0 to 63 of three voices independently (Figure 66).
- Page 38 Program VOICE EDIT Press the USER 1 button to access the edit page of each VOICE of the PROGRAM. You will see a screen similar to Figure 70 where all the parameters of the VOICE of the PROGRAM will appear. By using the F1 to F10 buttons you can select a parameter and modify the value using the DATA/VALUE wheel or the CURSOR Ó...
- Page 39 Program 2ND VOICE Press the USER 2 button (2nd Voice) to see a screen like Figure 73 by using the parameters for the second voice (2ND VOICE), that you can activate by pressing the 2ND VOICE button in the VOICES section. Press the F1...
- Page 40 Program EFF. MODE The USER 3 button opens a screen like Figure 77 where all the parameters for EFF. MODE will appear, that is the effects mode of the PROGRAM. Use the F1... F10 buttons to modify the parameters of the effects mode.
- Page 41 Program For the ECHO effect (Figure 81) you can choose from the following types: Mono Echo1, Mono Echo2... Mono Echo5 Stereo Echo1, Stereo Echo2... Stereo Echo5 Triple Echo1, Triple Echo2... Triple Echo5 Mono User1 Stereo User1, Stereo User2 Triple User1, Triple User2 Figure 81 For the DIST effect (Figure...
- Page 42 Program F1/F6–VOICES: you can assign up to three VOICES to the same PROGRAM, as already seen in the first PROGRAM EDIT screen. F2/F7–REVERB: you can adjust the reverb effect send. Values from 0 to 63 (Figure 86). By pressing together the CURSOR Ó Á buttons you set the reverb send to 0.
- Page 43 Program F1/F6–VOICES: you can assign up to three VOICES to the same PROGRAM, as already seen in the first PROGRAM EDIT screen. F2/F7–RANGE ( Figure 91): you can set the split points of the three instruments. You can set the split points for each VOICE playing directly on the keyboard.
- Page 44 Program F1/F6–VOICES: you can assign up to three VOICES to the same PROGRAM, as already seen in the first PROGRAM EDIT screen. F2/F7–PORT/MONO ( Figure 96): you can set the PORTAMENTO time with choosing values from 5 to 127. By pressing the CURSOR Ó Á buttons together you set the value to OFF.
- Page 45 Program F5–SPLIT -12 (ON/OFF) ( Figure 99): you can enable/disable the SPLIT to -12 semitones function. That is, when SPLIT mode is set, the RIGHT hand will sound a -1 octave, instead, when PIANIST mode is set, the keyboard will sound the original octave.
-
Page 46: Registration
Registration Registration A Registration stores a complete configuration of the panel. Audya lets you to save two types of Registrations, SINGLE and BLOCK. By using the REGISTRATION button on the front panel you can enter the Registration functions. Creating a SINGLE REGISTRATION... - Page 47 Registration Recalling a SINGLE REGISTRATION To recall a REGISTRATION from the list on the window, you can use the CURSOR § ¶ buttons or the DATA/VALUE wheel to select a REGISTRATION and then press the ENTER button (Figure 107). To recall a REGISTRATION you can also use the NOTE When you save a REGISTRATION in automatic mode, Figure 107...
- Page 48 Registration To jump to the second page, press the BACK or FORWARD buttons below the display. If you want to replace or delete one SINGLE REGISTRATION, select it by using the F1-F10 buttons and press the USER 2 button (REPLACE) or USER 3 button (DELETE), respectively, and then the ENTER button.
- Page 49 Registration Recalling a REGISTRATION from the MAIN VIEW window If the MAIN VIEW function and the NUMERIC ON function are enabled, by pressing the F2 button you can directly recall the REGISTRATION number by using the numeric keypad. From the MAIN VIEW window press the F2 button. “Enter Number ->”...
-
Page 50: Play List
Play List Play List By pressing the PLAY LIST button you can access the Play Lists stored on the hard disk. In order to create a Play List, follow the procedure below. Creating a PLAY LIST Press the PLAY LIST button. A screen like Figure will appear showing a PLAY LIST demo. -
Page 51: Key Tunes
Key Tunes Key Tunes By pressing the KEY TUNES button in the VOICE section, you can assign a song to each key of the keyboard. You can freely assign any song of the WAVE folder to any key of the keyboard. -
Page 52: Double, Harmony
Double, Harmony Double, Harmony By pressing the DOUBLE button in the VOICE section, you can activate the function to double the octave of the voice for the right hand. By pressing the HARMONY button in the VOICE section, you can enable the function to harmonize the voice for the right hand. -
Page 53: Style View
Style View Style View From the STYLE section on the front panel you can select a style by using the numeric keypad. If the style uses an Audio Style Modeling, please note that a ^ symbol appears before the style name otherwise the name appears without any symbol (Figure... - Page 54 Style View For any other part you can set the routing of the effects up to four effects (Figure 129). By using the F1 button you can select the routing of the effects for the parts. Please note that you select the part on the previous VOICE page (USER 1).
-
Page 55: Audio Style Modeling
The Audio Style Modeling is the powerful system For all the sections, you can scroll by using of Audya sound engine. The place where you the DATA/VALUE wheel or choosing directly can “model” the style is the Style View section. -
Page 56: The Audio Style Modeling Sections
Style View The Audio Style Modeling sections 1 - Audio Drum Strings, Synth, Banjo. The Audio Drum is a stereo Wave file containing an It works in place of the Chord 4 of the Style. audio rhythmic sequence. It can replace the normal You can store 4 Arp &... - Page 57 Style View Setting an Audio Drum, Groove Bank or Live Guitar. The selection of the tables for these three parts is the same. This is the procedure to set an Audio Drum. The procedure is the same for the other two parts. With the Arranger stopped, press the STYLE VIEW button.
- Page 58 Style View Storing the style Once you made all the desired settings, press the SAVE button on the front panel and give a name from the keyboard to store the style in the current position (Figure 135). In the example of Figure 136 the style The changes can be stored both for styles containing...
-
Page 59: Style Mode
Style Mode Style Mode By pressing the MODE button of the STYLE section, you can access the functions and the settings of the Arranger. The STYLE MODE main window is similar Figure 138. From here you can choose 5 sections by using the USER buttons from 1 to 5: MODES (USER 1) DRUM (USER 2) BASS (USER 3) - Page 60 Style Mode PIANIST SUSTAIN When this parameter is ON or OFF (Figure 142) enables/disables the Sustain Pedal control on Pianist when this is activated. PRESET MIX When this parameter is ON (Figure 143) the Styles play the original factory mix. While in OFF position, you can freely adjust the volumes of the sections of the Arranger by using the sliders.
- Page 61 Style Mode CHORD MODE Once CHORD MODE is selected, you can choose among four operative modes for the automatic chords, by using the CURSOR Ó Á buttons or the DATA/VALUE wheel (Figure 147). Easy 1 Standard functionality with normal chord recognition.
- Page 62 Style Mode DRUM (1) By pressing the USER 2 (DRUM) once you can access to the first edit window of the audio drum (Figure 151): F1–LIVE DRUM: sets the STRETCH or PITCH mode for Audio Style Modeling of the live drum. The STRETCH algorithm (default) guarantees a good audio quality even changing the tempo.
- Page 63 Style Mode BASS The USER 3 button (BASS) opens the edit window for the bass part of the Arranger. By using the F1- F10 buttons you can set the following options: F1–BASS TO ROOT: (Figure 154) brings all the automatic bass notes to the root of the recognized chord.
- Page 64 Style Mode CHORDS The USER 4 button (CHORDS) allows to access the chords settings (Figure 158). You can select the CLOSE/PARALLEL mode (except Live Guitar) and NORMAL/RETRIGGER mode for the 5 chords of the Style. In CLOSE mode the chords follow the intervals of the notes closer to conventional harmony rules.
-
Page 65: Gm Part
GM Part GM Part When MIDI Player is playing back, you can open the window to control the parts corresponding to the MIDI tracks of the file ( , by Figure 161) pressing the GM PART MIXER button on the PLAY CONTROL section. - Page 66 GM Part FILT. TX/RX (USER 2) By pressing FILT. TX you can access the window where to edit the MIDI transmission filters (Figure 164). By pressing the button again you can access the window where to edit the MIDI reception filters. To change the MIDI transmission/reception parameters, please see the MENU>MIDI section.
- Page 67 GM Part UTILITY (USER 5) By pressing UTILITY, you can access the MIDI utility window (Figure 169). Here you can set the following parameters by pressing directly the F1-F10 buttons: F1–SOFT-THRU: enables the MIDI Thru. F2–MIDI CLOCK IN: enables the MIDI clock reception.
-
Page 68: Drum Mixer
Drum Mixer Drum Mixer By pressing the DRUM MIXER button on the PLAY CONTROL section you can access the 10 percussive parts of the drum set ( Figure 172) By pressing the F1-F10 buttons you select the percussive parts of the drum: F1–KICK F2–SNARE F3–HI-HAT... - Page 69 Drum Mixer The available values are from 64L to >|< and to 63R, that is totally to the left, in the centre and totally to the right Figure 176). By pressing the CURSOR Ó Á buttons together you set the PAN value in the centre (>|<).
- Page 70 Drum Mixer 7. By using the DATA/VALUE wheel select “kick15”. Next to the name of the slot an asterisk (*) will appear. In our example you will hear the kick playing an electronic sound (Figure 181). 8. Press F1 once more to move on the selection of the family of the Drum part, so you can navigate between different families.
-
Page 71: Drum Set
Drum Set Drum Set By pressing the DRUM SET button in the PLAY CONTROL section you can access the screen where to select one of the available 53 DRUM SETS plus 20 user sets ( Figure 185) By pressing the F1-F10 buttons you select the DRUM SET, while the or the CURSOR Ó... - Page 72 Drum Set 5. Press F2 (GROUP) if you want change the percussion group (Figure 190) by using the CURSOR Ó Á buttons or the DATA/VALUE wheel: KICK SNARE HI-HAT CYMBAL RIMSHOT LATIN1 Figure 190 LATIN2 LATIN3 CLAP/FX 6. Press F3 (INSTR.) to select an instrument within the percussion group, by using the CURSOR Ó...
-
Page 73: Drawbars
Drawbars Drawbars By pressing the DRAWBARS button on the VOICE section, you switch the DRAWBARS mode on. For the selection of the different organ types please see “Selecting the organ DRAWBARS” on page 16. Creating a new organ DRAWBARS To create a new type of organ Drawbars, select one of the 20 organs available from the two DRAWBARS pages (Figure... -
Page 74: Ram Ins / Supersolo
When you can access to RAM INS section, you can find inviting to free one or more memory locations of INS the folder called SUPERSOLO, containing high quality, voices, by using the F2 button (CLEAR SELECT) or the F6 exclusive for AUDYA, orchestral voices . button (CLEAR ALL). -
Page 75: Voice List
Voice List Voice List By pressing the VOICE LIST button in the VOICE section, the screen of the custom voices will appear. For each of the 16 VOICES (the first two rows) you can access the VOICE LIST button with 20 memory locations each. In this way, you can customize your favourite voice lists to be used for each voice family. -
Page 76: Menu
Once the language is set, exit from MENU by using the EXIT or MENU buttons. Press SAVE and F6 (CUSTOM STARTUP) to store the language setting at Audya start-up. MIDI Press the F2 button (MIDI) to open the MIDI settings page (Figure 208). - Page 77 Menu CHANNEL TX By pressing the F1 button a window like Figure 209 will appear. Here you can set all the MIDI transmission channels for each part of the keyboard by using the F1-F10 buttons. Press the F1 button-10 corresponding to the part and assign the MIDI transmission channel choosing from 1 to 16 by using the CURSOR Ó...
- Page 78 Menu General, Master1, Master2, Accord1, Accord2 You can save the MIDI settings in five Preset, assigned to the USER buttons from 1 to 5: General: General Preset Master1: Master Keyboard Preset Master2: Second Master Keyboard Preset Accord1: MIDI accordion Preset Accord2: Second MIDI accordion Preset Figure 212 shows the Master2 page (USER...
- Page 79 Menu TRANPOSE TX From the first screen of the MIDI menu, by pressing the F3 button a window will appear where to set the MIDI transmission of the parts transposition. By using the F1-F10 buttons or the CURSOR § ¶ buttons you can select the parts to transpose via MIDI transmission, as shown in Figure...
- Page 80 Menu FILTER PROG.CHANGE RX From the first screen of the MIDI menu, by pressing the F7 button a window will appear where to set the Program Change reception filter (Figure 220). By using the buttons F1-10 you can select the parts to filter: F1–Right F2–Left...
- Page 81 Left: MIDI channel 2, both TX and RX track of the sequencer can be output directly Bass: MIDI channel 3, both TX and RX by using the Audya sound module. Chord1: MIDI channel 5, both TX and RX Drum1: MIDI channel 10, both TX and RX...
- Page 82 Menu From the first screen of the menu, press the F3 button to open the DSP (Digital Signal Processor) settings page, as shown in Figure 226. By using the F1-F10 buttons you can edit the following pages: F1–REVERB: Reverb settings. F2–CHORUS: Chorus settings.
- Page 83 Menu LEFT/GM REVERB From the REVERB page, by pressing the F2 button (LEFT/GM REVERB) you can access the page for the selection of the reverb for the left hand and the GM parts (Figure 230). The available reverb Preset are the same of those for the right hand seen before.
- Page 84 Menu CHORUS RIGHT From the CHORUS page, by pressing the F1 button (CHORUS RIGHT) you can access the page for the selection of the Chorus for the right hand (Figure 234). 10 Chorus Presets are available in the first page and 10 in the second, by pressing any CURSOR button or the DATA/VALUE wheel.
- Page 85 Menu ECHO-DELAY By pressing the F3 button on the DSP page, you can access the ECHO-DELAY screen, as shown in Figure 237. Here you can make the selection of the ECHO- DELAY type to set into the DSP in order to make it available for PROGRAMS from which you can choose an ECHO algorithm (Figure...
- Page 86 Menu DISTORTION By pressing the F4 button on the DSP page, you can access the DISTORSION screen, as shown in Figure 241. Here you can select the DISTORTION type to set into the DSP in order to make it available for PROGRAMS from which you can choose a DISTORTION algorithm (Figure...
- Page 87 Menu ROTOR By pressing the F5 button on the DSP page, you can access the window ROTOR, as shown in Figure 244. Here you can select the speed of the rotor: F1–SLOW F2- FAST The same function is available by using the two SLOW and FAST buttons of the ROTOR section on the front panel.
- Page 88 Menu EQUALIZER By pressing the F7 button on the DSP page, you can access the EQUALIZER screen, as shown in Figure 247. Here you can select the EQUALIZER type to set as global equalization of the keyboard. of the F1-F5 buttons to select the corresponding Equalizer type: Equalizer1 ...
- Page 89 Menu WAVE EQUALIZER By pressing the F8 button on the DSP page, you can access the WAVE EQUALIZER screen, as shown in Figure 249. Here you can select the WAVE EQUALIZER type to set as equalization of the WAVE Player. one of the F1-F5 buttons to select the corresponding Wave Equalizer type: Wave Equal.1 ...
- Page 90 Menu KEYBOARD CONTROL From the first MENU screen, by pressing the F4 button you can access the KEYBOARD CONTROL page where to make the keyboard settings (Figure 252). By using the F1-F10 buttons you can access the following pages: F1–PITCH/VOL/TRANS: Pitch Bend, Master Tune, Master Volume, Keyb Transpose, Player Transpose Lock and Right Boost Level settings.
- Page 91 Menu AFTERTOUCH By pressing the F3 button on the KEYBOARD CONTROL page you can access the settings of the AFTERTOUCH parameters (Figure 255): F1– Sensitivity: adjustment of the Aftertouch sensitivity (values 0–63) F2– Threshold: threshold of the Aftertouch (values 0–63) F3–...
- Page 92 Menu By using the F1-F10 buttons from the LEFT DRUM page (Figure 258) you can set the percussive instruments for the left hand. F1– Bass Drum Instr.1: percussive instrument 1 for the bass (see note). F2– Bass Drum Instr.2: percussive instrument 2 for the bass (see note).
- Page 93 Menu FOOTSWITCH By pressing the F8 button from the KEYBOARD CONTROL page, you can activate the FOOTSWITCH screen (Figure 262), where you can assign the functions to the pedalboard connected on the rear. The optional FS13 pedalboard has 13 functions, to which you can assign any parameter of the keyboard.
- Page 94 Menu F6– Intelligent Transpose: affects the transposition of the MIDI file. Each instrument is transposed within its natural octave. Values ON/OFF. F7– LINE IN: enables/disables the LINE IN input. The input volume is controlled by the S/PDIF-LINE IN (SFX) slider of the PLAYER section.
- Page 95 Menu KEY TUNE TO CHORD function When the Key Tune To Chord is active, you can start a Key Tune, by using the associated key, but also by using the recognition of the associated chord. Here’s an example: Press the KEY TUNE button on the panel and select a Key Tune (Figure 266).
- Page 96 Menu Out1&2 Drum By using the CURSOR § ¶ bu t tons or the DATA/ VALUE wheel, you can select the percussive instrument of the drum to output (Figure 269). The percussive instruments are the following: KICK SNARE HI-HAT CYMBAL RIMSHOT Figure 269 LATIN...
- Page 97 Menu VIDEO MODE From the main page of the MENU, press the F7 button (VIDEO MODE) to open the page for the video settings (Figure 273). By using the F1- F10 buttons you can open the following settings pages: F1 - MODE: sets the VGA video output for lyric display (karaoke) or as MIRROR (all that you see in the display is mirrored on a VGA monitor).
- Page 98 Menu AUDIO RECORDING From the main page of the MENU, press the F8 button to open the AUDIO RECORDING page dedicated to audio recording (Figure 274). By using the F1-F10 buttons you can set the following parameters: F1- MP3 RECORDING: MP3 file recording. F2- MIDI SYNC RECORDING: audio file recording synchronized with a MIDI file.
- Page 99 Menu MIDI SYNC RECORDING (file audio recording synchronized with a MIDI file) Press the MENU button and the F8 button (AUDIO RECORDING) to open the audio recording environment. Press the F2 button (MIDI SYNC RECORDING) to show the list of MIDI files within the MIDIFILE folder on the disk (Figure 277).
- Page 100 Menu Avoiding the MIDI file recording mixed to the source When you make a MIDI SYNC RECORDING by selecting a Main or Keyboard source, also the MIDI file playing will be recorded into the audio file. To avoid this, you can follow two procedures: Manual procedure Select MENU >...
- Page 101 Menu Press the USER 5 button (ENTER). Press the F1 button (KEYBOARD) to set the recording mode from keyboard. Press the USER 5 button (START REC) or the ENTER button to start the MIDI recording. Play the keyboard and/or start the Arranger. Press the USER 4 button (STOP REC) to stop recording.
-
Page 102: Midi Remix
MIDI Remix Audya offers a MIDI REMIX function to replace the drum track in any MIDI file with the drum part of an internal Style of Audya, even one with AUDIO DRUM part. Making a MIDI Remix Press the MIDI button in the Player section and select a MIDI file from the list. - Page 103 MIDI Remix Menu NEW MIDI REMIX FEATURES Two options for MIDI REMIX storing have been added: F1–START BAR F2–STOP BAR Start Bar and Stop Bar ( Figure 290) indicate the start bar of the MIDI REMIX and the stop bar, respectively.
-
Page 104: Voicetron
Voicetron Voicetron Once you connect two microphones to the MICRO 1 and MICRO 2 connectors you can access to a bunch of options for the voice treatment. MICRO The MICRO button enables the MICRO 1 input and MICRO 2 input. Connect one or two microphones to the jacks on the rear and adjust the level by using the GAIN 1 and GAIN 2 wheels. - Page 105 Voicetron REVERB By selecting the F3 button a REVERB screen like Figure 294 will appear where you can choose one of the available reverbs by using the CURSOR § ¶ buttons or the DATA/VALUE wheel: Off (nessun effect) Church Short Room Cathedral Room Gated Reverb...
- Page 106 Voicetron LIMITER By selecting the F6 button a LIMITER screen (only for MICRO1) like Figure 298 will appear where you can choose one of the available Limiters by using the CURSOR § ¶ buttons or the DATA/VALUE wheel: -6dB -12dB -18dB User Figure 298...
- Page 107 Voicetron Saving a microphone effect After you have modified one of the MICRO PRESETS, you can save it by overwriting the same Preset or giving a new name. Here is the procedure to follow. Select a MICRO PRESET. Press the EDIT button on the front panel and edit the parameters as explained above.
- Page 108 Voicetron Editing a VOCALIZER effect Select a VOCALIZER effect. By pressing the EDIT button, a window like Figure will appear. Press the F1-F10 buttons to access the parameters of the Preset F1–DUET: duet effects. F2–TRIO: trio effects. F3–QUARTET: quartet effects. F4–QUINTET: quintet effects.
- Page 109 Voicetron QUINTET By pressing the F4 button the list of QUINTET effects similar to Figure 310 will appear from which you can choose one of the available quintet effects by using the CURSOR § ¶ bu t tons or the DATA/VALUE wheel: Standard Open...
- Page 110 Voicetron EQUALIZER By pressing the F8 button the list of EQUALIZER effects similar to Figure 314 will appear from which you can choose one of the 10-bands graphical equalizer preset by using the USER buttons from 1 to 5, or edit the parameters to set the custom equalization.
- Page 111 Voicetron EFFECTS By selecting the F9 button the list of EFFECTS similar Figure 319 will appear from which you can edit the parameters of the REVERB and ECHO effects. Select the parameter by using the CURSOR § ¶ buttons and edit the value of the 3 parameters by using the DATA/VALUE wheel.
-
Page 112: Search (Main View)
Search Search (Main View) Audya features a useful SEARCH function in order to search files stored in the internal disk or in external USB devices. When is the MAIN VIEW is active, the search engine looks different from the normal view. -
Page 113: User Assignable
User Assignable User Assignable By pressing the USER ASSIGNABLE button, located to left of the display, you can access the screen where to assign custom functions to the USER buttons (Figure 328). By using the F1-F5 buttons you can assign up functions for the five User buttons below the display. -
Page 114: User Styles
Audya features two style families: FACTORY STYLES and USER STYLES . The FACTORY STYLES are the built-in styles of Audya and can be accessed by using the keypad in the STYLE section and the ordinary selection of the style by using the F1-F10 buttons, as already described in the “Styles”... -
Page 115: Msp Function
MSP function Audya offers a complete Multi Sample Player editor. To access the MSP function, press the WAVE button, choose a file from the list in the WAVE folder and press the EDIT button. Creating an MSP Select a WAV format file from the WAVE folder... - Page 116 Figure 336 NOTE The MSP files created by Audya will be stores in a single file containing all the information data to work, unlike the previous versions of KETRON files which need to have the WAV files in the same folder. Ot...
-
Page 117: Text Scrolling
Combining a text file with a MIDI file, an MP3 or a WAVE file Make the USB connection to access the hard disk of Audya. After connecting, open the WAVE folder and copy a text file (an ordinary TXT file) Figure 337 containing the lyric of a song. -
Page 118: Disk
Disk Disk Audya features a bunch of functions dedicated to the disk management. Disk Menu Press the DISK button to see the content of the internal disk (Figure 341). The disk contains a certain number of folders, that you can access by using the CURSOR §... -
Page 119: Usb Drive
USB Figure 345 drive. Search Audya features a useful SEARCH function in order to search files stored in the internal disk or in external USB devices. Searching a file Press the SEARCH button. -
Page 120: Technical Tables
Technical Tables Sounds GM Voices BANK A (CC0 Value=0) N° VOICE N° VOICE N° VOICE N° VOICE Acoustic Altosoft Rock&Roll Finger Altosax Soundtrack Upright Picked Tenor Crystal Honky Fretless Bariton Atmosphere Slap Oboe Brightness Funk Goblin Harpsichord Synbass1 Bassoon Clavinet Synbass2 Clarinet Startheme... - Page 121 Sounds GM Voices Analogs Stops Synth21 Flanger Click Whaguitar Wave Brightpad Hawaian Wiring Mandolin Synth10 Synth23 Synth4 Ramp ClassicFx Hit&Crash Synth22 Pedalsteel Clackson Synth25 R&Roll Vintage Fusion Reed Synbass6 Strato Silent Alarm&Laser Synbass7 Melobar Synbass8 Vintage Polisynth Punch3 Fingered Airhorn BANK C (CC0 Value=10) N°...
-
Page 122: Drum Set
Sounds GM Voices BANK D (CC0 Value=11) N° VOICE N° VOICE N° VOICE N° VOICE Synth15 Synth16 Folk Synth17 Deep Synth18 Synth19 Retro Musette2 Melotom2 Synbass9 Accordion2 Synbass10 Synbass11 Synbrass4 Synth11 Synbass12 Bass&Piano1 Explosion Synbass13 Bass&Piano2 Bass&Guit3 Fingerpick Staccato Gunshot2 Marktree Muted Gunshot3... -
Page 123: Audio Drum
Audio Drum Audio Drum N° N° N° CTRYBEAT2RX120 16 TRIPLTRX90 CTRYROCK2RX123 CTRYROCK4RX120 BLUEGRASSRX108 PARTYPOLKA120... - Page 124 Audio Drum Audio Drum N° N° N° ROCK&ROLL180 ROCK&ROLLRX180 POPFUNK2FX106 POPFUNK2RX106 POPSTUDIORX91 ROCKABILLY105 POPTRIPLTRX75 ROCKABILLYRX105 R&BLUES1RX110 R&BLUES3RX115 NOTE SHUFFLE3RX125 name of the AUDIO DRUM is the remixed version of the same file with the same version with some effects applied, like compressor, reverb, etc.
-
Page 125: Groove Bank (Drum 2)
Groove (Drum 2) Groove Bank (Drum 2) N° N° N° GIPSY1 GIPSY2 BLUEGRASS HIHAT SWING1 HIHAT SWING2 HIHAT SWING3 HIPHOP1 HIPHOP2... - Page 126 Groove (Drum 2) Groove Bank (Drum 2) N° N° LATINDANCE1 LATINDANCE2 STREET1 PANDERO1 STREET2 PANDERO2 PASODOBLE TAMBORA TAMBOURIN16 TAMBOURIN16T TRIPLET URBAN REELS...
-
Page 127: Bass Bank
Bass Bank Bass Bank N° N° N° N° CHARLESTON CNTRYDIX ROCKSHUFF SHAKE SLOWROCK LATINROCK MARCH... -
Page 128: Arp & Licks
Arp & Lick Arp & Licks N° N° N°... -
Page 129: Live Guitar
Live Guitar Live Guitar N° N° N° SOKA SURF BALLENATO DANCE DISCO FINGERPICK WESTERN... -
Page 130: Audya Factory Styles
Styles AUDYA FACTORY STYLES BALLAD DANCE COUNTRY N° STYLE N° STYLE N° STYLE ^APACHE ^BLUEGRASS ^EUROPOP ^ROCKABILLY ^ITALBEAT BALLROOM N° STYLE ^ARGENTINO ^ITALPOLKA ^MAZURCA (R) ^MODERATO ^QUADRIGLIA ^TARANTELLA ^WIENER NOTE The symbol ^ before the name of the STYLE means that the style has AUDIO DRUM, GROOVES or LIVE GUITAR parts. - Page 131 Styles AUDYA FACTORY STYLES FOLK PARTY LATIN N° STYLE N° STYLE N° STYLE ^BACHATA ^MILONGA ^BALADA ^PAQUITO ^BALLENATO ^PARISIENNE ^PIZZICA ^SCHLAGER ^BOSSA&SALSA ^REELS ^CALIENTE(R) ALOHA ^SALTARELLO BOARISCHER ^SEVILLANA ^TAMMURIATA ^CUMBIA (R) ^CUMBION BAROQUE ^DOMINICANA(R) MEXICAN ^ITALBACHATA OBERKRAIN SIRTAKY ^MAMBO R&ROLL N°...
- Page 132 Styles AUDYA FACTORY STYLES SWING UNPLUGGED N° STYLE N° STYLE N° STYLE ^ANDALUZ ^BEGUINE ^BLUEGRAS ^GOGO(R) ^DOWNBEAT ^GIPSY ^MEDITERRANEAN CHARLESTON ^BALLAD ^SUBWAY DIXIELAND(R) MANOUCHE ^SURFIN ^LOUNGE ^FADO ROCK&SOUL N° STYLE ^RAP®GAE ^SOULFUL...
-
Page 133: Drum Set
Drum Set Drum Set 31 Sticks01 79 Cuica02 32 Click 80 Triangle01 Standard 1 Program Change 1 33 Metronome 01 81 Triangle02 34 Metronome 02 82 Shaker01 14 Snare001 62 Conga Slap 35 Kick03 83 Shaker02 15 Roll01 36 Kick04 84 Sticks02 16 Roll02 37 Rimshot03... - Page 134 Drum Set 22 Empty 70 Maracas01 50 Tom12 98 Empty 51 Ride01 99 Empty 23 Empty 71 Whistle01 52 Crash03 100 Empty 24 Empty 72 Whistle02 53 Ridebell01 101 Empty 25 Empty 73 Guiro01 54 Tambourine01 102 Empty 26 Empty 74 Guiro02 55 Crash04 103 Empty...
- Page 135 Drum Set 45 Tom03 93 Empty 18 Empty 46 Open01 94 Empty 19 Empty 47 Tom04 95 Empty 20 Empty 48 Tom05 96 Empty 21 Empty 69 Cabasa 49 Crash02 97 Empty 22 Empty 70 Maracas01 50 Tom06 98 Empty 23 Empty 71 Whistle01 51 Ride01...
- Page 136 Drum Set 41 Tom01 89 Snare009 42 Stick02 90 Snare010 Jazz Dry Program Change 11 43 Tom02 91 Middle02 14 Snare001 62 Conga Slap 44 Close01 92 Stick03 15 Roll01 45 Tom03 93 Close02 16 Roll02 46 Open01 94 Open02 17 Snare002 47 Tom04 95 Reverse...
- Page 137 Drum Set 34 Metronome 02 82 Shaker01 57 Crash05 105 Empty 35 Kick10 83 Shaker02 58 Vibraslap 106 Empty 36 Kick11 84 Sticks02 59 Ride02 107 Empty 37 Rimshot09 85 Castagnet 108 Empty 38 Snare021 86 Tambourine02 109 Empty 39 Clap01 87 Rimshot03 40 Snare016 88 Snare022...
- Page 138 Drum Set 31 Sticks01 79 Cuica02 32 Click 80 Triangle01 Progressive Program Change 28 33 Metronome 01 81 Triangle02 34 Metronome 02 82 Shaker01 14 Snare001 62 Conga Slap 35 Kick14 83 Shaker02 15 Roll01 36 Kick15 84 Sticks02 16 Roll02 37 Rimshot07 85 Clap04 17 Snare002...
- Page 139 Drum Set 43 Tom27 91 Kick47 24 Crash01 72 Whistle02 44 Close05 92 Kick23 25 Snare007 73 Guiro01 45 Tom28 93 Middle07 26 Fingsnap 01 74 Guiro02 46 Middle08 94 Open07 27 Slap 75 Claves01 47 Tom29 95 Reverse 28 Snare008 48 Tom30 96 Applause 29 Scratch Up...
- Page 140 Drum Set 56 Cowbell01 104 Empty 37 Empty 85 Empty 57 Crash05 105 Empty 38 Empty 86 Empty 58 Vibraslap 106 Empty 39 Slap 87 Empty 59 Ride04 107 Empty 40 Snare008 88 Empty 108 Empty 41 Scratch Up 89 Empty 109 Empty 42 Scratch Down 90 Empty...
- Page 141 Drum Set 18 Snare003 51 Ride03 99 Empty 19 Snare004 52 Crash03 100 Empty 20 Snare005 53 Ridebell01 101 Empty 21 Snare006 69 Cabasa 54 Tambourine01 102 Empty 22 Tom Flam01 70 Maracas01 55 Crash04 103 Empty 23 Tom Flam02 71 Whistle01 56 Cowbell01 104 Empty...
- Page 142 Drum Set 32 Click 80 Triangle01 33 Metronome 01 81 Triangle02 Modern Program Change 62 34 Metronome 02 82 Shaker01 35 Kick33 83 Shaker02 14 Snare001 62 Conga Slap 36 Kick23 84 Sticks02 15 Roll01 37 Rimshot14 85 Clap03 16 Roll02 38 Snare077 86 Tambourine02 17 Snare002...
- Page 143 Drum Set 40 Snare017 88 Snare010 Pop Jazz Program Change 73 41 Tom01 89 Snare013 14 Snare001 62 Conga Slap 42 Stick01 90 Snare028 15 Roll01 43 Tom02 91 Stick05 16 Roll02 44 Close01 92 Stick02 17 Snare002 45 Tom03 93 Close02 18 Snare003 46 Open01...
- Page 144 Drum Set 43 Tom21 91 Kick17 24 Crash01 72 Whistle02 44 Close01 92 Kick18 25 Snare007 73 Guiro01 45 Tom22 93 Stick08 26 Fingsnap 01 74 Guiro02 46 Middle02 94 Middle06 27 Slap 75 Claves01 47 Tom23 95 Reverse 28 Snare008 48 Tom24 96 Applause 29 Scratch Up...
- Page 145 Drum Set 56 Cowbell01 104 Empty 37 Kick02 85 Snare071 57 Crash05 105 Empty 38 Kick03 86 Snare072 58 Vibraslap 106 Empty 39 Kick04 87 Snare058 59 Ride03 107 Empty 40 Kick05 88 Snare031 108 Empty 41 Kick06 89 Snare073 109 Empty 42 Kick07 90 Snare060...
- Page 146 Drum Set 18 Snare003 51 Ride01 99 Empty 19 Snare004 52 Crash03 100 Empty 20 Snare005 53 Ridebell01 101 Empty 21 Snare006 69 Cabasa 54 Tambourine01 102 Empty 22 Tom Flam01 70 Maracas01 55 Crash04 103 Empty 23 Tom Flam02 71 Whistle01 56 Cowbell01 104 Empty...
- Page 147 Drum Set 32 Click 80 Triangle01 16 Roll02 17 Snare002 33 Metronome 01 81 Triangle02 18 Snare003 34 Metronome 02 82 Shaker01 19 Snare004 35 Kick50 83 Shaker02 20 Snare005 36 Kick21 84 Sticks02 21 Snare006 69 Cabasa 37 Rimshot16 85 Clap01 22 Tom Flam01 70 Maracas01...
- Page 148 Drum Set 50 Tom31 98 Empty 28 Snare008 51 Ride02 99 Empty 29 Scratch Up 52 Crash03 100 Empty 30 Scratch Down 78 Cuica01 53 Ridebell01 101 Empty 31 Sticks01 79 Cuica02 54 Tambourine01 102 Empty 32 Click 80 Triangle01 55 Crash04 103 Empty 33 Metronome 01...
- Page 149 Drum Set 56 Cowbell01 104 Empty 32 Snare091 80 Empty 57 Crash05 105 Empty 33 Roll05 81 Empty 58 Vibraslap 106 Empty 34 Snare092 82 Empty 59 Ride01 107 Empty 35 Kick57 83 Empty 108 Empty 36 Kick56 84 Empty 109 Empty 37 Rimshot21 85 Empty...
-
Page 150: Midi Implementation
MIDI Implementation NOTE ON 9nH kk vv n(0-0FH) midi channel, kk(01H-7FH)=NOTE ON vv=velocity(01H-7FH) (vv=0 means NOTE OFF) NOTE OFF 8nH kk vv n(0-0FH) midi channel, kk(01H-7FH)=NOTE OFF 9nH kk 00H vv=don’t care if command 8nH PITCH BEND EnH bl bh Pitch Bend as specified by bl(low) bh(high), bl=(00H-7FH),bh=(00H-7FH) 14 bit resolution. -
Page 151: Control Change
MIDI Implementation Control Change Modulation wheel Status Byte 2 Byte 3 BnH 01H mmH n = LC-1 or HC-1 (lead or harmony MIDI channel) mm = modulation amount : 00H -7FH Portamento time Status Byte 2 Byte 3 BnH 05H ttH n = LC-1 or HC-1 (lead or harmony MIDI channel) tt = portamento time : 00H -7FH (default = 00H) Volume Status Byte 2 Byte 3... -
Page 152: Non Registered Parameter Numbers
MIDI Implementation (Vocalizer) Non Registered Parameter Numbers Note: All NRPN messages are to be sent through harmony or lead MIDI channels (HC or LC). System NRPN NRPN NRPN Data MSB Default Parameter value Main volumes, modes and switches 0...127 Master volume: affects the whole system output 0, 1 Vocalizer mode: 0 = MIDI Mode: 5 harmony voices driven by MIDI messages sent... - Page 153 MIDI Implementation NRPN NRPN Data MSB Default Parameter value 0…23 Virtual voice presets: presets for Virtual voice feature. Calling a preset overwrites the current Voice transform (vibrato, formant, tone…) and EQ parameters of the lead voice. Calling a preset also turns “Lead channel processing switch”...
- Page 154 MIDI Implementation NRPN NRPN Data Default Parameter value Pitch to MIDI conversion Pitch to MIDI switch: enables pitch to midi conversion. Refer to “Pitch 1...127 output” section for more information about this feature. 0...4 Note trigger sensitivity: this parameter affects the responsiveness of the algorithm for triggering a new MIDI note.
- Page 155 MIDI Implementation Lead voice NRPN NRPN NRPN Data MSB Default value Parameter 0...127 Lead level: input voice output level 0...64...127 Lead pan: same as control 10 on lead MIDI channel (LC) Voice transform parameters 40...64...88 64 Transpose: -24...0...+24 semitones 0...64...127 Formant: formant control 0...38 Tone frequency: low pass filter resonance frequency...
- Page 156 MIDI Implementation 0...38 Voice 3 tone frequency 0...38 Voice 4 tone frequency 0...38 Voice 5 tone frequency 64...71 Voice 1 tone resonance: harmony voice low pass filter resonance amount 64...71 Voice 2 tone resonance 64...71 Voice 3 tone resonance 64...71 Voice 4 tone resonance 64...71 Voice 5 tone resonance...
- Page 157 MIDI Implementation Effects NRPN NRPN NRPN Data MSB Default value Parameter Compressor 0,1...127 Compressor switch: 0: Off 1...127: On 0...127 Attack time: 0=fast attack (0.1 ms), ... 60=1ms..100= 10ms, 127=slow attack (100ms), exp. curve 0...127 Release time: 0=fast release (10ms) , ...60= 100 ms, ... 100=1 s.
- Page 158 MIDI Implementation Band Frequency 100Hz 160Hz 265Hz 430Hz 700Hz 1.1kHz 1.9kHz 3kHz 5kHz 8kHz Reset NRPN NRPN NRPN Data Default value Parameter sets most of the vocalizer parameters to their default value + all notes off. The following parameters are reset : -pan (Control 10) -expression (Control 11)
-
Page 159: Specifications
2 microphone inputs with separate gain control, 10-band equalizer, echo, reverb, pan, pitch shift, talk, voice transformation. VOICETRON Harmonizer with 5 separate voices by Ketron. Vocoder mode, auto-harmony by using the arranger, vocalizer track on MIDI file, advanced editing on all 5 voices. MIDI In 1, In 2, Out, Thru. - Page 160 Notes Due to continuing product improvement efforts, specifications and appearance are subject to change without notice. Please visit frequently our website www.ketron.it to check for software updates, user manuals, etc.
- Page 161 Notes...
- Page 162 KETRON s.r.l. Via Giuseppe Taliercio n. 7 60131 Ancona (Italy) Tel. +39 071 285771 Tel. +39 071 2857748 www.ketron.it email: ketron@ketron.it Printed in Italy...
Need help?
Do you have a question about the KETRON and is the answer not in the manual?
Questions and answers