
Related Manuals for PolyVision TS Series


Summary of Contents for PolyVision TS Series
- Page 1 TS Series interactive whiteboard user guide Part number 370-0364-02 ©2011 PolyVision Corporation All rights reserved...
- Page 2 Information in this document is subject to change without notice. Reproduction in any manner without written permission of PolyVision Corporation is forbidden. PolyVision is a registered trademark of Steelcase, Inc. ēno, Walk-and- Talk and Lightning are trademarks of PolyVision Corporation. Webster is a registered trademark of PolyVision Corporation.
-
Page 3: Table Of Contents
Mounting on the wall ........4 Install the PolyVision driver ....... . . 7 System requirements . - Page 4 Checking for updates ........35 Exiting the PolyVision driver ....... 35 To uninstall the PolyVision driver in Windows .
-
Page 5: Welcome
PolyVision offers these TS whiteboards: • TS Interactive Whiteboard (TS) • TS Lightning Interactive Whiteboard (TSL) PolyVision’s TS (touch sensitive) and TSL interactive whiteboards enable you to: • write with dry-erase markers and print or save your work • use the whiteboard as a touch-screen for your computer to navigate... -
Page 6: Register Your Polyvision Product
600 model whiteboard and your computer. (Refer to "Appendix 1: Installing the TS 600 Bluetooth option" on page 44.) Register your PolyVision product By registering your product, you receive enhanced customer service with information on software upgrades. To register your PolyVision product: • Register on-line at: http://register.polyvision.com PolyVision... -
Page 7: Installing The Ts Interactive Whiteboard
1. Mount the TS interactive whiteboard to a wall. (Refer to“Mount the TS interactive whiteboard on a wall” on page 4). 2. Install the PolyVision driver on the computer. (Refer to “Install the PolyVision driver” on page 7.) 3. Connect power and data to the whiteboard. (Refer to “Connect power and data for TS or TSL models”... -
Page 8: Mount The Ts Interactive Whiteboard On A Wall
Erase Print Mounting on the wall To mount any TS or TSL whiteboard on a wall: 1. Choose a location with convenient access to your computer, an AC power outlet, and any network connections or projectors you are using. PolyVision... - Page 9 If you are not installing on a sheet rock wall, you must provide your own fasteners. 5. Attach the mounting bracket to the wall anchors on the wall using the four Phillips screws provided. Assure that the screws are snug. PolyVision...
- Page 10 7. Peel the backing off the front and back of the two Velcro strips. 8. Attach Velcro strips to lower right and left corners on the back of whiteboard and press against the wall. PolyVision...
-
Page 11: Install The Polyvision Driver
Install the PolyVision driver Install the PolyVision driver System requirements Your Windows-based computer must have: • 500 MHz Pentium processor • 512 MB Ram • Windows XP SP2, Tablet XP SP2, Vista, or Windows 7 • VGA HD-15 video port •... -
Page 12: Polyvision Driver Installation
2. Installation should begin automatically. If it does not: • Windows: double-click “My Computer” on your desktop, double- click the disk named “PolyVision driver.” To install the PolyVision driver in English, double-click “PVAutoRun.exe.” To install the PolyVision driver in another language, navigate to the appropriate folder and double-click “Setup.”... -
Page 13: Connect Power And Data For Ts Or Tsl Models
“Configuring PolyVision driver options” on page 24. Connect power and data for TS or TSL models After you install the PolyVision driver on your computer, connect the cable between the whiteboard and computer. Ensure that both your computer and whiteboard are powered off before you make cable connections. -
Page 14: Connections For Ts 600 Model
Connections for TS 600 model To connect the whiteboard to your computer: 1. Plug the AC power cord into the power connector on the bottom of the whiteboard, next to the serial port. 9-Pin Serial Cable AC Power Cord PolyVision... - Page 15 4. Plug the other end into your computer’s serial port. note: NOTE: The maximum serial port cable length is 25 feet (7.5 meters). For greater distances, a serial amplifier is required (available at computer networking suppliers). PolyVision...
-
Page 16: Getting Started In Projection Mode
2. Tap the Projection icon on the whiteboard one time. To align the projected image with TS models: 1. Move the projector physically so that the entire solid-colored background is positioned inside the borders of the whiteboard. 2. Tap the Projection icon on the whiteboard. PolyVision... - Page 17 When alignment is complete, you are ready to begin interacting with your computer. The alignment between your projector and the PolyVision driver is important. PolyVision offers three levels of alignment: good, better, best. The default is “better” alignment. If you need to change the correspondence between the position of the cursor and the point of contact when you tap the whiteboard, refer to “Choosing alignment...
-
Page 18: Using Ts Series Interactive Whiteboards
To get started using your TS interactive whiteboard: 1. Make sure the whiteboard is plugged in and turned on, if necessary. 2. Make sure the PolyVision driver is installed on the computer connected to the TS interactive whiteboard. (Refer to "Install the PolyVision driver"... -
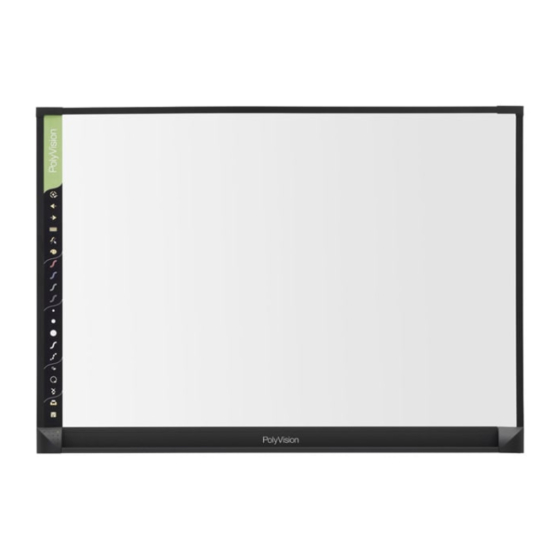
Page 19: The Ts Icon Strip
Using TS series interactive whiteboards The TS icon strip The TS whiteboard includes icons that you tap with your finger to interact with your computer. The icon functions are described below. PolyVision... - Page 20 Using TS series interactive whiteboards TS icon Operation Toggles “projection mode” on and off. The first use starts the onscreen alignment (calibration) process. Goes to the previous PowerPoint slide or PgUp. Goes to the next PowerPoint slide or PgDown. Displays the on-screen keyboard.
-
Page 21: Control Icon Options
• by configuring the PolyVision driver to project the control icons onto the whiteboard in a movable window that you tap with your finger (Refer to "Using on-screen tools" on page 34.) Cursor control in projection mode You can use your finger as both a pen or cursor in projection mode. -
Page 22: Using Dry-Erase Markers
The default ink color recorded in the software is black. To change the default color at startup, refer to "Configuring PolyVision driver options" on page 24. Erase the board using the large circular felt eraser provided, or using your finger for small erasures. -
Page 23: Writing In Projection Mode
20.) note: NOTE: The PolyVision driver provides the option to change the function of the Red icon to two other alternative functions: spotlight or reveal. These options are available in Projection mode only. To change the Red control icon, refer to "Spotlight and reveal options"... -
Page 24: Changing The Pen Style
Erase using the eraser provided with the whiteboard. • Tap the Pen Style icon on the whiteboard, tap an eraser option in the palette, and then erase with your finger. • Tap the Erase All icon to erase everything and start fresh. PolyVision... -
Page 25: Printing And Saving
Printing and saving Printing and saving To print: • Tap the Print control icon. The PolyVision driver sends a snapshot to the printer connected to the computer. To save a snapshot in a graphics file on your computer: • Tap the Save control icon. -
Page 26: Revealing Your Work
Revealing your work To use the reveal tool: 1. Configure the red pen color for the reveal option. (Refer to "Projection options" on page 30.) 2. Tap the red control icon.The screen becomes black except one strip at the top. PolyVision... -
Page 27: Opening A Blank Window For Writing
• Choose the Previous (left) arrow. You can choose Previous up to four times to open up to five blank windows. To return to the projected computer desktop: • Choose the Next (right) arrow until the computer desktop appears. PolyVision... -
Page 28: The Polyvision Driver
The PolyVision driver is always available and running in the background after you install it on your computer. Configuring PolyVision driver options The PolyVision driver is ready to use as soon as it is installed. You can change the default options at any time. To configure PolyVision driver options: 1. -
Page 29: General Options
“Sounds”: Enable or disable sounds from your computer or PolyVision product that indicate system status. “Automatic Update Check”: Enable or disable the PolyVision driver to connect automatically to the PolyVision web site to check for driver updates. “Low Battery Warning”: Enable the PolyVision driver to display a warning on your computer desktop when the ēno stylus battery is getting low. -
Page 30: Configuration Options
Click “Configuration”. You see the following options: “Desktop Alert”: Enable this option to see an alert window appear on your computer desktop while you write or draw on the PolyVision product. The alert window shows what you are drawing. As soon as you stop drawing, the window fades off. -
Page 31: Draw Options
“Startup Pen Style”: Choose the pen style that is used when the PolyVision driver launches on your computer. The options are: • “Remember last used”: The PolyVision driver remembers the last active pen style and uses it when the program is next launched. •... -
Page 32: Print Options
The PolyVision driver Print options To configure print options: • Click “Print.” You see these options: “Select Printer”: Specify the printer used when you print a snapshot. The drop-down list includes printers currently installed on your computer. You can click “Change” to specify options for the selected printer. By default, the computer default printer is used. -
Page 33: Save Options
PDF (Macintosh). “Base file name”: Specify the name of the snapshot files saved on your computer when you save an image from your PolyVision product. Click the existing base file name to enter a new file name. Check boxes enable you to add a date/time stamp to the base filename, to add a sequential number to the base file name, and to overwrite the existing file each time you save. -
Page 34: Projection Options
The PolyVision driver “Save PDF in landscape mode”: Enable to save PDF files in landscape orientation. Projection options To configure projection alignment options that apply when your device enters projection mode: • Click “Projection.” You see these options: “Alignment Points”: Choose between three levels of projection alignment: good, better, and best. -
Page 35: Hardware Options
“Replay Strokes”: When enabled, pen strokes are remembered when you switch from pen mode to cursor mode, and back to pen mode. Pen strokes accumulate until you erase all. Hardware options To view the PolyVision hardware products communicating with the computer: • Click “Hardware.”... -
Page 36: Icon Options (For Ēno Users)
If your device is still not listed, there is a problem with your Bluetooth registration. Icon options (for ēno users) The PolyVision driver enables ēno users to customize the function of up to two user-defined icons to provide quick access to frequently used applications or web sites. -
Page 37: Status Of The Polyvision Driver
(i.e. http:// www.webpage.com) in the text box. Status of the PolyVision driver The Status option provides a live view of all PolyVision products communicating with the computer and their current status. PolyVision products shown in gray are installed and communicating with the computer, but are inactive or in a “sleep”... -
Page 38: Using On-Screen Tools
The PolyVision driver To change the number of alignment points: 1. Click the PolyVision driver icon in you computer system menu bar or system tray (refer to "Configuring PolyVision driver options" on page 24). 2. Click “Projection.” 3. Choose the alignment type from the drop-down list. -
Page 39: Getting Help
To update the PolyVision driver: 1. Click the PolyVision driver icon in the system tray (Windows or Linux) or menu extras (Macintosh). The PolyVision driver menu appears. 2. Choose “Check for Updates” from the menu when your computer is connected to the Internet. -
Page 40: To Uninstall The Polyvision Driver In Windows
2. Choose “All Programs” from the menu. 3. Choose “PolyVision driver” from the menu. 4. Choose “Remove the PolyVision driver.” To uninstall the PolyVision driver on a Macintosh To uninstall the PolyVision driver using a Macintosh: 1. Navigate to “Applications” and then to “PolyVision.”... -
Page 41: Care And Maintenance
Dry with a soft cloth prior to writing. • Remove any remaining marks with Sanford Expo Towelettes or equivalent. Whiteboard cleaners available from PolyVision or at office supply stores can also be used. • Important! Always rinse with water and dry with a soft cloth to prevent future markers from smearing. -
Page 42: Caring For Dry-Erase Markers And Erasers
For all TS and TSL whiteboards: • Use only the dry-erase markers and erasers recommended by PolyVision. To order markers, call 1.800.620.POLY (7659) in the USA, 1.678.542.3100 outside the USA, or +32 (0)89 32 31 30 in Europe, or go to: www.polyvision.com... -
Page 43: How To Obtain Replacement Parts
When preparing for Fall classes: • Test this product early in the Fall preparation process. Connect the computer to the Internet so that the PolyVision driver can acquire automatic software updates that may have been issued during the Summer break. -
Page 44: Technical Support
PolyVision USA Technical Support: • Phone: 1.800.620.7659 (POLY), 678.542.3100 24-hour support Monday through Friday. • E-mail: support@polyvision.com • Internet: www.polyvision.com Or, outside the USA contact PolyVision Europe/Asia Technical Support: • Phone: +32 (0)89 32 31 30 • E-mail: business.center@polyvision.com • Internet: www.polyvision.com PolyVision... -
Page 45: Fcc Compliance
Changes or modifications not expressly approved by the party responsible for compliance could void the user’s authority to operate the equipment. PolyVision... -
Page 46: Warranty
Shipping charges to and from our factory or authorized repair depot. HOW TO GET WARRANTY SERVICE If you experience a problem with this product, contact your local dealer or PolyVision Product Support (800.620.POLY in the USA, or +32 (0)89 32 31 30 in Europe) to... - Page 47 ACCORDANCE WITH POLYVISION’S USER INSTRUCTIONS. POLYVISION’S SOLE AND EXCLUSIVE LIABILITY, AND YOUR EXCLUSIVE REMEDY, FOR ANY BREACH OF THIS WARRANTY IS THAT, IF THE BREACH IS REPORTED TO POLYVISION IN WRITING WITHIN THE WARRANTY PERIOD, POLYVISION WILL CORRECT THE NONCONFORMITY, EITHER BY CORRECTING THE PRODUCT OR (WHERE APPROPRIATE) DOCUMENTATION;...
-
Page 48: Appendix 1: Installing The Ts 600 Bluetooth Option
Appendix 1: Installing the TS 600 Bluetooth option Installing the TS BT adapter TS Bluetooth is available for the TS 600 model only. The Bluetooth adapter kit includes the following: 1. TS 600 Bluetooth adapter 2. two screws note: NOTE: Your computer must include Bluetooth capability. PolyVision... - Page 49 1. Write down the number printed on the adapter’s label (PV 00500, for example). You will need that number in a later step. PV 00500 2. Connect the TS series interactive whiteboard power adapter cord to the whiteboard and to a power outlet. PolyVision...
- Page 50 4. Use a screwdriver to install and tighten the two screws supplied for the adapter. 5. Finish installing the TS 600 interactive whiteboard. 6. Register the wireless communication link between your computer and the whiteboard as described below. PolyVision...
-
Page 51: Appendix 2: Using The Ts 600 Bt (Bluetooth) Option
PolyVision provides wireless Bluetooth communication between your computer and PolyVision interactive whiteboard. For Bluetooth wireless operation of a PolyVision interactive whiteboard, your computer must have Bluetooth capability and you must register the whiteboard’s Bluetooth connection with your computer. note: NOTE: Instructions below describe registering the whiteboard’s Bluetooth... - Page 52 2. Choose “Add a Bluetooth Device” from the menu. You see the dialog box shown below. 3. Make sure that the whiteboard Bluetooth adapter is connected and the whiteboard is powered on. 4. Check “My device is set up and ready to be found.” PolyVision...
- Page 53 5. Click “Next.” You see the dialog box shown below. 6. Select your whiteboard from the list and click “Next.” You see the dialog box shown below. 7. Click the radio button beside “Use the passkey found in the documentation” and enter “1234” as shown. PolyVision...
- Page 54 Bluetooth Settings” from the menu that appears when you right click the Bluetooth icon in your taskbar. 13. If the software asks you for a passkey, the factory default is “1234.” 14. Skip to "Confirming Bluetooth registration" on page 58. PolyVision...
-
Page 55: Registering The Whiteboard On A Macintosh
For each whiteboard that you want to share wireless Bluetooth communication with your computer, you must register the whiteboard with your computer. 1. To see the Bluetooth menu, click the Bluetooth icon in the system menu. 2. Select “Set up Bluetooth Device.” The Bluetooth Setup Assistant appears. PolyVision... - Page 56 3. Click “Continue.” You see the Select Device Type dialog. 4. Select “Any device.” 5. Click “Continue.” A list of discoverable Bluetooth devices appears. 6. Select the Polyvision Bluetooth-Serial adapter identified by a number in the form PV-10346, for example. PolyVision...
- Page 57 Appendix 2: Using the TS 600 BT (Bluetooth) option 7. Click “Continue.” The system gathers information about your adapter. 8. Click “Continue” when the setup assistant has completed gathering information about your device. You are prompted to enter a passkey. 9. Enter “1234.” PolyVision...
- Page 58 Appendix 2: Using the TS 600 BT (Bluetooth) option 10. Click “Continue.” You see the Bluetooth Device Setup window. No services are available. 11. Click “Continue.” You see the Conclusion window. 12. Click “Quit.” PolyVision...
-
Page 59: Registering The Whiteboard Using Linux
1. To see the Bluetooth menu, click the Bluetooth icon in the system menu. 2. Select “Set up new device.” You see the Bluetooth New Device Setup Introduction dialog. PolyVision... - Page 60 Appendix 2: Using the TS 600 BT (Bluetooth) option 3. Select “Forward.” A list of discoverable Bluetooth devices appears. 4. Select the PolyVision Bluetooth-Serial adapter identified by a number in the form PV-11083, for example. 5. Click “PIN options.” 6. Click the “1234” radio button.
- Page 61 Appendix 2: Using the TS 600 BT (Bluetooth) option 7. Click “Close.” Device setup continues automatically. 8. When setup is completed, click “Close.” PolyVision...
-
Page 62: Confirming Bluetooth Registration
Confirming Bluetooth registration To confirm wireless communication between your computer and the whiteboard: 1. Click the PolyVision driver icon in your system tray (Windows or Linux) or menu extras (Macintosh). You see the PolyVision driver menu. 2. Choose “Configure the PolyVision driver” from the menu. -
Page 63: Appendix 3: Using The Ts Wireless Option (Ir)
Projection Previous Next Keyboard Pen / Cursor Pen Style Red Pen Blue Pen Green Pen Black Pen Narrow Pen Medium Pen Wide Pen Solid Pen Dashed Pen Small E raser Large E raser Erase All Print Save To Computer PolyVision... -
Page 64: Transceiver Leds
The transceiver starts sending out a signal that the other transceiver can receive. • The transceiver starts looking for a signal from the other transceiver. The green light comes on when the transceiver with the green light can see the signal from the other transceiver. PolyVision... -
Page 65: When A Wireless Link Breaks
Remove the cause of the broken link and the link will automatically restore itself. The troubleshooting section gives you a list of symptoms, probable causes and cures for broken links. PolyVision... -
Page 66: Troubleshooting The Ts Wireless (Ir) Option
Move the transceivers closer are AMBER. too far apart or are together. shaded from one Move the transceivers out another. from under any overhanging objects. Move the transceivers away from tall, wide objects that are between the two transceivers. PolyVision... - Page 67 Particularly, move the in front of or sitting near transceiver away from any the computer place where a person is likely transceiver. to sit in front of the transceiver. PolyVision...
-
Page 68: Index
TS whiteboard install PolyVision driver Change drawing cursor for left handed register the WT BT adapter person system requirements Check for Updates uninstall the PolyVision driver COM ports Low Battery Warning components Configuration options Make Sounds configuration options... - Page 69 Index Permanently-Mounted Projector spotlight PolyVision driver drag to ellipse checking for updates enlarge or shrink exit removing installation Start PolyVision driver start Startup Pen Style system requirements system requirements uninstall print technical support options transceiver Print To positioning projection alignment...
- Page 70 (TS models) whiteboard care and maintenance (TS models) writing in projection mode PolyVision...
Need help?
Do you have a question about the TS Series and is the answer not in the manual?
Questions and answers