Hills VoiceNav User Manual
Security system voicenav
Hide thumbs
Also See for VoiceNav:
- Installation manual (13 pages) ,
- User manual (24 pages) ,
- User manual (47 pages)
Table of Contents
Advertisement
Quick Links
Advertisement
Table of Contents

Subscribe to Our Youtube Channel
Related Manuals for Hills VoiceNav


Summary of Contents for Hills VoiceNav
-
Page 2: Table Of Contents
Basic system configuration – adjust area entry / exit delay times Understanding the Mute Menu Mute menu – Adjusting volume level and microphone sensitivity Mute menu – enabling / disabling features within the mute menu Word library Zone list Hills – VoiceNav V0.4 - 2 -... -
Page 3: Introduction
We trust that you will enjoy your VoiceNav, and we would like to thank you for choosing a Hills Security System. All users of your security system should read and follow the instructions and precautions in this manual before operating your security system. -
Page 4: Glossary Of Terms
An option that allows certain zones not to be secure when arming. A security system that is ready to be “force armed” will flash the corresponding area light green. Generally assigned to detection devices that cover the VoiceNav (eg; motion sensors, front door reed switches), allowing the user to arm the security system without the need to wait for those zones to be secure. -
Page 5: Drawing
Touch the corresponding number on the numeric section of the touch screen, then touch the [5]-[ENTER] enter key. Enter the required code on the numeric section of the touch screen [?]-[?]-[?]-[?] Exit the premises, or walk test the movement sensors Hills – VoiceNav V0.4 - 5 -... -
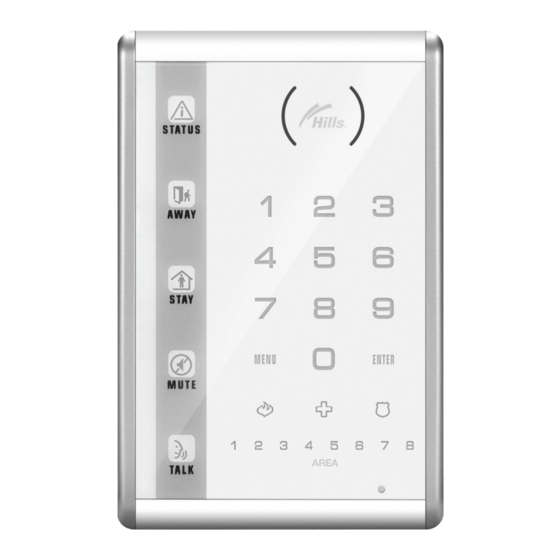
Page 6: Indicators, Icons And Lights
Green Area is disarmed. Area is armed in the “AWAY” mode. *If both the stay and away keys are off, this VoiceNav has multi area control and a pin number must be entered to gain area control. Green Area is disarmed. -
Page 7: Away Arming
If an armed zone is alarmed whilst your security system is in the stay mode, it will initiate a warning tone at your VoiceNav, your sirens will sound at the end of this warning. -
Page 8: Multi Area Arming - Away Mode - All Areas
Make your way to the VoiceNav through one of the designated entry / exit doors. When you are detected entering, your VoiceNav will repeat a warning message for the duration of the entry delay until a valid pin code is entered. Your sirens and communicator will activate at the end of the entry delay time if a valid pin code is not entered. -
Page 9: Intercom Room Calling
Emergency Activation Keys Three (3) emergency icons are available via your VoiceNav to provide personal support in areas of: Medical, Police (duress) and Fire alarm. To activate these functions touch the required key for two seconds. You should only touch these keys in an emergency situation that requires a response by a central station. -
Page 10: Understanding The Main Menu Structure
With its inbuilt intuitive voice prompts aiding you through all menus, using your VoiceNav is enjoyable and easy. From the moment you touch the menu key, your VoiceNav immediately starts to instruct you on what to do next, simply select the option you wish to access and follow the voice prompts. -
Page 11: To Control Zone Bypass - Bypassing Zones
To Control Zone Chime – Menu 2 You can setup your VoiceNav so that it will “beep” when programmed zones are tripped or activated, this is called chime. Chime mode does not trigger any alarms, and is only used as a low level alert such as a customer entry door. -
Page 12: System Event History - Alarm Memory
Note: To simplify reviewing of alarm memory or system event history, first record user names, zone names, outputs and area names in menu 8 – Recordings. Your VoiceNav will now announce all these events by name. System Test – Menu 4 Your security system is made up of different components, brought together to produce a very powerful, yet easy to use security system. -
Page 13: System Test - Siren, Communicator, Back Up Battery And Walk Test
Zone Walk test is used to test the connectivity between your alarm devices IE: movement sensors, door contacts etc, and your security system. When in walk test mode your VoiceNav will emit the chime “beep” each time a zone is activated, and chirp the outside siren. -
Page 14: User Configuration - Configure A New Pin Code
[4] - [ENTER] Selects user 4. Deselects area 2 [MENU] Moves back to user configuration (step 3) [MENU] Exits back to main menu (“Touch [1] to control zone bypass…etc……etc……) [MENU] Touch menu to exit Hills – VoiceNav V0.4 - 14 -... -
Page 15: User Configuration - Configure User Authority Levels
If you attempt to enter a user pin code in your security system that is being used by another user, your VoiceNav will announce Pin code has failed followed by three fast beeps, simply select another pin code. -
Page 16: Phone Number Configuration - Enter And Delete Phone Numbers
Touch menu to exit Note: You can record names for up to 16 outputs, making it easier to identify individual outputs later on. You can record these names in menu 8, Voice message Recordings. Hills – VoiceNav V0.4 - 16 -... -
Page 17: Voice Message Recording - Exit / Entry Message Recording
Voice Message Recording – Menu 8 With the VoiceNav there is no more need to memorize who has what user code, or what zone number is that sensor in the lounge room. Menu 8 allows you to record names against users, zones, areas, rooms and outputs creating an extremely user friendly security system. -
Page 18: Basic System Configuration - Resetting Latching Sensors (Smoke Detectors / Shock Sensors)
Exits back to main menu (“Touch [1] to control zone bypass…etc……etc……) [MENU] Touch menu to exit How to: Reset latching detectors that are in alarm Step Example: Reset smoke detectors, shock sensors and latching glass break detectors Hills – VoiceNav V0.4 - 18 -... -
Page 19: Understanding The Mute Menu
VoiceNavs and hold a conversation. From the mute menu you would set the following options. Note: When a VoiceNav is configured for intercom functionality, it is refer to as a room station. Hills – VoiceNav V0.4... -
Page 20: Mute Menu - Adjusting Volume Level And Microphone Sensitivity
5. Time Annunciation Turning this feature On, will make your VoiceNav annunciate the time and date during exit and entry delays. Turning this feature Off, disables this feature. 6. Full Menu Annunciation Turning this feature On, gives full descriptions to all the options within the main menu. -
Page 21: Word Library
Wall Area Games Outside Warehouse Attic Garage Panic Water Automatic Pantry West Auxiliary Gate Partial Window Back Glass Perimeter Windows Basement Glass break Pool Wireless Bathroom Ground Rear Yard Bedroom Guest Reception Zone Hills – VoiceNav V0.4 - 21 -... -
Page 22: Zone List
Programmed Phone Number 1.………………………………………………..……………..…... Programmed Phone Number 2………………………………………………..……………..…..Programmed Phone Number 3.…………………………………………………………………... Zone List Service provider……………………………………………………Phone…………………………………………….. Monitoring station………………………………………….……... Phone…………………………………………….. System type.……………………… ……………………………...Date of installation…………………………….. Hills – VoiceNav V0.4 - 22 -... - Page 23 Please visit www.das.com.au for detailed interactive user instructions for your VoiceNav code pad www.das.com.au...
Need help?
Do you have a question about the VoiceNav and is the answer not in the manual?
Questions and answers