
Related Manuals for Hills Wireless DIY security alarm starter kit


Summary of Contents for Hills Wireless DIY security alarm starter kit
- Page 1 Wireless DIY security alarm starter kit User guide E0166_Wireless_Security_Alarm_Kit_Prod_Manual_PM1004a_R1.indd 1 27/02/2015 4:24 pm...
-
Page 2: Table Of Contents
Features Than Introduction Wirel 1.1 Box Content 1.2 Features 1.3 Recommendations Pleas 1.4 Warnings the b Easy Install this m 2.1 Insert SIM card into the alarm panel and install in desired location 2.2 Register accessories with the alarm panel 2.3 Download App and set your personal alarm settings 1.1 B Alarm settings... -
Page 3: Introduction
1. Introduction 1.2 Features Thank you for purchasing the Hills Wireless Security Alarm DIY Starter Kit. • Wireless alarm system • Easy to install Please read this manual carefully to get • Remote access control via phone the best use out of this product. Keep •... -
Page 4: Recommendations
1. Introduction 1.3 Recommendations 1.4 Warnings 2 Eas For your safety, it is recommended to • The alarm panel is provided with a 2.1 I follow these precautions: separate battery. Please dispose the used batteries responsibly. • Do not forget to arm the alarm panel Your during your absence and make sure •... -
Page 5: Easy Install
2. Easy Install 2 Easy Install 2.1 Insert SIM card into the alarm panel and install in desired location Your SIM card must support the 2G or 3G network (850/2100Mhz ). The SIM card should have SIMLOCK deactivated. SIMLOCK can be deactivated using a r an mobile phone prior to installing the SIM card into your alarm panel. -
Page 6: Register Accessories With The Alarm Panel
Swipe the RFID tag in front of the RFID reader contr on the alarm panel sectio Additional siren Contact Hills Security for further information Accessories may now be installed Once you have registered all following specifications in section 6 of accessories, exit Registration Mode: this document. -
Page 7: Download App And Set Your Personal Alarm Settings
Remote access control of your alarm and configuration of alarm settings may be performed from your smartphone using the Hills DIY Wireless Security App. This app is available from the Apple App Store or Google Play. To install the App, use your device to search for “Hills DIY Wireless Security... -
Page 8: Alarm Settings
3. Alarm settings 3 Alarm settings 3.3 Store phone numbers 3.4 D Alarm settings may be configured Phone and SMS numbers are defined Indivi directly from the alarm panel, via SMS by ID: or via the App. This section details direct alarm panel configuration. -
Page 9: Delete Phone Numbers
3. Alarm settings 3.4 Delete phone numbers 3.7 Set Siren ring time Individual numbers may be deleted by ID. Siren ring time may be set from 1 to 9 minutes. Enter Setup Mode Enter Setup Mode Enter “#[ID]##” Enter “ [minutes] ”... -
Page 10: Control Your Alarm
Control your alarm 4 Control your alarm 4.1 Arm your system 4.4 Mute mode 4.6 M To arm your system, press the Arm From the remote control, you can The a button ( ) on your Alarm panel, prevent the alarm panel beeping In dis remote control or App. -
Page 11: Make A Phone Call
Package contents 4.6 Make a phone call The alarm panel supports phone calls: In disarmed status, type the telephone number and press the key on the alarm panel. Press to end the call. The middle white LED indicator blinks once every 2 seconds during the call. If a phone call is received on the alarm panel, the LED blinks once every second. -
Page 12: Responding To An Alarm
5. Responding to an alarm 5 Responding to an alarm If the system detects an intrusion, the 6.1 A siren will ring out immediately, and the alarm panel will send alert SMS and dial the pre-stored phone numbers. Zone The user can manage the site remotely and control the system by phone when Arm / receiving the call from the alarm system. -
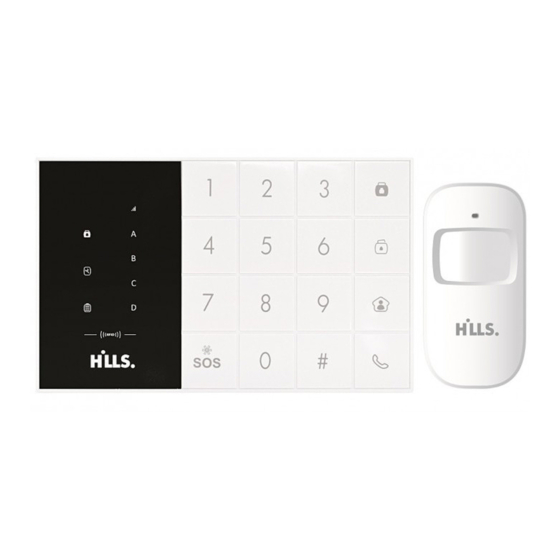
Page 13: Specifications
6. Specifications Specifications 6.1 Alarm Panel LED GSM Signal Zone LED Signal Arm / Disarm LED Signal Disarm Setup / Connection LED Signal Home Mode Power / Low Power LED Signal RFID Reader Phone Call The blue LED is the “Arm / Disarm” Monitoring MIC Tamper switch status indicator. - Page 14 6. Specifications Specifications • Power supply: Input AC 110~240V-50~60Hz / Output DC 12V-800mA • Internal battery backup: 3.7V / 800 mAh battery pack x 2 • Internal siren: 120dB • Quantity of accessories supported: 60 (including 10 Remote Control) • Radio frequency: 433MHz (±75 KHz) •...
- Page 15 6. Specifications Description Operation Functions Remarks The system enters Enter Connection into Connection Mode Mode after 1 beep. The system enters Enter Setup Mode into Setup mode after 1 beep. [9] is the time the siren Program Ringing Time rings out (in minutes). Default setting: of the Siren It can be set from 1 to...
-
Page 16: Wireless Remote
6. Specifications 6.2 Wireless Remote Control Mute Mode 6.3 W Press the Home Mode button and the Featu Arm or Disarm button immediately after. The h Disarm The alarm panel will not ring out when senso you arm or disarm your system. logic indicator Home... -
Page 17: Wireless Motion Sensor
6. Specifications 6.3 Wireless motion sensor Features after. The high performance wireless motion sensor boasts a digital dual-core fuzzy logic infrared control chip with intelligent analysis. This technology identifies 2.2m interferences created by body motion and reduces the false alarm rate. button trol. - Page 18 6. Specifications Usage Insta Open the case and remove the battery Avoid activation strip. Self-testing will start for to wi 30 seconds refrig wher Alarm zone *Tamper switch wher LED working When the alarm system is armed, the indicator If two Tamper switch* tamper switch will trigger the alarm if the detec...
- Page 19 6. Specifications Installation Avoid mounting the sensor close to windows, air conditioner, heater, refrigerator, oven, sunshine and places where the temperature changes fast or where the air stream flows frequently. Top view Side view If two sensors are installed in the same witch* detection scope, adjust the location to avoid interferences and false alarms.
-
Page 20: Wireless Door/Window Sensor
6. Specifications Specifications 6.4 Wireless door/window sensor Desig Power supply: DC 3V (AA 1.5V LR6 Features Batteries x 2) The door/window sensor can be installed on doors, windows, and any Static current: ≤ 30 uA Alarm current: other objects that open and close. ≤...
Need help?
Do you have a question about the Wireless DIY security alarm starter kit and is the answer not in the manual?
Questions and answers