Table of Contents
Advertisement
Quick Links
Advertisement
Table of Contents

Related Manuals for Hills ChallengerPlus Training Kit


Summary of Contents for Hills ChallengerPlus Training Kit
- Page 1 ChallengerPlus Training Kit Starter Guide Hills Training Solutions...
- Page 2 Commercial Statement Copyright © 2021 Hills Ltd. All rights reserved. Any form of reproduction, dissemination, copying, disclosure, modification, distribution and/or publication of this document and its content is strictly prohibited. ChallengerPlus Training Kit Starter Guide 1...
- Page 3 Version Modified By Changes Made 16 June 2021 Taqi Ali Complete 17 June 2021 Taqi Ali Added full kit picture and updated list Prepared By: Taqi Ali, James Margariti Prepared For: Training Status: Complete ChallengerPlus Training Kit Starter Guide 2...
-
Page 4: Table Of Contents
Contents ChallengerPlus Training Kit Starter Guide ....................4 Training Kit Contents ........................... 4 Opening the Enclosure Prior to Training ....................5 Left Panel of the Enclosure ........................6 Right Panel of the Enclosure ........................7 Additional Equipment ..........................8 Remote Arming Stations ........................8 Power Plug ............................ -
Page 5: Challengerplus Training Kit Starter Guide
To maximize the efficiency of online training the following information is used during your training session to help support your learning experience. Training Kit Contents The ChallengerPlus Training Kit comes with the following components • ChallengerPlus Training Kit with Enclosure •... -
Page 6: Opening The Enclosure Prior To Training
Place kit vertically with rubber feet on the bottom and power socket on top. For maximum stability, please ensure the box is kept open at a 90-degree angle. Step 4 DO NOT POWER UP until the connections are verified. Please see the following pages. ChallengerPlus Training Kit Starter Guide 5... -
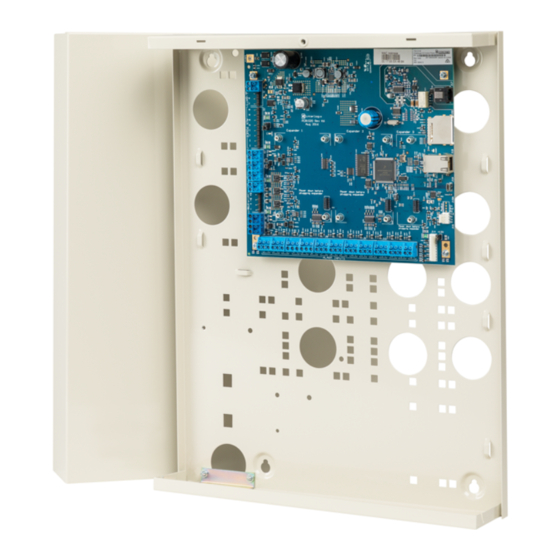
Page 7: Left Panel Of The Enclosure
3. TS1020 Data Gathering Panel (DGP17) 4. 6 Input box with 3 Tampers on side 5. LAN1 TS0844/TS1044 LAN Distribution Board 6. LAN2 TS0844/TS1044 LAN Distribution Board 7. Siren LED 8. Strobe LED 9. DGP Siren LED ChallengerPlus Training Kit Starter Guide 6... -
Page 8: Right Panel Of The Enclosure
6. Sublan TS1044/TS0844 LAN Distribution board 7. Request to Exist Inputs for Doors 17-20 8. Door Inputs 1,4,7 and 10 9. DGP Siren LED *Please ignore labelling on kit as these may be wrong/outdated ChallengerPlus Training Kit Starter Guide 7... -
Page 9: Additional Equipment
2x CA1116 16 Area Remote Arming Station (RAS) Note: Should have labels RAS1 and RAS11 Figure 3: RAS1 and RAS11 should both have the card reader symbols above LCD screen Power Plug 16VAC Plugpack with 4-pin connector Figure 4: AC Plugpack ChallengerPlus Training Kit Starter Guide 8... -
Page 10: Smart Cards And Fobs
Smart Cards and Fobs A bag of smart cards and fobs Figure 5: Smart cards and fobs Input Trigger Input Trigger (found in above bag) Figure 6: Input trigger ChallengerPlus Training Kit Starter Guide 9... -
Page 11: Missing Equipment
Missing Equipment Please ensure all the above are available before proceeding. If any components are missing, please inform your trainer as soon as possible! If you are unable to contact your trainer, email the Hills Training team • hti_admin@hills.com.au ChallengerPlus Training Kit Starter Guide 10... -
Page 12: How To Guides
Connecting USB and Ethernet 1. Please connect the mini USB cable to the main panel, and a standard CAT5/6 cable to the network using the RJ45 socket. Figure 8: USB and Ethernet connections Ethernet Mini USB ChallengerPlus Training Kit Starter Guide 11... -
Page 13: Connecting The Code Pads (Ca1116 Rass)
(see Figure 1:5). There is no specific slot they should be connected to, any will do. Figure 7: LAN1 connection to RAS1 and RAS11 RASs can also be connected to these empty slots RAS 1 RAS 11 ChallengerPlus Training Kit Starter Guide 12...
Need help?
Do you have a question about the ChallengerPlus Training Kit and is the answer not in the manual?
Questions and answers