Table of Contents
Advertisement
Advertisement
Table of Contents

Related Manuals for Oceanic OC1


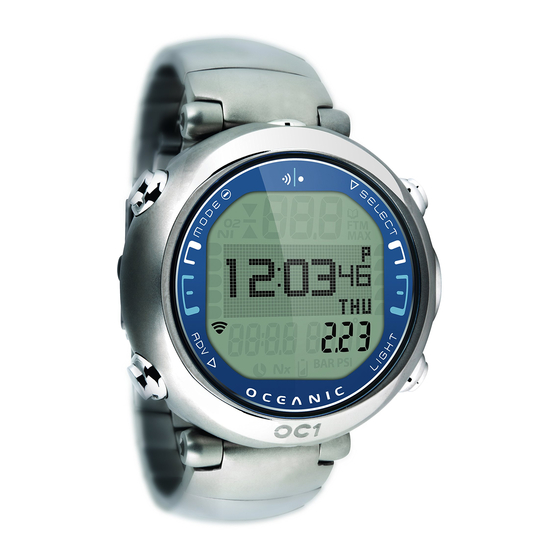
Summary of Contents for Oceanic OC1
-
Page 3: Table Of Contents
CONTENTS WARRANTY, NOTICES, MODEL .............................8 ABBREVIATIONS ................................9 INITIAL ACTIVATION ..............................10 FEATURES AND FUNCTIONS ............................11 OVERVIEW ................................13 MENU SYSTEM, MODE STRUCTURE ........................14 AUDIBLE ALARM ..............................22 PC INTERFACE .................................24 POWER SUPPLY, BATTERY STATUS ........................25 WATCH MODE ................................29 FUNCTIONS ................................30 WATCH DEFAULT TIME ............................31 WATCH MENU ................................33 Countdown Timer ...............................33 Chronograph ...............................35... - Page 4 CONTENTS (continued) NORM SURFACE MODES .............................47 NORM SURF MAIN AND ALTS..........................48 NORM MENU ................................50 Fly/Dsat Time ..............................50 NORM Plan Mode ..............................51 NORM/GAUG Log Mode .............................54 Set F (FO2) Menu ..............................56 Set FO2 Gas 1 ..............................57 Set FO2 Gas 2 ..............................58 Set FO2 Gas 3 ..............................59 Set FO2 Default ..............................60 Set A (Alarms) Menu ............................60...
- Page 5 CONTENTS (continued) NORM/GAUG History Mode ..........................73 Serial Number ..............................74 Battery/TMT Status .............................75 DIVE MODE FEATURES ..............................77 PROXIMITY OF THE TMTS AND OC1 ........................79 Link Interruption Underwater ..........................79 WET ACTIVATION ..............................80 BACKLIGHT ................................80 BAR GRAPHS ................................81 TLBG ..................................81 O2BG ..................................82 VARI ..................................83 ALGORITHM (NDL BASIS) ............................84...
- Page 6 CONTENTS (continued) DEEP STOP ................................96 SAFETY STOP ................................98 DECOMPRESSION ..............................99 VIOLATION MODES ..............................102 HIGH PO2 ................................108 HIGH 02 ...................................111 GAS/TMT SWITCHING AND BUDDY PRESSURE CHECK ..................115 DIGITAL GAUGE MODE...............................121 GAUG SURFACE MAIN AND ALTS ........................122 GAUG MENU ................................124 Fly Time ................................124 Select Dive Mode ..............................124 GAUG DIVE MAIN AND ALT...........................125 Delayed Violation ..............................126...
- Page 7 BATTERY REPLACEMENT ............................162 Data Retention ..............................163 TMT INSTALLATION ON REGULATOR .........................167 ALTITUDE SENSING AND ADJUSTMENT ......................168 TECHNICAL DATA................................169 PZ+ ALGORITHM NDL CHART ..........................170 DSAT ALGORITHM NDL CHART ...........................171 SPECIFICATIONS ..............................172 FCC COMPLIANCE ..............................176 INSPECTION/SERVICE RECORD ..........................177 OCEANIC WORLD WIDE .............................178...
-
Page 8: Warranty, Notices, Model
The programs within the OC1 simulate the absorption of nitrogen into the body by using a mathematical model. This model is merely a way to apply a limited set of data to a large range of experiences. The OC1 dive computer model is based upon the latest research and experiments in decompression theory. -
Page 9: Abbreviations
DISPLAY ABBREVIATIONS ACTIV = Activation NDC = No Deco DTR = Alarm NDL = No Deco Limit ALT = Alternate (watch time) = Northeast (compass) ATR = Air Time Remaining = Number AUD = Audible NO-D = No Decompression AVAIL = Available NORM = Normal Dive Mode BATT = Battery = Northwest (compass) BUD = Buddy (pressure) = Oxygen CAL = Calibrate (compass) OTR = O2 DTR CDT (CD) = Countdown Timer PO2 = Partial Pressure of O2 (ATA) CHRONO = Chronograph (stop watch) PRESS = Pressure CONSERV = Conservative Factor PZ+... -
Page 10: Initial Activation
In this mode, Date and Time are updated as they normally would be. However, they are not displayed. Upon waking the OC1 up, the correct Date and USA Pacific Time will be displayed and it will be ready to operate with full functions. -
Page 11: Features And Functions
Welcome to OCEANIC THANK YOU for choosing the FEATURES AND FUNCTIONS... -
Page 12: Display Layout
DISPLAY LAYOUT ICONS Descend, Ascend, or Stop Mode Depth id BG id TLBG or Dot Matrix VARI O2BG Temp or Daily AL or Heading TMT Link Time Press id Battery Nitrox... -
Page 13: Overview
OVERVIEW The OC1 is a fully loaded Watch Dive Computer featuring >> • 4 Control Buttons • No Deco Deep Stop • 10 Menus • No Deco Safety Stop • 40 Set Selections • Gauge Depths to 660 FT/200 M •... -
Page 14: Menu System, Mode Structure
MENU SYSTEM The Dot Matrix located in the middle of the LCD viewing area is used to display alpha numeric messages and measured values as well as Menu type systems for selection of settings and vari- ous auxiliary functions. It also serves as the Digital Compass which can be accessed during operation in any mode. - Page 15 Menu button action >> M (< 2 sec) - to access Menu A (< 2 sec) - to step down the screen (forward) through selections M (< 2 sec) - to step up the screen (backward) through selections S (< 2 sec) - to access selection indicated by Arrow icon ( > ) Right Arrow icon ( >...
- Page 16 WATCH MODE STRUCTURE Dive Op Daily AL Mode Pg. 37 Pg. 45 2 sec < 2 sec Select Watch Compass < 2 sec 2 sec > CDT Menu Op Main 2 sec 60 sec Chrono Pg. 33 WATCH Pg. Daily AL MAIN Set Time Pg. 32 Watch < 2 sec closure Light ALT 1 Pg. 80 Pg. 32 < 2 sec Watch ALT 2 Pg. 33...
- Page 17 NORM SURFACE MODE STRUCTURE Watch Mode Pg. 32 2 sec Select NORM Compass < 2 sec 2 sec > Fly/Dsat Menu Op Main 2 sec 60 sec Plan Pg. 50 SURF Pg. Log MAIN Set F Pg. 48 SURF Set A < 2 sec closure Light ALT 1 Set U Pg. 80 Dive Mode Pg. 49 History < 2 sec SN Batt/TMT SURF ALT 2 Pg. 49...
- Page 18 GAUG SURFACE MODE STRUCTURE Watch Mode Pg. 32 2 sec Select GAUG Compass < 2 sec 2 sec > Fly Menu Op Main 2 sec 60 sec Log Pg. SURF Pg. Set A MAIN Set U Pg. 122 SURF Dive Mode < 2 sec closure Light ALT 1 History Pg. 80 SN Pg. Batt/TMT < 2 sec SURF ALT 2 Pg.
- Page 19 WATCH/NORM/GAUG SET MODE STRUCTURE WATCH NORM or GAUG Menu Menu Pg. 33 Pg. 50/122 < 2 sec < 2 sec < 2 sec < 2 sec Set U Menu Set F Menu** Set A Menu Set Time Menu > Wet Activ > FO2_1 > Aud AL > Date Format FO2_2 Depth AL Units Hour Format Deep Stop** FO2_3 EDT AL Time Safety Stop** FO2 Default TLBG AL** Date DTR AL** NDL Basis** ALT Time Pg. 56 Conserv** Default Time Turn AL Glo Dura End AL...
- Page 20 FREE SURF MODE STRUCTURE Watch Mode Pg. 32 2 sec Select FREE Compass 2 sec < 2 sec > CDT Menu Op Main 2 sec 60 sec Set EDT AL Pg. 132 SURF Pg. Set DD1 AL MAIN Set DD2 AL Pg. 130 SURF Set DD3 AL < 2 sec closure Light ALT 1 Dive Mode Pg. 80 Pg. 131 < 2 sec SURF ALT 2 Pg. 131...
- Page 21 COMPASS MODE STRUCTURE SURFACE Select COMP Watch or < 2 sec 2 sec > Calibration Menu DC Main 2 sec 60 sec North Pg. COMP OP Pg. 32/48/122/130 Reference MAIN Declination Pg. 153 AUTO 2 sec closure Light HOME (if REF) Pg. 80 Pg.
-
Page 22: Audible Alarm
AUDIBLE ALARM While operating in NORM or GAUG Mode the Audible will emit 1 beep per second for 10 seconds when alarms strike, unless it is set Off. During that time, the Audible can be acknowledged and silenced by pressing the S button (less than 2 seconds). A LED Warning Light, on the lower end of the housing, is synchronized with the Audible and flashes as the Audible sounds. - Page 23 • Entry into Decompression Mode (Deco)**. • Conditional Violation (above a required Deco Stop Depth for less than 5 minutes)**. • Delayed Violation (above a required Deco Stop Depth for more than 5 minutes)**. • Delayed Violation (a Deco Stop Depth greater than 60 FT/18 M is required)**. •...
-
Page 24: Pc Interface
Interface with a PC, to allow uploading settings and downloading data, is accomplished by connecting the OC1 to a PC USB Port using the special OC1 USB Interface Cable. The software program together with the USB Driver required is on the Oceanlog CD, and can be downloaded from the OceanicWorldwide web site. -
Page 25: Power Supply, Battery Status
• Shelf life >> up to 7 years (when shipped from factory in Deep Sleep mode) • OC1 use life >> 1 year or 300 dive hours if (2) 1 hour dives per dive day • TMT (Transmitter) Battery >> (1) 3 vdc, CR2, .75 Ahr, Lithium battery •... - Page 26 OC1 LOW BATTERY WHILE ON THE SURFACE <= 2.75 volts (warning level) • Backlight is completely disabled. • Battery icon (shell with inner bar) appears solid (Fig. 2a). • If a dive is started, the icon is not displayed on the dive mode screens.
- Page 27 OC1 LOW BATTERY DURING A DIVE <= 2.75 volts (warning level) • Backlight is completely disabled. • Full DC functions and Compass continue to be available. • Battery icon is not displayed on the dive mode screens. • Battery icon (shell with inner bar) appears solid upon entry into Surface Mode.
- Page 28 (or GAUG) SURF Main screen (Fig. 7). • The graphics TMTx BATT and LO also flash on the Battery Status screen. • TMT operation continues until Tank Pressure decreases to 50 PSI. Read and understand the Oceanic Personal Dive Computer Safety and Reference Manual. Fig. 7 - NORM SURF MAIN...
-
Page 29: Watch Mode
WATCH MODE... -
Page 30: Functions
WATCH FUNCTIONS DC Op Mode 2 sec Watch closure Default Light Compass 2 sec Time back to ALT 2 ALT 1 Watch < 2 sec < 2 sec < 2 sec < 2 sec 2 sec Menu Status back to > CDT (view) Status < 2 sec < 2 sec < 2 sec < 2 sec Status < 2 sec to Stop, Recall Laps Start/Stop Chrono (view) < 2 sec < 2 sec 2 sec to Reset, back to Status... -
Page 31: Watch Default Time
WATCH DEFAULT TIME Default Time is the Time that is displayed on the Watch until changed. It is also the Time viewed during operation in DC (Dive Computer) Modes. Main Time is the current Time at your home location and is normally selected as the Watch Default Time. - Page 32 Default Time, information includes (Fig. 8): > Time of Day (hr:min:sec), Home (or Alternate if selected) > Day of Week graphic MON, TUE, WED, THU, FRI, SAT, or > Graphic ALT, if Alternate Time is selected as Default > Month.Day (or Day.Month) >...
-
Page 33: Watch Menu
• A < 2 sec to access ALT 2 • 5 sec reverts to Watch Default if A is not pressed • L (on closure) to activate Backlight Alt 2, information includes (Fig. 10): > Altitude graphic EL2 (to EL 7), blank if Sea level >... - Page 34 • A < 2 sec to step through selections OFF, ON, and SET. • S < 2 sec to save the selection that is flashing. >> If OFF is selected, operation reverts to the Menu. >> If ON is selected, operation reverts to the Menu with the time set starting to countdown.
-
Page 35: Chronograph
The CDT will run in the background, while in Watch mode, until it counts down to 0:00, or it is set OFF, or DC Mode is accessed or a Dive is started in which case the CD will terminate and revert to OFF. -
Page 36: Daily Alarm
• S (< 2 sec) to freeze and display Laps (up to 9), the Timer continues to run in the background • A (< 2 sec) to stop Timer and recall Lap 1 (Fig. 16), repeat to recall other Laps •... - Page 37 • S < 2 sec to save the selection that is flashing. >> If OFF is selected, operation reverts to the Menu. >> If ON is selected, operation reverts to the Menu with the Alarm enabled. >> If SET is selected (Fig. 18), Set Daily Alarm is accessed. Set Daily Alarm, information includes (Fig.
-
Page 38: Set Time Menu
SET TIME MENU • S (< 2 sec) to access Set Time Menu, while the selection Arrow icon ( > ) is next to Set Time on the Watch Menu • A (< 2 sec) to step down (forward) through selections •... -
Page 39: Set Time
Set Time of Day, information includes (Fig. 22): This setting directly changes the Time of Day that is selected to be the Watch Default Time, whether it is Main (home) Time or Alternate (travel location) Time. The other will be changed by the Time Differential set. -
Page 40: Set Date
Set Date, information includes (Fig. 23): The sequence for setting date is Year, then Month, then Day, regardless of the Date Format set. > Graphic DATE > Graphics YEAR MNTH.DAY (or (DAY.MNTH) > Date with Year digits flashing • A (hold) to scroll upward through Year Set Points at a rate Fig. 23 - SET DATE of 8 per second from 2008 to 2051, in increments of 1 •... -
Page 41: Set Alternate Time
Set Alternate Time, information includes (Fig. 24): This feature sets an Hour based numeric time Differential rang- ing from - 23 through 0 to + 23 (hours). Once the Differential is selected/saved, Alternate Time/Date values are based on the Time of Day Set Points unless changed while at a travel location with ALT Time selected as the Watch Default Time in which case Main (home) Time would change by a differential opposite to the one previously set for ALT Time. -
Page 42: Select Default Time
Select Default Time, information includes (Fig. 25): This feature selects whether Main (home) Time or Alternate (travel location) Time will be displayed as the Watch Default Time. The other will be displayed on the Watch ALT 1 screen. > Graphics SEL and DFLT TIME solid >... - Page 43 (This page intentionally left blank.)
-
Page 44: Dive Computer Mode Access
DIVE COMPUTER MODE ACCESS WATCH NORM Shown is access to NORM from Watch, DFLT TIME SURF MAIN 2 sec then to GAUG from NORM. Access from NORM to FREE, GAUG to FREE, GAUG to NORM, FREE to NORM , < 2 sec 2 sec and FREE to GAUG are similar. -
Page 45: Dive Computer Operating Modes
DIVE COMPUTER OPERATING MODES NORM Mode >> for Air and Nitrox SCUBA activity with up to 3 Gases/3 TMTs GAUG Mode >> for SCUBA activity with up to 3 TMTs FREE Mode >> for breath hold diving activity with Depth/Time indication If no previous dive has been taken within the past 24 hours, NORM is the default upon access from Watch Default Time. -
Page 46: Norm Surface Functions
NORM SURFACE FUNCTIONS Watch Mode 2 sec NORM closure SURF Light Compass 2 sec MAIN Surface ALTs < 2 sec < 2 sec 2 sec Menu access selection > FLY/DSAT < 2 sec PLAN < 2 sec SET F SET A SET U < 2 sec DIVE MODE HISTORY BATT/TMT... -
Page 47: Norm Surface Modes
NORM SURFACE MODES... -
Page 48: Norm Surf Main And Alts
NORM SURF MAIN, information includes (Fig. 26A/B): > Graphic NORM > Graphic DIVE and number of dives completed during that operating period, up to 24 (0 if no dive made yet) > Graphic SURF and SI (hr:min) with Time (clock) icon; if no dive yet, this is time since access to NORM >... - Page 49 NORM SURF ALT 1, information includes (Fig. 27): > Max Depth with MAX and FT (or M) icons, 2 dashes ( - - ) if no previous dive > Elapsed Dive Time (hr:min) with graphic EDT, 3 dashes ( - : - - ) if no previous dive >...
-
Page 50: Norm Menu
> Graphic O2 > Graphics FO2 and GAS 1 with FO2 Set Point > Nx icon > O2BG with O2 icon, current O2 • 5 sec or A < 2 sec, revert to Main • L (on closure) to activate Backlight NORM MENU Fig. 29 - NORM SURF ALT 3 M (<... - Page 51 from a dive, counting down from 23:50 (max) to 0:00 (hr:min). When the Dsat count down reaches 0:00, which will generally occur prior to the Fly count down reaching 0:00, it will remain on the display until the Fly count down reaches 0:00. >...
-
Page 52: Norm Plan Mode
NORM PLAN MODE No Deco Dive Times (NDLs) in NORM Plan Mode are based on the Algorithm selected (DSAT or PZ+) and only on the FO2 set for Gas 1. FO2 set for Gas 2 and 3 are not used. NORM Menu >>... - Page 53 When the Conservative Factor is set On, No Deco Dive times are reduced to the values of the next 3000 foot (915 meter) higher Altitude. Refer to tables in back. PDPS, information includes (Fig. 32A/B): > Max Depth with MAX and FT (or M) icons, if Nitrox, blank if set for Air >...
-
Page 54: Norm/Gaug Log Mode
NORM/GAUG LOG MODE Information from the latest 24 NORM and/or GAUG dives is stored for viewing. After exceeding 24 dives, the most recent dive is stored while the oldest is deleted. > Dives are numbered from 1 to 24 starting each time NORM (or GAUG) Dive Mode is activated. - Page 55 of 8 per second ** Max Depth for NORM • A (< 2 sec) to step upward through screens one at a time dives is 330 FT (100 M), and for GAUG dives it is • M (< 2 sec) to step back through screens one at a time 660 FT (200 M) •...
-
Page 56: Set F (Fo2) Menu
Log Data 2 (Nitrox only), information includes (Fig. 35): > Log Mode (book) icon > Graphic GAS 1 (or 2 or 3), in use when dive ended > Graphic FO2 with FO2 Set Point (or graphic Air) for Gas in used when dive ended >... -
Page 57: Set Fo2 Gas 1
Set FO2 Gas 1, information includes (Fig. 36A/B): > Max Depth with MAX and FT (or M) icons, allowed for PO2 Alarm Set, blank if Air > Graphic GAS1 > Graphic FO2 with FO2 Set Point value, flashing > Graphic PO2 with alarm value set >... -
Page 58: Set Fo2 Gas 2
Set FO2 Gas 2, information includes (Fig. 37): > Max Depth with MAX and FT (or M) icons, allowed for PO2 Alarm Set, blank if Air > Graphic GAS2 > Graphic FO2 with FO2 Set Point value, flashing > Graphic PO2 with alarm value set >... -
Page 59: Set Fo2 Gas 3
Set FO2 Gas 3, information includes (Fig. 38): > Max Depth with MAX and FT (or M) icons, allowed for PO2 Alarm Set, blank if Air > Graphic GAS2 > Graphic FO2 with FO2 Set Point value, flashing > Graphic PO2 with alarm value set >... -
Page 60: Set Fo2 Default
> Graphics DEFAULT and 50 > Set Point graphics ON and OFF; Arrow ( > ) icon next to the one previously saved flashing > Nx icon, blank if Air • A (< 2 sec) to toggle Set Points • S (< 2 sec) to save the setting and revert to the Set F Menu Turning the FO2 Default feature On controls FO2 Nitrox settings regardless of Set Points selected for Gases 1, 2, or 3. -
Page 61: Set Audible Alarm
Set Audible Alarm, information includes (Fig. 40): > Graphic AUDIBLE > Set Point graphics ON and OFF; Arrow ( > ) icon next to the one previously saved flashing • A (< 2 sec) to toggle Set Points • S (< 2 sec) to save the setting and revert to the Set A Menu Set Depth Alarm, information includes (Fig. -
Page 62: Set Edt Alarm
Set EDT Alarm, information includes (Fig. 42): > Graphic EDT AL with MAX icon > Elapsed Dive Time value (hr:min) flashing with MAX and Time (clock) icons • A (hold) to scroll upward through Set Points at a rate of 8 per second from 0:10 to 3:00 (hr:min) in increments of :05 (:min) •... -
Page 63: Set Dtr Alarm
Set DTR Alarm, information includes (Fig. 44): > Graphic DTR AL > Dive Time Remaining value (hr:min) flashing with Time (clock) icon • A (hold) to scroll upward through Set Points at a rate of 8 per second from 0:00 to 0:20 (hr:min) in increments of :01 (:min) •... -
Page 64: Set End Press Alarm
Set End Press** Alarm, information includes (Fig. 46): > Graphic END AL > Pressure value flashing with PSI (or BAR) icon • A (hold) to scroll upward through Set Points at a rate of 8 per second from 300 to 1500 PSI (20 to 105 BAR) in increments of 100 PSI (5 BAR) •... -
Page 65: Set U (Utilities) Menu
SET U (UTILITIES) MENU Set U S (< 2 sec) - to access Set U Menu while the selection Arrow Menu icon ( > ) is next to Set U on the NORM (or GAUG) Menu > WET ACTIV UNITS A (<... -
Page 66: Set Units
> Graphic UNITS > Set Point graphics IMPERIAL and METRIC; Arrow ( > ) icon next to the one previously saved flashing • A (< 2 sec) to toggle Set Points • S (< 2 sec) to save the setting and revert to the Set U Menu Set Deep Stop, information includes (Fig. -
Page 67: Set Safety Stop
Arrow ( > ) icon next to the one previously saved flashing • A (< 2 sec) to step upward through Set Points one at a time • M (< 2 sec) to step back through Set Points one at a time •... -
Page 68: Set Ndl Basis
> Set Point graphics PZ+ and DSAT; Arrow ( > ) icon next to the one previously saved flashing • A (< 2 sec) to toggle Set Points • S (< 2 sec) to save the setting and revert to the Set U Menu This feature, which allows selection of the algorithm to be used for nitrogen and oxygen calculations for Plan and DTR values , is described on page 84. -
Page 69: Set Glo (Backlight) Duration
> Set Point 0 (or 5, 10, 30, 60) flashing with graphic SEC • A (< 2 sec) to step upward through Set Points one at a time • M (< 2 sec) to step back through Set Points one at a time •... -
Page 70: Set Tmt Menu
> Graphic SEt > Graphic selections TMT 1, TMT 2, and TMT 3 with last setting saved (ON, OFF, SELF, or BUD) A (< 2 sec) - to step down (forward) through selections M (< 2 sec) - to step up (back) through selections S (<... -
Page 71: Set Tmt 2, 3
• A (< 2 sec) to step upward one at a time • M (< 2 sec) to step back one at a time • S (< 2 sec) to save the 1st digit and flash the 2nd • Repeat A and M action to set other digits •... - Page 72 Set TMT 2 Use**, information includes (Fig. 58B): > Graphic TMT 2 > Set Point graphics SELF and BUD; Arrow ( > ) icon next to the one previously saved flashing • A (< 2 sec) to toggle Set Points •...
-
Page 73: Select Dive Mode
SELECT DIVE MODE S (< 2 sec) - to access Set Dive Mode while the selection Arrow icon ( > ) is next to it on the NORM Menu Set Dive Mode, information includes (Fig. 59): > Graphics SEL and DIVE MODE >... -
Page 74: Serial Number
> OC1's factory programmed SN > Graphic r1A (or higher), indicating the revision level of the Firmware (OC1's operating software); followed by 01 (or higher), indicating the revision level of the Display • S (< 2 sec) to revert to the NORM (or GAUG) Menu BATTERY/TMT STATUS Fig. 62 - SERIAL NUMBER... -
Page 75: Battery/Tmt Status
S (< 2 sec) - to access while the selection Arrow icon ( > ) is next to it on the NORM (or GAUG) Menu Access to this selection activates the OC1's Receiver, then after 2 seconds, starts an automatic scroll displaying a sequence of Status screens >>... - Page 76 > Graphic TMT1 (or 2 or 3), or BUD1 (or 2) > Graphic NOT AVAIL Fig. 64B - BUD STATUS This screen appears when the OC1's receiver is not receiving a signal from a TMT, or the TMT is set Off. Read and understand the Oceanic Personal Dive Fig. 64C - TMT NOT...
-
Page 77: Dive Mode Features
DIVE MODE FEATURES... - Page 78 Poor Reception Distance (greater than 4 feet/1.2 meters) Best Reception Area Poor Poor Reception Reception Area Area Poor Poor Reception Reception Area Area Transmitter Signal Reception Guide...
-
Page 79: Proximity Of The Tmts And Oc1
Link Interruption Underwater During a dive, you may at times move the OC1 out of the signal pattern of the TMT, result- ing in a temporary loss of the Link signal. The Link will be restored within 4 seconds after the OC1 is moved back into its correct position. -
Page 80: Wet Activation
The contacts are the metal pins of the PC Interface Data Port and the metal housing. When Wet Activation is set Off, the OC1 will not enter Dive Mode while in Watch Mode unless a dive has already been conducted and it is a repetitive dive. -
Page 81: Bar Graphs
BAR GRAPHS The OC1 features 2 bar graphs, one on each side of the LCD. > The one on the left is dual function. It represents either Nitrogen loading or Oxygen accumulation. The icons NI and O2 identify which is displayed at that time. -
Page 82: O2Bg
Fig. 67 - NO DECO ALT The OC1 will store O2 calculations for up to 10 dives conducted during a 24 hour period. If the limit for O2 is reached (100% = 300 OTU), all 5 segments of the O2BG will be displayed on the Main dive screen in place of the TLBG (Fig. -
Page 83: Vari
VARI The VARI (Fig. 69a) provides a visual representation of ascent speed (i.e., an ascent speedometer). The segments represent two sets of speeds which change at a reference depth of 60 FT (18 M). Refer to the chart. When ascent is too fast, all segments will be displayed flashing (Fig. -
Page 84: Algorithm (Ndl Basis)
You can select DSAT or PZ+ as the NDL Basis. The selection will lock in for 24 hours after the last dive. DSAT has been the standard used by Oceanic in all of its dive computers until this time. It features NDLs that are based on exposures and test data which also formed validation for the PADI RDP. -
Page 85: Conservative Factor
CONSERVATIVE FACTOR (CF) When the CF is set On, the NDLs which are based on the algorithm selected and used for Ni/O2 calculations and displays relating to Plan and DTR, will be reduced to the values available at the altitude level that is 3,000 feet (915 meters) higher. Refer to the NDL charts on pages 170 and 171. -
Page 86: Safety Stop
SAFETY STOP (SS) Upon ascending to 5 FT (1.5 M) below the SS Depth set on any NORM No Deco dive in which Depth exceeded 30 FT (9 M), the Audible will sound and a SS at the Depth set will be displayed with a countdown beginning at the Safety Stop Time set and counting down to 0:00 (min:sec). -
Page 87: Fo2 Set For Air
24 hours elapse after the last dive, or the FO2 50% Default is set Off. When the FO2 50% Default is set Off, the OC1 will remain set at the last FO2 Gas 1 Set Point for that period of activation. -
Page 88: Dive Time Remaining (Dtr)
Default is set On, all FO2 values default to 50%. • The OC1 is programmed to prevent FO2 Gas 2 and 3 from being set at values lower than the FO2 Set Point for Gas 1. Gas 2 and Gas 3 require Set Points equal to/ higher than Gas 1 and Gas 2, respectively. -
Page 89: O2 Dtr (Otr)
DTR on the Main. Air Time Remaining (ATR) The OC1 calculates ATR using a patented algorithm that is based on a diver's individual Air Consumption Rate and Current Depth. Tank Pressure is measured once each second and an average rate of Consumption is calculated over a 90 second period. - Page 90 ATR becomes greater than 5 minutes. You should initiate a controlled Ascent while monitoring Tank Pressure. However, there is no reason to panic, the OC1 has allowed for the Air necessary for a safe Ascent including the No Deco Deep and Safety Stops, if set On, and any Deco Stops required.
-
Page 91: Error (Reset During Dive)
ERROR (RESET DURING A DIVE) If for any reason, the OC1 shuts Off then turns On again during any Dive, the graphic ERR (Error) will be displayed with the Up Arrow icon and current Depth with FT (or M) icon (Fig. 75A). -
Page 92: Norm Dive Mode Structure
NORM DIVE MODE STRUCTURE Surface Mode 2 FT (0.6 M) for 1 sec 5 FT (1.5 M) for 5 sec Safety Stop Dive Mode ALTs Main < 2 sec Pg. 98 Deep Stop ALTs Main < 2 sec Gas/TMT Menu Pg. 96 < 2 sec Select > GAS 1 Air Compass 2 sec 2 sec GAS 2 32% Op Main BUD 1 Press 60 sec < 2 sec DIVE Pg. Pg. 115 MAIN < 2 sec Pg. 94 < 2 sec closure... -
Page 93: Norm Dive Modes
NORM DIVE MODES... -
Page 94: No Deco Main And Alts
NO DECO MAIN, information includes (Fig. 76) - > Current Depth with FT (or M) icon > DTR (hr:min) with graphic NDC (or OTR or AIR), whichever is less at the time > ATR (min) when 60 minutes or less with graphic ATR and Time (clock) icon, blank if no TMT or ATR is DTR >... - Page 95 No Deco Alt 1, information includes (Fig. 77) - > Max Depth with MAX and FT (or M) icons > Graphic EDT with Elapsed Dive Time (hr:min) > Graphic FO2 with Set Point for Gas in use > Graphic PO2 with current value (ATA), if Nitrox >...
-
Page 96: Deep Stop
Deep Stop Preview, information includes (Fig. 79) - > Stop Depth with graphic FT (or M) and countdown Time as 2:00 (min:sec) > Graphic DEEP STOP • 5 sec, revert to No Deco Main • L (closure) to activate Backlight DEEP STOP MAIN, information includes (Fig. - Page 97 Deep Stop Alt 1, information includes (Fig. 81) - > Max Depth with MAX and FT (or M) icon > DTR (hr:min) with graphic NDC (or OTR if less) > Graphic EDT with Elapsed Dive Time (hr:min) > Graphic FO2 with Set Point for Gas in use >...
-
Page 98: Safety Stop
SAFETY STOP MAIN, information includes (Fig. 83) - > Current Depth with FT (or M) icon > Stop Depth with graphic FT (or M) and remaining countdown Time (min:sec) > ATR (min) when 60 minutes or less with graphic ATR and Time (clock) icon, blank if no TMT >... -
Page 99: Decompression
• A (< 2 sec) to access ALT 2 • Revert to Main in 5 sec, if A not pressed Safety Stop Alt 2, information includes (Fig. 85) - > Time of Day (hr:min sec), with A (or P) if 12 Hour >... - Page 100 Managing Deco Stops To fulfill your decompression obligation, you should make a safe controlled Ascent to a depth slightly deeper than, or equal to, the required Stop Depth indicated and decompress for the Stop Time indicated. The amount of decompression credit time that you receive is dependent on Depth, with slightly less credit given the deeper you are below the Stop Depth indicated.
- Page 101 • A (< 2 sec) to access ALTs • M (2 sec) to access Gas Switching (or Bud Press Check) • S (< 2 sec) to acknowledge alarms • S (2 sec) to access Compass • L (closure) to activate Backlight Deco Stop Alt 1, information includes (Fig.
-
Page 102: Violation Modes
CONDITIONAL VIOLATION (CV) Upon ascent above the required Deco Stop Depth, operation will enter CV during which no off gassing credit will be given; with remaining Deco Stop Time and TAT freezing. The Audible will sound and the red LED will flash. The full TLBG and Down Arrow icon will flash (Fig. - Page 103 • S (< 2 sec) to silence Audible > Down Arrow icon continues to flash until descent to below required Stop Depth (within Stop Zone), then full Stop icon (Stop Bar with both Arrows) will be on solid. • L (closure) to activate the Backlight When descent below the required Deco Stop Depth is made, operation will resume in Deco with off gassing credit given (Stop Time and TAT decrease).
- Page 104 Current Depth and Max Depth will only indicate 3 dashes ( - - - ) signifying that you are Out of Range. **MOD is the Max Operating Depth at which the OC1 can perform (NORM/FREE) nitrogen calculations. Upon ascending above 330 FT (100 M), Current Depth will be restored, however, Max Depth (on ALT 1) will display 3 dashes for the remainder of that dive.
- Page 105 • A (< 2 sec) to access ALTs • S (< 2 sec) to acknowledge alarms • S (2 sec) to access Compass • L (closure) to activate Backlight DV3 Alt 1, information includes (Fig. 94) - > Max Depth as 3 dashes ( - - - ) with MAX and FT (or M) icons >...
- Page 106 VGM. This would be preceded by DV2. Operation would then continue in VGM during the remainder of that dive and for 24 hours after surfacing. VGM turns the OC1 into a digital instrument without any decompression or oxygen related calculations or displays.
- Page 107 • A (< 2 sec) to access ALTs • S (< 2 sec) to acknowledge alarms • S (2 sec) to access Compass • M (2 sec) to access Gas Switching (or Bud Press Check) • L (closure) to activate Backlight VGM Alt 1, information includes (Fig.
-
Page 108: High Po2
VGM ON SURFACE The graphic VIOL flashes for the first 10 minutes, then it alter- nates with NORM (each On 3 seconds, Fig. 99A/B) until DC shut down after 24 hours with no dives. In the event that a dive is made during the 24 hour period, a full 24 hour surface interval must then be served before all functions are restored. - Page 109 > After Audible - NDC is restored, Up Arrow icon solid until PO2 decreases below .20 less than the Alarm Set Point. If PO2 continues to increase and reaches the PO2 Alarm Set Point, the Audible sounds again. > The PO2 value with graphic PO2 and Up Arrow icon will flash until PO2 decreases below the Alarm Set Point.
- Page 110 PO2 Alarm Alt 1, information includes (Fig. 102) - > Max Depth with MAX and FT (or M) icons > DTR (hr:min) with graphic NDC (or OTR if less), 0:00 if PO2 is 1.60 > Graphic EDT with Elapsed Dive Time (hr:min) >...
-
Page 111: High 02
HIGH O2 Warning >> at 80% (240 OTU) Alarm >> at 100% (300 OTU) When O2 accumulation increases to 80%, the Audible sounds, the Up Arrow icon will flash, and the graphic O2 will flash (in place of NDC) until the Audible is silenced (Fig. 104) >... - Page 112 O2 Alarm Main button operations: • A (< 2 sec) to access ALTs • S (< 2 sec) to acknowledge alarms • S (2 sec) to access Compass • M (2 sec) to access Gas Switching (or Bud Press Check) •...
- Page 113 High O2 during Deco If a High O2 Warning (80%) occurs while at a Deco Stop, the graphic O2 will flash (in place of Stop Depth/Time) until the Audible is silent, then Stop Depth/Time is restored. If a High O2 Alarm (100%) strikes while at a Deco Stop, the graphic O2 and O2BG will flash (in place of Stop Depth/Time and TLBG) until on the surface.
- Page 114 If you are following these dive profiles, Oceanic advises that you should not use an OC1. If you exceed certain limits, the OC1 will not be able to help you get safely back to the surface. These situations exceed tested limits and can result in loss of some functions for 24 hours after the dive in which a violation occurred.
-
Page 115: Gas/Tmt Switching And Buddy Pressure Check
GAS/TMT SWITCHING BUDDY PRESSURE CHECK... - Page 116 OVERVIEW > Can only switching when Dive Main screens are displayed. > Cannot Switch Gas or TMTs on surface. > Cannot Switch Gas or TMTs during alarms. > All NORM dives begin with Gas 1. > NORM mode defaults to Gas 1 after 10 minutes on the surface.
- Page 117 • S (< 2 sec) - to Switch from Gas in use to Gas 1, > display a Search for TMT screen (Fig. 110) for 10 sec, > then revert to Main with Gas 1/TMT 1 selected If the Gas/TMT are not switched to the same source as the gas being breathed, ATR will increase to maximum after 1 minute without a change in transmitted Pressure.
- Page 118 GAUG TMT/BUD Menu, information includes (Fig. 112): M (2 sec) while a GAUG Dive Main is displayed - to access the Menu (Select) screen. > Graphic SEL > Graphic selections TMT1, TMT2 (or BUD1); TMT3 (or BUD2); with graphic PRESS A (<...
- Page 119 BUD Status on Surface Buddy Pressure Check can be performed when on the Surface by accessing the TMT Status screens while the NORM SURF MAIN screen is being displayed. Read and understand the Oceanic Personal Dive Fig. 114B - BUD 1 NOT Computer Safety and Reference Manual. REPORTING...
- Page 120 GAUG SURFACE GAUG DIVE Surface Mode Watch 2 FT (0.6 M) Mode 2 sec for 1 sec GAUG Compass 2 sec SURF 5 FT (1.5 M) MAIN for 5 sec Surface ALTs < 2 sec Dive Mode closure Light Compass < 2 sec 2 sec 2 sec Start/Stop GAUG < 2 sec Timer Menu DIVE access Reset > MAIN selection < 2 sec 2 sec Timer...
-
Page 121: Digital Gauge Mode
DIGITAL GAUGE MODE... -
Page 122: Gaug Surface Main And Alts
GAUG SURF MAIN, information includes (Fig. 115A/B): > Graphic GAUG > Graphic DIVE and number of dives completed during that operating period, up to 24 (0 if no dive made yet) > Graphic SURF and SI (hr:min) with Time (clock) icon; if no dive yet, this is time since access to GAUG >... - Page 123 GAUG SURF ALT 1, information includes (Fig. 116): > Max Depth with MAX and FT (or M) icons, 2 dashes ( - - ) if no previous dive > Elapsed Dive Time (hr:min) with graphic EDT, 3 dashes ( - : - - ) if no previous dive >...
-
Page 124: Gaug Menu
GAUG MENU GAUG M (< 2 sec) - to access Menu, while viewing Surface Main MENU A (< 2 sec) - to step down (forward) through selections M (< 2 sec) - to step up (backward) through selections S (< 2 sec) - to access selection indicated by Arrow icon ( > ) >... -
Page 125: Gaug Dive Main And Alt
Set Dive Mode, information includes (Fig. 119): > Graphics SEL and DIVE MODE > Set Point graphics NORM and FREE; Arrow ( > ) icon next to NORM • A (< 2 sec) to toggle between the selections • S (< 2 sec) to save the selection and access that mode's Surface Main screen Refer to pages 50 through 76 for descriptions of Fig. 119 - SET DIVE MODE... -
Page 126: Delayed Violation
Button operations for GAUG Surface Main: • S (2 sec) to access Compass • S (< 2 sec) to start/stop Run Timer; acknowledge Alarms (which does not operate Timer) • A (2 sec) to reset Run Timer • A (< 2 sec) to access ALT •... - Page 127 NOTE: When operating in Digital Gauge Mode, the Depth range is extended to 660 FT (200 M). DV3 MAIN, information includes (Fig. 122) - > Up Arrow icon, flashing > Current Depth, 3 dashes ( - - - ) flashing, with FT (or M) icon >...
-
Page 128: Free Dive
FREE SURFACE FREE DIVE Surface Mode Watch Mode 2 sec FREE 2 FT (0.6 M) Compass 2 sec for 1 sec SURF MAIN Surface ALTs < 2 sec 5 FT (1.5 M) for 5 sec closure Light Dive Mode < 2 sec 2 sec Menu access 2 sec > Compass selection < 2 sec FREE SET EDT AL DIVE SET DD1 AL MAIN < 2 sec SET DD2 AL... -
Page 129: Free Dive Mode
FREE DIVE MODE... -
Page 130: Free Surface Main And Alts
FREE SURF MAIN, information includes (Fig. 124A/B): > Graphic FREE > Graphic SURF and SI (min:sec up to 59:59, then hr:min) with Time (clock) icon > Graphic DIVE and number of dives completed during that set/series of repetitive dives, up to 99 (0 if no dive made yet) >... - Page 131 FREE SURF ALT 1, information includes (Fig. 125): > Max Depth with MAX and FT (or M) icons, 2 dashes ( - - ) if no previous dive > Elapsed Dive Time (min:sec) with graphic EDT, 3 dashes ( - : - - ) if no previous dive >...
-
Page 132: Free Menu
FREE MENU M (< 2 sec) - to access Menu, while viewing Surface Main. A (< 2 sec) - to step down (forward) through selections. M (< 2 sec) - to step up (backward) through selections. S (< 2 sec) - to access selection indicated by Arrow icon ( > ). M (2 sec) any time - to revert to Surface Main. -
Page 133: Set Cdt
Set CDT, information includes (Fig. 128): > Graphics SEt and CD TMR > CDT (min:sec) with Minutes digits flashing > Time (clock) icon • A (hold) to scroll upward through Minute Set Points at a rate of 8 per second from 0: to 59: in increments of 1: (min). •... -
Page 134: Elapsed Dive Time Alarm
EDT ALARM Factory set for a fixed 30 seconds, the EDT (Elapsed Dive Time) alarm sounds the Audible every 30 seconds while underwater in FREE Dive Mode. Set EDT Alarm, information includes (Fig. 130): > Graphic EDT > Graphic OFF (or ON) flashing •... - Page 135 • A (hold) to scroll upward through Depth values at a rate of 8 per second from 30 to 330 FT (10 to 100 M) in increments of 10 FT (1 M) • A (< 2 sec) to step upward through Set Points one at a time •...
- Page 136 Set DD3 Alarm**, information includes (Fig. 133A): > Depth value with MAX and FT (or M) icons > Graphics DD3 AL > Graphic OFF (or ON) flashing • A < 2 sec to toggle OFF/ON • S (< 2 sec) to save Set Point and flash Depth digits (if ON); or revert to FREE Menu (if OFF) ** If this screen is accessed when DD2 is set Off, a message Fig. 133A - SET DD3 AL...
-
Page 137: Select Dive Mode
SELECT DIVE MODE S (< 2 sec) - to access Set Dive Mode while the selection Arrow icon ( > ) is next to it on the FREE Menu Set Dive Mode, information includes (Fig. 134): > Graphics SEL and DIVE MODE >... -
Page 138: Free Dive Main And Alts
FREE Dive Main, information includes (Fig. 135) - > Current Depth with FT (or M) icon > Graphic NDC with Time Remaining (hr:min) > Graphic EDT with Elapsed Dive Time (min:sec) > TLBG with NI icon, if any from FREE or NORM dives within last 24 hours •... -
Page 139: Free Dive Alarms
FREE Dive Alt 2, information includes (Fig. 137) - > Time of Day (hr:min sec), with A (or P) if 12 Hour > Temperature with ° icon and graphic F (or C) • 5 sec or A (< 2 sec), revert to Main FREE DIVE ALARMS Fig. 137 - FREE DIVE ALT 2 FREE mode alarms, which are separate from NORM (or GAUG) - Page 140 FREE EDT Alarm When set ON, the EDT alarm activates every 30 seconds during a dive. The Audible will sound during which time the EDT digits will flash on the Main (Fig. 139). FREE Depth Alarms Fig. 139 - EDT AL When set ON, the DD alarms (1, 2, 3) activate at their set Depths.
- Page 141 After 1 minute on the surface, the graphic VIOL alternates with FREE and dive computer operation locks into FREE Mode for 24 hours. Access to Watch and Compass will be as usual. Fig. 142A - FREE VIOLATION (entry into Deco, during Aud) Fig. 142B - FREE VIOLATION (after Aud) Read and understand the Oceanic Personal Dive Fig. 143 - FREE VIOLATION Computer Safety and Reference Manual. (6 sec on surface)
- Page 142 The mathematical models currently used in the OC1 are based on no decompression/ decompression multilevel repetitive dive schedules. These algorithms do not take into account the physiological changes associated with...
- Page 143 WARNINGS Ensure that you know which Operating Mode is selected (NORM, GAUG, or FREE) prior to commencing any dive. Conducting Free dives within a 24 hour period after conducting SCUBA dives, combined with the effects of multiple rapid Free Dive ascents, in- creases your risk of decompression sickness.
- Page 144 COMPASS ICONS Diver’s Direction of Travel Turn Left Turn Right North OP Mode Tilt Heading Reference Degrees OP Mode dynamic North or Ref Heading set...
-
Page 145: Compass Mode
COMPASS MODE... - Page 146 COMPASS MODE SURFACE 2 sec Watch or DC COMP Surface Main closure 60 sec Light MAIN Battery Auto Invert Change Home Heading 2 sec < 2 sec Ref Mode < 2 sec 2 sec Retain 3 sec A < 2 sec Compass Data to toggle < 2 sec Save/Clear Menu Start 3 sec if OK, back to Menu >...
-
Page 147: Overview
OVERVIEW > S (2 sec) - to access** from Watch or Surface Main > S ( 2 sec) - to revert to Watch or Surface Main > 60 sec (no button action) - revert to Watch or Surface Main > Only active while OP Main is displayed >... -
Page 148: Compass Menu
> 360 with ° icon • S (< 2 sec) - to activate (start) Calibration • Slowly and steadily rotate the OC1 360° in either direction while maintaining it in a flat level position (keeping it level is critical for acurracy), CAL progress will be displayed. - Page 149 CAL Progress**, information includes (Fig. 147) - > Graphic CAL > dotted circle, increasing from 0 to 360° as it is rotated **Rotation should take about 30 seconds. If not fully rotated in 60 seconds, operation will revert to the Menu. Fig. 147 - CAL PROGRESS CAL Complete, information includes (Fig.
-
Page 150: North Op Mode
NORTH OP MODE Used for activity involving navigation in which a Heading (direc- tion of travel) is not set prior to diving. North remains as the default mode until Reference is selected. North OP Mode, information includes (Fig. 149) - >... -
Page 151: Reference Op Mode
• S (< 2 sec) - to add the graphic SEt to the display with Reference Mode icon and Heading digits flashing (Fig. 151) • Slowly and steadily rotate the OC1 in either direction while maintaining it in a flat level position until the Heading (001 to 360°) required is displayed. -
Page 152: Declination
DECLINATION Magnetic Declination is taken from numbers provided on maps and/or charts that apply to a specific location. The numbers represent the easterly or westerly angular difference (Declina- tion) in degrees between magnetic North and true (geometric or polar) North. A Compass will point to magnetic North unless its reference is adjusted to true North prior to conducting activities. -
Page 153: Compass Operation
COMPASS OPERATION Once it is Calibrated, Declination is set, the OP Mode is se- lected, and the course Heading is set (if Reference), the OC1 is ready for operation on the surface or underwater. • S (2 sec) - to access Compass OP Main while viewing a... - Page 154 Reference OP Main, information includes (Fig. 155) - > Depth with FT (or M) icon, blank on surface > Reference Mode icon > Static Arrow icon, diver direction of travel > Turn Arrow icon (left or right) flashing, while > 10° deviation from Heading set >...
- Page 155 • S (2 sec) or 60 sec - reverts to Dive Main WARNING: You must become thoroughly familiar with setup and operation of the OC1 Digital Compass before using it as your primary device for navigation. Failure to do so could result in serious errors relating to activities involving navigation.
-
Page 156: Pc Requirements
• 20MB of available hard drive storage • Mouse • CD Rom drive • Printer For software updates, refer to the Oceanic web site at - www.OceanicWorldwide.com For support, call OceanLog Support toll free at - (866) 732-7877, 8 Am to 5 Pm USA Pacific time. -
Page 157: Reference
CAUTION: When the procedure provided in this section is used to change the OC1 Battery, you must be sure that the case o-ring is not pinched and that the OC1 is water tight before conduct- ing diving activities. Pre dive pressure testing by an Authorized Oceanic facility is highly recommended. -
Page 158: Uploading Settings And Downloading Data
A USB Driver is provided on the Oceanlog CD as part of the Interface System. The OC1 is configured with a Data Port located on the side (Fig. 158a) that enables it to be connected to a PC through a USB port using the special Interface Cable supplied. - Page 159 > turn the connector clockwise until the red dot is at 1 o'clock and it locks in (Fig. 159B), then release it. The OC1 checks for a connection to the Data Port once every second while the Watch Default Time is displayed. Checks are Fig. 159A - PCI CABLE...
-
Page 160: Care And Cleaning
Instrument Lens Protector. Small scratches will naturally disappear underwater. • Soak and rinse the OC1 in fresh water at the end of each day of diving, and check to ensure that the areas around the Low Pressure (Depth) Sensor (Fig. 160a), PC Interface Data Port (Fig. - Page 161 2 year limited warranty. To Obtain Service: Take your OC1 system to an Authorized Oceanic Dealer or send it to the nearest Oceanic Regional Distributor Facility (page 178). To return your OC1 system to Oceanic: •...
-
Page 162: Battery Replacement
Inspect the Buttons, Lens, and Housing(s) to ensure they are not cracked or damaged. If there is any sign of moisture in the OC1 or Transmitter(s), DO NOT attempt to use the OC1 for diving (NORM, GAUG, or FREE) until it receives proper service by the Oceanic... -
Page 163: Data Retention
Fig. 161 - CASE BACK (refer to page 146). All parts needed for the battery change that follows are provid- ed in the OC1 Battery Kit available at your Authorized Oceanic Dealer as Oceanic PN 04.6175.35. OC1 Battery Removal • There is no need to remove the straps. - Page 164 WARNING: If damage or corrosion is found, Fig. 164 - BATT O-RING return your OC1 to an Authorized Oceanic Dealer, and DO NOT attempt to use it until it has received factory prescribed service. • Remove the case back O-ring (Fig. 164a) by squeezing the sides.
- Page 165 > Ensure that the LCD is clear and sharp in contrast. If any portions are missing or appear dim, or if a Low Battery condition is indicated, return the OC1 with TMTs to an Authorized Oceanic Dealer for evaluation before use.
- Page 166 Battery (+) ( - ) NOTE: The O-ring must be a genuine Oceanic part available at an Authorized Oceanic Dealer. Fig. 171 - ORIENTATION Use of any other O-ring will void the warranty.
-
Page 167: Tmt Installation On Regulator
• Attach the First Stage to a full Scuba Tank and pressurize by slowly opening the tank valve, listening for any indication of air leaking around the fitting. • If air leakage is present, DO NOT use, take the complete Regulator Assembly to an Authorized Oceanic Dealer for inspection and service. Fig. 174 -INSTALLING TMT... -
Page 168: Altitude Sensing And Adjustment
(3,355 meters) are then made to allowable dive times for 14,000 feet (4,270 meters). At Sea Level, calculations are based upon an Altitude of 6,000 feet. The OC1 will not function as a Dive Computer above 14,000 feet (4,270 meters). -
Page 169: Technical Data
TECHNICAL DATA... -
Page 170: Pz+ Algorithm Ndl Chart
PZ+ ALGORITHM >> NDLS (HR:MIN) AT ALTITUDE (IMPERIAL) Altitude 3001 4001 5001 6001 7001 8001 9001 10001 11001 12001 13001 (feet) 3000 4000 5000 6000 7000 8000 9000 10000 11000 12000 13000 14000 Depth ( FT ) 30 3:17 2:30 2:21 2:14 2:08 2:02 1:57... -
Page 171: Dsat Algorithm Ndl Chart
DSAT ALGORITHM >> NDLS (HR:MIN) AT ALTITUDE (IMPERIAL) Altitude 0 3001 4001 5001 6001 7001 8001 9001 10001 11001 12001 13001 (feet) 3000 4000 5000 6000 7000 8000 9000 10000 11000 12000 13000 14000 Depth ( FT ) 30 4:20 3:21 3:07 2:55 2:45 2:36... -
Page 172: Specifications
DIVE COMPUTER PERFORMANCE • Buhlmann ZHL-16c based PZ+, or DSAT based, algorithm • No Deco limits closely follow PADI RDP • Decompression in agreement with Buhlmann ZHL-16c and French MN90 • No Deco Deep Stops - Morroni, Bennett • Deco Deep Stops (not recommended) - Blatteau, Gerth, Gutvik • Altitude - Buhlmann, IANTD, RDP (Cross) • Altitude corrections and O2 limits based on NOAA tables TRANSMITTERS • Battery and Pressure check > every 2 minutes when asleep > every 2 seconds when awake • Startup > Pressure => 120 PSI (8 BAR) > Battery => 2.75 volts • Shutdown > Pressure < 50 PSI (3.5 BAR) TMT Compatibility with Nitrox When packaged and shipped from the factory, Oceanic TMTs are rated for use with compressed Air and Nitrox mix- tures containing up to 99% O2 by volume and with 100% O2. - Page 173 SPECIFICATIONS (CONTINUED) NUMERIC DISPLAYS: Range: Resolution: • Dive Number 0 to 24 • Norm/Free Current Depth 0 to 330 FT (100 M) 1 FT (.1/1 M ) • Norm/Free Max Depth 330 FT (100 M) 1 FT (.1/1 M) • Gaug Current Depth 0 to 660 FT (200 M) 1 FT (.1/1 M ) • Gaug Max Depth 660 FT (200 M) 1 FT (.1/1 M) • Gas 1 FO2 Set Point Air, 21 to 50 % • Gas 2 FO2 Set Point Air, 21 to 100 % • Gas 2 FO2 Set Point Air, 21 to 100 % • PO2 Value 0.00 to 5.00 ATA .01 ATA • Dive Time Remaining 0:00 to 9:59 hr:min 1 minute • Air Time Remaining...
- Page 174 SPECIFICATIONS (CONTINUED) BAR GRAPHS TLBG O2BG segments segments • No Deco Normal zone 3 • Normal zone 3 • No Deco Caution zone 1 • Caution zone 1 • Decompression Warning zone 1 • Danger zone 1 Ascent Rate Indicator: 60 FT (18 M) & Shallower Deeper than 60 FT (18 M) segments FPM MPM segments FPM 0 0 - 10 0 - 3 0 0 - 20 0 - 6 • Normal Zone 1 11 - 25...
- Page 175 • OC1 (Watch) Battery (1) 3 vdc, CR2450, Lithium battery (Panasonic or equivalent) • Transmitter Battery (1) 3 vdc, CR2, .75 Ahr, Lithium battery (Duracell model DL-CR2 or equivalent) • Shelf life Up to 7 years (when shipped from factory in Deep Sleep mode) • Replacement User replaceable (annual recommended) • Use Life (OC1) 1 year or 300 dive hours if (2) 1 hour dives per dive day • Use Life (Transmitter) 300 dive hours if (2) 1 hour dives per dive day Battery Icon (OC1 only): • Warning - icon on solid at 2.75 volts, Battery change recommended • Alarm - icon on flashing at 2.50 volts, change the Battery Dive Computer Mode Activation: • Manual - push button (recommended), required prior to dive if Wet Activation is set OFF. • Automatic - by immersion in water (if set ON) • Cannot be manually activated deeper than 4 FT (1.2 M), if Water Activation is set OFF. • Cannot operate as a Dive Computer at elevations higher than 14,000 feet (4,270 meters) Operating Temperature: • Out of the water - between 20 °F and 140 °F (-6 and 60 °C). • In storage case provided - between 14 °F and 158 °F (-8 and 70 °C). • In the water - between 28 °F and 95 °F (-2 and 35 °C).
-
Page 176: Fcc Compliance
• Connect the equipment to an outlet on a circuit different from that to which the receiver is connected. • Consult the dealer or an experienced radio/TV technician. Warning: Changes or modifications to this unit not expressly approved by Oceanic/2002 Design could void the user's authority to operate the equipment. -
Page 177: Inspection/Service Record
OC1 Firmware and Display Revs: _________________________________ Transmitter1 Serial Number: _________________________________ Transmitter 2 Serial Number: _________________________________ Transmitter 3 Serial Number: _________________________________ Date of Purchase: ____________ Purchased from: __________________________ Below to be filled in by an Authorized Oceanic Dealer: Date Service Performed Dealer / Technician... -
Page 178: Oceanic World Wide
OCEANIC WORLD WIDE OCEANIC USA 2002 Davis Street San Leandro, CA 94577 Tel: 510/562-0500 Fax: 510/569-5404 Web: www.OceanicWorldwide.com E-mail: hello@oceanicusa.com OCEANIC NORTHERN EUROPE Rosebud, Victoria, Australia Augsburg, Germany Tel: 61-3-5986-0100 Fax: 61-3-5986-1760 Tel: +49 (0) 821 810342 0 Fax: +49 (0) 821 810342 29 Web: www.OceanicAUS.com.au Web: www.oceanic.de E-mail: sales@OceanicAUS.com.au E-mail: office@oceanic.de OCEANIC ASIA PACIFIC OCEANIC ITALY Singapore Genova, Italy Tel: +65-6391-1420 Fax: +65-6297-5424 Tel: +39 010 545 1212 Fax: +39 010 518 4232 E-mail: info@oceanicasia.com.sg Web: www.oceanicitalia.com E-mail: info@oceanicitalia.com OCEANIC JAPAN Yokohama Kanagawa-Prev, Japan OCEANIC UK Tel: 03-5651-9371 Devon, United Kingdom E-mail: mamoru@jecee.com Tel: (44) 1404-891819 Fax: +44 (0) 1404-891909 Web: www.OceanicUK.com OCEANIC HAWAII and MICRONESIA E-mail: helpyou@oceanicuk.com Kapolei, Hawaii Tel: 808-682-5488 Fax: 808-682-1068 OCEANIC FRANCE E-mail: lbell@oceanicusa.com...
Need help?
Do you have a question about the OC1 and is the answer not in the manual?
Questions and answers