
Subscribe to Our Youtube Channel
Related Manuals for Extech Instruments EX810


Summary of Contents for Extech Instruments EX810
- Page 1 User's Guide Extech 800 Series 1000 Amp Clamp Meters with IR Thermometer EX810 AC Clamp meter EX820 True RMS AC Clamp meter EX830 AC/DC True RMS Clamp meter...
- Page 2 Introduction Congratulations on your purchase of the EX800 Series Clamp device. The series consists of the following models: EX810 1000A AC Current Clamp meter EX820 1000A True RMS AC Current Clamp EX830 1000A True RMS AC/DC Current Clamp All models measure:...
- Page 3 Safety International Safety Symbols This symbol, adjacent to another symbol or terminal, indicates the user must refer to the manual for further information. This symbol, adjacent to a terminal, indicates that, under normal use, hazardous voltages may be present Double insulation SAFETY NOTES •...
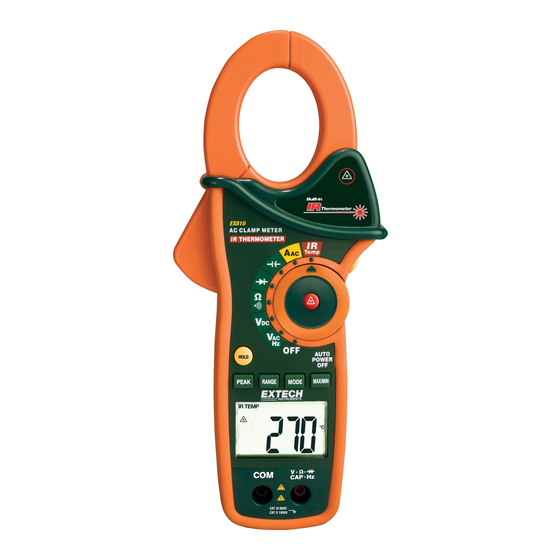
- Page 4 Description Meter Description (EX830 pictured) 1. Current clamp 2. Clamp opening trigger 3. Data Hold Button 4. Mode 5. Peak 6. Range 7. DCA Zero (EX830 only) 8. MIN/MAX 9. Backlit LCD Display 10. Test lead input jacks 11. IR thermometer and laser pointer (rear) 12.
-
Page 5: Specifications
Specifications Accuracy Range & (% of reading + digits) Function Resolution EX810 EX820 EX830 AC Current 400.0 AAC ± (2.8% + 8d) ± (2.5% + 8d) ± (2.5% + 8d) 50/60 Hz True RMS on 1000 AAC ± (3.0% + 8d) ±... - Page 6 Accuracy (% of reading + digits) Range and Function Resolution EX810 EX820 EX830 -4 to 1400 ± (3%rdg + 9 ± (3%rdg + 9 Temperature (type-K) -20 to 760 ± (3%rdg + 5 ± (3%rdg + 5 ± 9 °F ±...
-
Page 7: Operation
Operation NOTES: Read and understand all Warning and Caution statements in this operation manual prior to using this meter. Set the function select switch to the OFF position when the meter is not in use. AC/DC Current Measurements (DC Current on Model EX830 only) WARNING: Ensure that the test leads are disconnected from the meter before making current clamp measurements. -
Page 8: Capacitance Measurements
Resistance Measurements Note: Remove power before making resistance measurements Insert the black test lead into the negative COM terminal and the red test lead into the Ω positive terminal. Set the function switch to the Ω position. Touch the test probe tips across the circuit or component under test. -
Page 9: Continuity Measurements
Type K Temperature Measurements (Models EX820 and EX830 only) Set the function switch to the K Temp position. Insert the Temperature Probe into the negative COM and the positive TEMP jacks, observing polarity. Touch the Temperature Probe tip to the device under test. Continue to touch the part under test with the probe until the reading stabilizes. - Page 10 Non-Contact InfraRed Temperature Measurements Set the function switch to the IR Temp position. Aim the infrared sensor (rear of the meter) at the surface to be measured. Press the button in the center of the rotary function switch to turn on the laser pointer and identify the surface spot to be measured.
-
Page 11: Automatic Power Off
Data Hold To freeze the LCD reading, press the HOLD button. While data hold is active, the HOLD icon appears on the LCD. Press the HOLD button again to return to normal operation. Peak Hold The Peak Hold function captures the peak AC or DC voltage or current. The meter can capture negative or positive peaks as fast as 1 millisecond in duration. -
Page 12: Maintenance
Maintenance WARNING: To avoid electrical shock, disconnect the meter from any circuit, remove the test leads from the input terminals, and turn OFF the meter before opening the case. Do not operate the meter with an open case. Cleaning and Storage Periodically wipe the case with a damp cloth and mild detergent;... -
Page 13: Warranty
Warranty EXTECH INSTRUMENTS CORPORATION warrants this instrument to be free of defects in parts and workmanship for one year from date of shipment (a six month limited warranty applies to sensors and cables). If it should become necessary to return the instrument for service during or beyond the warranty period, contact the Customer Service Department at (781) 890-7440 ext.
Need help?
Do you have a question about the EX810 and is the answer not in the manual?
Questions and answers