Table of Contents
Advertisement
Advertisement
Table of Contents

Related Manuals for Phonak TVLink II


Summary of Contents for Phonak TVLink II
- Page 1 Phonak TVLink II User Guide...
-
Page 2: Table Of Contents
Contents 1. Welcome 2. Getting to know your TVLink II 3. Getting started 3.1 Setting up the power supply 3.2 Selecting the charging slot 3.3 Connecting the cables 3.4 Charging the streamer 3.5 Pairing TVLink II and the streamer 4. Daily use 4.1 Wearing the streamer... - Page 3 5. Troubleshooting 5.1 Testing the audio transmission 5.2 Questions and answers 6. Service and warranty 6.1 Local warranty 6.2 International warranty 6.3 Warranty limitation 7. Compliance information 8. Information and explanation of symbols 9. Important safety information 10. Important notice...
- Page 4 I will use the TVLink II along with the following streamer: ComPilot ComPilot II ComPilot Air II...
-
Page 5: Welcome
TV and other entertainment or communication devices. Please read this user guide carefully to discover how to benefit from all the features of your TVLink II. If you have any questions, please consult your hearing care professional or go to www.phonak-us.com/tvlink Phonak –... -
Page 6: Getting To Know Your Tvlink
2. Getting to know your TVLink II The intended use of the TVLink II basestation is to connect your hearing aids to a TV (or any other audio source). It sends audio signals wirelessly to the hearing aids up to 30 meters (100 ft). It also serves as a charging cradle for the Phonak streamer. -
Page 7: Hearing Aid
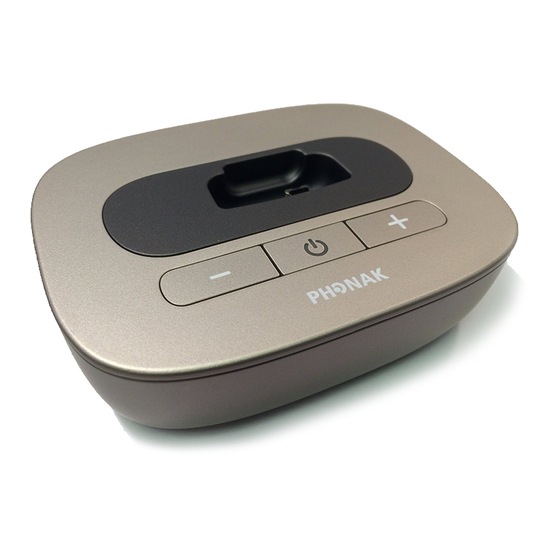
TVLink II ComPilot Air II * basestation * ComPilot or ComPilot II are also compatible The Bluetooth® word mark and logos are registered trademarks owned by Bluetooth SIG, Inc. and any use of such marks by Phonak is under license. - Page 8 2. Getting to know your TVLink II 2.1 Device description Buttons Volume down Power on/off and main indicator light Volume up Pairing Inputs Power supply Digital audio (optical) Digital audio (coaxial) Analog audio (3.5 mm) Others Audio indicator lights Exchangable charging slot...
-
Page 9: Getting Started
3. Getting started 3.1 Setting up the power supply Select the adapter that corresponds to your country. J Firstly, insert the top round end of the adapter into the round corner of the power supply. J Click the bottom end of the adapter in to lock it into place. -
Page 10: Selecting The Charging Slot
3. Getting started 3.2 Selecting the charging slot The stand-alone TVLink II is delivered with the charging slot for Phonak ComPilot Air II clip-on streamer. If you have ComPilot or ComPilot II, change the slot using a Phillips head screwdriver no 1. -
Page 11: Connecting The Cables
3.3 Connecting the cables Connect the power supply: J Place TVLink II next to your TV or sound source. Connect the mini-USB plug of the power supply to the power input of the TVLink II. Plug the power supply into a wall socket. - Page 12 3. Getting started Supported audio formats The Phonak TVLink II can be connected to any audio source such as a TV or computer. It supports 3 different audio input formats. Optical (“Toslink”) Coaxial Analog Digital signal Digital signal Analog signal...
- Page 13 2. Coaxial 3. Analog Even if the optical and coaxial cable are a single- wire, the signal is in stereo. TVLink II shows the selected input by an orange audio indicator light: Input selected Slow blink orange Input selected and...
- Page 14 J Remove the protection caps from the plugs. J Connect one end of the optical cable into the “Optical” input of TVLink II, and the other end into the optical output of your TV. Now proceed with the charging of the streamer...
- Page 15 J Unpack the cable labeled “Coaxial” (orange plugs). J Connect one end of the coaxial cable into the “Coaxial” input of TVLink II, and the other end into the coaxial (also known as “digital out”, “S/P DIF”) output of your TV.
- Page 16 J Unpack the cable labeled “Analog RCA / Cinch”. J Connect the 3.5 mm plug into the “Analog” input of the TVLink II. Connect the red and white plugs to the matching red and white output sockets on your TV.
- Page 17 Option 4: Connecting to the headset socket J Unpack the cable labeled “Analog 3.5 mm”. J Connect the stereo plug into the “Analog” input of the TVLink II. Plug the other end into the headset output socket of your TV.
- Page 18 3. Getting started When connecting TVLink II to the headset socket of your TV, you are able to adjust the volume via your TV remote control. Some TVs will switch off their loudspeakers when using the headset socket – the TV will not be...
-
Page 19: Charging The Streamer
J Ensure the charging slot fits the Phonak streamer (see chapter 3.2). J Insert the streamer gently into the charging slot of TVLink II. Ensure the integrated plug is placed in the streamer charging socket correctly. ComPilot Air II ComPilot, ComPilot II Charging is complete when the streamer’s indicator... -
Page 20: Pairing Tvlink Ii And The Streamer
3. Getting started The TVLink II can either be on or off during charging. Its main indicator light does not show the charging process. The typical time to fully charge the streamer is 90 minutes. We recommend that the streamer is switched off while charging. - Page 21 Put the streamer into pairing mode Either ComPilot Air II: J Switch on while pressing the volume up button at the same time. Or ComPilot II: J Switch on first. Press the connect and volume up buttons at the same time for 2 sec.
-
Page 22: Put Tvlink Ii Into Pairing Mode
3. Getting started Put TVLink II into pairing mode If TVLink II has never been paired, it will automatically be in pairing mode after switching on. This is indicated by a rapidly blinking blue main indicator light. To manually start pairing mode: J Switch TVLink II on. - Page 23 Wait until both indicator lights turn solid blue. This can take up to 2 minutes but usually occurs within a few seconds. The TVLink II basestation can be paired to a maximum of 4 streaming devices. A fifth pairing will replace the first paired device.
-
Page 24: Daily Use
4. Daily use of the Phonak TVLink II TVLink II can only transmit the audio signal to one Phonak streamer at the same time. Streaming to multiple receiving streamers is not possible. 4.1 Wearing the streamer J Wear the streamer as shown and switch it on. -
Page 25: Connecting The Devices
J Make sure your hearing aids are switched on and worn correctly. J Make sure the streamer and TVLink II are within 1 meter (3 ft) range and the audio source (e.g. TV) is on. J Switch both devices on. - Page 26 5 minutes. Its main indicator light will blink green. The distance between TVLink II and the streamer can be up to 30 m (100 ft). Line-of-sight between your streamer and the TVLink II is not required. However, interference in the environment by walls or furniture may reduce the operating range.
- Page 27 If the streamer is out of range of TVLink II the wireless audio transmission will be terminated. If the streamer is then moved back into the range of TVLink II, it will automatically resume streaming to your hearing aids. It may take up to 10 seconds until the streaming resumes.
-
Page 28: Adjusting The Volume
TVLink II volume control until the sound through the hearing aids is comfortable. To fine-tune the overall volume of the hearing aids and the TVLink II, you may use the streamer’s volume buttons: to increase the volume. to decrease the volume. - Page 29 J If your TVLink II is connected to the headphone socket of your TV, you may also use your TV remote control to adjust the volume via the TV directly. Please refer to the TV user guide for more details on setting the TV volume.
-
Page 30: Streaming Pause And Resume
4. Daily use of the Phonak TVLink II 4.4 Streaming pause and resume To pause the audio signal from your streamer, press the main button. When paused: J The indicator lights will blink blue on both devices. J Your hearing aids will switch back to the most recent hearing aid program. -
Page 31: Tvlink Ii And Phone Calls
TVLink II. In case of an incoming call, the streamer automatically stops transmitting the audio signal from your TVLink II and sends the signal from your cell phone to your hearing aids. -
Page 32: Switching Off Devices
Press the main button again and the phone call will be ended. 4.6 Switching off devices J To end the transmission of the audio signal, switch off TVLink II by pressing the on / off button. -
Page 33: Understanding The Indicator Light
4.7 Understanding the indicator light The TVLink II main indicator light gives you useful information: Solid green Switched on Blink green On but no audio input Rapid blink Pairing mode blue Solid blue Streaming Blink blue Pause mode Multi color Test mode, see chapter 5.1... -
Page 34: Troubleshooting
J The streamer and the TVLink II should connect now (blue/green or blue/red blinks), and you hear a sound test melody through your hearing aids. - Page 35 TVLink II buttons is pressed. Test the cable connections If you were able to hear the test melody from TVLink II but you cannot hear the sound from the TV, there is a problem with the cable connection.
- Page 36 The colors alternate to indicate the audio input status as well as the connection status to the streamer. Example: Red/blue/red/blue/etc: Streaming test sound no audio input detected on the TVLink II. Color codes: No audio input on TVLink II Green...
-
Page 37: Questions And Answers
I see a rapidly blinking blue indicator light on the TVLink II. J Pair devices (page 20). J TVLink II is in Bluetooth pairing mode. Only one of the blue indicator lights turned solid blue. J Make sure to switch off... - Page 38 J The cables are not plugged in J Repeat chapter 3.3. correctly. J No audio input to TVLink II. J Make sure TV is not muted. J Select a 75% volume level on the TV set. J Make sure the audio cable uses an “OUT”...
- Page 39 J Adjust the volume using the streamer volume buttons. After connecting the TVLink II the TV loudspeaker is switched off. J You have selected the headset J Choose another audio output of the TV set. output on your TV set such as optical, coaxial, RCA/ Cinch or SCART.
-
Page 40: Service And Warranty
6.2 International warranty Phonak offers a one year limited international warranty, valid as of the date of purchase. This limited warranty covers manufacturing and material defects. The warranty is valid only if proof of purchase is shown. -
Page 41: Warranty Limitation
6.3 Warranty limitation This warranty does not cover damage from improper handling or care, exposure to chemicals, immersion in water or undue stress. Damage caused by third parties or non-authorized service centers renders the warranty null and void. This warranty does not cover any services performed by a hearing care professional in his/her office. -
Page 42: Compliance Information
7. Compliance information Declaration of Conformity Hereby Phonak AG declares that this Phonak product is in compliance with the essential requirements of the Radio and Telecommunications Terminal Equipment Directive 1999/5/EC. The full text of the Declaration of Conformity can be obtained from the manufacturer or the local Phonak representative whose address can be taken from the list on www.phonak-us.com... - Page 43 Notice 2: Changes or modifications made to this device not expressly approved by Phonak may void the FCC authorization to operate this device. Notice 3: This device has been tested and found to comply...
- Page 44 7. Declaration of Conformity This device generates, uses and can radiate radio frequency energy and, if not installed and used in accordance with the instructions, may cause harmful interference to radio communications. However, there is no guarantee that interference will not occur in a particular installation. If this device does cause harmful interference to radio or television reception, which can be determined by turning the equipment off and on, the user is...
- Page 45 Japanese Radio Law (電波法) and the Japanese Telecommunications Business Law (電気通信事業法). This device should not be modified (otherwise the granted designation number will become invalid).” More details can be found in the data sheet which can be downloaded from www.phonak-us.com/tvlink...
-
Page 46: Information And Explanation Of Symbols
8. Information and explanation of symbols The CE symbol is confirmation by Phonak AG that this Phonak product XXXX meets the requirements of the R&TTE Directive 1999/5/EC on Radio and Telecommunication Terminal Equipment. The numbers after the CE symbol are the numbers of consulted certified bodies under the above mentioned directives. - Page 47 Indicates the device manufacturer, as defined in EU Directive 93/42/EEC. This symbol indicates that it is important for the user to pay attention to the relevant warning notices in this user guide. Important information for handling and product safety. EMC and radio communications compliance label Australia.
- Page 48 8. Information and explanation of symbols Temperature transport and storage: –20° to +60° Celsius (–4° to +140° Fahrenheit). Temperature operation: 0° to +40° Celsius (+32° to +104° Fahrenheit). Keep dry. Humidity transportation: up to 90% (non condensing). Humidity storage: 0% to 70%, if not in use.
- Page 49 The Bluetooth® word mark and logos are registered trademarks owned by Bluetooth SIG Inc., and any use of such marks by Phonak is under license. Other trademarks and trade names are those of their respective owners.
-
Page 50: Important Safety Information
Dispose of electrical components in accordance with your local regulations by Phonak AG. Changes or modifications to any of the devices that were not explicitly approved by Phonak are not permitted. External devices may only be connected if they have been tested in accordance with corresponding IECXXXXX standards. - Page 51 5 VDC, min. 500 mA. Caution: electric shock. Do not insert plug alone into electrical outlets. Do not power TVLink II from a PC or laptop USB port. This may damage your equipment. Do not use the device in explosive areas (mines or...
- Page 52 9. Important safety information Product safety information When TVLink II is not in use, switch it off. Protect the device connectors, plugs, charging slot and power supply from dirt and debris. Protect all devices from excessive moisture (bathing or swimming areas) and heat sources (radiator, TV top).
- Page 53 larger electronic installation or other strong electro- magnetic fields, it may be necessary to be at least 60 cm (24") away from the interfering device to ensure proper operation. X-ray radiation, CT or MRI scans may destroy or adversely affect the correct functioning of the devices.
- Page 54 Notes...
-
Page 55: Important Notice
10. Important notice Important notice FCC/Industry Canada RF Radiation Exposure Statement: This equipment complies with FCC/Industry Canada RF radiation exposure limits set forth for an uncontrolled environment. This equipment should be installed and operated with a minimum distance of 20 cm between the radiator and your body. - Page 56 Phonak LLC 4520 Weaver Parkway Warrenville, IL 60555 0560 www.phonak-us.com...
Need help?
Do you have a question about the TVLink II and is the answer not in the manual?
Questions and answers
dos it work with infinio 90
I have a phonak TVLink II My new TV does not have hard wire hook ups so TV is connected by bluetooth to neck device. I no longer have volume control on base and the volume control on neck device will not reduce volume to a comfortable level