Advertisement
Please read these operating instructions carefully before using the ProMaster Wireless Remote Shutter
Release.
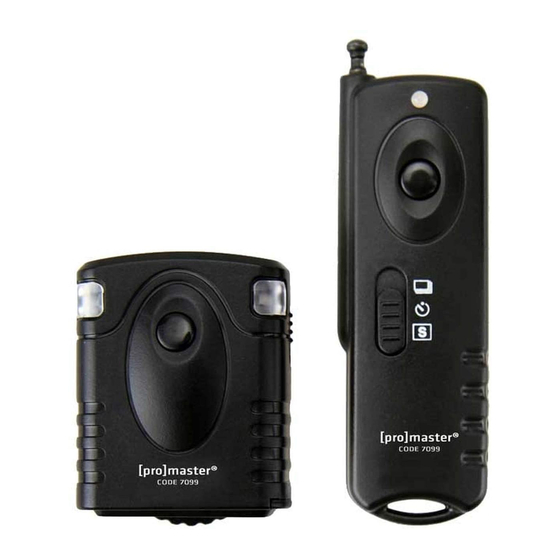
The ProMaster Wireless Remote is designed for most of DSLR and SLR cameras that have a remote socket on
the camera body. It allows you to easily create compelling close-ups from a safe and secure "line-of-sight"
distance of up to 30 meters (99' feet). The receiver simply attaches to a compatible camera's accessory shoe and
connects to the camera's remote socket with the supplied receiver cable. The receiver is powered by one CR-2
lithium battery and the transmitter is powered by one 23A battery.
Package Contains
Package Contains:
Receiver x1
Transmitter x1
CR-2 battery x1
23A battery x1
English Instruction x1
IMPORTANT NOTICE: This remote requires the use of a ProMaster Camera Release Cable. This cable is designed
especially for your camera and is a required additional purchase in order for this remote to function.
Advertisement
Table of Contents

Related Manuals for Promaster Wireless Remote Shutter


Summary of Contents for Promaster Wireless Remote Shutter
- Page 1 Please read these operating instructions carefully before using the ProMaster Wireless Remote Shutter Release. The ProMaster Wireless Remote is designed for most of DSLR and SLR cameras that have a remote socket on the camera body. It allows you to easily create compelling close-ups from a safe and secure "line-of-sight"...
-
Page 2: Function Identification
Features Receiver • Battery type: CR-2 3V lithium battery × 1 • Operating temperature: 5 °C to 40 °C (40 °F to 105 °F) • Net weight : Approx. 19g • Dimensions: 47.5 × 38 × 21.9mm Transmitter • Battery type: 23A 12V battery x 1 •... - Page 3 Receiver 1 Left status LED 2 Right status LED 3 Shutter button 4 Battery cover 5 Channel selection switch 6 1/4"-20 tripod mount socket 7 Cold shoe mount 8 Lock nut 1 ON/OFF switch 2 Camera connection cable socket...
-
Page 4: Replacing The Batteries
Replacing the batteries Slide the battery covers in the direction of the arrow to remove. Insert a fresh battery. Ensure that the batteries are inserted in the correct direction. Installing batteries in the wrong direction could cause the batteries to leak corrosive liquids, generate heat or explode. Replace the battery covers in the opposite direction of the indicator arrow. -
Page 5: Attaching To The Camera
Attaching to the camera Turn the power of the camera OFF before attaching the receiver to camera. Please make sure the transmitter and receiver are both set to the same channel. There are 16 channels available. Slide the receiver gently into your cameras hot shoe as shown. Rotate the lock nut clockwise to tighten the receiver on your camera. -
Page 6: Operating Modes
Turn the power to the receiver and the camera ON. Operating modes Transmitter Mode Function Camera Drive Mode Switch Single exposure Single exposure Unlimited continuous exposures Continuous exposures Manual Mode Bulb Shutter Speed: BULB 5s Delay shot Single exposure 3 continuous shots Single exposure... - Page 7 Single Exposure 1. Set the mode switch to the single exposure position. Set the camera to single exposure mode. 2. Press the shutter button on the transmitter half way to focus. 3. Press the shutter button completely to trigger your camera. ...
- Page 8 3. Press the shutter button completely and hold until the transmitter LED light goes OFF. The receiver will now lock the camera shutter for continuous shooting. 4. To release the shutter lock, press the shutter button on the transmitter again, the receiver will unlock the shutter.
- Page 9 3. Press the shutter button completely and hold until the transmitter LED light goes OFF. The receiver will now lock the camera shutter for BULB. 4. To release the shutter lock, press the shutter button on the transmitter again, the receiver will unlock the shutter. ...
-
Page 10: Additional Functions
ONE YEAR UNCONDITIONAL GUARANTEE If for any reason, your ProMaster product fails within ONE YEAR of the date of purchase, return the product to your ProMaster dealer and it will be exchanged for you at no charge. ProMaster products are guaranteed for ONE FULL YEAR against defects in workmanship and materials.
Need help?
Do you have a question about the Wireless Remote Shutter and is the answer not in the manual?
Questions and answers