Table of Contents
Advertisement
Quick Links
Congratulations on your purchase of this ProMaster Specialist tripod kit. Please read these instructions
thoroughly to ensure proper assembly, operation, and adjustment of your new tripod kit. With proper use and
adjustments your Specialist tripod kit will provide many years of excellent service.
ASSEMBLY
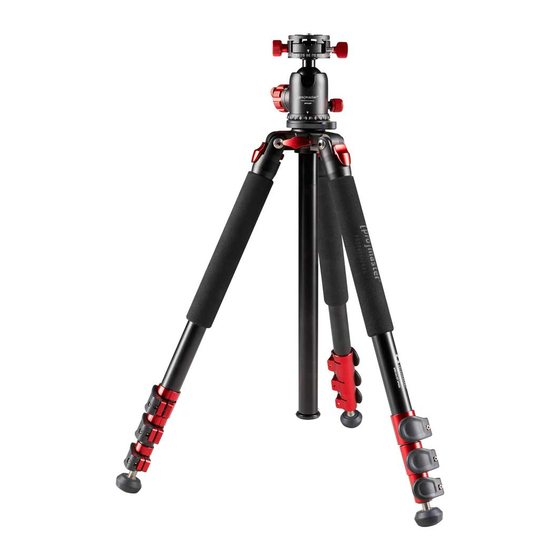
Attaching the ball head to the tripod legs
Unpack the kit. Notice the ball head is packaged in a separate box from the tripod legs. Remove the ball head
as well as the legs and all parts.
Extend the tripod's Column (12) by loosening the Column Lock Knob (9) and pulling up on the column. Once
you have extended the column tighten the Column Lock Knob (9).
Notice the Reversible Platform Screw (8) in the tripod Platform (7) One side of the screw is 3/8" (larger side)
and the other side is a ¼"-20 type screw thread (smaller side). Be sure the 3/8" side is facing out from the
platform. If it is not, use a flathead screwdriver or coin to remove, reverse, and reinstall the screw using its
slot.
Align the bottom of the ball head with the Platform Screw (8) and turn the ball head in a clockwise direction
until it is tight against the Platform (7).
The underside of the Platform (7) has a small locking bolt with a female allen head. Locate the small allen key
in your tripod kit and use it to tighten the locking screw against the bottom of the ball head. This will prevent
the head from becoming loose on the Platform (7). You can now lower the tripod column.
Mounting the Quick Release platform to your camera
Locate the Quick Release Plate (1). It should have been packed in the small box with the ball head. Notice it
has a male ¼"-20 screw on one side. Align this screw with the female threaded port on the bottom of your
camera. Tighten the screw so the platform is snug. You can use the fold out handle on the screw head or insert
an allen key for more leverage while tightening. The quick release plate can be mounted to your camera in
any direction. The position of the plate will dictate the direction in which you mount your camera to the ball
head. It will either slide onto the ball head in a front-to-back motion or a side-to-side motion.
Mounting your camera
Loosen the Quick Release Knob (3). This opens the jaws of the quick release receiver on the ball head. Slide
your camera onto the head by aligning the Quick Release Plate (1) and top of the ball head. Once the plate is
centered in the jaws tighten the Quick Release Knob (3). This quick release system uses a safety latch, which
Advertisement
Table of Contents

Related Manuals for Promaster Specialist Series


Summary of Contents for Promaster Specialist Series
- Page 1 Congratulations on your purchase of this ProMaster Specialist tripod kit. Please read these instructions thoroughly to ensure proper assembly, operation, and adjustment of your new tripod kit. With proper use and adjustments your Specialist tripod kit will provide many years of excellent service.
- Page 2 will make a clicking noise as you slide the camera onto the head. It prevents your camera from falling off the head when the jaws are loosened. Press the silver button on the top of the ball head when the jaws are open and you are sliding the camera off to disengage the safety latch.
- Page 3 ONE YEAR UNCONDITIONAL WARRANTY If for any reason, this ProMaster product fails within ONE YEAR of the date of purchase, return this product to your ProMaster dealer and it will be exchanged for you at no charge. ProMaster products are guaranteed for ONE FULL YEAR against defects in workmanship and materials.
Need help?
Do you have a question about the Specialist Series and is the answer not in the manual?
Questions and answers