
Related Manuals for Roland P-6


Summary of Contents for Roland P-6
- Page 1 Owner’s Manual To ensure correct use of this unit, carefully read the documentation listed below beforehand. After reading, keep the document(s) where it will be available for immediate reference. ¹ Leaflet “Read Me First”...
-
Page 2: Table Of Contents
Contents Top panel ................Copying all steps to double the length........59 Editing notes..................60 Rear panel ................Shifting the timing of the upbeat (SHUFFLE) ..... 62 Understanding samples............ Setting the pattern length............63 Playing the samples ............10 Copying the patterns............... 64 Switching between sample banks........ - Page 3 Contents Filter+Drive ................126 Scatter..................127 Isolator ..................128 Resonator .................. 129 Stopper ..................130 Super Filter................131 Vinyl Sim..................132 Cassette Sim................133 Lo-fi..................... 134 Reverb..................135 Chorus..................136 Flanger..................137 Phaser ..................138 Tremolo/Pan ................139 Ring Mod ................... 140 Crusher..................
-
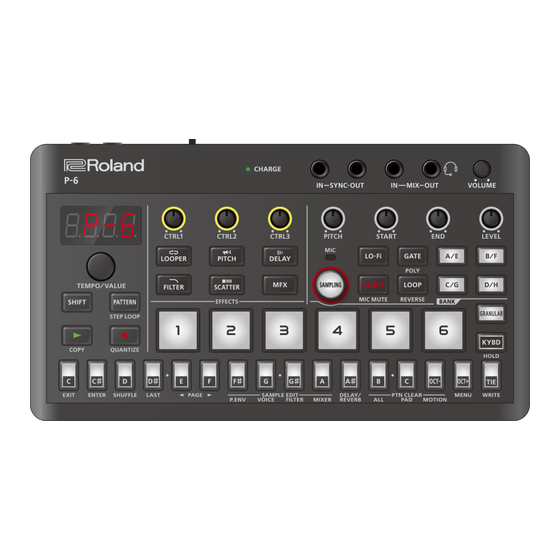
Page 4: Top Panel
When not charging via USB port: Red (lit): The remaining battery power is low. Charge the battery. The P-6 powers down within 30 minutes. SYNC IN jack Use this jack to input synchronization signals from an external device. SYNC OUT jack Use this jack to output synchronization signals to an external device. - Page 5 Top panel ¹ Use cables with stereo miniature phone type plugs to connect to/from the MIX (IN/OUT) jacks. These jacks do not operate correctly when using a cable with mono mini plugs. ¹ Use a headset with a CTIA-type mini plug (four-conductor) when connecting to the MIX OUT/HEADSET jacks. 2.
- Page 6 MEMO ¹ The settings for each sample pad are saved in the P-6 system and used in common by all patterns. ¹ Press a sample pad while holding down the [PATTERN] button to select a sample pad without playing it back.
- Page 7 Top panel 6. Step/keyboard buttons Controller Explanation Step buttons These buttons are used for switching between patterns and banks, inputting notes for the sampler and granular sampler and so forth..Step 1 Step 16 [KYBD] button When the [KYBD] button is on, the step buttons function as keyboard buttons.
-
Page 8: Rear Panel
Use TRS/TRS connecting cables (BCC series, sold separately) or TRS/MIDI connecting cables (BMIDI series, sold separately) to connect this unit to an external MIDI device. You can make the P-6 play in sync with a MIDI device by connecting the devices with a commercially available MIDI cable. -
Page 9: Understanding Samples
The samples are specified by bank (A–H) and by sample number (1–6), for a total of 48 samples. Samples can be assigned to sample pads on the P-6 and played back, or you can use them as parts of patterns to construct your song. -
Page 10: Playing The Samples
Playing the samples Once the P-6 starts up, you can use the sample pads to play back the samples. MEMO The tempo of the current pattern is shown on the display. Press sample pads to play the samples. This plays back the samples that are assigned to the sample pads. -
Page 11: Switching Between Sample Banks
Playing the samples Switching between sample banks Here’s how to switch between the sample banks. There are eight banks (A–H), with six samples that you can play per bank for a total of 48 samples. Press the [A/E]–[D/H] buttons. This switches to the bank you pressed. To select banks E–H, press the [A/E]–[D/H] buttons twice. -
Page 12: Changing The Sound Quality Of The Sample Playback (Lo-Fi)
Playing the samples Changing the sound quality of the sample playback (Lo-Fi) You can use the Lo-Fi effect to degrade the playback sound quality, which plays back the samples at a lower sample bit rate. Press the sample pads [1]–[6] to which you want to apply the Lo-Fi effect, or press the [GRANULAR] pad. Press the [LO-Fi] button to turn the Lo-Fi effect on/off. -
Page 13: Setting And Checking The Lo-Fi Effect Intensity
Playing the samples Setting and checking the Lo-Fi effect intensity You can set the intensity at which the Lo-Fi effect is applied (meaning how much the sound quality degrades). Press the [LO-Fi] button while holding down the [SHIFT] button. Use the [TEMPO/VALUE] knob to select “LoFi”. Press the [C´] (ENTER) button. -
Page 14: Changing The Sample Playback Mode (Gate/One-Shot)
Playing the samples Changing the sample playback mode (gate/one-shot) Here’s how to change the sample playback mode. The way that samples play back when you press sample pads depends on the playback mode. Press the sample pad for which you want to change the playback mode. Press the [GATE] button to set the playback mode. -
Page 15: Selecting The Sample Playback Direction
Playing the samples Selecting the sample playback direction You can choose which direction a sample plays back. Press the [LOOP] button while holding down the [SHIFT] button. This switches the direction in which the sample plays back. The sample playback direction changes as shown below each time you press the [LOOP] button while holding down the [SHIFT] button. Display [LOOP] button Explanation... - Page 16 Playing the samples MEMO You can restore the settings of the sample pads to the way they were prior to editing (meaning the last saved state). Refer to “Restoring the sample pad settings (p. 21)” for details.
-
Page 17: Playing Back Samples In A Loop
Playing the samples Playing back samples in a loop Here’s how to play back samples in a loop. Press the [LOOP] button. This turns sample loop playback on. MEMO ¹ When the [GATE] button is off (one-shot), the loop does not stop playing back even after you take your fingers off the sample pads. To stop the sample playback, press the sample pads again. -
Page 18: Layering And Triggering The Same Sample (Polyphonic)
Playing the samples Layering and triggering the same sample (polyphonic) You can layer and trigger up to 16 notes of a single sample. This lets you trigger samples as chords, or play back the same samples that you split using the chop function at the same time. Press sample pads to select a sample. -
Page 19: Using The Keyboard Buttons To Play The Samples
Playing the samples Using the keyboard buttons to play the samples You can use the keyboard buttons to play the sample you’ve selected using sample pads or the [GRANULAR] pad, as notes in a scale. You can also use the keyboard buttons to play each of the samples you’ve sampled using step sampling or split using the chop function. MEMO You can’t play the samples you’ve sampled using step sampling or the samples you’ve split using the chop function as notes in a scale. -
Page 20: Switching Between Keyboard Button Octaves
Playing the samples Switching between keyboard button octaves You can change the key range that’s covered by the keyboard buttons in one-octave units. Press the [KYBD] button. The [KYBD] button lights up, and the step buttons switch to keyboard buttons. Press the [OCT-] [OCT+] button. -
Page 21: Restoring The Sample Pad Settings
Playing the samples Restoring the sample pad settings This shows how to restore the settings of a selected sample pad to the way they were prior to editing (meaning the last saved state). Press the [OCT+] (MENU) button while holding down the [SHIFT] button. This shows the parameter (item to set). -
Page 22: Sampling
The samples you create are assigned to a sample pad. MEMO Each sample is saved in a dedicated area internally on the P-6, and is used in common by all patterns. Press the [SAMPLING] button to enter sampling mode. The [SAMPLING] button lights up. - Page 23 Sampling To exit sampling, press the [SAMPLING] button. The sample is saved to this unit and assigned to the sample pad. MEMO ¹ The method of stopping the sampling depends on the conditions (length) used. You can also configure other detailed settings related to sampling. Refer to “Sampling settings (p.
-
Page 24: Adjusting The Input Level
Sampling Adjusting the input level You can adjust the input level of the built-in mic or the headset mic used for sampling. The actual input level can be adjusted while you’re checking it, so that you can set the optimal level. Press the [SAMPLING] button. -
Page 25: Sampling Settings
Sampling Sampling settings You can edit the sampling parameters (recording settings) for this unit. Press the [SAMPLING] button. The unit enters sampling mode. Use the following controllers to configure the sampling parameters. Controller Value Explanation [LO-Fi] button Sets the sample rate. (The sample rate changes each time The unit samples at 44.1 kHz. - Page 26 Sampling Controller Value Explanation [START] knob Sets the sample length. MEMO The length you can set depends on the tempo, sample rate and mono/stereo setting. Sampling stops when you press the [SAMPLING] button. FREE MEMO Refer to “Maximum sample time (p. 148)”...
-
Page 27: Creating Equally-Divided Samples (Step Sampling)
Sampling Creating equally-divided samples (step sampling) Step sampling is a function that creates a number of individual samples based on the sampling time you specify with the [START] knob. Although normal sampling creates one sample per sample pad, step sampling lets you create multiple samples for a single sample pad. After sampling is finished, a note number is assigned to each sample, and you can use the keyboard buttons or an external MIDI keyboard to play the samples. - Page 28 Sampling MEMO You can’t select a sample pad to which a sample is already assigned, meaning that pad can’t be used for sampling. To sample, either select a sample pad that doesn’t have a sample assigned to it (unassigned sample pads are blinking), or delete a sample from the desired sampled pad beforehand.
-
Page 29: Editing A Sample Sound
Sampling Editing a sample sound Here’s how to adjust the sample parameters to edit the sounds. Follow the instructions in “Playing the samples (p. 10)” to select the sample for which you want to edit the sound. Use the operations shown below according to the parameter you want to edit. Parameter/item to edit Operation Reference... -
Page 30: Copying A Sample
Sampling Copying a sample You can copy a sample that’s assigned to a sample pad to a different sample pad. Press the [SHIFT] button and the [ø] (COPY) buttons while holding down the sample pad you want to copy. Use the [TEMPO/VALUE] knob to select “COPY”. Press the [C´] (ENTER) button. -
Page 31: Exchanging (Swapping) Samples
Sampling Exchanging (swapping) samples Here’s how to exchange (swap) samples between two sample pads. Press the [SHIFT] button and the [ø] (COPY) buttons while holding down the sample pad (for the first sample) you want to exchange. Use the [TEMPO/VALUE] knob to select “EXCG”. Press the [C´] (ENTER) button. -
Page 32: Deleting A Sample
Sampling Deleting a sample Here’s how to delete the sample assigned to a pad. Press the [DELETE] button. The display indicates “dEL”. Press the sample pads (ones that are blinking) from which you wish to delete a sample. MEMO You can also switch between sample pad banks as necessary. Refer to “Switching between sample banks (p. -
Page 33: Understanding The Granular Sampler
¹ Randomly change the grain playback direction, stereo position (pan), etc. On the P-6, the function for using and playing grains is called the “granular sampler”. You can use the granular sampler on the P-6 to create sounds from samples you’ve already recorded. -
Page 34: Using The Granular Sampler
Using the granular sampler Here’s how to select the sample you wish to use as material (raw data) for the granular sampler. Press the [GRANULAR] pad and the sample pad corresponding to the material you want to use, while holding down the [PATTERN] button. -
Page 35: Controlling The Grains
Using the granular sampler Controlling the grains This shows how to adjust the grain to edit the sound. Follow the steps in “Using the granular sampler (p. 34)” to assign the sample you want to process with the granular sampler to the [GRANULAR] pad. - Page 36 Using the granular sampler Head position Grain shape Grain size Head speed Spread MEMO ¹ You can also adjust some of the parameters with the [CTRL1]–[CTRL3] knobs as well as the [PITCH], [START], [END] and [LEVEL] knobs. Refer to “SAMPLE EDIT (VOICE) settings (p. 103)”...
-
Page 37: Restoring The [Granular] Pad Settings
Using the granular sampler Restoring the [GRANULAR] pad settings This restores the settings of the [GRANULAR] pad to the way they were prior to editing (meaning the last saved state). Press the [OCT+] (MENU) button while holding down the [SHIFT] button. This shows the parameter (item to set). -
Page 38: Understanding Patterns
9 10 11 12 13 14 15 . . . Use the pattern sequencer to record patterns. On the P-6, the following data is managed as a “pattern”. ¹ Performance data using the pattern sequencer (Recording what you play using the pattern sequencer (p. -
Page 39: Playing A Pattern
Playing a pattern Here’s how to play back the currently selected pattern. Press the [ø] button. The currently selected pattern plays back. MEMO ¹ You can switch between patterns for playback. Refer to “Selecting a pattern (p. 41)” for details. ¹... -
Page 40: Setting The Tempo
Playing a pattern Setting the tempo The tempo is always shown on the display. Turn the [TEMPO/VALUE] knob to set the tempo. The tempo can be set within a range of 40.0–300.0. Turn the [TEMPO/VALUE] knob while holding down the [SHIFT] button to make fine adjustments to the tempo. You can set the value in units of 0.1. -
Page 41: Selecting A Pattern
Playing a pattern Selecting a pattern This shows how to switch patterns and recall the performance data on the P-6. Press the [PATTERN] button. The [PATTERN] button lights up, and the unit enters pattern selection mode. Press a step button while holding down the [PATTERN] button to select a bank. -
Page 42: Muting A Sample
Playing a pattern Muting a sample You can mute a certain sample pad or the [GRANULAR] pad when a pattern is playing. Press the sample pad or the [GRANULAR] pad while holding down the [SHIFT] button. This mutes the playback of the selected pad. To cancel the muting, press the sample pad or the [GRANULAR] pad while holding down the [SHIFT] button. -
Page 43: Playing Back Specific Steps In A Loop (Step Loop)
Playing a pattern Playing back specific steps in a loop (step loop) You can make a selected step play back in a loop during pattern playback. You can also select multiple steps. Press the [ø] button to make the step light up, after which playback begins. Press the [PATTERN] button while holding down the [SHIFT] button. -
Page 44: Recording What You Play Using The Pattern Sequencer
A sequencer is a system that uses recorded performance data (a “sequence”) such as note pitches, lengths, timings and so forth to trigger and play a sound source. The pattern sequencer on the P-6 records the following performance data in units of time called “steps”, and manages them as patterns. ¹ Note pitch (note number) ¹... -
Page 45: Recording Your Performance In Real Time (Real-Time Input)
Recording what you play using the pattern sequencer Recording your performance in real time (Real-time input) Here’s how to record your playing on the sample pads, the keyboard buttons and from an external MIDI device. Press the [ó] button. Press the [ø] button. Recording starts. - Page 46 Recording what you play using the pattern sequencer ¹ You can record what you play via real-time input from a external MIDI keyboard that’s connected to this unit. ¹ If you press the [ó] (QUANTIZE) button while holding down the [SHIFT] button, you can do real-time input while the data is being quantized (REC quantize).
-
Page 47: Recording The Knob Motions
This shows how to record the motions of the knobs during real-time input. If a pattern is playing, you can make the recorded knob motions play back. You can record and play back the motions of the [PITCH], [START], [END] and [LEVEL] knobs on the P-6. Follow the steps in “Recording your performance in real time (Real-time input) (p. -
Page 48: Deleting Knob Operations Recorded In A Pattern
Recording what you play using the pattern sequencer Deleting knob operations recorded in a pattern Here’s how to delete the knob operations recorded using the steps in “Recording the knob motions (p. 47)”. Press the [OCT-] (MOTION) button while holding down the [SHIFT] button. “CLr. -
Page 49: Inputting Your Performance By Hand (Step Input)
Recording what you play using the pattern sequencer Inputting your performance by hand (step input) This shows how to use the step buttons to manually input the notes of your performance. Bank H Bank A Bank A Bank A Press a sample pad or the [GRANULAR] pad to select the pad to which you want to input your performance. The selected pad lights up. - Page 50 Recording what you play using the pattern sequencer MEMO Press a sample pad or the [GRANULAR] pad while holding down the [PATTERN] button to select a pad without playing it back. Press the step buttons to select which steps trigger the pad (timing). The step buttons corresponding to the steps you select light up, and the notes are inputted.
-
Page 51: Using The Step Buttons To Switch Between Pages To Operate
Using the step buttons to switch between pages to operate The P-6 can handle up to 64 steps (four “pages” of 16 steps each) per pattern. When you want to input notes from step 17 and afterwards, switch the page. -
Page 52: Inputting A Tie
Recording what you play using the pattern sequencer Inputting a tie Here’s how to connect two steps by inputting a tie, which makes the notes longer. Follow the steps in “Inputting your performance by hand (step input) (p. 49)” to start step input. To input a tie that extends to the next step, press the [KYBD] button while holding down the step button of the step whose length you wish to change. -
Page 53: Inputting Notes (Scale Tones) For Each Step
Recording what you play using the pattern sequencer Inputting notes (scale tones) for each step This shows how to edit (input/delete) the notes for each step. Make sure that the [KYBD] button is not lit. When the [KYBD] button is lit, make it go dark by pressing the [KYBD] button. Press the [ó] button. -
Page 54: Recording Knob Movement In Steps (Motions)
This lets you accurately reproduce the recorded knob values for each step of a pattern that’s playing. You can record and play back the values of the [PITCH], [START], [END] and [LEVEL] knobs on the P-6. Follow the steps in “Inputting your performance by hand (step input) (p. -
Page 55: Deleting Knob Operations Recorded In A Step
Recording what you play using the pattern sequencer Deleting knob operations recorded in a step Here’s how to delete the knob operations recorded using the steps in “Recording knob movement in steps (motions) (p. 54)”. The recorded knob values can be deleted for each step. Press the [ó] button. -
Page 56: Copying A Step
Use the [TEMPO/VALUE] knob to select “COPY” (Copy). Press the [C´] (ENTER) button. “donE” is shown, and the data of the selected step is saved to the temporary memory in the P-6. MEMO Copying the step data has no effect on the pattern. -
Page 57: Pasting A Step
Recording what you play using the pattern sequencer Pasting a step This shows how to paste (overwrite) the data that’s saved in the temporary memory of the P-6 to a specified step. MEMO First, copy the data of the step you want to paste. -
Page 58: Inserting An Empty Step
Recording what you play using the pattern sequencer Inserting an empty step This shows how to insert an empty step at the location of the current step. Press the [ó] button. Now you can edit the notes in the steps. “St. -
Page 59: Copying All Steps To Double The Length
Recording what you play using the pattern sequencer Copying all steps to double the length This shows how to copy all of the steps, doubling the step length. MEMO This operation is the same as “Copying a pattern to increase the length (p. 65)”. -
Page 60: Editing Notes
Recording what you play using the pattern sequencer Editing notes Here’s how to edit the notes you input. Long-press the step button of the step that contains the performance data you want to change. The performance data of the selected step is shown. Hold down the step button of the step that contains the performance data you want to change and press the [GRANULAR] pad to select the performance data to edit. - Page 61 Recording what you play using the pattern sequencer Item Setting range Explanation Probability You can use the probability feature to make a pattern play in different variations, while that same pattern keeps playing back. Use the master probability setting when you want to change the probability en masse, for all steps that are set at 90 or lower.
-
Page 62: Shifting The Timing Of The Upbeat (Shuffle)
Recording what you play using the pattern sequencer Shifting the timing of the upbeat (SHUFFLE) Here are the steps for setting how much to shift the timing of the upbeats (the degree of swing), to create a rhythm with a shuffle or swing groove. Select a pattern for which you want to alter the timing. -
Page 63: Setting The Pattern Length
Recording what you play using the pattern sequencer Setting the pattern length Here’s how to set the length of the current pattern, which means the number of steps. Select the pattern for which you wish to set the number of steps. MEMO For details on how to select the pattern, refer to “Selecting a pattern (p. -
Page 64: Copying The Patterns
Recording what you play using the pattern sequencer Copying the patterns Copies the current pattern to a specified pattern. Select the pattern that you want to copy. MEMO For details on how to select the pattern, refer to “Selecting a pattern (p. 41)”. -
Page 65: Copying A Pattern To Increase The Length
Recording what you play using the pattern sequencer Copying a pattern to increase the length This shows how to copy a pattern, doubling the length of the current pattern. MEMO This operation is the same as “Copying all steps to double the length (p. 59)”. -
Page 66: Copying A Sequence
The [C´] (ENTER) button rapidly blinks, and the sequence is copied to the temporary memory of the P-6. MEMO To delete the sequence you copied to the temporary of the P-6, press the [C´] (ENTER) button while holding down the [SHIFT] button. “CLr” is shown on the display. - Page 67 Press the [C´] (ENTER) button. “PStE” (Paste) blinks in the display. The sequence stored in the temporary memory of the P-6 is now pasted into (overwrites) the specified pad. The temporary memory is then cleared, and the [C´] (ENTER) button blinks slowly.
-
Page 68: Restoring The Current Pattern Settings To Their Original State
Recording what you play using the pattern sequencer Restoring the current pattern settings to their original state This restores the settings of the current pattern to the way they were prior to editing (meaning the last saved state). Press the [OCT+] (MENU) button while holding down the [SHIFT] button. This shows the parameter (item to set). -
Page 69: Restoring The Sequence Data Of The Current Pattern
Recording what you play using the pattern sequencer Restoring the sequence data of the current pattern This restores only the sequence data in the current pattern’s settings to the way they were prior to editing (meaning the last saved state). Press the [OCT+] (MENU) button while holding down the [SHIFT] button. -
Page 70: Using The Mfx Effects
You can use the built-in effects on the P-6 to process the audio in unique ways. The P-6 features 20 built-in effects, and five of those can be accessed right away from the buttons on the top panel. Effect buttons... -
Page 71: Turning Effects On/Off At The Desired Timing
Using the MFX effects Turning effects on/off at the desired timing You can make effects apply only while you hold down the effect buttons (EFFECT GRAB). This lets you quickly turn an effect on/off in time with what you play. Press the effect buttons ([LOOPER]–[MFX] buttons) while holding down the [PATTERN] button. -
Page 72: Switching Between Buses For Sending Sound
You can select the bus to which the audio from a sample or external input is sent. On the P-6, you can control the volume for each bus, separating the audio sources into different groups used for controlling the volume. -
Page 73: Saving The Sample Pad, Pattern And Effect Parameter Settings (Write)
Saving the sample pad, pattern and effect parameter settings (WRITE) Use the following operation to save different types of data. Press the [TIE] (WRITE) button while holding down the [SHIFT] button. Use the [TEMPO/VALUE] knob to choose the data to save. Display Explanation Saves the parameters for all sample pads and saves all patterns. - Page 74 Saving the sample pad, pattern and effect parameter settings (WRITE) ¹ If you turn off the power, any parameters or effect parameters you haven’t saved for the patterns and sample pads revert to their last-saved state.
-
Page 75: Connecting To A Computer Or Mobile Device
Connecting to a computer or mobile device You can transmit and receive audio and MIDI data by connecting a USB cable from your computer or mobile device (smartphone or tablet) to this unit. MEMO ¹ You don’t need to install a device driver on your computer or mobile device to do this, since this unit supports USB Audio Device Class 2.0 specs. -
Page 76: Connecting To Your Computer
Connecting to a computer or mobile device Connecting to your computer Use a USB Type-C® - USB A cable (included) or a cable that uses USB Type-C® on both sides (commercially available) to connect this unit to your computer. USB Type-C® to Type-C® cable (commercially available) USB Type-C® to USB A cable (included) -
Page 77: Connecting To An Ios Device (Usb Type-C® Port)
Connecting to a computer or mobile device Connecting to an iOS device (USB Type-C® port) USB Type-C® to Type-C® cable (commercially available) Connect your iOS device to this unit using a USB Type-C® to Type-C® cable (commercially available). When doing so, you can power this unit from your iOS device. MEMO If you want to use this unit on battery power without drawing power from your iOS device, turn on this unit while holding down the [C] (EXIT) button (battery-only mode). -
Page 78: Connecting An Ios Device (Lightning Connector)
Connecting to a computer or mobile device Connecting an iOS device (Lightning connector) Lightning to USB camera adapter (commercially available) USB Type-C® to USB A cable (included) - Page 79 Connecting to a computer or mobile device While holding down the [C] (EXIT) button, turn on the P-6. This powers up the unit in battery-only mode. Use an Apple-manufactured USB adaptor (such as the Lightning-USB Camera Adapter, the Lightning to USB 3 Camera Adapter and so on) as a converter for the iOS device’s connector.
-
Page 80: Connecting With An External Midi Device
When you use a MIDI-compatible keyboard whose MIDI transmit channel is the same as the MIDI channel that’s set using the Sampler MIDI Channel (p. 92) parameter of the P-6 and play a note within the C3–B6 range (note numbers 48–95), this triggers the corresponding sample pads (bank A, sample pad [1] to bank H, sample pad [6]). Refer to “MIDI implementation chart (p. -
Page 81: Backing Up The Patterns To Your Computer
If there are many patterns stored in this unit, it may take a few minutes for the files to appear on the hard drive of your computer. The step buttons light up to show the progress. The pattern files (P6_PTN1-01.PRM – P6_PTN4-16.PRM) are saved in the “BACKUP” folder of the “P-6” drive. Copy the pattern files to your computer. -
Page 82: Restoring The Patterns (Restore)
While holding down the [ó] button, turn on the power. Open the “P-6” drive on your computer. Copy the pattern files (P6_PTN1-01.PRM – P6_PTN4-16.PRM) saved on your computer to the “RESTORE” folder of the “P-6” drive. Once copying is finished, eject the “P-6” drive from your computer. -
Page 83: Backing Up Samples To Your Computer (Export)
The step buttons light up to show the progress. Open the “P-6” drive on your computer. The samples (WAV files) for each pad and the setting data (PRM files) for the sample pads [1]–[6] are saved in the “EXPORT” folder of the “P-6” drive. - Page 84 BANK_A PAD_1 PAD_6 BANK_H Copy the samples and setting data to your computer. Once copying is finished, eject the “P-6” drive from your computer. Operation Right-click on the “P-6” icon and click “Eject”. Windows 11/10/8/7 MacOS Drag the “P-6” icon to the Trash icon in the Dock.
-
Page 85: Loading Samples (Import)
Connect your computer to the P-6’s USB port via USB cable. While holding down the [SAMPLING] button, turn on the power. Open the “P-6” drive on your computer. Copy the sample files you want to import into the pad folders (PAD_1–PAD_6) in the “IMPORT” folder on the “P-6” drive. - Page 86 “Maximum sample time (p. 148)” for details. ¹ When you import the samples that were exported from the P-6, we recommend that you also copy the sample pad setting data (the PRM files that are output during export) to the pad folders.
- Page 87 Loading samples (Import) Once you see the message “donE”, turn off the P-6.
-
Page 88: Restoring The Factory Settings (Factory Reset)
Press the [GRANULAR] pad. This executes the factory reset. Once “donE” is displayed and all buttons are blinking, turn the power of the P-6 off and then on again. MEMO You can’t perform a factory reset to restore the internal sample data and patterns that came with the unit when it was shipped from the factory. -
Page 89: Configuring The Various Settings
Configuring the various settings Here’s how to configure the various parameters. Use the operations shown below according to the parameter you want to configure. Parameter Operation Parameter details [SHIFT] button + [OCT+] (MENU) button MENU list (p. 90) Menu SAMPLE EDIT (P.ENV) parameter SAMPLE EDIT (P.ENV) settings (p. -
Page 90: Menu List
Configuring the various settings MENU list These are the parameters (items to set) you see when you press the [OCT+] (MENU) button while holding down the [SHIFT] button. MEMO If you’re viewing this content on your smartphone, we recommend that you turn your smartphone on its side for landscape mode. Parameter Display Value... - Page 91 Configuring the various settings Parameter Display Value Explanation Play Quantize This enables or disables the sample pad quantize settings that are used when a pattern is played. P. q nt (*1) MEMO The micro-timing setting is disabled for sample pads whose quantize setting is enabled. Refer to “Editing notes (p.
- Page 92 Configuring the various settings Parameter Display Value Explanation Quantize Timing Sets the timing for quantization, meaning whether to align the note with the qnt. t 50–99 (%) current step, or to align it with the next step. When this is set to 50%, any notes you input that are 50% or later than the length of one step are aligned with the next step, meaning that they play on the next step.
- Page 93 Configuring the various settings Parameter Display Value Explanation Auto MIDI Channel This is the MIDI receive channel used for playing the currently selected pad A. C H 1–16 (sample pads [1]–[6], [GRANULAR] pad) or receiving control change messages. MIDI Clock Sync Sets which synchronization signal (clock) this unit follows.
- Page 94 When using with another port besides the USB HOST 3 port on the MX-1, set the P-6 to “battery-only mode”. To use battery-only mode on the P-6, turn on the power while holding down the [C] (EXIT) button. Count In Cnt.
-
Page 95: Sample Edit (P.env) Settings
P. S US [END] knob 0–255 Adjusts the sustain level (S). On the P-6, the envelope shape for the overall pitch automatically adapts based on the sustain level, so that the sustain level remains at the original pitch. P.Env Release [LEVEL] knob Sets the release time (R). - Page 96 Configuring the various settings Parameter Display Controller Value Explanation P.Env Time [CTRL1] knob This lets you modify how fast the changes in pitch occur that you set t. K y. F 0–255 Key Follow using the P.Env Attack, P.Env Decay and P.Env Release parameters, according to the key that’s played or triggered.
-
Page 97: Examples Of Pitch Envelope Parameter Settings
Configuring the various settings Examples of pitch envelope parameter settings These examples show you how the pitch changes when you set the P.Env Envelope Depth (p. 96), P.Env Velocity Sens (p. 96) P.Env Sustain (p. parameters to different values. When the P.Env Envelope Depth (p. - Page 98 Configuring the various settings Pitch x2 (+1 oct) Sustain x1 (±0 oct) x0 (-∞ oct) Time Attack Decay Release When the P.Env Envelope Depth (p. 96) parameter is 100, and the P.Env Velocity Sens (p. 96) parameter is 255 When the P.Env Sustain (p.
- Page 99 Configuring the various settings Pitch x4 (+2 oct) x2 (+1 oct) Velocity = 127 Velocity = 1 Sustain x1 (±0 oct) x0 (-∞ oct) Time Attack Decay Release When the P.Env Sustain (p. 95) parameter is 255 Pitch x4 (+2 oct) x2 (+1 oct) Velocity = 127 Velocity = 1...
- Page 100 Configuring the various settings Pitch x2 (+1 oct) Sustain x1 (±0 oct) x0 (-∞ oct) Time Attack Decay Release When the P.Env Sustain (p. 95) parameter is 128 Pitch x2 (+1 oct) Sustain x1 (±0 oct) x0 (-∞ oct) Time Attack Decay Release...
- Page 101 Configuring the various settings Pitch x2 (+1 oct) Sustain x1 (±0 oct) x0 (-∞ oct) Time Attack Decay Release When the P.Env Envelope Depth (p. 96) parameter is -100, and the P.Env Velocity Sens (p. 96) parameter is 255 When the P.Env Sustain (p.
- Page 102 Configuring the various settings Pitch x4 (+2 oct) x2 (+1 oct) Velocity = 127 Velocity = 1 Sustain x1 (±0 oct) x0 (-∞ oct) Time Attack Decay Release When the P.Env Sustain (p. 95) parameter is 255 Pitch x2 (+1 oct) Velocity = 127 Velocity = 1 Sustain...
-
Page 103: Sample Edit (Voice) Settings
Configuring the various settings SAMPLE EDIT (VOICE) settings These are the parameters (items to set) you see when you press the [G] (VOICE) button while holding down the [SHIFT] button. Use the [TEMPO/VALUE] knob to select a parameter, and press the [C´] (ENTER) button to edit the parameter’s value. MEMO If you’re viewing this content on your smartphone, we recommend that you turn your smartphone on its side for landscape mode. - Page 104 Configuring the various settings Parameter Display Controller Value Explanation Spread [CTRL1] knob Adjusts the position at which the grain is generated based on the position set in SPrd 0–100 the Head Position parameter. (*1) (*3) When the Head Speed value is positive, the head plays back randomly from the point after the Head Position;...
- Page 105 Configuring the various settings Parameter Display Controller Value Explanation Loop Size [END] knob Sets the length of sample loop playback. LP. S Z 0. 0 00– (sec) (*2) (*4, *6) The loop plays back from the time set in the Loop Size parameter (loop point) (*5) through the length set in the Size parameter.
- Page 106 Configuring the various settings This is enabled for the sample pads [1]–[6]. This is enabled for SAMPLE EDIT (VOICE). This is enabled on the top screen (the tempo display you see right after the power is turned on). You can set this on a per-sample basis (1 ÷ sample rate). For this reason, the value shown in the display may not change even when you turn the [TEMPO/VALUE] knob.
-
Page 107: Sample Edit (Filter) Settings
Configuring the various settings SAMPLE EDIT (FILTER) settings These are the parameters (items to set) you see when you press the [G´] (FILTER) button while holding down the [SHIFT] button. Use the [TEMPO/VALUE] knob to select a parameter, and press the [C´] (ENTER) button to edit the parameter’s value. MEMO If you’re viewing this content on your smartphone, we recommend that you turn your smartphone on its side for landscape mode. - Page 108 Configuring the various settings Parameter Display Controller Value Explanation Filter Velocity Sens [CTRL2] knob Changes the cutoff frequency according to velocity. vEL. S 0–255 Larger values result in a higher cutoff frequency as the velocity increases, and a lower cutoff frequency as the velocity decreases. Smaller values produce the same cutoff frequency (the cutoff frequency that’s set in Filter Cutoff Frequency), regardless of the velocity.
-
Page 109: Sample Edit (Mixer) Settings
Configuring the various settings SAMPLE EDIT (MIXER) settings These are the parameters (items to set) you see when you press the [A] (MIXER) button while holding down the [SHIFT] button. MEMO If you’re viewing this content on your smartphone, we recommend that you turn your smartphone on its side for landscape mode. Parameter Display Controller... - Page 110 Configuring the various settings Parameter Display Controller Value Explanation Output Bus This specifies the output bus to use. OUt. b Select MEMO You can also change this setting as described in “Switching between buses for sending sound (p. 72)”. bUS. A Outputs to BUS A.
-
Page 111: Delay/Reverb Settings
Configuring the various settings DELAY/REVERB settings These are the parameters (items to set) you see when you press the [A´] (DELAY/REVERB) button while holding down the [SHIFT] button. Use the [TEMPO/VALUE] knob to select a parameter, and press the [C´] (ENTER) button to edit the parameter’s value. MEMO If you’re viewing this content on your smartphone, we recommend that you turn your smartphone on its side for landscape mode. - Page 112 Configuring the various settings Parameter Display Controller Value Explanation High Cut d. H . C t 630–FLAt (Hz) Cuts the frequencies above the frequency that you set. No frequencies are cut when this is set to “FLAt”. Delay Level Mode Sets which level to adjust when the [START] knob d.
- Page 113 Configuring the various settings Parameter Display Controller Value Global Delay/Reverb Selects whether to control delay and reverb by using the pattern parameters or GL. d . r by using the system parameters. The effect is set and changes for each pattern, and is muted when you switch patterns.
-
Page 114: List Of Shortcut Keys
List of shortcut keys You can quickly recall a desired function or screen by pressing a button or pad while holding down the [SHIFT] button. -
Page 115: Shortcuts That Use The [Shift] Button
List of shortcut keys Shortcuts that use the [SHIFT] button While holding down the [SHIFT] Explanation Reference button Sample pads [1]–[6] Mutes the selected sample pad when a pattern is Muting a sample (p. 42) playing. [GRANULAR] pad Mutes the [GRANULAR] pad when a pattern is playing. Muting a sample (p. -
Page 116: Shortcuts That Use The [Pattern] Button
List of shortcut keys Shortcuts that use the [PATTERN] button While holding down the [PATTERN] button Explanation Reference Sample pads [1]–[6] Selects a sample pad without triggering the sound. Inputting your performance by hand (step input) (p. 49) [GRANULAR] pad Selects the [GRANULAR] pad without triggering the sound. -
Page 117: Shortcuts That Use The [Kybd] Button
List of shortcut keys Shortcuts that use the [KYBD] button While holding down the [KYBD] button Explanation Reference [OCT+] button Lets you restore settings such as the current pattern to the last Reload Pattern (p. 94) saved data, initialize the effects and so forth. (*1) Reload Granular (p. -
Page 118: Shortcuts That Use The [Mfx] Button
List of shortcut keys Shortcuts that use the [MFX] button While holding down the [MFX] button Explanation Reference Step buttons Lets you select an effect. Effects and effect parameters (p. 122) Sample pads [1]–[6] Switches the output bus for the sample pad between “BUS A” and Switching between buses for “BUS EFFECT”. -
Page 119: Shortcuts That Use The Pads
List of shortcut keys Shortcuts that use the pads While holding down the sample pads [1]–[6] or the Explanation Reference [GRANULAR] pad Switches the setting for quantization during playback Play Quantize (p. 91) [ó] button (Play Quantize) for each sample pad. parameter [KYBD] button Holds the sample pads in a “pressed-down”... -
Page 120: Shortcuts That Use The Step Buttons
List of shortcut keys Shortcuts that use the step buttons While holding down a step Explanation Reference button Sample pads [1]–[6] Sets the velocity for the step and note of the sample pad you pressed. (*1) Pressing the button toggles between the StrG (strong), ÷Edi (medium) and ľEAK (weak) settings. -
Page 121: Knob Functions
Knob functions The knob functions depend on the selected sample pad and the current mode (screen). MEMO If you’re viewing this content on your smartphone, we recommend that you turn your smartphone on its side for landscape mode. When a sample pad is selected Mode Knob (screen) -
Page 122: Effects And Effect Parameters
Effects and effect parameters MEMO If you’re viewing this content on your smartphone, we recommend that you turn your smartphone on its side for landscape mode. Effects Display Parameters that can be controlled [CTRL1] knob [CTRL2] knob [CTRL3] knob [SHIFT] button [SHIFT] button [SHIFT] button + [CTRL1] knob... -
Page 123: Djfx Looper
Effects and effect parameters DJFX Looper This effect loops the sound in short cycles. You can vary the playback direction and playback speed of the input sound to get a turntable-type effect. Parameter Value Explanation LENGTH 0. 2 30–0. 0 12 (sec) Sets the length of the loop. -
Page 124: Chromatic Ps
Effects and effect parameters Chromatic PS A two-voice pitch shifter that changes the pitch in semitone steps. Parameter Value Explanation Adjusts the amount of pitch shift for PITCH1 or PITCH2. PITCH1, PITCH2 -24–12 (semi) BALANCE 100. 0 –0. 1 00 (%) Adjusts the volume balance between the dry (original) sound and effect sound. -
Page 125: Sync Delay
Effects and effect parameters Sync Delay Gives an echo effect in sync with the tempo. Parameter Value Explanation Sets the sound delay time. TIME 1/32, 1. 1 6t, 1. 3 2d, 1/16, 1/8t, 1. 1 6d, 1/8, 1/4t, 1/8d, 1/4, 1/2t, 1/4d, 1/2, 1/1t, 1/2d, 1/1 (*1) FEEDBACK... -
Page 126: Filter+Drive
Effects and effect parameters Filter+Drive This is a filter with overdrive. It cuts the specified frequencies and adds distortion. Parameter Value Explanation CUTOFF 20–16. 0 k (Hz) Sets the cutoff frequency range in which the filter works. RESONANCE Adjusts the filter’s resonance level. 0–100 The larger the value, the more that the frequency range set in CUTOFF is emphasized. -
Page 127: Scatter
Effects and effect parameters Scatter This effect swaps the sound played back by a loop in steps, altering its playback direction and gate length. This produces a digital groove feel to the loop playback. Parameter Value Explanation TYPE Sets the scatter type. 1–10 Adjusts the scatter depth. -
Page 128: Isolator
Effects and effect parameters Isolator This effect lets you cut off sounds in a specified frequency range. Parameter Value Explanation Adjusts the amount of boost/cut in the low-frequency range. -Inf, -47. 9 –12. 0 0 (dB) Adjusts the amount of boost/cut in the mid-frequency range. -Inf, -47. -
Page 129: Resonator
Effects and effect parameters Resonator This effect uses “Karplus-Strong synthesis”, which is often used in physical modeling of sounds. This lets you alter the sound with a maximum of six “resonators” that match different keys or chords. Parameter Value Explanation ROOT C-1–G9 Sets the reference pitch (root note). -
Page 130: Stopper
Effects and effect parameters Stopper This effect lowers the sample playback speed, reproducing the sound of a turntable stopping. Parameter Value Explanation Adjusts how much the playback speed should be slowed down. DEPTH 0–100 RATE Sets the period at which the playback speed is changed. 4/1, 2/1, 1/1, 1/2, 1/4, 1/8, 1/16, 1/32, 1/64... -
Page 131: Super Filter
Effects and effect parameters Super Filter This is a filter with an extremely sharp slope (attenuation characteristics). The cutoff frequency can be varied cyclically. Parameter Value Explanation CUTOFF Sets the frequency range in which the filter 0–100 works (the cutoff frequency). Higher values increase the frequency range. -
Page 132: Vinyl Sim
Effects and effect parameters Vinyl Sim This effect models the Vinyl Sim effect of the SP-404SX. The effect simulates the sound of an analog record playing. Parameter Value Explanation Sets the frequency characteristics of the playback system. FREQUENCY 0–100 NOISE Adjusts the volume of the noise. -
Page 133: Cassette Sim
Effects and effect parameters Cassette Sim This effect simulates the sound of a cassette tape playing. Parameter Value Explanation Sets the tone. TONE 0–100 HISS Adjusts the volume of the noise. 0–100 0–60 (years) Sets how many years the cassette tape has degraded. DRIVE Adjusts the amount of distortion. -
Page 134: Lo-Fi
Effects and effect parameters Lo-fi Degrades the tonal character. Parameter Value Explanation Sets the type of pre-filter (the filter that the sound passes through PRE FILT 1–6 before effects are applied). Larger settings cause more tonal degradation. LOFI TYPE 1–9 TONE Sets the tone. -
Page 135: Reverb
Effects and effect parameters Reverb Adds reverberation to the sound. Parameter Value Explanation Sets the type of reverb. TYPE A÷B (Ambience), Roo÷ (Room), hAL1 (Hall 1), hAL2 (Hall 2) TIME Sets the reverb time. 0–100 LEVEL 0–100 Adjusts the volume of the effect sound. LOW CUT Sets the frequency range at which the effect FLAT, 20, 25, 31, 40, 50, 63, 80, 100, 125, 160, 200, 250, 315,... -
Page 136: Chorus
Effects and effect parameters Chorus Adds spaciousness and richness to the sound. Parameter Value Explanation Sets the depth of the effect sound. DEPTH 0–100 RATE Sets the cycle (period) of the effect sound. 0. 3 3–2. 3 0 (sec) BALANCE 100. -
Page 137: Flanger
Effects and effect parameters Flanger This effect creates modulation like a jet airplane taking off and landing. Parameter Value Explanation Sets the depth of the effect sound. DEPTH 0–100 RATE Sets the cycle (period) of the effect sound. When the SYNC parameter is Off: 0–100 When the SYNC parameter is On: 4.000–0.016 (Bar) -
Page 138: Phaser
Effects and effect parameters Phaser This effect creates modulation by adding a phase-shifted sound. Parameter Value Explanation Sets the depth of the effect sound. DEPTH 0–100 RATE Sets the cycle (period) of the effect sound. When the SYNC parameter is Off: 0–100 When the SYNC parameter is On: 4. -
Page 139: Tremolo/Pan
Effects and effect parameters Tremolo/Pan Cyclically varies the volume or panning. Parameter Value Explanation DEPTH Sets the depth of the effect. 0–100 RATE Sets the cycle (period) of the effect. When the SYNC parameter is Off: 0–100 When the SYNC parameter is On: 1. -
Page 140: Ring Mod
Effects and effect parameters Ring Mod This effect alters the tonal character to make the sound more metallic. Parameter Value Explanation Sets the frequency range to which the effect is applied. FREQUENCY 0–100 SENS Adjusts the volume of the effect sound. 0–100 BALANCE 100. -
Page 141: Crusher
Effects and effect parameters Crusher Produces a lo-fi effect. Parameter Value Explanation Sets the frequency range in which the pre-filter (the filter that the sound passes through FILTER 331–15. 4 k (Hz) before effects are applied) works. Sets the sample rate of the effect. Larger values make the sample rate lower, for a more lo-fi RATE 0–100 sound. -
Page 142: Compressor
Effects and effect parameters Compressor This effect reduces high volume levels while bringing up the level of quieter sounds, smoothing out any variations in overall volume. Parameter Value Explanation Sets how long the effect is applied to the decaying sound. SUSTAIN 0–100 ATTACK... -
Page 143: Signal Flow
Signal flow... -
Page 144: Midi Implementation Chart
MIDI implementation chart Model: P-6 Date: Aug. 29, 2024 Version: 1.02 Function Transmitted Recognized Remarks Basic channel Default 5 (granular sampler) 5 (granular sampler) These settings are stored in memory. 11 (sample pads) 11 (sample pads) 16 (program change) 15 (auto) - Page 145 MIDI implementation chart Function Transmitted Recognized Remarks Aux messages All sound off (*3) Reset all controllers (*3) All notes off (*3) Omni mode off Omni mode on Monophonic mode on Polyphonic mode on Active sensing System reset The note numbers are used to specify the sample pads. For this reason, you can’t specify scale notes (the pitch does not change for each note).
-
Page 146: Control Change Message
MIDI implementation chart Control change message MEMO Control change messages are received under the following conditions. ¹ For ver. 1.02 and later, data is received using the channel that’s set in the Granular MIDI Channel (p. 92) Auto MIDI Channel (p. 93) parameters. - Page 147 MIDI implementation chart Control change number Parameter (decimal) (hexadecimal) 0x4A GRANULAR Filter Cutoff Frequency (p. 107) 0x4B GRANULAR T.Env Decay (p. 105) 0x4C GRANULAR Coarse Tune (p. 103) 0x4D GRANULAR T.Env Time Key Follow (p. 105) 0x4E GRANULAR Filter Velocity Sens (p. 108) 0x4F GRANULAR Start Mode (p.
-
Page 148: Main Specifications
305 g 11 oz Accessories Leaflet "Read Me First" USB Type-C® to USB A cable This document explains the specifications of the product at the time that the document was issued. For the latest information, refer to the Roland website. - Page 149 Owner’s Manual Roland Corporation © 2024 Roland Corporation...
Need help?
Do you have a question about the P-6 and is the answer not in the manual?
Questions and answers