Table of Contents
Advertisement
Quick Links
Advertisement
Table of Contents

Subscribe to Our Youtube Channel
Related Manuals for Marmitek PROTECTOR 28


Summary of Contents for Marmitek PROTECTOR 28
- Page 1 PROTECTOR28 SECURITY AND HOME AUTOMATION SYSTEM PROTECTOR28 20003/120303...
-
Page 2: Table Of Contents
The Marmitek Security System protects yourself and your home against will be reported in a similar way by playing a fixed service message. intruders. On top of that your Marmitek Security System can control lights and appliances throughout your house (using the existing mains wires!). In It is important that you carefully read through all of the chapters of this that way your Marmitek Security System can create a “lived-in look”... -
Page 3: General
The electrical parameters, especially with respect to the mains voltage listed on the PS500, must be observed at all times. • Only Marmitek Authorised Service Centres (MASC’s) are qualified to repair the system. Unauthorised opening of any parts of the system voids the warranty. -
Page 4: Marmitek Systems
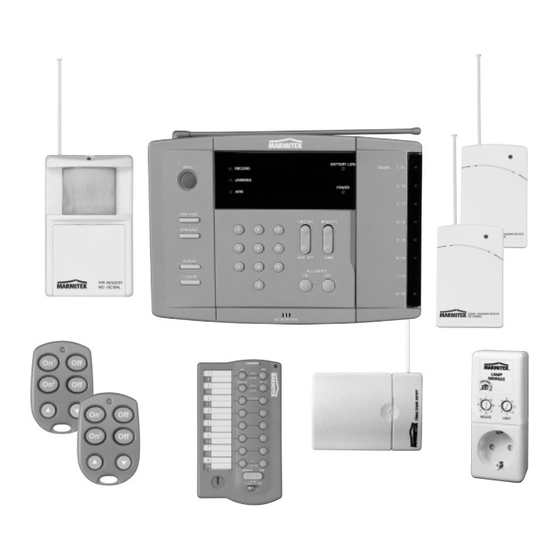
3 MARMITEK SYSTEMS 3.1 COMPONENTS MARMITEK SYSTEMS CONSIST OF THE FOLLOWING PARTS: SC2800 SECURITY CONSOLE (BASE STATION) PS500 MAINS ADAPTOR* MS10 MOTION SENSORS DS10 DOOR/WINDOW SENSORS KR21 KEY FOB REMOTE CONTROL WALL MOUNTING BRACKET FOR SC2800* SECURITY CONSOLE SH624 SYSTEM REMOTE CONTROL... -
Page 5: Installation Of The Components
Moreover, you simply (consisting of a so-called house and unit code) can take the Marmitek system with you in case and an instruction (e.g. on or off) are transmitted In case of and ISDN or other digital telephone you’re going to move. -
Page 6: Sc2800 Security Console (Base Station)
ARM- Lights when the system in armed. THERM - For use with Marmitek X-10 Wireless BATTERY LOW- Indication that the back up battery 10. ALL LIGHTS ON/OFF Thermostats. Thermostat functions are of the base station needs to be replaced. - Page 7 13. ENTER 21. TELEPHONE CONNECTION mounting hole and reposition the plastic tube Used for confirmation of the system settings For connecting the system to the telephone line over the antenna wire. during installation. (meant for analog lines; for ISDN and PABX, refer to 4.1).
-
Page 8: Ds10 Door/Window Sensors
To do this, you OPEN the door or window that is protected by this sensor. After replacing the batteries, you can close the MARMITEK... -
Page 9: Ms10 Motion Sensors
door or window and the sensor will instantaneously become part of the system again. In case this does not work (e.g. the batteries have been low for too long), you have to re-install this sensor. You first have to erase this specific zone (refer to 5.9) and re-install the sensor (refer to 5.1). -
Page 10: Kr21 Key Fob Remote Control
To controlling the security system and as well as The position of this switch defines the functions of 1. PANIC the Marmitek X-10 Home Automation modules. the control keys. When this key is pressed, an immediate alarm will be initiated by the security system. -
Page 11: Lm12 Lamp Module (Optional For Protector28/4)
INSTALLATION: MODE SWITCH IN POSITION 1: 1. PLACING THE BATTERIES 1…8: For controlling Marmitek X-10 Home IMPORTANT: When placing the batteries, make Automation modules with corresponding address sure the switch is not in position 2! (unit code 1 t/m 8). -
Page 12: Installation Of Other (Wired) Sensors
For more information about the many options of switches: Unit Code (1 through 16) and House with Marmitek X-10 modules, you can remotely the Marmitek X-10 system, contact the web site Code (A through O). Take care that when you are control lights and appliances. - Page 13 Controls 2 Activating the GB 10 Open the battery-compartment at the front side 1 Battery Indicator of the unit. When pressing the TEST key or when a signal is Press the TEST key for longer than one second. transmitted, the indicator light will blink. If it only The red indicator light will flash twice.
-
Page 14: Digimax 210 Wireless Thermostat (Option)
The DigiMax 210 is available separately (Art. No. , between 1 and 9 degrees. When the Maxi 09431). Please visit www.marmitek.com for more Controller is in "Disarm" or "Arm home" mode, it information. -
Page 15: Programming The Sc2800 Base Station
5. PROGRAMMING THE SC2800 BASE STATION 5.1 REGISTRATION OF RADIO SENSORS Every sensor must be installed or registered with the base station. In this way, the base station recognises only its own sensors. Up to 16 sensors can be registered on the SC2800. One of those 16 can be a wired sensor connected to the input jack at the back of the base station. -
Page 16: Registration Of Wireless Remote Controls
3. Press key number 4. 4. Press ENTER. 5. Press 0 for silent alarm: double confirmation beep Press 1 for alarm with siren: double confirmation beep 6. Reset the mode switch to the RUN 1 or RUN 2 position: Zone indicators go out MARMITEK... -
Page 17: Programming Of Telephone Numbers
5.4 PROGRAMMING TELEPHONE NUMBER The Marmitek SC2800 base station has a standard telephone dialler. In case of a alarm, up to 4 telephone numbers of up to 16 digits can be dialled. The phone numbers which are dialled get to listen to your pre-recorded message (5.5). Whoever picks up the phone needs to confirm the call by pressing a 0 on the telephone. -
Page 18: Recording The Alarm Message
Example of an alarm message: This is the security system of […..]. Press the zero key on your telephone if this message is over so you can listen to noises in my house. Please initiate the actions we agreed upon. MARMITEK... -
Page 19: Delayed Alarm Times
5.6 DELAY TIMES ARMING When arming the security system by means of the remote controls KR21 or SH624 in the ARM AWAY mode, the system will arm with a instantaneously (factory default). In case you want to arm the system delayed, you can program the base station for a delay. -
Page 20: Jamming Detection On/Off
5.7 JAMMING DETECTOR ON/OFF The Marmitek SC2800 base station is equipped with a system to detect strong external interfering signal that may affect the proper operation of the security system. Signals of e.g. wireless headsets may influence the range of sensors drastically. In case you want your system to detect these signals, you have to switch on the anti jamming function. -
Page 21: Change Personal Identification Code (Pin)
SC2800 base station. You can also use this code to arm and disarm the system via the keyboard of the base station. In case you loose your PIN, you have to contact your Marmitek Authorised Service Centre (MASC) to reset the access code to the factory default [0000]. -
Page 22: Erasing A Radio Sensor
2. Key in your 4 digit PIN code (factory default [0000] refer to 5.8) 3. Press key number 0 4. Press ENTER 5. Reset the mode switch to the RUN 1 or RUN 2 position: Zone indicators go out MARMITEK... -
Page 23: Operating The System
6. OPERATING THE SYSTEM 6.1 INSTALL, RUN 1 AND RUN 2 INSTALL – Position for installing sensors and for changing system settings. RUN 1 – For normal alarm operation. RUN 2 – For normal alarm operation. When in disarmed mode, the base station will give a pleasant sounding tone when a door or window is opened (access control). -
Page 24: When An Alarm Situation Occurs
When an alarm is detected, all lights connected to the lamp module (LM12, LW10 and LD10) will switch on and off (flash) during the alarm time of 4 minutes. Then the lights remain on until the system is disarmed. Appliance modules (AM12, AW10, AD10) will be switched off. For more information refer to 6.8. MARMITEK... -
Page 25: Disarming The System
6.4 DISARMING THE SYSTEM The security system can be disarmed by means of the KR21 and SH624 remote control or by using your PIN on the keyboard of the SC2800 base station. 1. Disarming via the keyboard of the SC2800 base station: Key in your 4 digit PIN code (factory default [0000] refer to 5.8): One confirmation beep at every key press Press the DISARM button: Dual tone confirmation. -
Page 26: Panic Alarm
The zone is cancelled by pressing the BYPASS button when you last armed the system (6.2). ZONE INDICATOR IS ON, ARM INDICATOR FLASHES: This zone initiated the most recent alarm situation. INDICATOR IS ON IN DISARM MODE: The door or window protected by the DS10 is open. MARMITEK... -
Page 27: Controlling Lights And Appliances (Home Automation)
(LM12 Lamp Module, LW10 In-Wall Dimmer and LD10 DIN-Rail Dimmer) will switch on and off continuously (flashing). Appliance modules will be switched off. You can get more information about expanding your system from your dealer or at our website: www.marmitek.com. 6.8.1. AVAILABLE HOME AUTOMATION FUNCTIONS (REFERENCE ADDRESS SC2800 = A1 (FACTORY DEFAULT). - Page 28 (or sooner MODULE SET TO B5 when the alarm is switched off). Note: When you use a Marmitek Alarm System, the Sirens 7. OFF WHEN AWAY For more information ask your dealer or look at...
-
Page 29: Lifestyle Programming
CONTROL INDIVIDUAL MODULES WITH THE SC2800 BASE STATION House Code You can also control Marmitek X-10 Home Automation modules from the keyboard of the SC2800 base Unit Code station. Key in the unit code on the keyboard (for 15: key in 1 and 5). You’ll hear a confirmation beep after UC+1: One Unit Code higher than the Unit each key press. -
Page 30: Sc2800 Dial-In Features
6. You can disarm the system by entering 0 followed by a #. You’ll hear 2 short confirmation beeps. 3. SWITCHING LIGHTS OVER THE TELEPHONE As soon as the base station answers your call, you can control lights and appliances with Marmitek X-10 Home Automation modules over the phone. -
Page 31: Setting 'Sensor Error' Message
8. SETTING ‘SENSOR ERROR’ MESSAGE When an error occurs in one of the motion or door/window sensors (e.g. battery low), you can program the base station to report this via phone. This is the same fixed service message which is used to report a detected jamming (refer to 5.7). It only reports a system error and not an alarm situation. -
Page 32: Troubleshooting
ARM button. Replace batteries in case Check all door- and window sensors for proper Marmitek X-10 signals. Contact your dealer or necessary and re-install the remote control. operation (open and close e.g. a door but not for more information. - Page 33 N.B.: When replacing the batteries of the batteries and press the TEST button. Reposition When an alarm occurs, the ARM indicator sensor when the system is operational, you can the batteries and press the TEST button for 3 flashes but the internal siren does not make sure that the sensor maintains its unique seconds.
-
Page 34: Declaration Of Conformity
Regarding the certification of this product Marmitek Protector28 Following technical documentation analysis and/or EMC test results, and according to article 10.5 of the directive 1999/05/EC, Marmitek declares that the equipment specified below complies with the essential requirements of this Directive. - Page 35 PROTECTOR28...
Need help?
Do you have a question about the PROTECTOR 28 and is the answer not in the manual?
Questions and answers