Table of Contents
Advertisement
Quick Links
D
ear Customer,
T
hank you for selecting Fiat and congratulations on your choice of a Fiat Multipla.
W
e have written this handbook to help you get to know all your new Fiat Multipla's features and use it in the best possible way.
Y
ou should read it right through before taking the road for the first time.
Y
ou will find information, tips and important warnings regarding the driving of your car to help you derive the maximum from your
Fiat Multipla's technological features.
Y
ou are recommended to read carefully the warnings and indications, marked with the respective symbols, at the end of the page:
personal safety;
the car's wellbeing;
environmental protection.
T
he enclosed Fiat warranty booklet lists the Services that Fiat offers to its Customers:
❒ the Warranty Certificate with terms and conditions for maintaining its validity
❒ the range of additional services available to Fiat Customers.
B
est regards and good motoring!
As a consequence, you should consider only the information which is related to the engine
This Owner Handbook describes all Fiat Multipla versions.
and bodywork version of the car you purchased.
Advertisement
Chapters
Table of Contents

Related Manuals for Fiat Multipla


Summary of Contents for Fiat Multipla
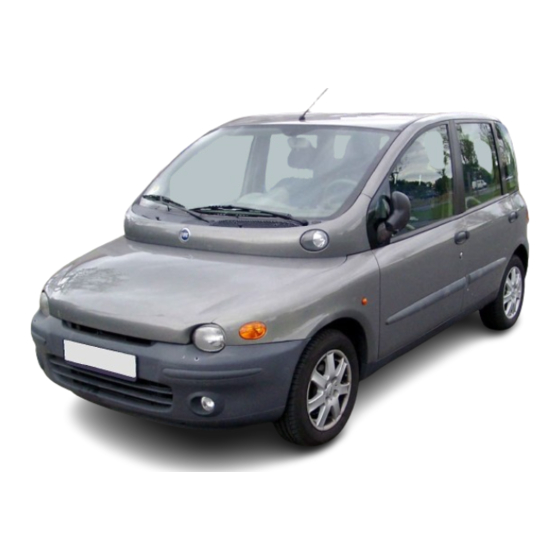
- Page 1 Fiat and congratulations on your choice of a Fiat Multipla. e have written this handbook to help you get to know all your new Fiat Multipla’s features and use it in the best possible way. ou should read it right through before taking the road for the first time.
- Page 2 MUST BE READ! REFUELLING Petrol engines: only refuel with unleaded petrol with octane rating (RON) not less than 95 conforming to the European specification EN228. Diesel engines: only refuel with diesel fuel conforming to the European specification EN590. Using other products or mixtures may damage the engine beyond repair and cause the forfeiture of the warranty cover for caused damages as a consequence.
- Page 3 If, after buying the car, you decide to add electrical accessories (that will gradually drain the battery), visit a Fiat Dealership. They can calculate the overall electrical requirement and check that the car’s electric system can support the required load.
-
Page 4: Table Of Contents
DASHBOARD ..............INTERIOR EQUIPMENT ........... SYMBOLS ................ELECTRICALLY CONTROLLED DOUBLE SUNROOF............THE FIAT CODE SYSTEM ..........DOORS .................. THE KEYS ................ELECTRIC WINDOWS ............. ELECTRONIC ALARM ............BOOT ..................IGNITION SWITCH ............BONNET ................INSTRUMENT PANEL ............ROOF RACK/SKI RACK ........... -
Page 5: Dashboard
DASHBOARD F0E0003m 1 Fixed vent to send air to the side windows - 2 Adjustable and swivel air vents - 3 Horn - 4 Oddments tray - 5 Driver’s airbag - 6 Hazard light switch - 7 Instrument panel and warning lights - 8 Fixed air vent - 9 Adjustable and swivel air vents - 10 Oddments tray - 11 Passenger’s airbag (where fitted) - 12 External light stalk - 13 Glove compartment - 14 Bonnet lever - 15 Steering wheel adjustment lever - 16 Windscreen wiper/washer lever - 17 Headlight beam adjuster - 18 Gearshift lever - 19 Heating and ventilation controls - 20 Coin/credit card holder -... -
Page 6: Symbols
SYMBOLS Special coloured labels have been attached near or actually on some of the components of your Fiat Multipla. These labels bear symbols that remind you of the precautions to be taken as regards that particular component. The plate summarising the symbols used (A) can be found under the bonnet. - Page 7 To have new keys memorised (maximum seven) go to switch off the engine turning the key to STOP; then a Fiat Dealership taking with you all the keys in your turn to MAR again: warning light ¢ comes on and possession, the CODE card, personal identification should go out after about one second.
-
Page 8: The Keys
A - the electronic code to be used for emergency starting (see “Emergency starting” in section “In an emergency”); B - the mechanical key code to be given to the Fiat Dealership when ordering duplicate keys; C - spaces for any remote control stickers when the car is fitted with the remote control option. - Page 9 KEY WITHOUT REMOTE CONTROL Key (A) (delivered in one copy only) is the one to be used normally for: ❒ starting up ❒ locking/unlocking the doors ❒ locking/unlocking the fuel cap ❒ deactivating the passenger’s airbag. Key (B), with built-in remote control, performs the same functions as key F0E0004m (A) for cars fitted with door remote control and/or electronic alarm.
- Page 10 Used batteries are harmful to the environment. They should be disposed of as specified by law in the special containers provided, or take them to a Fiat Dealership, which will deal with their disposal.
-
Page 11: Electronic Alarm
F0E0601m OPERATION The electronic alarm of Fiat Multipla is controlled by the receiver located in the dashboard under the front right panelling. It is activated by the radio-frequency remote control built into the ignition key. It will only work when the ignition key is removed from position STOP or PARK. - Page 12 This operation is only to be carried out by a Fiat MAR (e.g. electric windows) turn the key to MAR, use Dealership, to avoid damaging the electronic memory the required electric control then bring the key back storage system.
- Page 13 If it is not possible to switch on the alarm with a new remote control battery, contact Fiat Dealership to HOW TO DEACTIVATE THE ALARM have the system checked. To switch the alarm off, press the remote control IMPORTANT If the car is to remain inactive for a button on the key.
- Page 14 HOW TO KNOW WHETHER THE ALARM HAS GONE OFF After switching the system off, led (F) will indicate whether the alarm system has been triggered and also the reason for activation: Alarm indications 1 flash = right front door 2 flashes = left front door 3 flashes = right rear door F0E0724m 4 flashes = left rear door...
-
Page 15: Ignition Switch
To turn the key to PARK, press button (A). If the ignition device is tampered with (e.g.: attempted theft), have it checked over WARNING by a Fiat Dealership. When getting out of the car, always remove the key to prevent any occupants WARNING from accidentally activating the controls. - Page 16 STEERING COLUMN LOCK To engage the lock: when the key is at STOP, or PARK, remove the ignition key and turn the steering wheel until it locks. To disengage the lock: rock the steering wheel slightly as you turn the key to MAR.
-
Page 17: Instrument Panel
INSTRUMENT PANEL Left-hand drive versions A. Multifunction display menu scroll button â B. Multifunction display menu scroll button ã C. Configurable multifunction display. D. Speedometer E. Trip computer scrolling trip button F. Multifunction display configuration mode button G. Rev counter F0E0374m H. -
Page 18: Instruments
INSTRUMENTS SPEEDOMETER Indicator (A) displays the car speed (speedometer). FUEL LEVEL GAUGE F0E0376m The needle indicates the amount of fuel still in the tank. If the reserve warning light (B) comes on it means that there are about 7 litres left in the tank. - Page 19 CONTROL BUTTONS In order to make the most of the information provided by the configurable display (with the key at MAR), you should firstly familiarise with the respective control buttons shown and learn how to use the buttons as described. You are also advised to read this entire chapter before using the display.
- Page 20 C - MODE button Press for less than 1 second (short pulse), indicated with MODE 1 in the following diagrams: to enter the Menu and to go to the different settings or to confirm the required option. Press for more than 2 seconds (long pulse), indicated with MODE 2 in the following diagrams: to confirm the required option and go back to the standard screen.
- Page 21 TIME For operation and instructions on how to set the time, see the “Time” paragraph in this section. KILOMETRE COUNTER You can display the kilometre counter or the trip meter. Turn the ignition key to MAR. The total kilometre counter will appear on the display.
-
Page 22: Riconfigurable Multifunction Display
RICONFIGURABLE Configurable multifunction display menu MULTIFUNCTION DISPLAY TRIP B: to switch the respective function on and off (ON/OFF). The configurable multifunction display shows useful TIME: to set the time (hours and minutes). information necessary when driving and a Menu to be DAYL. - Page 23 DESCRIPTION OF THE MENU The menu consists of a set of functions arranged in a circular fashion. Buttons â and ã can be used to select the functions and settings (for example “Language” in the diagram below). For more details, see “Accessing the main menu”...
- Page 24 MAR when a distance of 2,000 km (or miles) before the service deadline is reached. The message is then represented every 200 km until there are 200 km left to the deadline after which the message is represented every 100 km, 50 km, etc... The data can only be reset by a Fiat Dealership.
- Page 25 If the message “INERT. SW. ACTIVE” SERVICE appears, you will firstly need to reset the inertia switch (fu- SETUP OFF el cut-off switch) as shown in the respective paragraph. Go to a Fiat Dealership if the message “CONFIG. ERROR” ap- pears.
- Page 26 Trip B (ON/OFF) This option is used to switch the trip b function (trip meter) on and off. This function shows quantities related to average consumption b, average speed b, trip time b, and distance driven B during a “partial mission” within the “general mission”.
- Page 27 TIME Setting time To set time (hours - minutes) proceed as follows: Press the MODE button (MODE 1), hours will flash. Set the required time by pressing button â or ã. turn the ignition key to MAR to access the multifunction display main menu.
- Page 28 ❒ Press the MODE button (for longer than 2 seconds) Press the button one to increase by one unit at a time. when in MODE 2 to store data and to go back to Hold the button pressed to increase or decrease the the standard screen (exit the Menu).
- Page 29 ACCESSING THE MAIN MENU â ã Back to standard display Menu â ã Back to menu Press button â or ã to increase or decrease the setting by one unit at a time. Hold the respective â button pressed to increase ã...
- Page 30 DAYLIGHT SAVING TIME Proceed as follows to switch the daylight saving time function (which corresponds to + 1 hour with respect to normal winter time) on and off: ACCESSING THE MAIN MENU â ã Back to standard display Menu â ã...
- Page 31 CLOCKMODE 12/24 This function is used to display the time by a 12 hour or 24 hour clock. Proceed as follows to make the setting: ACCESSING THE MAIN MENU â ã Back to standard display Menu â ã â Back to menu Next menu...
- Page 32 LANGUAGE Proceed as follows to select the required language for messages and warnings: See ACCESSING THE MAIN MENU â ã Back to standard display Menu â â ã ã â °C°F TRIP AB I/100kmi Next menu Back to menu â â...
- Page 33 UNIT The display will show information according to set unit. Proceed as follows to select the required units: â ã â ã â ACCESSING THE MAIN ã MENU â ã â ã â (*) The unit of measure selected in the DISTANCE menu automatically defines the unit of measure used in the CONSUMPTION menu.
- Page 34 BUZZER The volume of the buzzer which accompanies the controls and the failure warnings can be adjusted on a predefined scale by means of buttons â and/or ã. Proceed as follows to mute the buzzer (OFF) or adjust the volume: ACCESSING THE MAIN MENU...
- Page 35 200 km until there information: are 200 km left to the deadline after which the message is represented every 100 km, 50 Menu km, etc... The data can only be reset by a Fiat Dealership. â â â...
- Page 36 SETUP OFF This is the last function of the cycle arranged in circular order (see initial menu). Menu â ACCESSING THE MAIN MENU Back to standard display ã â...
- Page 37 TRIP A (GENERAL) - TRIP B (PARTIAL) The TRIP COMPUTER function shows the quantities related to car operation on the configurable multifunction display. This function consists of TRIP A (general) related to the total mission of the car and TRIP B (partial) which relates to the partial mission of the car.
- Page 38 continued When the external lights are on, â and ã will always INITIAL go from TRIP to ILLUMINATION (see CHECK “Dimmer” in this section). Failures detected? Standard display See WARNING LIGHTS and MESSAGES in this section With km/l consumption condition on. Press the button when TRIP A data is displayed to reset TRIP Press the MODE button to return automatically to the stan- A and TRIP B at the same time.
- Page 39 Back to standard display continued TRIP B Press the button when TRIP B data is displayed to reset TRIP When the external lights are on, B only. â and ã will always go from TRIP to Press the MODE button to auto- ILLUMINATION see “Dimmer”...
- Page 40 DIMMER This function is used to adjust (increase/decrease) the brightness of the instrument panel and of the display. Turn ignition Switch side/ key to MAR taillights on Standard display Adjust brightness â â ã ã After 10s without actions IMPORTANT The display will be dimmed when the external lights are switched on.
-
Page 41: Seats
SEATS FRONT SEATS Moving the seat backwards or forwards (where provided) Lift the lever (A) (on seat internal side) and push the seat forwards or backwards: in the driving position the arms should rest on the rim of the steering wheel. F0E0629m Driver’s seat lumbar adjustment (where provided) This gives better support to your back. - Page 42 The same lever can be used to lower it, on the rear of the centre seat back there is a rigid surface that acts as an armrest and table with glass holders. Use the same lever to return the seat back to its original position. When lowering the centre seat back make sure that the seat is pushed back as far as it will go and that the head restraint is lowered.
- Page 43 Centre sliding seat (where provided) Lift the lever (A) and push the seat forwards or backwards. After releasing the lever, make sure the seat is correctly locked on the runners. Moving the seats To increase the boot load capacity the seats have two positions (three for the centre seat).
-
Page 44: Head Restraints
HEAD RESTRAINTS FRONT SEATS To improve passenger safety, the height of the head restraints can be adjusted. They will automatically lock in the position required. To raise grip it at the base and pull upwards. To lower press it downwards from above, keeping button (A) pressed. F0E0231m When you release the button, check the restraints are firmly locked in place. -
Page 45: Steering Wheel
STEERING WHEEL It can be adjusted vertically. 1) Move lever (A) to position 1. 2) Adjust the steering wheel position. 3) Return the lever to position 2 to lock the wheel in place again. F0E0018m WARNING All adjustments must be made when the car is stationary. -
Page 46: Rearview Mirrors
REARVIEW MIRRORS DRIVING MIRROR This mirror is adjustable. Move lever (A) to shift the mirror to the following positions: 1) standard position; 2) anti-dazzle position. F0E0019m The mirror is also fitted with a safety device that releases the mirror in the event of a collision. - Page 47 The fixed part of the right-hand mirror reflects the The mirrors can tilt in both directions in the event of a rear right wheel when parking. collision. This can only be adjusted with the ignition key at MAR. To reset the mirror in the correct position, first set it in the fully closed position by keeping the control Use switch (C) to select the mirror (left, neutral, right) pressed until the mirror stops, then open it.
-
Page 48: Heating/And Climate Control System
HEATING AND CLIMATE CONTROL SYSTEM F0E0045m 1 Windscreen defrosting/demisting vents - 2 Front side window defrosting/demisting vents - 3 Upper vent to send air over the heads of the front seat passengers - 4 Directional and adjustable outlets - 5 Vents sending air to feet of front seat passengers - 6 Directional and adjustable centre vents. - Page 49 DIRECTIONAL AND ADJUSTABLE OUTLETS Use the directional control to adjust the air flow (A). Outlets can be directed by rotation. F0E0046m DIRECTIONAL AND ADJUSTABLE VENTS A - Control for air flow adjustment. B - Controls to direct the air flow. F0E0047m...
-
Page 50: Heating And Ventilation
HEATING AND VENTILATION CONTROLS A - Air temperature knob (mixing hot and cold air). B - Fan knob. C - Slider for setting the air recirculation function. This prevents air from being taken in from outside. F0E0048m D - Air distribution knob. HEATING 1) Air temperature knob: pointer on red sector. - Page 51 FAST DEMISTING AND/OR DEFROSTING VENTILATION 1) Centre and side vents: fully open. Windscreen and side windows 2) Air temperature knob: pointer on blue sector. 1) Air temperature knob: pointer on red sector 3) Fan knob: pointer on required speed. (turned fully to the right). 4) Air distribution knob: pointer on ¥.
-
Page 52: Manual Climate Control System
MANUAL CLIMATE CONTROL SYSTEM CONTROLS A - Air temperature knob (mixing hot and cold air). B - Switch to turn on the air recirculation, preventing outside air from entering the passenger compartment. When the light on the switch is on, the recirculation system is operating. C - Fan knob. - Page 53 FAST DEMISTING AND/OR DEFROSTING Rear window Press button (. The electric mirror demisting device Windscreen and side windows also comes on. 1) Air temperature knob: pointer on red sector As soon as the rear window is clear, switch the device (turned fully to the right).
-
Page 54: Automatic Climate Control System
AUTOMATIC CLIMATE CONTROL SYSTEM This is a passenger compartment temperature control system that automatically adjusts: ❒ the temperature of the air directed to the vents to reach the temperature selected with knob (A); ❒ continuous fan speed with knob (C) in position. - Page 55 D - Switch to turn the compressor on and off. When 3) Air distribution knob, pointer to: this switch is pressed it automatically starts the fan ≤ to warm the feet and demist the windscreen at at the first speed if knob (C) is at p. When the the same time;...
- Page 56 FAST DEMISTING AND/OR DEFROSTING IMPORTANT An important characteristic of the climate control system is the de-humidification of the 1) Air distribution knob, pointer to air. We recommend that you always engage the compressor by pressing button √ (led on) to prevent The system is set for rapid demisting/defrosting of the misting.
- Page 57 COOLING RECIRCULATION When switch T is pressed (led on) only internal air 1) Central air vents and side vents fully open. circulates. 2) Air temperature knob to the required temperature. IMPORTANT When the outside temperature is very 3) Fan knob: high, switching on the recirculation system will cool ❒...
- Page 58 If there is a fault If the fault involves the fan control (C) and the fan still works, it will automatically operate at 1st speed. If an anomaly affecting the automatic system is detected the words “AIR-COND FAULTY” will be If the fault involves an air temperature sensor, the displayed.
-
Page 59: External Lights
EXTERNAL LIGHTS LEFT-HAND STALK This stalk groups together the external lights and the direction indicators. The external lights can only be switched on when the ignition key is at MAR. When the external lights are turned on: the instrument panel and the symbols of the various controls located on the dashboard will turn on. - Page 60 To flash the lights Pull the stalk towards the steering wheel (unstable position). F0E0054m Direction indicators Move the stalk: up - to switch on the right-hand direction indicator down - to switch on the left-hand direction indicator. Instrument panel warning light y will flash. Indicators are switched off automatically when the steering wheel is straightened.
-
Page 61: Window Cleaning
Never use the window wiper to remove ice or snow from the windscreen. In these conditions, the wiper is submitted to excessive effort that results in motor protection cutting in and wiper operation inhibition for few seconds as a consequence. If operation is not restored contact Fiat Dealership. - Page 62 Never use the rear window wiper to remove ice or snow from the rear window. In these conditions, the wiper is submitted to excessive effort that results in motor protection cutting in and wiper operation inhibition for few seconds as a consequence. If operation is not restored contact Fiat Dealership.
-
Page 63: Ceiling Light
CEILING LIGHT FRONT CEILING LIGHT Switch (A) turns the ceiling lights on/off. Switch (B) controls the spot light. According to the position, you can have the following conditions: ❒ with switch (A) in centre position, ceiling lights (C) and (D) will turn F0E0065m on when front doors are opened;... - Page 64 REAR CEILING LIGHTS Ceiling lights turn on when rear doors are opened. With doors closed they can be turned on/off by pressing (A). In car versions with double sunroof the ceiling lights are located between the two roofs. F0E0067m...
-
Page 65: Controls
CONTROLS HAZARD LIGHTS They come on when switch (D) is pressed regardless of the position of the ignition key. When the device is on, the switch flashes. Press the switch again to turn the lights off . F0E0630m CONTROL BUTTONS These are located in the centre of the dashboard. - Page 66 FUEL CUT-OFF SWITCH It is located under the dashboard on driver’s side and comes into operation in the event of a crash. It is a safety switch (A) that comes into operation in the event of a crash, cutting off the fuel supply thus stopping the engine. Carefully inspect the car to find fuel leaks, e.g.
-
Page 67: Interior Equipment
INTERIOR EQUIPMENT GLOVE COMPARTMENT ON DRIVER’S SIDE To open, raise flap (A). F0E0063m GLOVE COMPARTMENT ON PASSENGER’S SIDE To open, raise flap (A). F0E0062m... - Page 68 ODDMENTS TRAY UNDER THE SUN VISORS To have access, lower the sun visors. IMPORTANT These compartments have been designed to contain small oddments (gate remote control, glasses, documents, etc.), heavy objects could cause the compartment to open while driving on rough roads. ODDMENTS TRAY UNDER THE FRONT RIGHT-HAND SEAT (where provided) F0E0065m...
- Page 69 Mobile (where required) It consists of a plastic removable box with spring release. The mobile ashtray can be used by front passengers by fitting it into the glass/can holder (A) on the dashboard or by rear passengers by fitting it into the glass/can holder (B) set on the back of the rear backrest (if folded).
- Page 70 Correct functioning is only ensured if the accessories are connected with a homologated plug, as installed on all Lineaccessori Fiat components. Do not use the socket for accessories with power over 180W (maximum intake 15A).
- Page 71 FOOD BOX (where prvided) The food box fitted on Fiat Multipla has a capacity of 8 litres which means that it can contain up to three one and a half litre bottles, equal to max. 4.5 kg distributed between the two boxes.
-
Page 72: Electrically Controlled Double Sunroof
ELECTRICALLY CONTROLLED DOUBLE SUNROOF This device can only work when the ignition key is on MAR. Switches (A) and (B) control the opening, closing, raising and lowering of both roofs. When you release the switch, the roof locks in the position it is in at that moment. - Page 73 Front controls Front roof: press N symbol on switch (A) to open and symbol O to close. Rear roof: press N symbol on switch (B) to open and symbol O to close. In the event of a fault on the electronic device, remove cover (C) located between the two roofs.
-
Page 74: Doors
DOORS Fiat Multipla is fitted with centralised side door closing system. Unlocking from outside Turn the key to position (I) and raise the handle. Locking from outside Turn the key to position (2). F0E0077m Locking/unlocking the front doors from inside Unlocking: pull lever (A). - Page 75 IMPORTANT If one of the doors is not perfectly closed, or there is a system fault, the central locking device will not work and after 8 or 9 attempts in rapid succession the device will cut out for about 30 seconds. During these 30 seconds the doors can be locked or unlocked manually, without involving the electric system.
-
Page 76: Electric Windows
ELECTRIC WINDOWS FRONT SEATS The electric windows are controlled by two buttons in the inside of the handle on the driver’s door: A - to open/close left window; B - to open/close right window. F0E0081m If button (A) on driver’s side is pressed for over one second, the automatic opening/closing function is activated: the window will stop moving when it reaches the end of its stroke (or when the button is pressed again). - Page 77 REAR SEATS Both internal handles are fitted with the switches (D) for controlling the relevant windows. To prevent the buttons on the rear doors being used to open/close the rear windows, press the lock button (E) (led on), on the instrument panel.
-
Page 78: Boot
BOOT OPENING/CLOSING THE TAILGATE The tailgate is fitted with an electric lock. To open: unlock front doors with the key and press lever (A) set under the handle. With doors locked, the tailgate cannot be opened. Tailgate opening is made easier by the gas-filled struts on each side. - Page 79 EMERGENCY OPENING If the electric tailgate lock is faulty, it is however possible to open it manually using lever (B) set on the left side of the lock (seen from the passenger’s compartment). To use this lever, open the rear side door, tilt the seat and push lever (B) to the right (towards the center of the car).
- Page 80 ANCHORING THE LOAD There are special rings in the boot to anchor cords to firmly hold in place the load being transported. IMPORTANT When travelling at night with a load in the boot, the height of the dipped beams should be adjusted (see “Headlights” in this section). To ensure the regulator works properly, make sure that the load does not exceed the values given.
- Page 81 EXTENDING THE BOOT The boot can be extended when needed in the following ways: 1) moving the rear seats forward (by 15 cm); 2) removing the rear window shelf; 3) tipping the rear seats forward; 4) removing the seats. Moving the rear seats F0E0089m ❒...
- Page 82 Re-positioning the rear seats Make sure that the anchorage points shown in the figure are clean: ❒ insert the front hooks in the special holes on the car floor; ❒ turn the seat until it is 10 cm from the floor then let it drop. The weight of the seat will position it and latch it to the back hooks.
- Page 83 Removing the rear window shelf To remove the rear window shelf: release the rear seat backs and tilt them forward, slightly raise the umbrella holding tab (1) and push the rear window shelf (2) forward until releasing the locking pins (A) from their seats, then remove it.
- Page 84 ❒ hook the shackle (A) located under the rear seat to the front head restraint rod taking care to open the spring catch (B) by pressing downwards as shown in the figure. IMPORTANT Refit retainer (A) after use. Be careful not to engage the release lever (D) with the red labels.
-
Page 85: Bonnet
BONNET To open the bonnet: 1) Pull the lever under the dashboard (A). 2) Push the lever upwards (B). 3) Lift the bonnet, at the same time release the supporting rod (C) from its retainer (D). F0E0615m 4) fit rod end into the bonnet recess (E) and push it to safety position. To close the bonnet: 1) Hold the bonnet with one hand and with the other remove rod (C) from recess (E) and refit into its retainer (D). - Page 86 The bonnet might fall violently if the support rod is not positioned properly. This WARNING should only be done when the car is stationary. Before opening the bonnet make sure the windscreen wiper arm is not lifted from WARNING the windscreen. If the engine is hot, be very careful when you put your hands under the bonnet as WARNING you risk burning yourself.
-
Page 87: Roof Rack/Ski Rack
To do so, press one end and slide them for a few millimetres under the trim. Specific roof/ski rack for Fiat Multipla are available in Lineaccessori Fiat. IMPORTANT Be careful not to knock objects on the roof rack when opening the boot tailgate. -
Page 88: Headlights
F0E0103m Contact Fiat Dealership to have the headlights properly adjusted. ADJUSTING THE HEADLIGHT SLANT When the car is loaded, it slopes backwards. This means that the headlight beam rises. - Page 89 HEADLIGHT BEAM ADJUSTMENT ABROAD The dipped beam headlights are adjusted for circulation in the country in which the car is marketed. In countries with opposite circulation, to avoid glaring oncoming vehicles, it is necessary to cover the areas of the headlight using a special sticker tape provided for the purpose.
-
Page 90: Abs System
ABS SYSTEM (where provided) IMPORTANT To have the maximum efficiency of the braking system, it is necessary a setting period of about 500 km: during this period, it is better to avoid If this is the first car with ABS you drive, get familiar sharp, repeated and prolonged brakes. - Page 91 If the low brake fluid warning light x comes on together with the message on the WARNING reconfigurable multifunction display, stop the car immediately and contact the nearest Fiat Dealership. Fluid leaks from the hydraulic system, in fact, can compromise the braking system, both traditional systems and systems with ABS.
-
Page 92: Esp System
ESP SYSTEM ESP SYSTEM INTERVENTION (Electronic Stability Program) It is signalled by the blinking of the warning light á on the instrument panel, to inform the driver that the car (where provided) is in critical stability and grip conditions. The ESP system is an electronic system controlling the ESP SYSTEM OPERATION car stability in the event of tyre grip loss. - Page 93 (A) comes on together with the message on the display (see section “Warning lights and messages”). In this case, go to a Fiat Dealership as soon as possible. F0E0384m During the use of the space-saver spare wheel, the ESP system carries on working.
- Page 94 ASR SYSTEM (Antislip Regulation) The ASR system is an integral part of the ESP system that controls the vehicle drive and cuts in automatically every time one or both driving wheels slip. In slipping conditions, two different control systems are activated: ❒...
- Page 95 When travelling the ASR can be switched off and on If the ASR is switched off when travelling, it will turn again pressing switch (A) on the centre console. on again automatically the next time the engine is started. When the ASR is off this is shown by the lighting up of the led on the switch.
-
Page 96: Eobd System
(together with the message on the multifunction display), contact Fiat Dealership as soon as possible. Warning light U operation can be checked by means of special equipment by traffic controller agents. Always comply with the traffic regulations in force... -
Page 97: Parking Sensors
PARKING SENSORS (where provided) Parking sensors are located in the rear bumper to detect and inform the driver (through an intermittent acoustic signal) about the presence of obstacles behind the car. ACTIVATION Sensors will activate automatically when engaging reverse gear. The frequency of the acoustic alarm will increase as the distance between F0G0664m the car and the obstacle decreases. - Page 98 FAILURE WARNINGS GENERAL WARNINGS ❒ When parking, take the utmost care to obstacles set In case of parking sensor failure, the driver is warned by a 3-seconds acoustic signal. above or under the sensors. ❒ Objects set close to the car front or rear part, OPERATION WITH TRAILER under certain circumstances are not detected and could therefore cause damages to the car or be...
-
Page 99: Multipla Van
MULTIPLA VAN Multiplan Van is available in the following versions: ❒ 5 seats (100 16v - JTD 120 versions) ❒ 4 seats (Natural Power versions) all versions features a division panel between passenger’s and load compartment. F0G0665m Do not travel with the tailgate open: exhaust fumes could enter the passenger’s WARNING compartment. - Page 100 LOAD RECOMMENDATIONS Each of these limits must be borne in mind and must never be exceeded under any circumstances. Fiat Multipla Van has been designed and approved on the basis of several set maximum weights: ❒ kerb weight ❒ payload ❒...
- Page 101 ❒ finally, remember that the way in which the vehicle In addition to these general precautions, some simple measures could enhance driving safety, comfort and moves is influenced by the weight being carried. In the length of the vehicle’s life: particular, stopping distance lengthens specially at high speed.
-
Page 102: Sound System
We advise you to have this done at a Fiat Dealership. F0E0110m Visit a Fiat Dealership if you want to install the sound system after buying the car. They can advise you on how to safety the battery life. Excessive idle intake can damage the battery and may... - Page 103 1) Remove map pockets after removing the 2 screws (D) and those under caps (E). F0E0635m 2) Install the speaker in the housing and refit the map pocket. IMPORTANT We recommend you go to a Fiat Dealership for correct installation of the system. F0E0616m AERIAL To install: 1) Remove plastic cap from the car roof (A).
- Page 104 HANDS-FREE KIT SETUP If the car has been ordered with the sound system provision, it will be fitted with: Setting for 6 speakers: ❒ 2 front speakers (tweeter); ❒ 2 rear speakers (full-range) ; ❒ 2 woofers on front doors; F0E0114m ❒...
- Page 105 To install the cellular phone and make the relevant connection in the car it is essential to have the system installed at a Fiat Dealership. This will ensure the best results and prevent problems which could affect the car safety.
- Page 106 Apply to Fiat Dealership only to have the cellular phone installed and to connect it to car presetting.
-
Page 107: At The Filling Station
AT THE FILLING STATION DIESEL ENGINES If the outside temperature is very low, the diesel thickens due to the formation of paraffin and could PETROL ENGINES clog the fuel filter. Use only unleaded petrol. In order to avoid these problems, different types of To prevent errors, the diameter of the fuel tank filler diesel are distributed according to the season: summer is too small to introduce a lead petrol pump filler. - Page 108 FUEL FILLER CAP the cap (B) is fitted with an antiloss device (C) which fastens it to the lid (A) so it cannot be mislaid. To open: hold the cap (B) still, turn the key anticlockwise, turn the cap by about half a turn and remove it.
-
Page 109: Protecting The Environment
❒ three-way catalytic converter; Protecting the environment has been the guiding ❒ Lambda sensor; principle in the design of the Fiat Multipla right from ❒ fuel evaporation system. start. The result is the use of materials and creation of devices that can reduce or considerably curtail harmful The devices for curtailing diesel fuel engine emissions influences on the environment. - Page 110 DIESEL PARTICULATE FILTER (DPF) During reclaiming the following phenomena could take place: idling slight increase, fan activation, slight smoke The Diesel Particulate Filter is a mechanical filter, increase, high exhaust temperatures. These situations integral with the exhaust system, that physically traps shall not be considered as faults and they do not affect particulates present in the exhaust gases of Diesel car performance and environment.
- Page 111 SEAT BELTS ................PRETENSIONERS ..............CARRYING CHILDREN SAFELY ........PRESETTING FOR MOUNTING THE “ISOFIX TYPE” CHILD RESTRAINT SYSTEM ....FRONT AIR BAGS .............. SIDE AIR BAGS (Side bag - Window bag) .............
-
Page 112: Seat Belts
SEAT BELTS Fiat Multipla has a three-point seat belt on the centre seats too (front and rear). A special belt retainer (A), set on front passenger’s door post, allows to lock the seat belt when the passenger is not wearing it. - Page 113 HOW TO USE THE SEAT BELTS (for front seats) The belt should be worn keeping the chest straight and rested against the seat back. To fasten the three belts, take the latching tongue (A) and clip it into the buckle (B), until you hear it click. At removal, if it jams, let it rewind for a short stretch, then pull it out again without jerking.
- Page 114 USING THE REAR SEAT BELTS Side seat belts The seat belt has a double buckle. Unwind the belt slowly. Take tongue (C) and insert it into seat (D). Then take tongue (A) and insert it into seat (B). Make sure both buckles are well fastened. When removing the side seats, wind up the belts and fasten the buckles to the pins on the right and left sides of the car.
- Page 115 Centre seat belt The belt has a double buckle. Slowly unwind the belt from its reel (A), take the tongue (D) and insert it in slot (E), then place tongue (B) in slot (C); make sure both buckles lock properly. When there is no-one in the centre seat fold both belt sections and place the buckles in the receptacle (A), inside the locking slots.
- Page 116 SEAT BELT HEIGHT ADJUSTMENT Always adjust the height of the seat belt to fit the person wearing it. This precaution could greatly reduce the risk of injury in case of collision. Correct adjustment is obtained when the belt passes half way between the end of the shoulder and the neck.
-
Page 117: Pretensioners
PRETENSIONERS To increase the efficiency of the front seat belts, Fiat Multipla is fitted with pretensioners on all the three front seats. Do not place objects under the centre seat as this could damage the pretensioner system. These devices “feel” through a sensor, that a violent crash is in progress and rewind the seat belts a few centimetres. - Page 118 Under no circumstances should the components of the seat belts and pretensioners WARNING be tampered with or removed. Any operation should be carried out by qualified and authorised personnel. Always contact a Fiat Dealership.
- Page 119 Seat belts are also to be worn by expectant mothers: the risk of injury in the case of accident is greatly reduced for them and the unborn child if they are wearing a seat belt. Of course they must position the lower part of the belt very low down so that it passes under the abdomen.
-
Page 120: Carrying Children Safely
CARRYING CHILDREN SAFELY HOW TO KEEP THE SEAT BELTS ALWAYS IN EFFICIENT CONDITIONS For optimal protection in the event of a crash, all ❒ Always use the belt with the tape taut and never passengers must be seated and wearing adequate twisted;... - Page 121 Lineaccessori Fiat offers seats for each weight group, which are the recommended choice, as they have been designed and experimented specifically for Fiat cars.
- Page 122 GROUP 0 and 0+ Babies up to 13 kg must be carried facing backwards on a cradle seat, which, supporting the head, does not induce stress on the neck in the event of sharp deceleration. The cradle is restrained by the car seat belts, as shown in the figure and in turn it must restrain the child with its own belts.
- Page 123 GROUP 2 Starting from 15 kg to 25 kg in weight, children may be restrained directly by the car belts. The only function of the seat is to position the child correctly in relation to the belts, so that the diagonal part adheres to the chest and not to the neck and that the horizontal part clings to the child’s pelvis and not the abdomen.
- Page 124 PASSENGER SEAT COMPLIANCE WITH REGULATIONS ON CHILD’S SEAT USE Fiat Multipla complies with the new European Directive 2000/3/EC regulating child’s seat assembling on the different car seats according to the table below. Key for the table. U = suitable for child restraint systems of the “Universal” category, according to European Standard ECE-R44 for the specified “Groups“...
- Page 125 ❒ Always check the seat belt is well fastened by pulling To sum up the safety precautions to follow when transporting children: the webbing. ❒ The recommended position for installing children’s ❒ Only one child is to be strapped to each retaining seat is on the rear seat, as it is the most protected system.
-
Page 126: Presetting For Mounting The "Isofix Type" Child Restraint System
PRESETTING FOR MOUNTING THE “ISOFIX TYPE” CHILD RESTRAINT SYSTEM Fiat Multipla is created preset for mounting the Isofix type child restraint system, a new European standardised system for mounting child restraints. Isofix type child restraint system is an additional option that does not prevent from using traditional child restraint systems. - Page 127 FITTING THE ISOFIX TYPE CHILD’S SEAT Groups 0 and 0+ For children of the 0, 0+ weight group (babies up to 13 kg), the child’s seat is facing backwards and the child is restrained by the child’s seat belts (D). For proper mounting proceed as follows: ❒...
- Page 128 Group 1 As the child grows, passing to weight group 1 (9-18 kg), refit the child’s seat facing forwards following the installation instructions. For proper mounting proceed as follows: ❒ move the seat where you want to install the child’s seat completely backwards;...
-
Page 129: Front Air Bags
FRONT AIR BAGS The front airbag (driver and passenger) is not a replacement of but complementary to the use of belts, which should always be worn, as specified by law in The car is fitted with front airbags for driver and Europe and most non-European countries. - Page 130 Driver’s and passenger’s airbags have been designed and calibrated to improve the protection of a person wearing seat belts. At their maximum inflation, their volume fills most of the space between the steering wheel and the driver and between the dashboard and the passenger.
- Page 131 MANUAL DEACTIVATION OF PASSENGER’S FRONT AIRBAG Should it be absolutely necessary to carry a child on the front seat, the passenger’s airbag on the car can be deactivated. Deactivation/reactivation takes place with ignition key at STOP and operating it in the special key switch set in dashboard box on driver’s side.
-
Page 132: Side Air Bags (Side Bag - Window Bag)
SIDE AIR BAGS (Side bag/Window bag) (where provided) SIDE BAG It consists of an instant-inflation cushion housed in the back rest of the front seat to increase protection of the occupants’ chest in the event of a side crash of medium-high severity. F0E0223m WINDOW BAGS Window bags are “curtain”... - Page 133 IMPORTANT Should an accident occur in which any of them does not mean that the system is not working of the safety devices is activated, take the car to a Fiat properly. Dealership to have the devices activated replaced and to have the system checked.
- Page 134 If the car has been stolen or an attempt to steal it has been made, if it has been WARNING subjected to vandals or floods, have the air bag system checked by Fiat Dealership.
- Page 135 Remember that with the key engaged and at MAR, even if the engine is not WARNING running, the air bags may be triggered on a stationary car if it is bumped by another moving car. Therefore, never seat children on the front seat even when the car is stationary.
- Page 136 ENGINE STARTING ............PARKING ................USING THE MANUAL GEARBOX ........ CONTAINING RUNNING COSTS ....... TOWING TRAILERS ............SNOW TYRES ..............SNOW CHAINS ..............STORING THE CAR ............
-
Page 137: Engine Starting
VERSIONS The car is fitted with an electronic engine lock device. IMPORTANT Do not press the accelerator before the If the engine fails to start, see paragraph “Fiat CODE engine is started. system” in section “Dashboard and controls”. ❒ Ensure that the handbrake is up. - Page 138 If you are still unable to start the engine, perform the ❒ Put the gear lever into neutral. emergency start-up procedure (see “Emergency start- up” in section “In an emergency”) and contact Fiat ❒ Turn the ignition key to MAR. The warning lights Dealership.
- Page 139 IMPORTANT When the outside temperature is very EMERGENCY START-UP low, the use of a fluid oil facilitates cold starting. If the Fiat CODE system fails to recognise the code During winter it is therefore recommended to transmitted by the ignition key (warning light ¢ on...
-
Page 140: Parking
PARKING STOPPING THE ENGINE Turn the ignition to STOP while the engine is idling. Proceed as follows: IMPORTANT After a taxing drive, you should allow ❒ stop the engine and engage the handbrake; the engine to “catch its breath” before turning it off by ❒... - Page 141 IMPORTANT If this is not the case, contact Fiat Dealership to have the handbrake adjusted.
-
Page 142: Using The Manual Gearbox
USING THE MANUAL GEARBOX To engage gears, press down the clutch and shift the gear lever into one of the positions shown (the diagram is also shown on the gear lever knob). To engage reverse (R), wait until the car has stopped and, from neutral move the gear lever to the right and back. -
Page 143: Containing Running Costs
CONTAINING RUNNING COSTS Roof rack/ski rack Remove the roof rack or the ski rack from the roof as Here are some suggestions which may help you to soon as they are no longer used. These accessories keep the running costs of your car down and lower lower air penetration and adversely affect the amount of toxic emissions released into the consumption levels. - Page 144 DRIVING STYLE Acceleration Accelerating violently increasing the revs will greatly Starting affect consumption and emissions: acceleration should be gradual and should not exceed the maximum Do not warm the engine with the car at a standstill or torque. at idle or high speed: under these conditions the engine warms up much more slowly, increasing electrical consumption and emissions.
-
Page 145: Towing Trailers
TOWING TRAILERS Engage a low gear when driving downhill, rather than constantly using the brake. IMPORTANT NOTES The weight the trailer exerts on the car tow hook reduces by the same amount the actual vehicle loading For towing caravans or trailers the car must be fitted capacity. - Page 146 Manufacturer of the device. An electric brake should be supplied directly by the battery through a cable with a cross section of no less Have installation carried out at Fiat Dealership. than 2.5 mm The towing device must meet current regulations with...
- Page 147 ASSEMBLY DIAGRAM The tow hook structure must be fastened in the points shown by the symbol (Ø) using 6 M8 screws and 6 M10 screws. Anchorage points 1 are to be fitted with spacers Ø 25 x 6 mm. The internal plates 5 shall have a minimum thickness of 5 mm, the external plates 2, 3 and 4 shall have a minimum thickness of 5 mm.
- Page 148 ASSEMBLY DIAGRAM The tow hook structure must be fastened in the points shown by the symbol (Ø) using 6 M8 screws and 6 M10 screws. Anchorage points 1 are to be fitted with spacers Ø 21 x 4 mm. The internal plates 5 shall have a minimum thickness of 5 mm, the external plates 2 and 3 shall have a minimum thickness of 5 mm;...
-
Page 149: Snow Tyres
(as per Fiat Dealership will be happy to provide advice EC Directive). concerning the most suitable type of tyre for the All four tyres should be the same (brand and track) to customer’s requirements. -
Page 150: Snow Chains
SNOW CHAINS Tyres on which chains can be fitted: – 185/65 R 15 88H Use of snow chains should be in compliance with local – 195/60 R 15 88H regulations. Use slow profile snow chains with maximum height off Snow chains should only be applied to the driving the tyre of 10 mm. -
Page 151: Storing The Car
❒ Clean and protect the painted parts using protective STORING THE CAR wax. If the car is to be left inactive for longer than a month, ❒ Clean and protect the shiny metal parts using special the following precautions should be noted: compounds readily available. - Page 152 SERVICE ................. ABS (WHEEL ANTI-LOCKING SYSTEM) FAILURE..WARNING LIGHT FAILURE ........... EBD (ELECTRONIC BRAKE FORCE DISTRIBUTOR) WATER IN DIESEL FUEL FILTER ........FAILURE .................. ESP SYSTEM ................EOBD / INJECTION SYSTEM FAILURE......FIAT CODE ................POSSIBLE ICE ON ROAD ..........
-
Page 153: General Information
GENERAL INFORMATION The fault messages appearing on the multifunction display when the respective panel warning light comes on are accompanied by specific suggestions (example: “contact garage”, “turn off engine”, “check manual”, etc...). These suggestions are short and cautionary. The purpose is to suggest the prompt action to be taken by the driver when a fault occurs. -
Page 154: Engine Coolant Too Hot
If the warning light does not go out in the follow- ing two or three minutes, stop the engine and contact a Fiat Dealership. LOW BRAKE FLUID LEVEL AND/OR HANDBRAKE ENGAGED (red) Turning the ignition key to MAR the warning light on the dial turns on, but it should go off after about 4 seconds. -
Page 155: Battery Not Recharging Properly
Turning the key to MAR the warning light on the dial turns on, but it should go out as soon as the engine is started. If the warning light stays on together with the message, contact a Fiat Dealership as soon as pos- sible to prevent draining the battery. -
Page 156: Doors Open
Turning the key to MAR the warning light on the dial turns on, but it should go out as soon as the engine is started. If v warning light stays on glowing steadily together with the message, stop the WARNING engine immediately and contact a Fiat Dealership. -
Page 157: Abs (Wheel Anti-Locking System) Failure
EBD system. In this case violent braking may be accompanied by early rear wheel locking with the possibility of skidding. Drive the car extremely carefully to the nearest Fiat Dealership to have the system checked. >... -
Page 158: Eobd / Injection System Failure
(on certain versions together with the dedicated message on the display), contact Fiat Dealership as soon as possible. Warning light U operation can be checked by traffic agents by proper equipment therefore, comply with laws and regulations in force in the... -
Page 159: Fiat Code
Warning Message light on panel on display FIAT CODE (amber) ¢ The warning light will come on in three cases (with the key at MAR): 1. One flash - the key code has been recognised. The engine can be started. -
Page 160: Exhaust Oil
The warning light with turn on flashing when the system detects that the engine oil is exhaust. After the first indication, at each engine starting the warning light v will go on flashing. (warning light flashing) If warning light flashes, contact immediately Fiat Dealership to have oil changed and instrument panel warning light turned off. -
Page 161: Diesel Particulate Filter Clogged
To enable the cleaning procedure, keep the car running until the warning light turns off. F0E0603m F0E0602m If led (F) continues to stay on, it means that the cleaning procedure cannot be performed; contact Fiat Dealership as soon as possible. -
Page 162: Glow Plugs
4 seconds, of warning light F. In this event warning light ¬ could not indicate safety system failures. In addition, the airbag system will deactivate automatically the passenger's airbags (side bag, where provided and front airbag). Contact immediately Fiat Dealership to have the system checked. -
Page 163: Outside Lights
WATER IN DIESEL FUEL FILTER (amber) (diesel versions) When there is water in the diesel fuel filter. The presence of water in the fuel circuit may cause serious damage to the entire injection system. Contact Fiat Dealership as soon as this warning light comes on. - Page 164 ENGINE STARTING ..........165 IF A TYRE IS PUNCTURED ........167 QUICK TYRE REPAIR KIT FIX & GO AUTOMATIC .......... 177 IF A BULB BURNS OUT ........... 183 IF AN EXTERIOR LIGHT BURNS OUT ....186 IF AN INTERIOR LIGHT BURNS OUT ....192 IF A FUSE BLOWS .............
-
Page 165: Engine Starting
EMERGENCY START-UP accelerator pedal to the floor and keep it there. ❒ Do the same for the remaining figures on the If the Fiat Code system cannot deactivate the engine immobiliser, the warning lights ¢ and U will remain CODE card. - Page 166 If after a few attempts the engine does not start, do not insist but contact the nearest Fiat Dealership. Never use a battery charger to start the engine as this could damage the electronic systems of your vehicle, particularly the ignition and fuel supply control units.
-
Page 167: If A Tyre Is Punctured
IF A TYRE IS PUNCTURED BUMP STARTING Never bump start the engine by pushing, towing or GENERAL INSTRUCTIONS coasting downhill. For versions/markets where applicable, the car can be This could cause fuel to flow into the catalytic fitted with a quick tyre repair kit called FIX & GO, converter and damage it beyond repair. - Page 168 The space-saver spare wheel (where provided) is specific to your car, do not use it WARNING on other models, or use the spare wheel of other models on your vehicle. The space-saver spare wheel shall only be used in an emergency. It shall only be used for the distance necessary to reach a service point and the car speed shall not exceed 80 km/h.
- Page 169 The jack shall only be used for changing wheels on the car with which it is provided WARNING or on cars of the same model. It must not be used for other purposes such as for instance raising cars of other models. In no case should it be used for repairs under the car.
- Page 170 Please note: ❒ the jack weight is 3.5 kg ❒ the jack requires no adjustment ❒ the jack cannot be repaired and in the event of a fault it must be replaced by another original one ❒ no tool other than its cranking device may be fitted on the jack. To change a wheel proceed as follows: ❒...
- Page 171 ❒ to take out the small wheel, or (where provided) the normal size spare wheel, you have to operate by wrench (A), provided in supply, on relating bolt; turning it anticlockwise the wheel will lower until it reaches the ground, to remove it from the supporting hoist, move the locking bell underneath from position 1 to position 2;...
- Page 172 ❒ Place the jack near the marks shown by the arrows, located near the front or rear wheelhouse (depending on the wheel to change). Make sure the jack groove (B) is fitted onto the side member fin (C); ❒ Warn any people present that the vehicle is about to be raised; make sure they keep at a safe distance and do not touch it until it is lowered once more;...
- Page 173 ❒ Turn the jack handle to lower the car and remove the jack; ❒ Tighten up the wheel bolts completely in criss-cross fashion following the order shown; ❒ Hook again drilled wheel directly to the winch (for wheels with rim made of metal sheet), or restore check bracket (B) (for wheels with 15”...
- Page 174 IMPORTANT To fasten bolt (A) use only the wrench supplied; never use pneumatic screwer since the hooking system could be damaged. To check the correct fastening of small wheel, or (where provided) normal size spare wheel, follow attached table providing the number of rough guide clicks to be heard in order that complete locking is ensured.
- Page 175 REFITTING THE STANDARD WHEEL ❒ Following the procedure described previously, raise the car and remove the space-saver spare wheel; ❒ fit the standard wheel. Make sure that the resting surface of the spare wheel is clean and there is no dirt that could cause the bolts to loosen. ❒...
- Page 176 When you have finished: ❒ place the space-saver spare wheel in the housing under the body checking it is properly locked in place. IMPORTANT To fasten bolt (A) use only the wrench supplied; never use pneumatic screwer since the hooking system could be damaged. The wheel is completely fastened when the bolt, after about 21 audible clicks, cannot be fastened further on.
-
Page 177: Quick Tyre Repair Kit Fix & Go Automatic
QUICK TYRE REPAIR KIT FIX & GO automatic The quick tyre repair kit Fix & Go automatic is placed under the right rear seat. The quick tyre repair kit includes: ❒ a bottle (A) containing sealer and fitted with: – filling pipe (B); F0E0709m –... - Page 178 In the event of a puncture caused by foreign bodies, it is possible to repair tyres showing damages on the track or shoulder up to max 4 mm diameter. Holes and damages on the tyre side walls cannot be repaired. Do not use the quick WARNING tyre repair kit if damaging is due to running with flat tyre.
- Page 179 IT SHOULD BE NOTICED THAT: The sealing fluid of the quick tyre repair kit is effective with external temperatures between -20 °C and +50 °C. The sealing fluid has limited life. The compressor shall not be operated for more than 20 minutes. Risk of WARNING overheating.
- Page 180 INFLATING PROCEDURE Put on the protection gloves provided WARNING together with quick tyre repair kit. ❒ Pull up the handbrake. Loosen tyre inflation valve cap, take the filler hose (A) out and screw the ring nut (B) on the tyre valve; FOE0712m ❒...
- Page 181 Apply the sticker in a visible position and restart; for the driver to indicate that the tyre ❒ drive with the utmost care to the nearest Fiat has been treated with the quick tyre repair kit. Drive carefully especially Dealership.
- Page 182 FOR CHECKING AND RESTORING PRESSURE ONLY The compressor can be also used just for restoring pressure. Disconnect the quick connection and connect it directly to the tyre valve; in this way the cylinder is not connected to compressor and the sealing fluid will not flow into the tyre.
-
Page 183: If A Bulb Burns Out
Where possible, have the lamps changed by Fiat Dealership. Correct operation and aiming of external lights are essential for safe driving in compliance with law regulations. - Page 184 Remove from the bulb holder by pressing the bulb Drops inside the headlight mean water infiltration: and rotating it anti-clockwise. contact Fiat Dealership. C Cylindrical bulbs To remove them, release them from their contacts. D Halogen bulbs To remove, release the locking spring and take out the bulb.
- Page 185 Bulbs Ref. figure Type Power Front side lights 12V-5W Dipped beams 12V-55W Main beams 12V-55W Front direction indicators P21W 12V-21W Side direction indicators WY5W 12V-5W Front fog lights 12V-55W (where provided) Rear light cluster - side/taillights 12V-21/5W - reversing light P21W 12V-21W - fog light...
-
Page 186: If An Exterior Light Burns Out
IF AN EXTERIOR LIGHT BURNS OUT For the type of bulb and power rating, see “If a bulb burns out”. FRONT LIGHT CLUSTER The front light cluster contains sidelight, dipped beam, main beam direction indicator and fog light bulbs. To change the bulbs of the sidelights, dipped beams, direction indicators and front fog lights it is necessary to remove the cover (A) releasing the F0E0644m catch (B). - Page 187 MAIN BEAMS To change the bulb, proceed as follows: ❒ turn cap (A) counterclockwise and remove it; ❒ disconnect the electric connector (B); ❒ release the bulb holder catch (C); ❒ remove the bulb (D) and replace it; ❒ refit catch (C), reconnect the electrical connector (B) and refit cap F0E0646m (A) turning it clockwise.
- Page 188 DIRECTION INDICATORS Front To change the bulb, proceed as follows: ❒ remove the protective cover releasing the catch; ❒ turn the bulb holder (A) counterclockwise and remove it; ❒ remove the bulb (B) pushing it gently and turning counterclockwise (“bayonet connection”); F0E0649m ❒...
- Page 189 FRONT SIDELIGHTS To change the bulb, proceed as follows: ❒ remove the protective cover releasing the catch; ❒ remove the snap-fitted bulb holder unit (A), take out bulb (B) and replace it; ❒ refit the snap-fitted bulb holder unit (A); ❒...
- Page 190 REAR LIGHT CLUSTER To change the bulb, proceed as follows: ❒ from inside the boot release and remove cover (A) by turning the retaining knob (B), then remove pin (C) to reach the third nut; ❒ loosen the two visible nuts (D) and the third one that can be reached through hole (E);...
- Page 191 THIRD BRAKE LIGHTS To replace 12V-3W bulbs: ❒ with the tailgate open, undo the four fastening screws under the caps (shown by the arrows) and remove the panel; ❒ take out connection (A); ❒ undo the four screws securing the light unit and remove the cover (B);...
-
Page 192: If An Interior Light Burns Out
IF AN INTERIOR LIGHT BURNS OUT For the type of bulb and power rating, see “If a bulb burns out”. FRONT CEILING LIGHT To replace the 12V-10W cylindrical bulbs: ❒ remove plastic caps (A) and casing (B) using a screwdriver; ❒... - Page 193 REAR CEILING LIGHTS To replace the 12V-10W cylindrical bulb from inside the car: ❒ remove the lens (A) using a screwdriver in (C); ❒ replace the bulb (B). In versions fitted with double sunroof the ceiling lights are set along the centre cross member: bulb can be replaced in the same way.
-
Page 194: If A Fuse Blows
If a general fuse (MEGA-FUSE, MIDI-FUSE, MAXI-FUSE) cuts in, do not attempt WARNING any repair and contact a Fiat Dealership. Before replacing a fuse, make sure the ignition key has been removed and that all the other services are switched off... -
Page 195: Certain Fuses
¬ and the “fault” would be stored by the airbag control unit. In such an event, go to Fiat Dealership to To reach the fuses: reset the fault stored on the airbag control unit. - Page 196 The car is fitted with a set of general protection fuses (MAXI-FUSE) that individually protect, besides the fuses for the various services, the electrical system functions. Press the 2 locking side tabs and remove the cover. Do not make these replacements yourself, but contact Fiat Dealership. F0E0692m F0E0627m F0E0626m...
-
Page 197: Fuses Inside Car Table
Fuses inside the car Ampere Fuse no. Right-hand main beam Left-hand main beam Main beam warning light Rear fog lights Rear fog lights warning light Side/taillight power Left-hand dipped beam Car interior fan Right-hand number plate light Right-hand front sidelight Cigar lighter light Ashtray light Side/taillight warning light... - Page 198 Fuse no. Windscreen wiper Rear window wiper Horn + 30 instrument panel + 30 front ceiling light + 30 EOBD Fiat tester + 30 rear ceiling light + 30 sound system + 30 connect-nav + 30 navigator + 30 clock...
- Page 199 Fuses inside the car Ampere Fuse no. + 15 navigator Anti-theft control unit Hazard light power Anti-theft led Anti-theft control unit Heated rear window Electric mirror defrosting Front fog lights Electric mirror movement Air recirculation Cigar lighter relay coil Windscreen wiper relay coil Electric seat relay coil Heater relay coil Heated rear window relay coil...
- Page 200 + 30 taxi-meter + 30 sunroof Rear power windows Fuses in engine compartment (next to battery, JTD versions only) Fiat code Webasto boiler (additional heater) Main relay Diesel fuel filter heating + 15 CCM and Fiat code control unit Headlight washer pump...
- Page 201 Fuses in engine compartment (next to battery, petrol versions only) Ampere Fuse no. Lambda probe + 15 CCM and Fiat code control unit + 30 Fiat code control unit + 15 ABS Headlight washer pump Fuses in engine compartment (on passenger’s compartment partition)
-
Page 202: If The Battery Is Flat
Fiat Dealership. ❒ Connect the charger cables to the battery terminals, You are advised to recharge the battery slowly for a observing the poles. -
Page 203: Jacking The Car
JACKING THE CAR If the car needs to be jacked up, go to a Fiat Dealership which is equipped with shop jacks and jack arms. Jack up the car only by positioning the jack arms or the shop jack in the points shown in the figure. - Page 204 Before starting to tow, turn the ignition key to MAR and then to STOP. Do not WARNING remove the key. If the key is removed, the steering lock engages automatically resulting in the impossibility to steer the wheels. When towing, remember that without the help of the servobrake and power WARNING steering, a greater effort is required on the pedal and steering wheel.
- Page 205 SCHEDULED SERVICING ..........SERVICE SCHEDULE ............PERIODICAL CHECKS ............USE OF THE CAR UNDER HEAVY CONDITIONS ..CHECKING FLUID LEVELS ..........AIR CLEANER ..............POLLEN FILTER ..............DIESEL FUEL FILTER ............BATTERY ................WHEELS AND TYRES ............RUBBER TUBING ..............WINDSCREEN/REAR WINDOW WIPERS ....
-
Page 206: Scheduled Servicing
Scheduled Servicing is performed by all Fiat Dealership, at pre-established times. This is why Fiat has programmed a series of checks and maintenance operations every 20,000 km. If during each operation, in addition to the ones... -
Page 207: Service Schedule
SERVICE SCHEDULE Thousands of km 120 140 160 180 Check tyre conditions/wear and adjust pressure if required Check lighting system operation (headlights, direction indicators, hazard lights, boot lights, passenger compartment lights, glovebox lights, warning lights, etc.) Check windscreen wiper/washer operation, adjust nozzles Check windscreen/rear window blade position/wear Check front disk brake pad conditions and wear and wear indicator operation... - Page 208 Thousands of km 120 140 160 180 Check and adjust tappet clearance, if required (JTD 120 versions) Check and adjust handbrake lever stroke Check exhaust emissions/smoke (JTD 120 versions) Check exhaust emissions Check antievaporation system Change fuel (JTD 120 versions) Change air cleaner cartridge (petrol versions) Change air cleaner cartridge (diesel versions) Replace fuel filter cartridge (diesel versions)
-
Page 209: Periodical Checks
Every 1,000 km or before long journeys, check and top You are recommended to use FL Selenia products, up if required: designed and produced specifically for Fiat cars (see ❒ engine coolant fluid level; table “Capacities” in section “Technical specifications”). -
Page 210: Use Of The Car Under Heavy Conditions
USE OF THE CAR UNDER carry out checks more frequently than required on Service Schedule: HEAVY CONDITIONS ❒ check front disk brake pad conditions and wear; Should prevailing use of the car be under one of the ❒ check cleanness of bonnet and boot locks and following specially heavy conditions: lever cleanness and lubrication;... -
Page 211: Checking Fluid Levels
CHECKING FLUID LEVELS 1. Engine oil 2. battery 3. brake fluid 4. windscreen washer fluid 5. engine coolant 6. power steering fluid. F0E0680m versions Never smoke while working in the engine compartment; gas and inflammable WARNING vapours may be present, with the risk of fire. When topping up take care not to confuse the various types of fluids: they are all incompatible with one another and could seriously damage the car. - Page 212 1. Engine oil 2. battery 3. brake fluid 4. windscreen washer fluid 5. engine coolant 6. power steering fluid. F0E0681m JTD 120 version...
- Page 213 ENGINE OIL The engine oil level must be checked with the car on level ground and while the engine is still hot (approximately 5 minutes after turning it off). ❒ Remove the dipstick. ❒ Clean it with a cloth that does not leave threads or other impurities. ❒...
- Page 214 ENGINE OIL CONSUMPTION IMPORTANT The oil consumption depends on driving style and the conditions under which the car is used. Max engine oil consumption is usually 400 grams every 1000 km. When the car is new, the engine needs to run in, therefore the engine oil consumption can only be considered stabilised after the first 5000 ÷...
- Page 215 Do not add oil with specifications other than that already in the engine. Used engine oil and filter contain harmful substances for the environment. Contact Fiat Dealership to have the oil and filter changed, as they are equipped to dispose of the waste oil and filters...
- Page 216 The engine cooling system uses PARAFLU UP fluid, top up only with fluid of the same type. PARAFLU UP cannot be mixed with other types of fluid; if mixed, do nor start the engine and contact Fiat Dealership immediately. The cooling system is pressurised. If necessary, replace the cap only with WARNING another genuine one, otherwise system efficiency could be compromised.
- Page 217 WINDSCREEN/REAR WINDOW/HEADLIGHT WASHER FLUID To top up, remove the cap (you shall hear a click) and then pour a mixture of water and TUTELA PROFESSIONAL SC 35, in the following concentrations: ❒ 30% TUTELA PROFESSIONAL SC 35 and 70% water in summer. ❒...
- Page 218 The oil consumption is very low; if, after topping up it becomes necessary to top up again quite soon after, have the system checked by Fiat Dealership for any leaks. Do not allow the power steering fluid to come into contact with the hot parts of WARNING the engine: it is inflammable.
- Page 219 BRAKE FLUID Unscrew cap (A) and check that the fluid level in the reservoir is at maximum. Fluid level in the reservoir shall not exceed the MAX mark. Check that the fluid level in the reservoir is at maximum. Top up with the brake fluid specified in the table “Fluids and lubricants” (see section “Technical Specifications ") When opening the cap take the utmost care to prevent impurities F0E00685m...
-
Page 220: Air Cleaner
AIR CLEANER REPLACEMENT Undo the four screws, remove cover (A) and take out the filtering element (B) to be replaced. F0E0172m Petrol version POLLEN FILTER If the car is used frequently in dusty or heavily polluted environments it is advisable to replace the filtering element more frequently than specified in the Service Schedule in this section;... -
Page 221: Diesel Fuel Filter
Dealership. Batteries contain substances that are very harmful for the environment. You are advised to have the battery changed at a Fiat Dealership, which is properly equipped for disposing of used batteries respecting nature and law. The liquid in the battery is poisonous and corrosive. Avoid contact with eyes and WARNING skin. - Page 222 (alarm, sound system, free-hand phone kit, etc.) contact Fiat Dealership whose qualified personnel, in addition to suggesting the most suitable devices, will evaluate the overall electric absorption, checking whether the car’s electric system is capable of withstanding the load required, or whether...
- Page 223 Passenger’s accessories which require permanent electric supply compartment lights must be off; (alarm, etc.) contact Fiat Dealership whose qualified ❒ ceiling lights must be off. The car is however personnel, in addition to suggesting the most suitable...
-
Page 224: Wheels And Tyres
❒ periodically check that the tyres have no cuts in the side wall, abnormal swelling or irregular tyre wear. If any of these occur, contact a Fiat Dealership. ❒ avoid overloading the vehicle when travelling: this may cause serious damage to the wheels and tyres. - Page 225 ❒ if a tyre is punctured, stop immediately and change ❒ if a tyre is changed, also change the inflation valve. it to avoid damage to the tyre, the rim, suspensions ❒ to allow even wear between the front and rear and steering system.
-
Page 226: Rubber Tubing
RUBBER TUBING WINDSCREEN/ REAR WINDOW WIPERS As far as the brake system and fuel rubber hoses are concerned, carefully follow the Service Schedule in this section. Indeed ozone, high temperatures and BLADES prolonged lack of fluid in the system may cause Periodically clean the rubber part using special hardening and cracking of the hoses, with possible products;... - Page 227 Changing the windscreen wiper blades On certain versions, to remove the blade proceed as follows: ❒ Raise the windscreen wiper arm and position the blade so that it forms an angle of 90° with the arm; ❒ press tabs (A) (set aside the blade) and remove the blade from the arm;...
- Page 228 SPRAY NOZZLES If there is no jet of fluid, first make sure there is fluid in the reservoir: see “Checking fluids” in this section. Then check that the nozzle holes are not clogged, if necessary use a needle. The windscreen jets are directed by adjusting the angle of the nozzles. Fluid jets shall be directed at about 250 mm from the window upper edge.
-
Page 229: Bodywork
WARRANTY bodywork against corrosion. Your Fiat Multipla is covered by warranty against perforation due to rust of any original element of the structure or body. For the general terms of this warranty, refer to Fiat Warranty Booklet. - Page 230 ❒ rinse well with water and dry with a jet of air or a ADVICE FOR PRESERVING chamois leather. THE BODYWORK When drying, take particular care with the less visible Paint parts like door frames, bonnet and around the headlights where water may collect. The car should Paintwork does not only serve an aesthetic purpose, not be taken to a closed area immediately, but left in but also protects the underlying sheet metal.
-
Page 231: Interiors
INTERIORS Windows Use specific window cleaner products to clean cloths Periodically check that water is not trapped under the to avoid scratching the glass or damaging the mats (due to water dripping off shoes, umbrellas, etc.) transparency. which could cause oxidisation of the sheet metal. IMPORTANT The inside of the rear window should CLEANING SEATS AND FABRIC/JERSEY be wiped gently with a cloth in the direction of the... - Page 232 STEERING WHEEL / GEAR LEVER KNOB If when cleaning the windscreen with special glass products, some drops fall on the leather covering of WITH GENUINE LEATHER COVERING the steering wheel/gear lever knob remove them These components shall only be cleaned with water immediately and then clean with water and neutral and neutral soap.
- Page 233 IDENTIFICATION DATA ..........ENGINE CODES - BODYWORK VERSIONS ....ENGINE ................. FUEL FEED/IGNITION ............TRANSMISSION ..............BRAKES .................. SUSPENSIONS ..............STEERING ................WHEELS ................. DIMENSIONS ............... PERFORMANCE ..............WEIGHTS ................CAPACITIES ................. FLUIDS AND LUBRICANTS ........... FUEL CONSUMPTION............EMISSIONS ..............RADIOFREQUENCY REMOTE CONTROL MINISTERIAL HOMOLOGATION .........
-
Page 234: Identification Data
IDENTIFICATION DATA You are advised to note the identification codes. The identification data stamped and given on the plates and their position are the following: 1 - Model plate. 2 - Chassis marking. 3 - Bodywork paint identification plate. 4 - Engine marking. F0E0654m MODEL PLATE The plate is to be found in the engine compartment and bears the... - Page 235 BODYWORK PAINT IDENTIFICATION PLATE The plate is applied inside the tailgate and it bears the following data: A - Paint manufacturer B - Colour name C - Fiat colour code D - Respray and touch up code. CHASSIS MARKING F0E0187m It is printed on the passenger compartment floor.
-
Page 236: Engine Codes - Bodywork Versions
ENGINE CODES - BODYWORK VERSIONS Engine code Body version 182B6.000 186AXC1A 02F JTD 115 (*) 186A8.000 – JTD 120 186A9.000 186AXG1A 07 VAN 100 4 seat 182B6.000 186BXC1A 00T 5 seat 182B6.000 186BXC1A 00U VAN JTD 120 4 seat 186A9.000 186BXG1A 04C 5 seat 186A9.000... -
Page 237: Engine
ENGINE GENERAL FEATURES JTD 115 (*) JTD 120 Engine code 182B6.000 186A8.000 186A9.000 Cycle Otto Diesel Diesel Number and layout of cylinders 4 in line 4 in line 4 in line Number of valves per cylinder Piston bore and stroke 80.5 x 78.4 82 x 90.4 82 x 90.4... -
Page 238: Fuel Feed/Ignition
FUEL FEED/IGNITION JTD 120 Ignition Multipoint sequential Direct injection phased electronic injection, with electronically controlled Multijet integral with ignition. “Common Rail” variable geometry turbosupercharger and intercooler. TRANSMISSION - JTD 120 Gearbox Five forward gears and reverse with synchromesh for forward gear engagement Clutch Self-adjusting pedal without idle stroke Drive... -
Page 239: Brakes
BRAKES - JTD 120 Service brakes: – front Disc, self-ventilating – rear Drum, self-centring shoes with mechanism for backlash recovery. Disc on cars fitted with ESP (optional). Handbrake Controlled by a lever, it works on the rear brakes IMPORTANT Water, ice and antifreeze salt on roads may deposit on the brake discs thus reducing braking efficiency at first braking. -
Page 240: Wheels
WHEELS SNOW TYRES Use the snow tyres specified in section “Driving your car” in paragraph “Snow tyres”. RIMS AND TYRES Pressed steel or alloy rims (where provided). Tubeless SNOW CHAINS tyres with radial carcass. Only use low profile chains, see section “Driving your All homologated tyres are listed in the log book. - Page 241 Maximum speed rating Load rating Q = up to 160 km/h. 60 = 250 kg 84 = 500 kg 61 = 257 kg 85 = 515 kg R = up to 170 km/h. 62 = 265 kg 86 = 530 kg S = up to 180 km/h.
- Page 242 UNDERSTANDING RIM MARKING The following are the necessary indications to understand the meaning of the markings on the rim, as shown in the figure. Example: 6 J x 15 H2 6 = rim width in inches (1) J = rim drop center outline (side projection where the tyre bead rests) 15 = rim nominal diameter in inches (corresponds to diameter of the F0E0228m tyre to be mounted) (3 =Ø)
- Page 243 COLD TYRE INFLATION PRESSURE (bar) Add +0.3 bar to the prescribed inflation pressure when the tyres are warm. Recheck pressure value with cold tyres. With snow tyres, add +0.2 bar to the inflation pressure value prescribed for standard tyres. Tyre From 1 person From 4 people plus 1 arranged in the boot...
-
Page 244: Dimensions
DIMENSIONS Boot volume (VDA standards): ❒ normal conditions 430 dm ❒ up to roof and with rear seats removed 1900 dm height is with car unladen. Dimensions in mm F0E0653m 2666 4089 1695 1515 1871 1520 JTD 120 2666 4089 1695 1515 1871... - Page 245 Boot 4-seat 5-seat Length Max. width 1440 1440 Width between wheelhouse 1215 1215 Effective height 1168 1168 Boot volume: – up to waist – – – up to rear parcel shelf – up to roof...
-
Page 246: Performance
PERFORMANCE Top speeds after running in, in kph. VAN 100 JTD 115 (*) JTD 120 VAN JTD 120 (*) Engine model provided for certain versions/markets only... -
Page 247: Weights
WEIGHTS Weights (kg) JTD 120 Empty weight (including all fluids, fuel tank at 90 % and with no optional): 1300 1370 Payload (*) including the driver: Maximum admitted loads (**) 1050 1100 – front axle: 1050 1050 – rear axle: –... - Page 248 Weights (kg) VAN 100 VAN JTD 120 4-seat 5-seat 4-seat 5-seat Kerb weight (with fuel, spare wheel, tools and accessories): 1350 1350 1420 1420 Payload (*) including the driver: 4p + 290 5p + 255 4 p+ 280 5p + 245 Maximum admitted loads (**) 1050 1050...
-
Page 249: Capacities
CAPACITIES JTD 120 Specified fuels Recommended products 63 (I) Unleaded Premium petrol Fuel tank: litres 7 (I) with no less than 95 R.O.N. including a reserve of: litres (EN228 Specification) (I) Diesel fuel for motor vehicles (EN590 Specification) Mixture of distilled water Engine cooling system 6.31 and PARAFLU UP at 50%... -
Page 250: Fluids And Lubricants
Use of products with low-quality properties than ACEA A3 and ACEA B4 could cause damages to the engine that are not covered by the war- ranty. For very cold climate conditions, ask Fiat Dealership for the appropriate Selenia product to use. - Page 251 Fluid and lubricant specifications Original fluids Applications for correct car operation and lubricants Synthetic-based oil, grade SAE 75W- 85, TUTELA CAR Mechanical gearbox that passes API GL4 PLUS specifications. TECHNYX and differential Lubricants and greases ATF DEXRON II D LEV oil TUTELA GI/A Hydraulic power steering for transmission...
-
Page 252: Fuel Consumption
FUEL CONSUMPTION The fuel consumption figures given in the table below are determined on the basis of the homologation tests set down by specific European Directives. Consumption values are defined by means of the following procedures: ❒ urban cycle: cold starting followed by driving that simulates urban use of the car; ❒... -
Page 253: Co 2 Emissions
Fuel consumption according to European Directive 1999/100/EC (litres x 100 km) JTD 120 Urban 11.1 Extra-urban Combined, average EMISSIONS The CO emission levels at the exhaust given in the following table refer to combined consumption. emissions according to Directive 1999/100/CE (g/km) JTD 120... -
Page 254: Radiofrequency Remote Control Ministerial Homologation
RADIOFREQUENCY REMOTE CONTROL: MINISTERIAL HOMOLOGATION International Country Homologation code code Austria Belgium Switzerland Germany Denmark Spain France Great Britain Greece Italy Ireland Iceland Luxembourg Norway Holland Portugal Sweden Finland... - Page 256 – advice for preserving – Isofix type child restraint BS system........system.......... the bodywork ......Additional checks ......Ceiling lights – headlights ........Adjusting the headlight beam ..– front ..........– identification plate..... Aerial ..........– front bulb replacement.... –...
- Page 257 – hazard lights........ lectric windows......iat Code (system) ......– heated rear window ....FIX & GO automatic – front ..........(quick tyre repair kit) ....– rear fog lights ......– rear..........Fluids and lubricants ....... Consumption Electrically controlled sunroof ..Front fog lights.........
- Page 258 – adjusting the headlight slant..Instrument panel......– key without remote control... – beam adjustment abroad..Instruments – replacing the batteries ..... Head restraints ........ – clock..........ubricants (specifications).... Heated rear window – control buttons ......– control ........– fuel gauge ........ain beam headlights Heating and climate –...
- Page 259 Pretensioners ........Roof rack/ski rack ......– accessories........Protecting the environment..Rubber tubing........– aerial..........– hands-free kit ......eat belts.......... adio-frequency remote control – radio transmitters and – general instructions ....– description ......... cellular telephones....– how to keep the seat belts –...
- Page 260 Steering wheel (adjustment) ..AN (setup)........Storing the car ........ Ventilation......... Sun visors .......... eights ........... Suspensions........Symbols..........Wheel geometry (toe-in) ....Wheel rims ........achometer........Tank cap ..........Wheels..........Third brake light......Window cleaning Top speeds ........– windscreen washer (control) .. Towing trailers –...
- Page 261 “End of Life Vehicles” to approved environmental standards. To find out the location of your nearest authorised treatment facility, offering free of charge take-back, simply contact one of our dealers or refer to the Fiat web site or call the toll free number 00800 3428 0000.
-
Page 264: Engine Oil Change
Only refuel cars with petrol engines with unleaded petrol with octane rating (RON) not less than 95 Diesel fuel for motor vehicles (EN 590 Specification) Fiat Auto S.p.A. Quality - Assistenza Tecnica - Ingegneria Assistenziale Largo Senatore G. Agnelli. 5 - 10040 Volvera - Torino (Italia) Print N.
Need help?
Do you have a question about the Multipla and is the answer not in the manual?
Questions and answers