JVC KD-SX985, KD-SX885 Instructions Manual
Jvc cd receiver instructions
Hide thumbs
Also See for KD-SX985, KD-SX885:
- Service manual (73 pages) ,
- Installation & connection manual (4 pages)
Table of Contents
Advertisement
CD RECEIVER
!"
CD
∂"¥„ Ë ´ ' ¥
For installation and connections, refer to the separate manual.
!"#$%&'()*+,-./0
°√ÿ ≥ "¥Ÿ § Ÿ Ë ¡ ◊ Õ ∑' Ë · ¬°µË " ßÀ"° „π°"√µ' ¥ µ— È ß ·≈–°"√‡™◊ Ë Õ ¡µË Õ
KD-SX985
ATT
SOUND
U
R
SOURCE
F
D
VOL
VOL
KD-SX885
ATT
SOUND
U
R
SOURCE
F
D
VOL
VOL
INSTRUCTIONS
!"
§"·π–π"
KD-SX985/KD-SX885
KD-SX985/KD-SX885
KD-SX985/KD-SX885
COMPACT
DIGITAL AUDIO
GET0073-001A
[U]
Advertisement
Table of Contents

Related Manuals for JVC KD-SX985, KD-SX885


Summary of Contents for JVC KD-SX985, KD-SX885
- Page 1 CD RECEIVER !" ∂“¥„ Ë ´ ’ ¥ SOUND SOURCE SOUND SOURCE For installation and connections, refer to the separate manual. !"#$%&'()*+,-./0 °√ÿ ≥ “¥Ÿ § Ÿ Ë ¡ ◊ Õ ∑’ Ë · ¬°µË “ ßÀ“° „π°“√µ‘ ¥ µ— È ß ·≈–°“√‡™◊ Ë Õ ¡µË Õ INSTRUCTIONS §”·π–π”...
-
Page 2: Important For Laser Products
3.CAUTION: Do not open the top cover. There are no user-serviceable parts inside. Leave all servicing to qualified service personnel. 4.CAUTION: This CD player uses invisible laser radiation and is equipped with safety switches to prevent radiation emission when unloading CDs. -
Page 3: Table Of Contents
Thank you for purchasing a JVC product. Please read all instructions carefully before operation, to ensure your complete understanding and to obtain the best possible performance from the unit. CONTENTS How to reset your unit ... How to use the MODE button ... -
Page 4: Location Of The Buttons
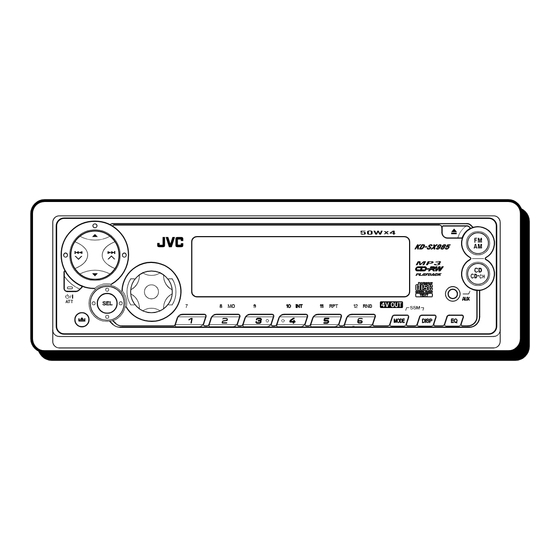
LOCATION OF THE BUTTONS Control panel Display window /¢ buttons 2 5 (up) button 3 ∞ (down) button 4 Remote sensor 5 Display window 6 0 (eject) button 7 FM AM button 8 CD CD-CH (AUX) button (standby/on/attenuator) button (control panel release) button q SEL (select) button w Control dial e MO (monaural) button... -
Page 5: Preparing The Remote Controller
Preparing the remote controller Before using the remote controller: • Aim the remote controller directly at the remote sensor on the main unit. Make sure there is no obstacle in between. Remote sensor • Do not expose the remote sensor to strong light (direct sunlight or artificial lighting). -
Page 6: Remote Controller
Remote controller RM–RK50 SOURCE 1 • Turns on the unit if pressed when the unit is turned off. • Turns off the unit if pressed and held until “SEE YOU” appears on the display. • Drops the volume level in a moment if pressed briefly. -
Page 7: Basic Operations
Turning on the power Turn on the power. “HELLO” appears on the display. Note on One-Touch Operation: When you select a source in step 2 below, the power automatically comes on. You do not have to press this button to turn on the power. Select the source. -
Page 8: Radio Operations
RADIO OPERATIONS Listening to the radio You can use either automatic searching or manual searching to tune in to a particular station. Searching a station automatically: Auto search Select the band (FM1 – 3, AM). (F1) (F2) Selected band appears*. * When “CLOCK”... - Page 9 Searching a station manually: Manual search Select the band (FM1 – 3, AM). (F1) (F2) (F3) Note: This receiver has three FM bands (FM1, FM2, FM3). You can use any one of them to listen to an FM broadcast. Press and hold ¢ “MANU”...
-
Page 10: Manual Preset
Storing stations in memory You can use one of the following two methods to store broadcasting stations in memory. • Automatic preset of FM stations: SSM (Strong- station Sequential Memory) • Manual preset of both FM and AM stations FM station automatic preset: SSM You can preset 6 local FM stations in each FM band (FM1, FM2 and FM3). -
Page 11: Tuning In To A Preset Station
Press and hold the number button (in this example, 1) for more than 2 seconds. Selected band/preset number and “MEMO” (memory) appear alternately for a while. Repeat the above procedure to store other stations into other preset numbers. Notes: • A previously preset station is erased when a new station is stored in the same preset number. -
Page 12: Cd Operations
CD OPERATIONS Playing a CD Open the control panel. Note: When an external component is connected to the AUX jack on the control panel, be careful of handling a CD. Insert a disc into the loading slot. The unit turns on, draws a disc and starts playback automatically. -
Page 13: Locating A Track Or A Particular Portion On A Cd
To stop play and eject the CD Press 0. CD play stops, the control panel opens, then the CD automatically ejects from the loading slot. If you change the source, the CD play also stops (without ejecting the CD this time). Notes: •... - Page 14 To play back tracks repeatedly (Repeat Play) You can play back the current track repeatedly. Press MODE to enter the functions mode while playing a disc. “MODE” flashes on the lower part of the display, and the number buttons work as different function buttons.
-
Page 15: Prohibiting Cd Ejection
Prohibiting CD ejection You can prohibit CD ejection and can lock a disc in the loading slot. While pressing CD CD–CH (AUX), press and hold for more than 2 seconds. “NO EJECT” flashes on the display for about 5 seconds, and the disc is locked and cannot be ejected. -
Page 16: Mp3 Introduction
MP3 INTRODUCTION This chapter is only for KD-SX985. What is MP3? MP3 is an abbreviation of Motion Picture Experts Group (or MPEG) Audio Layer 3*. MP3 is simply a file format with a data compression ratio of 1:10 (128 Kbps**). That means, by using MP3 format, one CD-R or CD-RW can contain 10 times as much data volume as a regular CD can. -
Page 17: Mp3 Directory/File Configuration
MP3 directory/file configuration : Root ROOT : Directories : MP3 files MP3 playback/search order (page 19) • The numbers in circles below the MP3 files ( MP3 files. Normally this unit plays back MP3 files in the recorded order. • The numbers inside the directories indicate the playback order and search order of the directories on an MP3 disc. -
Page 18: Mp3 Operations
MP3 OPERATIONS This chapter is only for KD-SX985. Refer also to “CD OPERATIONS” on pages 12 to Playing an MP3 disc Open the control panel. Insert an MP3 disc into the loading slot. The unit draws the disc. Playback starts automatically from the first file of the first directory once disc... -
Page 19: Locating A File Or Particular Portion On An Mp3 Disc
To change the display information While playing back an MP3 file, you can change the file information shown on the display. Each time you press DISP (display), the display changes to show the following: • When “TAG DISP” is set to “TAG ON” (initial setting: see page 29) Album name/performer (directory name*) Track title (file name*) - Page 20 To go to a particular directory directly IMPORTANT: To directly select the directories using the number button(s), it is required that directories are assigned 2 digit numbers at the beginning of their directory names. (This can only be done during the recording of CD-Rs or CD-RWs.) Ex.: If directory name is “01 ABC”...
-
Page 21: Selecting Mp3 Playback Modes
To skip to the previous directory Press ∞ (down) briefly while playing an MP3 disc. Each time you press the button consecutively, the previous directory is located (and the first file in the directory starts playing, if recorded). Ex.1: While playing an MP3 file in Directory 03 (see the illustration on page 17) Ex.2: While playing an MP3 file in Directory 05 (see the illustration on page 17) - Page 22 To play back files repeatedly (Repeat Play) You can play back the current file or all the files in the current directory repeatedly. Press MODE to enter the functions mode while playing an MP3 disc. “MODE” flashes on the lower part of the display, and the number buttons work as different function buttons.
-
Page 23: Sound Adjustments
Adjusting the sound You can adjust the sound characteristics to your preference. Select the item you want to adjust. Each time you press the button, the adjustable items change as follows: (bass) (treble) (fader) WOOFER (volume) (only for KD-SX985) Indication To do: Adjust the bass. -
Page 24: Selecting Preset Sound Modes (C-Eq: Custom Equalizer)
Selecting preset sound modes (C-EQ: custom equalizer) You can select a preset sound mode (C-EQ: custom equalizer) suitable to the music genre. Press EQ. The last selected sound mode is recalled and applied to the current sound. Sound mode indicator flashes. Ex.: If you have selected “USER”... -
Page 25: Storing Your Own Sound Adjustments
• When “CEQ LINK” is set to “LINK ON” The selected sound mode can be stored in memory for the current source. Each time you change to the same source, the same sound mode is also recalled and shown on the display. The C-EQ indicator also flashes. •... -
Page 26: Other Main Functions
OTHER MAIN FUNCTIONS Setting the clock Press and hold SEL (select) for more than 2 seconds so that one of the PSM items appears on the display. (See page 27.) Set the hour. 1 Select “CLOCK H (hour)” if not shown on the display. - Page 27 Repeat steps 2 and 3 to adjust the other PSM items if necessary. Preferred Setting Mode (PSM) items Hold. Select. CLOCK H Hour adjustment CLOCK M Minute adjustment CEQ LINK Custom equalizer link CLOCK Clock display LEVEL Level display DIMMER* Dimmer mode TEL* Telephone muting...
- Page 28 To set the Custom Equalizer Link – CEQ LINK A different sound mode (C-EQ) can be stored in memory for each source so that you can change the sound modes simply by changing the sources. When shipped from the factory, this mode is deactivated.
- Page 29 To select the scroll mode – SCROLL (only for KD-SX985) You can select the scroll mode for the disc information (when the entire text cannot be shown all at once). When shipped from the factory, Auto Scroll mode is set to “ONCE.” •...
-
Page 30: Assigning Names To The Sources (Only For Kd-Sx985)
Assigning names to the sources This section is only for KD-SX985. You can assign names to station frequencies and discs (both in this unit and in the CD changer). After assigning a name, it will appear on the display when you select the source. Sources Maximum number of characters... -
Page 31: Attaching The Control Panel
Detaching the control panel You can detach the control panel when leaving the car. When detaching or attaching the control panel, be careful not to damage the connectors on the back of the control panel and on the panel holder. Detaching the control panel Before detaching the control panel, be sure to turn off the power. -
Page 32: Cd Changer Operations
We recommend that you use one of the CH-X series with your unit. If you have another CD automatic changer, consult your JVC car audio dealer for connections. • For example, if your CD automatic changer is one of the KD-MK series, you need a cord (KS-U15K) for connecting it to this unit. - Page 33 To show the CD Text information (only for KD-SX985) This is possible only when connecting a JVC CD automatic changer equipped with CD Text reading capability. Select text display mode while playing a CD Text.
-
Page 34: Selecting Cd Playback Modes
Selecting CD playback modes To play back tracks at random (Random Play) Press MODE to enter the functions mode while playing a disc. “MODE” flashes on the lower part of the display, and the number buttons work as different function buttons. -
Page 35: External Component Operations
EXTERNAL COMPONENT OPERATIONS Playing an external component You can connect two external components to this unit. Connect one to the CD changer jack on the rear using the Line Input Adaptor KS-U57 (not supplied), and the other to the AUX (auxiliary) input jack on the control panel. -
Page 36: Troubleshooting
TROUBLESHOOTING What appears to be trouble is not always serious. Check the following points before calling a service center. Symptoms • Disc cannot be played back. • Sound is sometimes interrupted. • CD-R/CD-RW cannot be played back. • Tracks on the CD-R/ CD-RW cannot be skipped. - Page 37 Symptoms • “NO DISC” appears on the display . • “RESET 8” appears on the display . • “RESET 1” – “RESET 7” appears on the display. • Disc cannot be played back. • Files skip, or 00’00” appears and playback stops. •...
-
Page 38: Maintenance
MAINTENANCE Handling CDs This unit has been designed to reproduce CDs and CD-Rs. Only for KD-SX985: • You can also play back CD Text. • You can also play back your original CD-Rs (Recordable) and CD-RWs (Rewritable) either in audio CD format or in MP3 format. Only for KD-SX885: KD-SX885 is not compatible with MP3. -
Page 39: Specifications
[AM Tuner] Sensitivity: 20 V Selectivity: 35 dB Having TROUBLE with operation? Please reset your unit CD PLAYER SECTION Type: Compact disc player Signal Detection System: Non-contact optical pickup (semiconductor laser) Number of channels: 2 channels (stereo) Frequency Response: 5 Hz to 20 000 Hz... -
Page 40: In-Dash Mounting
• installation. However, you should make adjustments corresponding to your specific car. If you have any questions or require information regarding installation kits, consult your JVC car audio dealer or a company supplying kits. Before mounting: Press (Control Panel Release button) to detach the control panel if already attached. -
Page 41: Electrical Connections
This unit is designed to operate on 12 V DC, NEGATIVE ground electrical systems. If your vehicle does not have this system, a voltage inverter is required, which can be purchased at JVC car audio dealers. • • Replace the fuse with one of the specified rating. If the fuse blows frequently, consult your JVC car audio dealer. - Page 42 ENGLISH !"#$ / Typical Connections / Before connecting: Check the wiring in the vehicle carefully. Incorrect connection may cause serious damage to this unit. Connect the colored leads of the power cord to the car battery, speakers and automatic antenna (if any) in the following sequence: 1 Black: ground 2 Yellow: to car battery (constant 12 V)
- Page 43 ≈”‚æßÀ≈— ß WOHK)« UŽUL ë INPUT JVC Amplifier JVC= = = = = ‡§√◊ Ë Õ ß¢¬“¬‡ ’ ¬ ß Â Â Â Â Â W W W W W — — — — — Ä Ä Ä Ä Ä U U U U U ...
Need help?
Do you have a question about the KD-SX985, KD-SX885 and is the answer not in the manual?
Questions and answers