Table of Contents
Advertisement
Quick Links
Instruction
manual
MODEL
C5101
To learn more about Porter-Cable
visit our website at:
http://www.porter-cable.com
Copyright © 2005 Porter-Cable Corporation
Single-Stage Oilfree
Compressor
Please make certain that the person who
is to use this equipment carefully reads
and understands these instructions before
starting operations.
The Model and Serial No. plate is located on the main
housing of the tool. Record these numbers in the
spaces below and retain for future reference.
®
Model No.______________________________________
Type ___________________________________________
Serial No. ______________________________________
ESPAÑOL: PÁGINA 23
FRANÇAIS : PAGE 45
IMPORTANT
Part No.
A10208
-054-0
Advertisement
Table of Contents

Subscribe to Our Youtube Channel
Related Manuals for Porter-Cable C5101


Summary of Contents for Porter-Cable C5101
- Page 1 Single-Stage Oilfree Compressor MODEL C5101 IMPORTANT Please make certain that the person who To learn more about Porter-Cable is to use this equipment carefully reads visit our website at: and understands these instructions before http://www.porter-cable.com starting operations. The Model and Serial No. plate is located on the main housing of the tool.
-
Page 2: Safety Guidelines - Definitions
SAFETY GUIDELINES - DEFINITIONS This manual contains information that is important for you to know and under- stand. This information relates to protecting YOUR SAFETY and PREVENTING EQUIPMENT PROBLEMS. To help you recognize this information, we use the symbols below. Please read the manual and pay attention to these symbols. Indicates a potentially Indicates an imminent- hazardous situation... - Page 3 IMPORTANT SAFETY INSTRUCTIONS Save these instructions Improper operation or maintenance of this product could result in serious injury and property damage. Read and understand all warnings and operation instructions before using this equipment. HAZARD WARNING: Risk of explosion or fire What Could Happen How To Prevent It It is normal for electrical contacts within...
- Page 4 HAZARD WARNING: Risk of Bursting Air Tank: The following conditions could lead to a weakening of the tank, and result in a violent tank explosion and could cause property damage or serious injury. How To Prevent It What Could Happen HAZARD WARNING: Risk from Flying Objects Always wear ANSI Z87.1 approved...
- Page 5 HAZARD WARNING: Risk of Electrical Shock What Could Happen How To Prevent It Your air compressor is powered by Never operate the compressor outdoors electricity. Like any other electrically when it is raining or in wet conditions. powered device, If it is not used Never operate compressor with properly it may cause electric shock.
- Page 6 HAZARD WARNING: Risk of Burns What Could Happen How To Prevent It Never touch any exposed metal parts Touching exposed metal such as the on compressor during or immediately compressor head or outlet tubes, can after operation. Compressor will remain result in serious burns.
- Page 7 HAZARD WARNING: Risk of Serious Injury or Property Damage When Transporting Compressor (Fire, Inhalation, Damage to Vehicle Surfaces) What Could Happen How To Prevent It Oil can leak or spill and could result in Always place COMPRESSOR on a fire or breathing hazard; serious injury or protective mat when transporting to death can result.
-
Page 8: Duty Cycle
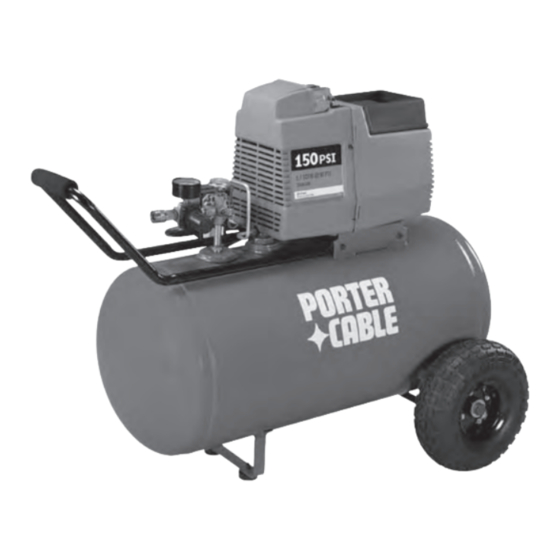
50%-75% average duty cycle be maintained; that is, the air compressor pump should not run more than 30-45 minutes in any given hour. SPECIFICATIONS Model Nos. C5101 Running Horsepower Bore 2-3/8" Stroke 1.35"... -
Page 9: Assemble Handle
ASSEMBLY Assemble Handle To make installation easier, submerge handle grip into warm soapy water. Remove handle grip from soapy water Screw and slide onto handle. Insert the handle inside the compressor saddle and line up the two bolt holes on each side. -
Page 10: Installation
INSTALLATION HOW TO SET UP YOUR UNIT Location of the Air Compressor • Locate the air compressor in a clean, dry and well ventilated area. • The air compressor should be located at least 12" away from the wall or other obstructions that will interfere with the flow of air. -
Page 11: Extension Cords
Extension Cords Using extension cords is not recommended. The use of extension cords will cause voltage to drop resulting in power loss to the motor and overheating. Instead of using an extension cord, increase the working reach of the air hose by attaching another length of hose to its end. -
Page 12: Know Your Air Compressor
OPERATION Know Your Air Compressor READ THIS OWNER’S MANUAL AND SAFETY RULES BEFORE OPERATING YOUR UNIT. Compare the illustrations with your unit to familiarize yourself with the location of various controls and adjustments. Save this manual for future reference. Description of Operation Become familiar with these controls before operating the unit. -
Page 13: Before Starting Break-In Procedure
Air Compressor Pump (not shown): Compresses air into the air tank. Working air is not available until the compressor has raised the air tank pressure above that required at the air outlet. Check Valve: When the air compressor is operating, the check valve is "open", allowing compressed air to Check Valve enter the air tank. -
Page 14: Before Each Start-Up
Before Each Start-Up: Place On/Auto/Off lever to "Off". Pull the regulator knob out and turn counterclockwise to set the outlet pressure to zero. Attach hose and accessories. NOTE: The hose or accessory will require a quick connect plug if the air outlet is equipped with a quick connect socket. -
Page 15: Maintenance
MAINTENANCE Customer Responsibilities Daily Before or after each each 15- ENG A10208... -
Page 16: Air Compressor Pump Intake And Exhaust Valves
Risk of Bursting. Water will condense in the air tank. If not drained, water will corrode and weaken the air tank causing a risk of air tank rupture. After the water has been drained, close the drain valve (clockwise). The air compressor can now be stored. -
Page 17: To Replace Regulator
Unscrew the check valve (turn counterclockwise) using a 7/8" open end wrench. Note the orientation for reassembly. Using a screwdriver, carefully push the valve disc up and down. NOTE: The valve disc should move freely up and down on a spring which Screwdriver holds the valve disc in the closed position, if not the check valve... - Page 18 STORAGE Before you store the air compressor, make sure you do the following: Review the "Maintenance" section on the preceding pages and perform scheduled maintenance as necessary. Set the On/Auto/Off lever to "Off" and unplug unit. Turn the regulator counterclockwise and set the outlet pressure to zero. Remove the air tool or accessory.
-
Page 19: Troubleshooting
TROUBLESHOOTING Risk of Unsafe Operation. Unit cycles automatically when power is on. When performing maintenance, you may be exposed to voltage sources, compressed air, or moving parts. Personal injuries can occur. Before performing any maintenance or repair, disconnect power source from the compressor and bleed off all air pressure. - Page 20 PROBLEM CAUSE CORRECTION Pressure reading It is normal for "some" If there is an excessive on the regulated pressure drop to occur. amount of pressure drop pressure gauge when the accessory is used, drops when an adjust the regulator following accessory is the instructions in the used.
- Page 21 PROBLEM CAUSE CORRECTION Regulator will Replace. Damaged regulator. not shut off air outlet. Motor will not Motor overload protection Let motor cool off and run. overload switch will switch has tripped. automatically reset. Tank pressure exceeds Motor will start automatically when tank pressure drops pressure switch "cut-in"...
- Page 22 • Use reasonable care in the operation and maintenance of the product as described in the Owners Manual(s). • Deliver or ship the product to the nearest Porter-Cable Authorized Warranty Service Center. Freight costs, if any, must be paid by the purchaser.
Need help?
Do you have a question about the C5101 and is the answer not in the manual?
Questions and answers