Table of Contents
Advertisement
Advertisement
Table of Contents

Related Manuals for Trek Radar


Summary of Contents for Trek Radar
- Page 1 Radar & Radar Alt...
- Page 2 Congratulations for purchasing a Trek cycling computer.
- Page 3 Arrow Up (shown) Fig. 1 shows current speed equal or greater than average. Arrow Down indicates current speed is less than average speed. Temperature (Fig. 3). Air Fig. 2 © Copyright Trek Bicycle Corporation 2001 All rights reserved...
- Page 4 temperature, displayed in Fahrenheit or Celsius to cor- respond to user’s selection of miles or kilometers. Wind chill (Fig. 4). Calcu- Fig. 3 lates temperature with speed. Starts at 50°F with ten degree increments to -20°F. Upper Display (scroll with Set button) Fig.
- Page 5 TIME- Clock (Fig. 8) show- ing time of day expressed in 12 or 24 hour format. Fig. 8 Compass (Fig. 9), Radar ALT model only. One or two letter compass heading (N, NE, E, etc.). The compass icon always points east.
- Page 6 button) MODE button (Fig. 11). Used to scroll through features on lower screen lines. Also used in Reset of computer, referred to as Fig. 11 <MODE>. TRP DST - Trip Distance (Fig. 12). Maximum 9999.9KM or 6213.0MI), then rollover to zero.
-
Page 7: Battery Change
AVG SPD - Average Speed (Fig. 14). TRP DST divided by RIDE TM. Minimum display of 0.1. Calculated since last Start, ReSet, ride time rollover, or battery change. Fig. 14 MAX SPD - Maximum Speed (Fig. 15). 100.0MPH or 160.7KPH maximum. - Page 8 Additional Features- 6 Language scroll bar for easy usage Waterproof Auto Start/Stop/Sleep - Computer turns on automatically when wheel turns. Enters Sleep mode after 2 seconds of no signal to preserve average speed. Time continues to display when the computer is in sleep mode. To save battery life, the computer turns off automatically after 10 minutes of no signal, or 10 minutes of sleep mode.
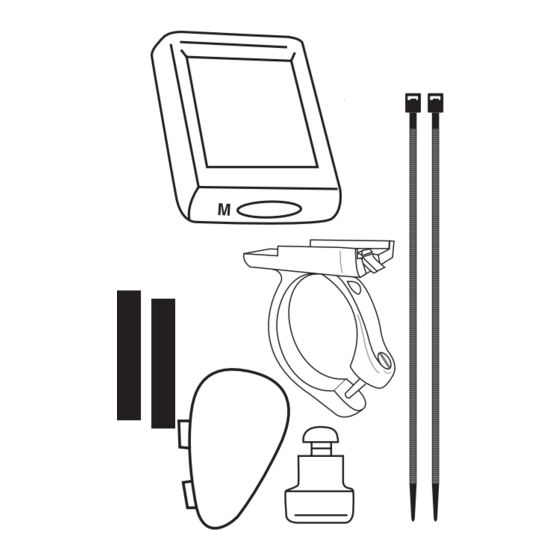
- Page 9 Install the computer on your bike Install the Sensor and Magnet 1. Position the sensor unit to the inside of the right fork blade near the top (Fig. 18). NOTE: For best results computer and sensor should be less than 18” apart. Attach the sensor to the fork blade with quick ties, but do not tighten the ties yet.
- Page 10 scissors. 4. Attach the bracket to the handlebar, on the right- hand side of the stem. Position the bracket end with the Phillips head screw nearest Fig. 20 the rider (Fig. 20). Your computer comes with a bar clamp which fits both 25.4 and 26.0mm diameter (mountain or road) handlebars.
-
Page 11: Wheel Size
(Fig. 20). Calibrate the Computer Quick Set-Up Your Trek Computer has a preset wheel size (as marked on the box) and is ready to ride. The next section describes how to change the factory settings. Follow those instructions which cover the setting(s) you would like to change. - Page 12 Dual wheel Size selection and set up. In any mode (day/date, time, compass, ride time) press and hold Mode and Set for 2 seconds. The computer will toggle between Wheel size 1 and Wheel size 2 in the lower right corner of the screen (Fig 20a).
- Page 13 Set Day and Date 1. Press <Set> to scroll to DAY/DT. 2. Hold <Set> until SET DT displays, replaced by a two digit display, with a digit flashing. 3. Press <Mode> to scroll the number menu. 4. Press <Set> to select a number and advance to the next digit.
- Page 14 hours. SET MIN displays. 7. Repeat #4 and #5 to set both digits or minutes. 24 HRS displays. 8. Press <Mode> to scroll clock types 24HR and 12HR. Press <Set> to choose. After selection is made with <Set>, DONE displays, then the computer returns to normal operation.
- Page 15 computer returns to normal operation. ReSet (Ride Memory)- Your computer has Ride Memory that calculates and stores Trip Distance, Average Speed, Maximum Speed, and Ride Time. This data can be reset to zero, and the computer will automatically begin storing data again. 1.
- Page 16 place with your thumb or fingers. 6. Follow the instructions on page 14 to ReStart after installing a battery. First Use- after ReStart or Battery Install 1. ENG displays. Press <Mode> to scroll the language options. 2. Press <Set> to select. SET WHL displays, then a wheel size.
- Page 17 stem is at its bottom-most position. 2. Mark the ground directly under the valve stem with chalk or a piece of tape (Fig. 23). 3. Roll the bicycle forward in a straight line until the wheel has completed one revolution and the valve stem is again at its bottom-most posi- tion.
- Page 18 ReStart (total system erase) 1. Press All Clear on the back of the computer (Fig. 24) to erase all information including wheel size. Fig. 24 Please note your settings before performing this operation. E.18...
Need help?
Do you have a question about the Radar and is the answer not in the manual?
Questions and answers