Advertisement
Table of Contents
- 1 Table of Contents
- 2 Your Spread Spectrum Transmitters
- 3 Arming the System
- 4 Protection While the System Is Armed
- 5 Disarming the System
- 6 Manually Overriding Your System
- 7 Programming Your Custom Override Code
- 8 Eliminating the Normal Arm and Disarm Chirps
- 9 Remote Panic Operation
- 10 Telematic Upgrade
- 11 PATENTED: Www.voxxintl.com/Company/Patents
- Download this manual
See also:
Installation Manual
Table Of Contents:
Features and Options
Intrusion Signals and Tones
Valet Override, Programming Control Switch
Manually Overriding Your System Using Custom Code
Optional Device Channels
Two Way Remote (Transceiver) Screen Icons & Indications
Two Way Remote Function Program Chart
Functions At A Glance
Replacement or Additional Transmitters Programming
Model APS-596E
Owners Guide
2 Way LCD Long Range Vehicle
Security System
Page 1
Page 2 - 4
Page 3
Page 4
Page 5
Page 5 - 6
Page 6 - 7
Page 7
Page 7
Page 8 - 9
Page 9
Page 10
Page 10 - 11
Page 11 - 12
Page 12
Page 12 - 17
Page 18
Page 19
Page 20
128-9315
1 of 20
Advertisement
Table of Contents

Related Manuals for Prestige APS-596E


Summary of Contents for Prestige APS-596E
-
Page 1: Table Of Contents
Model APS-596E Owners Guide 2 Way LCD Long Range Vehicle Security System Table Of Contents: Features and Options Page 2 - 4 Your Spread Spectrum Transmitters Page 3 Arming The System Page 4 Protection While The System Is Armed Page 5... - Page 2 5 Button Two Way Security System With Plug-In Shock Sensor & Starter Disable IMPORTANT! In order to provide you with the highest level of security to your vehi- cle, this system is equipped with selectable manual override circuitry. It is possible that you will need to override you security system if the transmitter becomes lost, or inoperative due to battery failure.
-
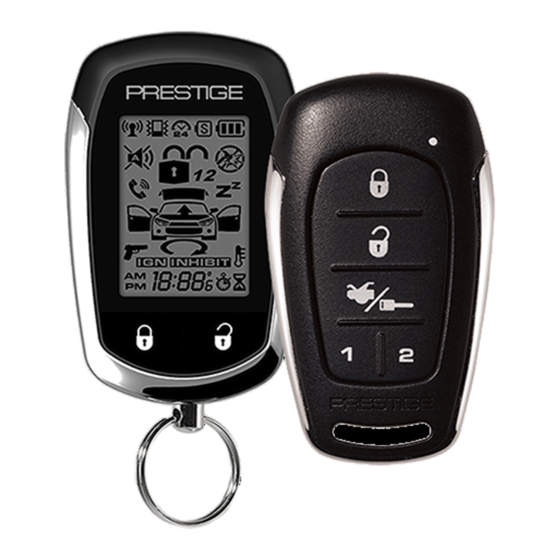
Page 3: Your Spread Spectrum Transmitters
Plug In Dual Stage Shock Sensor Audible Arm, Disarm, Defect, and Tamper Chirp Indications Headlight Control Output Illuminated Entry Control Output Active or Passive Arming Selectable Programmable Auto Lock On / Off Programmable Auto Unlock On / Off/Drivers Door/All Doors ... -
Page 4: Arming The System
See "System Status" described later in this manual. Consult your installation center if your system has been configured differently. PRESTIGE NOTE: Your system has the option of using a siren, the vehicle horn, or both for the sounding device. Where the siren is refer- enced below, the horn or both may in fact chirp, or beep. -
Page 5: Protection While The System Is Armed
cycle will restart when all doors are closed. At the end of the passive arming cycle; The dash mounted LED begins to flash slowly. Parking Lights flash one time. Siren sounds one chirp If the siren did not sound when arming, then the chirps have been turned off and you should refer to the section titled “ELIMINATING THE ARM / DISARM CHIRPS“... - Page 6 The LED will start flashing rapidly, indicating that the system is re-arming automatically. Open any door to suspend the automatic arming. Parking Lights flash two times. If the parking lights flashed three times, then the alarm was triggered in your absence.
-
Page 7: Manually Overriding Your System
If the LED is flashing three times...pause...three times...pause...etc., then an intrusion attempt was made through one of the vehicle’s doors. These intrusion warning indicators are stored in the system’s memory and will only be erased when the ignition key is turned on. Push Button LED Receiver Valet/Programming Switch The push button switch located on the windshield mount receiver allows you to temporarily bypass all alarm functions, eliminating the need to hand your transmitter... -
Page 8: Programming Your Custom Override Code
The alarm system will stop sounding and enter the (bypassed) mode. You can now start and operate the vehicle normally. Typically this override mode is used only if the transmitter has become inoperative. Programming Your Custom Override Code: Unlike override switches easily found, and defeated, this security system allows the consumer to program a personal override code, offering a higher level of security. - Page 9 Custom Code Programming Example: To Change the code from the factory pre-assigned code of 11 to “52” you would do the following: 1. Disarm the system by use of the transmitter, or by use of the emergency override sequence. 2. Turn the ignition switch to the ON position. 3.
-
Page 10: Eliminating The Normal Arm And Disarm Chirps
MANUALLY OVERRIDING YOUR SYSTEM: USING THE CUSTOM CODE OVERRIDE Assuming the override code programmed has not been changed, and the default override code of 11 is in the system's memory. 1) Enter the vehicle and turn the ignition switch to the on position. NOTE: The siren will sound. - Page 11 1. Press and hold the ARM or DISARM button on the keychain transmitter for 3 or more seconds. The alarm will immediately sound. 2. To stop the alarm, press and hold the ARM or DISARM button on the transmitter again for 3 seconds. If the button is not pressed, the alarm will automatically stop after 30 seconds.
-
Page 12: Telematic Upgrade
Remote Window Closure Remote Garage Door Interface To remotely operate the device indicated, momentarily press, or press and hold the appropriate transmitter button(s) as indicated above. ADDITIONAL REMOTE FUNCTION ( CHANNEL 5 ) Controlled By: Trunk/Key Button Option Button Lock + Unlock Buttons Lock + Trunk/Key Buttons ... - Page 13 When Armed, Press the Disarm/Unlock button to Unlock and Disarm the System. The Unlock Icon is displayed on the LCD panel and the parking lights flash twice. When the Key Icon Button has been operated for 3 seconds the trunk open icon will flash on the LED Screen.
- Page 14 ADDITIONAL REMOTE FEATURES: The two way remote control unit allows you to access status information from the vehicle, check tempera- PRESTIGE ture, light the display, toggle the transmitter from Trunk Release/ Remote Start beep tones to vibrate mode, initiate daily start timer, Option and temperature start.
- Page 15 Temperature Start Mode (Available on certain remote start models) To toggle this feature on or off, from the armed mode, press the Option & Unlock Buttons simultaneously, the temperature icon appear on, or disappear from the display, and the transmitter will emit a tone. NOTE: This feature must be active in the feature selection menu of your system.
- Page 16 NOTE: A maximum of two of either style transmitter may be programmed to your unit. BATTERY INDICATOR Your transmitter has a battery indicator that is PRESTIGE shown in the upper right corner of the screen as shown left. This icon indicates a new bat- tery shown with 3 bars. As the battery deteriorates, INHIBIT the bars will disappear.
- Page 17 VIBRATE MODE ON This icon will be displayed if you select vibrate instead of tones. To toggle vibrate on and off, press "F" + Unlock simultaneously. ALARM CLOCK This icon will be toggled on and off when the "F" + Trunk/Key buttons are pressed simultaneously.
- Page 18 TRANSMITTER TRANSMITTER ICON TONE/VIBRATE FUNCTION BUTTON DISPLAYED SELECTION PRESS FOR 18:88 TIMING ADJUST 2 BEEP TONES 5 SECONDS MODE (HRS) TIMING ADJUST 18:88 USE KEY BUTTON OR OPTION PRESS 1X BUTTON TO SELECT MODE (MINS) ALARM CLOCK 18:88 USE KEY BUTTON OR OPTION PRESS 2X ADJUST MODE (HRS) BUTTON TO SELECT...
- Page 19 APS 596E SYSTEM FUNCTIONS AT A GLANCE DASH LED INDICATORS RAPID FLASHING PASSIVE ARMING/ACTIVE REARMING SLOW FLASHING ARMED DISARMED ON SOLID VALET MODE 3 FLASH...PAUSE INTRUSION ZONE 3 2 FLASH...PAUSE INTRUSION ZONE 2 1 FLASH...PAUSE INTRUSION ZONE 1 SIREN CHIRP INDICATORS 1 CHIRP * 2 CHIRPS * DISARM...
-
Page 20: Patented: Www.voxxintl.com/Company/Patents
2 receiver channels at the same time. This unit's transmitters can control two vehicles with Prestige Remote Systems. To toggle primary or secondary vehicle press lock and trunk/key buttons simultaneously for 5 seconds.
Need help?
Do you have a question about the APS-596E and is the answer not in the manual?
Questions and answers