Table of Contents
Advertisement
EN
Digital Camera
User's Guide
Thank you for purchasing this CASIO product.
• Before using it, be sure to read the precautions contained in this User's Guide.
• Keep the User's Guide in a safe place for future reference.
• For the most up-to-date information about this product, visit the official EXILIM
Website at http://www.exilim.com/
Advertisement
Table of Contents

Subscribe to Our Youtube Channel
Related Manuals for Casio Exilim EX-FR10


Summary of Contents for Casio Exilim EX-FR10
-
Page 1: Digital Camera
Digital Camera User’s Guide Thank you for purchasing this CASIO product. • Before using it, be sure to read the precautions contained in this User’s Guide. • Keep the User’s Guide in a safe place for future reference. • For the most up-to-date information about this product, visit the official EXILIM... -
Page 2: Accessories
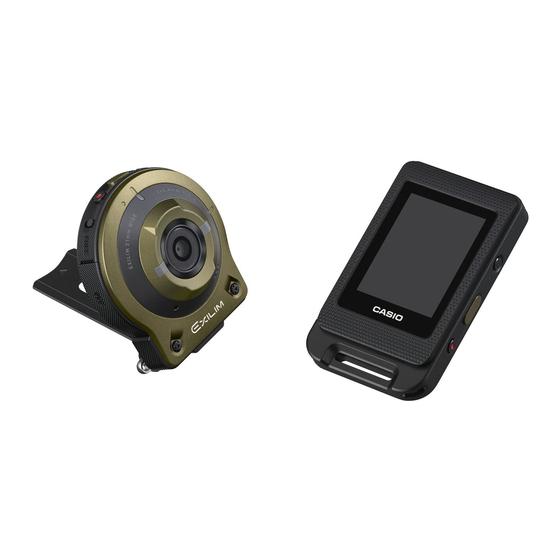
As you unpack your camera, check to make sure that all accessories shown below are included. If anything is missing, contact your original retailer. Hinge Unit Camera Controller • The hinge unit comes (EX-FR10) (EX-FR10CT) pre-attached to the camera. Lens hood Tripod nut... -
Page 3: Read This First
CASIO COMPUTER CO., LTD. is forbidden under copyright laws. • CASIO COMPUTER CO., LTD. shall not be held liable for any damages or lost profits suffered by you or any third party due to the use or malfunction of this product. -
Page 4: Table Of Contents
Quick Start Basics What you can do with your CASIO camera ......10 Using the Attachment ......... . . 12 Controller . - Page 5 Viewing Snapshots and Movies Play Mode Screen ..........50 Viewing Snapshots .
- Page 6 Memory Card Data ..........80 Appendix Safety Precautions.
-
Page 7: General Guide
General Guide The numbers in parentheses indicate the pages where each item is explained. Camera Controller 9 bk bl cl cm cn co cp Camera [FREE] lever (page 13) Carabiner strap [USB] port attachment bar Operation lamp (pages 18, 21, 74, 78) (page 16) (pages 19, 22) [USB] cover... -
Page 8: Monitor Screen Contents And How To Change Them
Monitor Screen Contents and How to Change Them The monitor screen uses various indicators, icons, and values to keep you informed of the camera’s status. • The sample screens in this section are intended to show you the locations of all the indicators and figures that can appear on the monitor screen in various modes. -
Page 9: Movie Playback
. Snapshot Viewing Image menu icon (page 54) Information icon (page 9) Snapshot image size (page 46) Folder name/file name (page 80) REC mode icon (page 27) Date/Time (pages 27, 68) Camera battery level indicator (page 24) Controller battery level indicator (page 24) Home icon (page 50) Exposure compensation (page 47) White balance (page 48) -
Page 10: Quick Start Basics
Quick Start Basics What you can do with your CASIO camera Your CASIO camera is packed with a powerful selection of features and functions to make recording of digital images easier, including the following main functions. . Shooting A variety of shooting styles The camera connects to the controller using Bluetooth ®... - Page 11 . Viewing Highlight Photo You can configure camera settings to automatically select snapshot highlights and generate a collage of them each day. *See page for more information. Highlight Movie You can configure camera settings to automatically select snapshot and movie highlights, and create a movie of them each day.
-
Page 12: Using The Attachment
Using the Attachment You can configure the camera to suit your specific needs by attaching the hinge unit, which enables attachment of the controller, and other included and optionally available attachments. This way you can configure the camera to suit your specific needs. -
Page 13: Hinge Unit
Hinge Unit . To use the hinge unit as a stand . To change the shooting direction by 90 degrees While pulling down on the camera’s [FREE] [FREE] lever lever, rotate the camera clockwise 90 degrees until you hear a click. •... -
Page 14: Lens Hood
Remove the hinge unit from the camera. . To attach the hinge unit to the camera Align the camera’s operation lamp with the A mark on the hinge unit. Rotate the camera clockwise about 15 degrees until its operation lamp is aligned with the B mark on the hinge unit. -
Page 15: Tripod Nut
Tripod nut Use the tripod nut to secure a tripod (commercially available) to the hinge unit. Tripod nut Tripod (commercially available) Strap . Neck Strap The neck strap can be attached to the camera or the controller. Remove the buckles from the strap and attach the strap to the two strap holes on the camera or controller. - Page 16 Pass the ends of the strap through the bands. . Carabiner Strap Pass the carabiner strap belt around the controller’s carabiner strap attachment bar. Pass the belt through the buckle to secure it. IMPORTANT! • The carabiner strap is not intended for mountain climbing use. It is designed only to support the camera.
-
Page 17: Using The Touch Panel
Using the Touch Panel The monitor screen of the camera is a touch panel. This means you can perform the following operations by touching the screen with your fingers. Touch Momentarily touching the screen with your finger. Touch the screen to select an icon or menu item, and to configure settings. -
Page 18: First, Charge The Battery Prior To Use
First, charge the battery prior to use. The camera and the controller each have a built-in rechargeable lithium ion battery. The batteries are not charged when you purchase the camera, so you will need to charge both the camera and controller before using them. You can use either of the two following methods to charge the batteries. - Page 19 . Operation Lamp Indications While power is off Operation Lamp Status Meaning Lit red Charging Charging stopped due to abnormal ambient Flashing red temperature, USB-AC adaptor problem, battery problem (page 102), timer operation. Unlit Charging complete While power is on •...
- Page 20 IMPORTANT! • A battery that has not been used for a long time, or ambient temperature extremes can cause charging to take longer than normal. If charging takes longer than about five hours, a timer will terminate it automatically, even if the battery is not fully charged.
- Page 21 . To charge using a USB connection to a computer While the camera and controller are turned off, connect in the sequence shown below [USB] port Computer (power turned on) USB port Micro USB cable [USB] cover (included with camera) When plugging in the connectors, orient this marking as described below.
- Page 22 . Operation Lamp Indications While power is off Operation Lamp Status Meaning Lit red Charging Charging stopped due to abnormal ambient Flashing red temperature, USB-AC adaptor problem, battery problem (page 102), timer operation. Unlit Charging complete While power is on •...
- Page 23 IMPORTANT! • The first time you connect the camera or controller to your computer with the USB cable, an error message may appear on your computer. If this happens, disconnect and then reconnect the USB cable. • A battery that has not been used for a long time, certain types of computers, and connection conditions can cause charging to take more than approximately five hours, which will trigger a timer that terminates charging automatically, even if the battery is not fully charged.
- Page 24 Checking the Current Battery Level As battery power is consumed, a battery indicator on the monitor screen indicates its current level as shown below. Level High Camera Battery Indicator Controller Indicator Color White * White indicates battery power is low. Charge the battery as soon as possible. indicates that the battery is about to go dead.
-
Page 25: Turning Power On And Off
Turning Power On and Off . Camera-Controller Wireless Connection (Bluetooth) The camera and controller communicate over a Bluetooth wireless technology connection. Once you perform the “pairing” operation required for Bluetooth wireless technology connection, the camera and controller will automatically connect to each other whenever you turn them on. - Page 26 • The maximum range for shooting with the controller’s shutter button is around 10 meters (32.8'). The maximum range for viewing the image on the controller’s monitor screen is around five meters (16.4'). • If the connection is poor, the controller operation lamp will flash green and “...
-
Page 27: Configuring Basic Settings The First Time You Turn On The Camera
Toggling Between the REC Mode and PLAY Mode Touch the icon in the lower right corner of the screen or flick the screen upwards or downwards to toggle between the REC mode and PLAY mode. REC mode PLAY mode “ ”... - Page 28 Set the date and the time. • Touch the value you want to change (year, month, day, hour, minute) and then touch “ ”, “ ” to change it. • To switch between 12-hour and 24-hour format, select “am (pm)”/“24h” and then touch “ ”, “...
-
Page 29: Preparing A Memory Card
Preparing a Memory Card Though the camera has built-in memory that can be used to store images and movies, you probably will want to purchase a commercially available memory card for greater capacity. The camera does not come with a memory card. Images recorded while a memory card is loaded are saved to the memory card. -
Page 30: To Load A Memory Card
• Never insert anything besides a supported memory card (page 29) into the memory card slot. • Should water or any foreign object ever get into the card slot, immediately turn off the camera, and contact your retailer or nearest CASIO authorized service center. Quick Start Basics... -
Page 31: To Format (Initialize) A New Memory Card
. To replace the memory card Press the memory card and then release it. This will cause it to pop out of the memory card slot slightly. Pull the card out the rest of the way and then insert another one. •... -
Page 32: Shooting A Snapshot
Shooting a Snapshot (Premium Auto) Your camera has a variety of different recording modes to suit various shooting conditions and objectives (page 39). This section explains general shooting procedures using Premium Auto. With Premium Auto recording, the camera automatically determines whether you are shooting a subject or scenery, and other conditions. -
Page 33: Shooting A Movie
Shooting a Movie Press [0] (Movie) on the camera or controller to start movie recording. To stop movie recording, press [0] (Movie) again. See page 42 for details. • Movie recording can continue up to 29 minutes. NOTE • You also can shoot a snapshot by touching a point on the monitor screen (page 45). -
Page 34: Snapshot Shooting Precautions
Snapshot Shooting Precautions Operation • If unwanted light is shining onto the lens, shade the lens with your hand or attach the lens hood (page 14) when shooting an image. Monitor Screen when Shooting Snapshots • Subject brightness conditions can cause monitor screen response to slow and can cause digital noise in the monitor screen image. -
Page 35: Recording Images
Recording Images REC Mode Screen This section explains the contents of the REC mode screens. While the REC mode main screen or home screen is displayed, pressing the camera or controller shutter button will shoot a snapshot. . Main Screen The main screen appears when you turn on the camera or when you enter the REC mode from the PLAY mode. -
Page 36: Shooting Multiple Images At A Specified Interval
Shooting Multiple Images at a specified Interval (Interval Snapshot) You can use Interval Snapshot to shoot snapshots and movies automatically at a specified interval. . To start an Interval Snapshot operation On the REC mode main screen, touch the “ ”... - Page 37 . To stop an Interval Snapshot operation On the controller, press any button to recover from the sleep state. Touch “Exit”. This stops the Interval Snapshot operation. . To shoot images manually during an Interval Snapshot operation Pressing the shutter button on the camera during an Interval Snapshot operation will shoot a snapshot.
-
Page 38: Self-Shooting
Self-shooting (Mirror) You can use this function to display a mirror image of controller display. This comes in handy when using the controller to compose self-shot images. The image is recorded in normal orientation (not mirror imaged). Normal image Mirrored image “... -
Page 39: Changing The Recording Mode
Changing the Recording Mode In addition to Premium Auto, your camera lets you select from among five ART SHOT scenes that apply different effects to your photos. Turn on the camera and controller (page 25). On the REC mode main screen, touch the “ ”... -
Page 40: Using The Self-Timer
NOTE • Selecting an ART SHOT scene will automatically enable auto focus. • ART SHOT effects will not be applied to a movie shot while an ART SHOT scene is selected. • Make-up cannot be turned on while an ART SHOT scene is being used. . -
Page 41: Shooting With Zoom
Shooting with Zoom Your camera is equipped with digital zoom, that lets you zoom an image up to 4X. Note that a digital process is used to enlarge the center of the image, so there is deterioration of image quality. In the REC mode main screen, touch the “... -
Page 42: Recording A Movie
Recording a Movie Your camera lets you record Full HD movies. Movie quality details are shown in the table below. Movie Quality Full HD Frame Rate 30fps Image Size (Pixels) 1920 x 1080 Aspect Ratio 16:9 Select “Premium Auto” as the recording mode. On the REC mode main screen, touch the “... - Page 43 Image stabilization during movie recording Image stabilization is always enabled during movie recording. Note, however, that image stabilization does not prevent image blur due to subject movement during movie recording. Also, image stabilization results in a narrower angle of view during movie recording.
-
Page 44: Advanced Recording Settings
Advanced Recording Settings The following are menu operations you can use to configure various camera settings. . Example Menu Screen Operation On the REC mode main screen, touch the “ ” (Home) icon. On the home screen, touch “MENU”. This will display the menu screen. •... -
Page 45: Recording Beautiful Portraits
Recording Beautiful Portraits (Make-up) Procedure Enter the “REC Mode” * * MENU * Make-up When turned on, Make-up smoothes the skin texture of the subject and softens facial shadows caused by harsh sunlight for better looking portraits. Using Touch Shutter (Touch Shutter) Procedure Enter the “REC Mode”... -
Page 46: Changing The Image Size
Changing the Image Size (Image Size) Procedure Enter the “REC Mode” * * MENU * Image Size This setting can be used to configure snapshot image size. Suggested Image Size REC Screen Print Size and Description (Pixels) Icon Display Application Poster Print (4320 3240) -
Page 47: Specifying The Maximum Movie Recording Time
Specifying the Maximum Movie Recording Time (Max Recording Time) Procedure Enter the “REC Mode” * * MENU * Max Recording Time See page 42 for details. Shooting with Brightness Compensation (EV Shift) Procedure Enter the “REC Mode” * * MENU * EV Shift You can manually adjust an image’s exposure value (EV value) before shooting it. -
Page 48: Adjusting Hue When Shooting
Adjusting Hue when Shooting (White Balance) Procedure Enter the “REC Mode” * * MENU * White Balance You can adjust white balance to match the source of light available where you are shooting and avoid the blue cast that results when shooting outdoors and the green cast that results when shooting indoors. -
Page 49: Enabling Auto Rotation Of Images To Match Camera Orientation
Enabling Auto Rotation of Images to Match Camera Orientation (Auto Rotate) Procedure Enter the “REC Mode” * * MENU * Auto Rotate When this function is enabled (ON), the camera senses its physical orientation and automatically rotates the image accordingly. Playback while Auto Rotate is enabled (ON) will automatically display the image in the orientation it was in when recorded. -
Page 50: Viewing Snapshots And Movies
Viewing Snapshots and Movies Play Mode Screen While in the PLAY mode, you can use the controller screen to view images your have recorded. You can also press the camera’s shutter button or [0] (Movie) button to record new images. . -
Page 51: Viewing Snapshots
Viewing Snapshots Use the following procedure to view snapshots on the camera’s monitor screen. • For information about how to play back movies, see page 52. On the REC mode main screen, touch the REC mode main screen “ ” (PLAY) icon or flick the screen upwards or downwards to enter the PLAY mode. -
Page 52: Viewing A Movie
Viewing a Movie On the REC mode main screen, touch the Movie recording time “ ” (PLAY) icon or flick the screen upwards Image quality or downwards to enter the PLAY mode. Flick the screen to the left or right to scroll through the movies until the one you want is displayed. -
Page 53: Zooming An On-Screen Image
Touch the “ ” (Delete) icon. Touch “ ” (Delete 1 File). Touch “ ” (Delete). This will delete the selected file. . To delete all files In the PLAY mode, touch the “ ” (Home) icon. Touch “ ” (Delete). Touch “... -
Page 54: Viewing The Image Menu
Viewing the Image Menu The image menu shows multiple images on a single screen. On the PLAY mode main screen, touch “ ”. This displays the image menu. • While the main screen is displayed, spread (to enlarge) or squeeze (to reduce) your fingers on the screen to zoom the displayed image. -
Page 55: Creating A Collage Of A Day's Snapshots
Creating a Collage of a Day’s Snapshots (Highlight Photo) You can configure camera settings to automatically select snapshot highlights and generate a collage of them each day. The snapshots included in a Highlight Photo are selected automatically based on their high light scores and shooting condition information recorded along with the snapshots. -
Page 56: Creating A Movie Of A Day's Images
Creating a Movie of a Day’s Images (Highlight Movie) You can configure camera settings to automatically select snapshot and movie highlights, and create a movie of them each day. Images included in a Highlight Movie are selected based on their high light scores and shooting condition information recorded along with the images. - Page 57 NOTE • A Highlight Movie generation operation cannot be stopped part way through once it is started. • An image whose highlight score is “–1” is never included in a Highlight Movie. • A Highlight Movie is FHD movie quality, with an aspect ratio of 16:9. If an image with an aspect ratio that is not 16:9 is incorporated into a Highlight Move, the top and bottom of the image will be cropped as required.
-
Page 58: Changing The Highlight Score Of An Image
Changing the Highlight Score of an Image You can use the procedure below to change the highlight score of a snapshot or movie. The highlight score of an image is used when performing the operations described in the table below. Highlight Description Score... - Page 59 NOTE • An image’s current highlight score is indicated as described below when the image is displayed on the monitor screen. Highlight Score Indicator –1 • The highlight score function can be used only with snapshots and movies recorded with this camera. Viewing Snapshots and Movies...
-
Page 60: Connecting The Camera With A Smartphone (Wireless Lan)
Connecting the Camera with a Smartphone (Wireless LAN) Controlling Your Camera with a Connected Smartphone Establishing a wireless LAN connection between the camera and a smartphone (or tablet computer) enables the functions described below. This operation requires installation of the EXILIM Link app on your smartphone. With this function: You can do this: page:... -
Page 61: Establishing A Connection Between A Smartphone And Your Camera
Establishing a Connection between a Smartphone and Your Camera Installing the EXILIM Link Smartphone app on your smartphone makes it possible to remotely control the camera from your smartphone and to send images recorded with the camera to your smartphone. Search the EXILIM Link app on Google Play (Android) or App Store (iOS) and install it on your smartphone (or tablet computer). -
Page 62: Change Ssid And Password Before Using Wireless Lan
Change SSID and password before using wireless LAN When establishing a wireless connection between the camera and smartphone for the first time, make sure to change the SSID and password as shown below. At the time of purchase, the default SSID and password settings are the same for all models. - Page 63 NOTE • Note that after changing the SSID and password on the camera, you will also need to change the Wi-Fi settings of the smartphone. • If you forget your camera SSID and password, you can perform the procedure below to return them to their initial defaults. Turn off the camera.
-
Page 64: Using A Smartphone As A Camera Remote Controller
Using a Smartphone as a Camera Remote Controller This function lets you remotely shoot a snapshot or movie with the camera using a smartphone (Remote Capture). You also can perform remote zoom, self-timer, and other operations as well. If the camera is on, hold down [p] (Power) to turn it off. On the camera, hold down [0] (Movie) as you hold down [p] (Power) until the camera’s operation lamp flashes green. -
Page 65: Sending A Snapshot Or Movie File From Camera Memory To A Smartphone
Sending a Snapshot or Movie File from Camera Memory to a Smartphone You can select one or more snapshot and/or movie file in camera memory and send it to a smartphone. You can select up to 99 files, totaling no more than 1500MB for a single send. - Page 66 NOTE • You can use the smartphone apps below to view snapshots after sending them. – iPhone: Camera Roll – Android terminal: Gallery or another photo browser app • In the case of an iPhone, sent snapshots cannot be deleted with the EXILIM Link app.
-
Page 67: Other Settings (Set Up)
Other Settings (Set Up) This section explains menu items that you can use to configure settings and perform other operations in both the REC mode and PLAY mode. For information about menu operations, see page 44. Configuring Camera Sound Settings (Camera Sound) Procedure * MENU * Setup * Camera Sound You can adjust the volume of the sound emitted when the camera is turned on, when... -
Page 68: Setting The Camera's Clock
Setting the Camera’s Clock (Adjust) Procedure * MENU * Setup * Adjust Touch the value you want to change (year, month, day, hour, minute). Touch “ ” or “ ” to change the currently selected value. • You can specify a date from 2001 to 2049. •... -
Page 69: Specifying The Display Language
Specifying the Display Language (Language) Procedure * MENU * Setup * Language . Specify the display language you want. On the menu screen, touch “Setup”. Touch “Language”. Flick upwards and downwards until you find the language you want, and then touch to select it. -
Page 70: Resetting The Camera To Factory Defaults
Resetting the Camera to Factory Defaults (Reset) Procedure * MENU * Setup * Reset See page 107 for details about the camera’s factory default settings. The settings below are not reset. clock settings, date style, screen language Other Settings (Set Up) -
Page 71: Printing
Printing Professional Print Service You can take a memory card that contains the images you want to print to a professional print service and have them printed. Printing on a Home Printer You can use a printer equipped with a memory card slot to print images directly from a memory card. -
Page 72: Printing With A Computer
Printing with a Computer There are a variety of different ways to print images stored on a computer. This section shows one standard printing example. . Printing on a Windows Computer Use the procedure under “Viewing and Storing Images on a Computer” (page 74) to store the image you want to print, and then display the image on your computer screen. -
Page 73: Using The Camera With A Computer
Using the Camera with a Computer Things you can do using a computer... You can perform the operations described below while the camera is connected to a computer. Save images to a • Save images and view them manually computer and (USB connection) (pages 74, 77). -
Page 74: Viewing And Storing Images On A Computer
Viewing and Storing Images on a Computer You can connect the camera to your computer in order to view and store images (snapshot and movie files). Never use your computer to modify, delete, move, or rename any image files that are in the camera’s built-in memory or on its memory card. Doing so can cause problems with the camera’s image management data, which will make it impossible to play back images on the camera and can drastically alter remaining memory capacity. - Page 75 Double-click “Removable Disk”. • Your computer recognizes the memory card loaded in the camera (or built-in memory if there is no card) as a removable disk. Right-click the “DCIM” folder. On the shortcut menu that appears, click “Copy”. Windows 8.1, Windows 8 users: Click “Documents”. Windows 7, Windows Vista users: Click “Start”...
-
Page 76: Playing Movies
Playing Movies To play back a movie, first copy it to your computer and then double-click the movie file. Some operating systems may not be able to play back movies. If this happens, you need to install separately available software. •... -
Page 77: Using The Camera With A Macintosh
Using the Camera with a Macintosh When you want to Operating Required Software do this: System Version page: Save images to your Macintosh and view OS X Installation not required. them there manually Save images to your Macintosh iPhoto, which comes bundled OS X –... - Page 78 . To connect the camera to your computer and save files Turn off the camera and then [USB] port use the micro USB cable that comes with the camera to connect it to your Macintosh. • For details about connecting to the camera and precautions when connecting, see page 21.
-
Page 79: Playing A Movie
. To view copied images Double-click the camera’s drive icon. Double-click the “DCIM” folder to open it. Double-click the folder that contains the images you want to view. Double-click the image file you want to view. • For information about file names, see “Memory Folder Structure” on page 81. •... -
Page 80: Files And Folders
File System (DCF). . About DCF The following operations are supported for DCF-compliant images. Note, however, that CASIO makes no performance guarantees concerning these operations. • Transferring this camera’s DCF-compliant images to another manufacturer’s camera and view them. • Printing this camera’s DCF-compliant images on another manufacturer’s printer. -
Page 81: Memory Folder Structure
. Memory Folder Structure DCIM Folder DCIM Recording Folder 100CASIO Image File CIMG0001.JPG Movie File CIMG0002.MOV Recording Folder 101CASIO Recording Folder 102CASIO . Supported Image Files • Image files shot with this camera • DCF-compliant image files This camera may not be able to display an image, even if it is DCF-compliant. When displaying an image recorded on another camera, it may take a long time for the image to appear on this camera’s monitor screen. -
Page 82: Appendix
• The battery is intended for use with a CASIO Digital Camera only. Use with any other device creates the risk of the battery damage, or deterioration of battery performance and service life. - Page 83 DANGER • Failure to observe any of the following precautions creates the risk of battery overheating, fire, and explosion. – Never use or leave the battery near open flame. – Do not expose the battery to heat or fire. – Make sure the battery is oriented correctly when charging it. –...
- Page 84 2. If you are using the USB-AC adapter to power the camera, unplug the power plug from the power outlet. 3. Contact your retailer or nearest CASIO authorized service center. . Keep Away From Fire • Never expose the camera to fire, which can cause it to explode and creates the risk of fire and personal injury.
- Page 85 • Except when disposing of the camera, never try to take it apart or modify it in any way. Doing so creates the risk of electric shock, burn injury, and other personal injury. Be sure to leave all internal inspection, maintenance, and repair up to your retailer or nearest CASIO authorized service center. Appendix...
-
Page 86: Memory Cards
2. If you are using the USB-AC adapter to power the camera, unplug the power plug from the power outlet. 3. Contact your retailer or nearest CASIO authorized service center. . Memory Cards • Memory cards are small and present a risk of accidentally being swallowed by infants and young children. - Page 87 Grasp the power plug and pull. . Built-in Rechargeable Battery • If battery charging does not end normally within the specified charging time, stop charging anyway and contact your local CASIO authorized service center. Continued charging creates the risk of battery overheating, fire, and explosion.
-
Page 88: Monitor Screen
CAUTION . Locations To Be Avoided • Never leave the camera in any of the following types of locations. Doing so creates the risk of fire and electric shock. – Areas subject to large amounts of humidity or dust – Food preparation areas or other locations where oil smoke is present –... -
Page 89: Shock Resistant, Splashproof, Dustproof
IMPORTANT! • The shock resistance, splashproofing, and dustproofing of this product are based on CASIO test results, and do not constitute any guarantee that the product will perform, will not be damaged, or will not malfunction under such conditions. . Precautions before Underwater Use Submersion and continued shooting up to a depth of 1.0 meters after starting a... - Page 90 • This camera will sink if dropped underwater. Use the strap or some other means to avoid dropping. • The splashproofing of this camera protects it against salt water and fresh water only. Protection is not provided against hot spring water. •...
- Page 91 • In order to maintain splashproofing, replacement of the camera’s gaskets is recommended once each year. Note that you will be charged for gasket replacement. Contact a CASIO authorized service center or your original retailer for gasket replacement. Appendix...
- Page 92 • CASIO COMPUTER CO., LTD. shall not be held liable for any accident that may occur while the camera is being used underwater. • CASIO COMPUTER CO., LTD. shall not be held liable for any damages or for any accident (personal injury, etc.) that occurs while using the camera underwater.
-
Page 93: Precautions During Use
Precautions During Use . Data Error Precautions Your digital camera is manufactured using precision digital components. Any of the following creates the risk of corruption of data in camera memory. – Removing the memory card while the camera is performing some operation –... -
Page 94: Caring For Your Camera
. Lens • Never apply too much force when cleaning the surface of the lens. Doing so can scratch the lens surface and cause malfunction. • You may sometimes notice some distortion in certain types of images, such as a slight bend in lines that should be straight. - Page 95 The radio waves that are used to send and receive data can be intercepted by third parties. Unauthorized access CASIO COMPUTER CO., LTD. shall be held in no way liable for any unauthorized access and/or use of the access point equipped on this product if the product is ever lost or stolen.
- Page 96 Note that CASIO COMPUTER CO., LTD. shall not be held liable for use of this product in any way that infringes on the copyrights of others or that violates copyright laws.
- Page 97 iPerf (BSD License) Copyright (c) The Board of Trustees of the University of Illinois All Rights Reserved. Iperf performance test Mark Gates Ajay Tirumala Jim Ferguson Jon Dugan Feng Qin Kevin Gibbs John Estabrook National Laboratory for Applied Network Research National Center for Supercomputing Applications University of Illinois at Urbana-Champaign http://www.ncsa.uiuc.edu...
- Page 98 getopt GNU LESSER GENERAL PUBLIC LICENSE Version 3, 29 June 2007 Copyright (c) 2007 Free Software Foundation, Inc. <http://fsf.org/> Everyone is permitted to copy and distribute verbatim copies of this license document, but changing it is not allowed. This version of the GNU Lesser General Public License incorporates the terms and conditions of version 3 of the GNU General Public License, supplemented by the additional permissions listed below.
- Page 99 2. Conveying Modified Versions. If you modify a copy of the Library, and, in your modifications, a facility refers to a function or data to be supplied by an Application that uses the facility (other than as an argument passed when the facility is invoked), then you may convey a copy of the modified version: a) under this License, provided that you make a good faith effort to ensure that, in the event an Application does not supply the function or data, the facility still...
- Page 100 e) Provide Installation Information, but only if you would otherwise be required to provide such information under section 6 of the GNU GPL, and only to the extent that such information is necessary to install and execute a modified version of the Combined Work produced by recombining or relinking the Application with a modified version of the Linked Version.
- Page 101 inet_ntop, inet_pton ISC License (ISC) [OSI Approved License] Copyright (c) 4-digit year, Company or Person's Name Permission to use, copy, modify, and/or distribute this software for any purpose with or without fee is hereby granted, provided that the above copyright notice and this permission notice appear in all copies.
-
Page 102: Power Supply
If problems persist after you perform the above steps or if the battery fails to charge after 5 hours, it could mean that the battery is faulty. Contact your nearest CASIO authorized service center. Appendix... -
Page 103: Battery Precautions
Battery Precautions . Precautions during Use • Operation provided by a battery under cold conditions is always less than operation under normal temperatures. This is due to the characteristics of the battery, not the camera. • Charge the battery in an area where the temperature is within the range of 15°C to 35°C (59°F to 95°F). -
Page 104: Disposing Of The Camera
• The battery of this camera is built-in and cannot be replaced by you. Contact your retailer or a CASIO authorized service center to have the battery replaced. • Make sure that the camera is turned off before removing the battery. - Page 105 . Controller Remove the two screws that secure the back of the controller. Swing the back cover open in the direction indicated by the arrow. Remove the four screws that secure the back of the controller. Holding the monitor screen at the circled location in the nearby illustration, swing it upwards in the direction indicated by the arrow to remove it.
-
Page 106: Using A Memory Card
. Old Rechargeable Battery Handling Precautions • Insulate the positive and negative terminals with tape, etc. • Do not peel the covering off of the battery. • Do not try to take the battery apart. Using a Memory Card See page 29 for information about supported memory cards and how to load a memory card. -
Page 107: Reset Initial Default Settings
Reset Initial Default Settings The tables in this section show the initial default settings on menus that appear in the REC mode and PLAY mode when you reset the camera (page 70). This operation also resets some non-menu settings. • A dash (–) indicates an item whose setting is not reset or an item for which there is no reset setting. - Page 108 . Interval Snapshot settings (page 36) Interval 5 min Shooting Style Snapshot + Movie . Highlight Photo setting (page 55) Layout . Highlight Movie settings (page 56) Music Music 1 Play time Short Appendix...
-
Page 109: When Things Don't Go Right
Check to make sure that the battery is charged and try turning power on again a number of times. If power still does not turn on, contact your retailer or a CASIO authorized service center. Power will not turn Use a thin object to press the [RESET] buttons (page 7) near off. - Page 110 Problem Possible Cause and Recommended Action Camera powers The battery may be dead. Charge the battery (page 18). down during Self- timer countdown. There is digital Sensitivity may have been increased automatically for a dark noise in images. subject, which increases the chance of digital noise. Use a light or some other means to illuminate the subject.
- Page 111 Problem Possible Cause and Recommended Action File Deletion A file cannot be The file may be protected. A protected image cannot be deleted. deleted. Wireless LAN I can’t establish a 1)The camera cannot connect with a smartphone if they are wireless LAN too far apart from each other.
- Page 112 If the same message appears after you turn power back on, contact your retailer or a CASIO authorized service center. There are various The monitor screen shows indicators and other information indicators and about shooting conditions and the image you are recording.
-
Page 113: Display Messages
Delete files you no longer need (page 52). Your camera system is corrupted. Contact your retailer or a SYSTEM ERROR CASIO authorized service center. There are no files. There are no files in built-in memory or on the memory card. This file cannot be The file you are trying to access is corrupted or is a type that played. - Page 114 The camera protection function may have activated because Overheating. camera and/or controller temperature is too high. Power will turn off. Turn off power and wait until the camera or controller cools down before trying to use it again. Camera temperature is high and continued use may activate its protection function.
-
Page 115: Number Of Snapshots/Movie Recording Time
Number of Snapshots/Movie Recording Time Snapshot microSD Image Size Approximate Built-in Memory Memory Card (Pixels) File Size Recording Capacity Recording Capacity 14M (4320 3240) 3.40 MB 3199 16:9 (4320 2432) 2.23 MB 4355 5M (2560 1920) 1.12 MB 9040 Movies Maximum Built-in Image Size /... -
Page 116: Specifications
Specifications File Format Snapshots: JPEG (Exif Version 2.3; DCF 2.0 standard) Movies: MOV format, H.264/AVC standard, IMA-ADPCM (monaural) Recording Media Built-in Memory (Image Storage Area: 65.9MB*) microSD/microSDHC/microSDXC * Built-in memory capacity after formatting Recorded Image Sizes Snapshots: 14M (4320 3240), 16:9 (4320 2432), 5M (2560 1920) Movies:... - Page 117 White Balance Auto, Indoors, Outdoors Monitor Screen 2.0-inch TFT color LCD (Controller) 230,400 dots Capacitive type touch panel External connection Micro USB port (Hi-Speed USB compliance, USB charging/ terminal (Camera) USB powered operation) External connection Micro USB port (USB charging/USB powered operation) terminal (Controller) Microphones (Camera) Monaural Speaker (Camera)
-
Page 118: Movie Recording
• Recording Medium: 16GB microSDHC memory card (SanDisk Corporation UHS-I series) In accordance with CIPA (Camera and Imaging Products Association) standards In accordance with CASIO standards One-image scroll approximately every 10 seconds • The above values are based on a full charge, the first time the battery is charged after the camera is purchased. - Page 119 Power Consumption Camera: 5 V DC, Approximately 2.8 W Controller: 5 V DC, Approximately 2.6 W Dimensions Camera: 60.9 (diameter) 28.8 (D) mm (2.4" (diameter) 1.1" (D)) (excluding hinge unit) Controller: 49.7 (W) 84.2 (H) 18.9 (D) mm (2.0" (W) 3.3"...
- Page 120 The copy of the Declaration of Conformity can be found on http://world.casio.com/ce/dc/. To comply with the relevant European RF exposure compliance requirements, this EX-FR10, EX-FR10CT must not be co-located or operating in conjunction with other transmitter. Note: This equipment is intended to be used in all EU and EFTA countries.
-
Page 121: Declaration Of Conformity
0 mm from all persons and must not be co-located or operating in conjunction with any other antenna or transmitter. Declaration of Conformity Model Number: EX-FR10, EX-FR10CT Trade Name: CASIO Responsible party: Industrial Handheld Division Casio America, Inc. - Page 122 CASIO COMPUTER CO., LTD. 6-2, Hon-machi 1-chome Shibuya-ku, Tokyo 151-8543, Japan MA1408-A 2014...
Need help?
Do you have a question about the Exilim EX-FR10 and is the answer not in the manual?
Questions and answers