Table of Contents
Advertisement
Advertisement
Table of Contents

Related Manuals for Syrp Genie


Summary of Contents for Syrp Genie
- Page 1 Genie inStruction manual 1.9 beta releaSe...
-
Page 2: Whats In The Box
The Genie is a simple, affordable and extremely easy-to-use motion control device for Time Lapse Photography + more. Simply attach your camera to the top of the Genie, plug it in using the matching cable for your camera and program it to move and shoot to your desired needs. - Page 3 © 2012 Syrp Ltd. All rights reserved. Syrp, the Syrp logo and the Genie logo are trademarks or registered trademarks of Syrp Ltd in New Zealand and/or other countries. All trademarks, trade names, icons, logos, written material, images, code, and product names used in association with this product are copyrights, trademarks, or other intellectual property exclusively owned and controlled by Syrp Ltd.
-
Page 4: Table Of Contents
Contents. 1. international product compliance 2. product warninGS 3. important Safety inStructionS 4. overview of the Genie 5. GettinG Started 6. takinG a panninG Shot 7. takinG a linear Shot 8. new recordinGS and SavinG preSet 9. timelapSe with video camera 10. -
Page 5: International Product Compliance
Limits and Methods of Measurement. european union compliance StatementS Syrp declares that the equipment described in this document conforms to the requirements of the European Council, EMC Directive, RoHS directive, and WEEE Directive. This device has been tested and complies in accordance with the following applicable directives: 2004/108/EC Electromagnetic Compatibility (As Amended) This device has been assessed against the following applicable standards;... -
Page 6: Product Warnings
4. Consult the dealer or an experienced radio/TV technician for help. Warning: Operation with non-approved equipment is likely to result in interference to radio and TV reception. Changes and modifications made to the equipment without the approval from Syrp could void the user’s authority to operate this equipment. - Page 7 240V ~ 50-60Hz 0.4A. The rated output voltage and current is 15V DC 1.2A 18W Max. Operation at voltages other than these may require the use of a different AC Plug. Please contact Syrp for assistance in selecting an alternate AC Plug.
-
Page 8: Important Safety Instructions
Do not use this apparatus near water. The unit is not waterproof and cannot be used under- water. If you accidentally drop the device into water, promptly contact Syrp. Wipe off any water droplets with a dry cloth. If the device has been exposed to salty air, wipe it with a well- wrung wet cloth. -
Page 9: Operating Precautions
device to fire or water and do not subject the device to strong physical shock. Do not charge unattended, or for longer than 4 hrs. Keep the device away from children at all times. If excessive heat, smoke or fumes are emitted during recharging, immediately unplug the battery charger from the power outlet to stop the recharging and prevent a fire. - Page 10 ac adaptor (battery charGer) and internal battery The rating plate is on the back of the AC Adapter. Disconnect the AC adaptor from the AC mains socket when not in use. This device uses rechargeable lithium polymer batteries. The ambient temperature and humidity will effect the operating time; If you use the device at loca- tions with extremely low temperatures, its operating time will be reduced.
-
Page 11: Overview Of The Genie
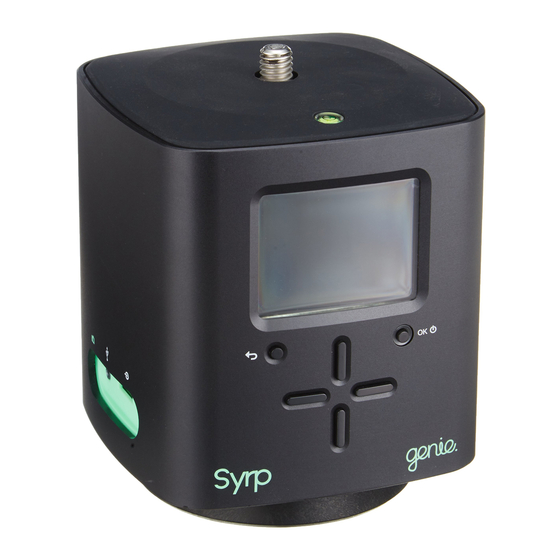
Overview of the Genie deScription of partS Power button + OK Button Level Keypad Camera connection port Back Button USB port Display Interface port 3/8 - 16 UNC Thread Quick release latch DC Power Connector 12V - 15V acceSSorieS Panning accessory... -
Page 12: Getting Started
SymbolS Panning Linear Getting started! Before you start, read the manual fully and make sure the Genie is fully charged. Connect the appropriate wall plug to the DC Insert the DC plug into the Genie and check adaptor. that the light around the OK button turns or- ange which means the Genie is charging. -
Page 13: Taking A Panning Shot
Genie. attachinG to your tripod. If you have just taken your Genie out of the box the first thing you will need to do is remove the panning accessory from the base of the Genie. Using a finger or thumb, move the release slide... - Page 14 Once the Genie is in place, check that the bub- To attach your camera to the top of the Ge- ble level on the top is showing the air bubble in nie you can either use a tripod head, or a ball the centre of the ring.
- Page 15 Before pressing start, be sure to set your camera to video mode, and press record. Now that the camera is setup and recording you can press start on the Genie. The ‘Fast’ preset will run for 10 seconds rotating your camera 90 degrees in the clockwise direc- tion.
-
Page 16: Taking A Linear Shot
Genie. attachinG to your Slider or dolly If you have just taken your Genie out of the box the first thing you will need to do is remove the panning accessory from the base of the Genie. - Page 17 Using a Syrp Link cable matched to your camera model, connect the 2.5mm end to the camera port on the Genie, and the other end to the remote input on your camera.
- Page 18 The ‘Slow’ preset will run for 60 seconds, moving very slowly 85cm* down the slider in the direc- tion of the ++ symbol on the linear accessory. * Make sure that you have enough room on the ++ side of your track for the Genie to complete its movement.
- Page 19 Rec time This is the total time the Genie will run for during the timelapse. Set this to a time that suits the scene you are shooting. Play time This is the time that you would like your final video to play for after you have compiled all of the images.
-
Page 20: Timelapse With Video Camera
Press the Left or Right buttons to set the capture time to the total recording time you would like to capture your timelapse for. Press the Left or Right button to set the angle or distance of travel you would like the genie to move throughout your timelapse. - Page 21 Select either timelapse or video according to what type of recording you would like to take. Preset Select your recording settings from a preset. You can use one that comes with the Genie already or one you have saved out already.
-
Page 22: Advanced Settings Menu
Press OK to enter advance setup. Move shoot delay To reduce camera shake increase the Move Shoot Delay time. This is the time your Genie will wait after moving and before it tells the camera to take a photo. The default setting is 400ms, but you can increase this to a maximum of 3000ms (3 seconds). -
Page 23: System Settings Menu
The following options will be available: Help If you would like to know more about using the genie you can scan the QR code and head straight to the support section on our website. Here you will find the instruction manual and tutorials and you can also get in touch with us to solve any other questions you may have. - Page 24 Shutter signal This is the time that the Genie sends a signal to the camera to tell it to take a photo. Default set- ting is 200ms. Some cameras require a longer signal to register the shutter has been fired.
-
Page 25: Updating Firmware
** Please note that uploading new firmware will wipe all existing presets and settings on the Genie. If you wish to keep settings please make a note of them and reinstall after update. *** If the red indicator light around the OK button is red then the firmware has not correctly installed. - Page 26 If you have any feedback good or bad, please email us at: syrp@syrp.co.nz Go filming!
- Page 27 Contact. Syrp Limited Please send feedback to: 835B Frankton RD syrp@syrp.co.nz Queenstown 9300 New Zealand www.syrp.co.nz +64 3 441 4147 twitter.com/syrp_ vimeo.com/syrp instagram.com/syrp_ gplus.is/syrp facebook.com/syrp.co.nz youtube.com/user/syrpey...
Need help?
Do you have a question about the Genie and is the answer not in the manual?
Questions and answers