Table of Contents
Advertisement
Quick Links
Advertisement
Table of Contents

Related Manuals for Syrp Genie II pan tilt


Summary of Contents for Syrp Genie II pan tilt
- Page 1 II pan tilt Setup Guide...
- Page 2 Welcome to the Syrp family Before you start filming, there are a few simple steps to follow to ensure your Genie II is assembled correct and you’re shooting smoothly. This guide will walk you through the correct Genie II set up, as well as some helpful tips.
- Page 3 What’s in the Box Genie II Pan Tilt (Battery incl.) QR Camera Plate 65mm USB-C Charge Cable 1/4" - 3/8" Adapter UK Plug USB-C to Shutter Release Cable Charger AU/NZ Plug USB Adapter Euro Plug USA Plug...
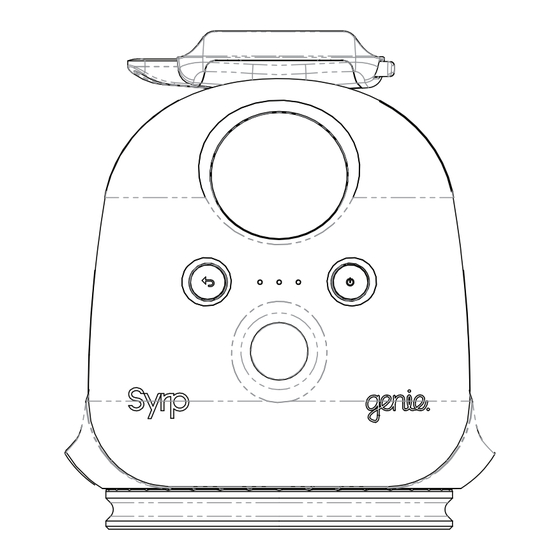
- Page 4 Genie II Pan Tilt Quick Release Button LCD Display Power Button Back Button Joystick Rotation Lock Quick Release Lock Camera recording light Battery Cover Catch Charging light Wireless connection light USB-C Ports x3 Pan Tilt Base 90mm...
- Page 5 Quick Release Camera Plate UNLOCK Open the Quick Release Lock...
-
Page 6: Mount Camera
Mount Camera Remove the rubber stopper to swap between 1/4” & 3/8” Camera Screws. IMPORTANT Ensure the Quick Release Camera Plate is locked once the plate is installed SWAP... - Page 7 Mount the Genie Genie II Linear Standard Tripod Remove the Quick Release Screw the Pan Tilt clock wise Plate from Linear. Push the onto a 3/8 thread and fully Pan Tilt down into the Linear tighten. and lock the Quick Release. Use the Rotation Lock to achieve sufficient tightness...
-
Page 8: Mounting Warning
Mounting Warning You must ensure the Quick Releases are installed correctly. Incorrect installation could result in your equipment detaching and cause harm to your equipment or others. IMPORTANT WARNING Insure the Genie Quick Always ensure the Quick Release base is not Release base is fully inserted. - Page 9 Remove / Install Battery UNLOCK Lift up the Battery Cover Catch Before you use the Genie for the first time you must remove the battery tape...
-
Page 10: Camera Control
Plug the USB-C to Shutter Release Cable into one of the USB ports of the Genie. Connect a Syrp Shutter Release Cable to the USB-C to Shutter Release Cable and plug in to the remote port of your camera. - Page 11 Connect to Genie Turn on the Genie, press the on button once. Turn Bluetooth on in your mobile device settings. Download the Syrp Genie App Open the Syrp Genie App. Continued overleaf.
- Page 12 App Connect Tap the CONNECT icon. Select your Genie or multiple CONNECTION Genies to link to more than one Genie. GENIE II Pan Tilt Tick confirms connection. CONNECTION GENIE II Pan Tilt Press “OK”.
- Page 13 Joystick Navigation Use the Joystick to scroll through the LCD menu screens and change the settings. Pressing the Joystick button in confirms your selection. TIME LAPSE Change values by scrolling left to right TIME Play 25 h 16 min VIDEO SPEED 50% Step back through navigation with the...
-
Page 14: Pan Right
Joystick Drive The Genie II can be driven manually with the Joystick by moving left to right for panning and up and down for tilting movement. TILT UP PAN LEFT PAN RIGHT TILT DOWN... - Page 15 Select your country’s plug and connect to the Charger. Connect the USB-C charging cable to the Charger and to one of the Genie’s USB ports. AU/NZ EURO IMPORTANT Use only Syrp supplied chargers and cables. Charger Orange light indicates charging, green means charged.
- Page 16 Genie Quick Tips When recording photographs always set your camera and lens to manual focus (MF), if set to Auto Focus (AF) the camera can misfire leading to missed frames. Turn image review OFF on your camera. On some cameras image review can cause missed frames in your time-lapse.
- Page 17 • Do not connect to other Bluetooth devices while updating, it's best to turn off other nearby Bluetooth devices completely, or the update may fail. • Try the update from a different location, in some situations unknown interference can cause a failed update. For more information visit support.syrp.co.nz...
-
Page 18: Stay In Touch
Stay in Touch We hope that the Genie II helps to expand your creativity and assists in making better films. Please stay in touch with us, join our community and show us your work. www.syrp.co.nz youtube.com/syrptube vimeo.com/syrp instagram.com/syrp_ facebook.com/syrp.co.nz twitter.com/syrp_ syrp@syrp.co.nz... -
Page 19: User Warnings
Syrp reserves the right to revise the design and specifications of the Genie II Pan Tilt and this guide and make changes from time to time including, without limitation, as a result of changes in any applicable laws or regulations. -
Page 20: Product Warnings
Genie II Pan Tilt. If the Genie II Pan Tilt is being used by you for business purposes as that term is defined in the New Zealand Consumer Guarantees Act 1993 then pursuant to the provisions of that Act the terms and guarantees of that Act do not apply to your purchase of the Genie II Pan Tilt. - Page 21 Genie II Pan Tilt, Ballhead, Slider or Camera. Any strong jolt may damage the unit, attached equipment’s or result in personal injury. CAUTION: Do not lift the Genie II Pan Tilt by its body when a tripod or other equipment is attached. When a tripod or other equipment accessory is attached, its weight will also affect the Genie II Pan Tilt’s handling, possibly causing it to break, as well as...
- Page 22 CAUTION: Do not cover or wrap the Genie II Pan Tilt or AC adapter with a cloth or any other material. Doing so may trap heat within and cause the casing to deform or catch fire.
- Page 23 - Always ensure the Quick Release plate is level and fully inserted in the Quick Release Base. - Never use the Genie II Pan Tilt hanging upside down. - Always ensure when attaching the Genie II Pan Tilt to a tripod, slider or other accessory that it is fully secured.
-
Page 24: Battery Warnings
- Servicing is required when the Genie II Pan Tilt has been damaged in any way, such as power-supply cord or plug is damaged, liquid has been spilled, objects have fallen onto the Genie II Pan Tilt, the Genie II Pan Tilt has been exposed to rain or moisture, does not operate normally, or has been dropped. - Page 25 WARNING: Do not disassemble or modify the battery. The battery contains safety and protection devices, which, if damaged, may cause the battery to generate heat, explode or ignite. WARNING: Do not pierce the battery with nails, strike the battery with a hammer, step on the battery or otherwise subject it to strong impacts or shocks.
- Page 26 - Do not place the battery in direct sunlight, or use or store the battery inside cars in hot weather. - Storing the Genie II Pan Tilt and/or the battery in temperatures over 50°C (104°F) or below -20°C (-4°F) for extended periods of time (more than 2 hours) may cause damage to battery and possible fire.
-
Page 27: Copyright And Trademarks
Syrp, the Syrp logo and the Genie logo are trademarks or registered trademarks of Syrp Ltd in New Zealand and/or other countries. All trademarks, trade names, icons, logos, written material, images, code, and product names used in association with this product are copyrights, trademarks, or other intellectual property exclusively owned and controlled by Syrp Ltd.
Need help?
Do you have a question about the Genie II pan tilt and is the answer not in the manual?
Questions and answers