Advertisement
Quick Links
Advertisement

Subscribe to Our Youtube Channel
Related Manuals for Syrp Slingshot


Summary of Contents for Syrp Slingshot
- Page 2 For more information on the Genie, please refer to the Genie User Manual. In this Guide you’ll learn how to set up the Slingshot properly. Your safety is our top priority so please make sure you read this entire Guide carefully to ensure proper set up before use and that you use the Slingshot safely.
- Page 3 Slingshot. If the Slingshot is being used by you for business purposes as that term is defined in the New Zealand Consumer Guarantees Act 1993 then pursuant to the provisions of that Act the terms and...
- Page 4 Never use the Slingshot without fully understanding the functions and safety precautions. You must ensure that the Slingshot is only used for its purpose and in accordance with this Guide. Please read the Product Warnings and Safety Instructions carefully before using.
- Page 5 HEED ALL WARNINGS. • Syrp has carried out safety testing in respect of the Slingshot and the results of the tests show that it is unsafe to use the Slingshot in storms, lightning and extreme weather conditions such as in temperatures over 30 degrees Celsius or less than 0 degrees Celsius. Using the Slingshot in these conditions could cause personal injury or damage to people, animals or property.
-
Page 6: Table Of Contents
Only use accessories and parts that are specified by Syrp. • Never overtighten the Slingshot Rope (the Max Torque Rating is 20 ft/lb / 26 Nm). UNDER NO CIRCUMSTANCES SHOULD YOU USE 3RD PARTY RATCHET WRENCHES FOR TIGHTENING THE SLINGSHOT ROPE AS THERE IS A RISK YOU COULD OVERTIGHTEN THE SLINGSHOT ROPE. -
Page 7: What's In The Box
Slingshot Carriage 4 x Wheels Slingshot Linear Accessory Ratchet Bar Fixed Bar 82ft (25m) Genie Rope 2 x 82ft (25m) Slingshot Rope 2 x 19.7ft (6m) Tie Down Straps Camera Safety Lanyard Wheel Safety Hooks Ratchet Wrench Slingshot Carry Bag... -
Page 8: Attach The Bars
Attach the Bars Attach the Ratchet Bar and Fixed Bar to two anchor points Hook one of the tie down straps onto the Ratchet Bar loop. Make sure that the hook is facing outwards. Wrap the tie down around your anchor point and attach the other end to the loop on the opposite side of the Ratchet Bar. -
Page 9: Attach The Slingshot Rope
Attach the Slingshot Rope Attaching the two 25m Slingshot Ropes. Pull the two pins out of the fixed bar by detaching the clips. Thread the looped ends through the rope guide on the fixed bar. Drop the pins back in through the rope loop to secure tightly. - Page 10 Attach the Slingshot Rope Attaching the two 25m Slingshot Ropes. Un-reel the 25m Rope to the other anchor point ensuring to keep the rope seperated from each other. Make a loop at the other end and thread the rope through the rope guide on the Ratchet Bar.
- Page 11 Attach the Slingshot Rope Attaching the two 25m Slingshot Ropes. Take the Ratchet Wrench and tighten each side, alternating sides every 2 or 3 turns. Note that it’s important that each side is tightened evenly during this process. Do not fully tighten one side before tightening the other.
-
Page 12: Attach The Genie Rope
Attach the Genie Rope Attaching the Genie Rope to each end. Attach one end of the 25m Genie Rope to the Ratchet Bar by threading around the rope accessory hook in the middle of the bar. Note that the end where you first attach the Genie Rope will be the end that you start your time-lapse. - Page 13 Assemble the Carriage Slingshot Carriage Assembly Loosen the arms by un-screwing the arm-lock screw just enough to loosen the bars. Be careful not to take the screw all the way out. Unfold the arms out and re- tighten the arm-lock screw into place.
-
Page 14: Attach The Carriage
++ -- markings on the Slingshot Linear Accessory. Lift the Carriage up through the bottom of the Slingshot Rope and line up the middle groove of each wheel so that they slot on top of the Slingshot Rope. -
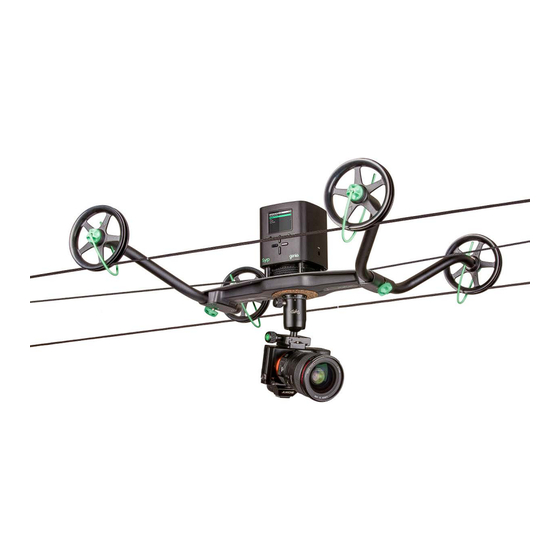
Page 15: Attach The Genie And Camera
Never operate when orange is visible on the Genies release latch Never attach the Genie hanging upside down on the Slingshot Carriage Note that the illustrations in this Guide are illustrations only and differ slightly from the actual product. - Page 16 Attach the caribenna end of the safety lanyard to the hole on the Slingshot Carriage. Then attach the other end to the camera strap hook. Attach one end of the Link cable to the camera port on the Genie and connect the other end to...
- Page 17 Specs Technical Specifications of the Slingshot Bag Dimensions: W: 15” (38cm) x L: 22” (56cm) x H: 6.3” (16cm) GENERAL Weight: 17.6 lbs / 8kg (full kit including bag) Dimensions: W: 21.6” (55cm) x L: 24.4” (62cm) x H: 4.7” (12cm) SLINGSHOT CARRIAGE Max Payload on carriage: 17.6lbs / 8kg...
- Page 18 Contact Syrp Limited General enquiries: 43A Linwood Ave, Suite 7 syrp@syrp.co.nz Mt Albert 1025 Auckland www.syrp.co.nz New Zealand +64 9 845 6319 twitter.com/syrp_ vimeo.com/syrp gplus.is/syrp instagram.com/syrp_ facebook.com/syrp.co.nz youtube.com/c/syrp...
Need help?
Do you have a question about the Slingshot and is the answer not in the manual?
Questions and answers