Vision Fitness T9600HRT Owner's Manual
Platform treadmill
Hide thumbs
Also See for T9600HRT:
- Owner's manual (68 pages) ,
- Service manual (43 pages) ,
- Assembly manual (9 pages)
Table of Contents
Advertisement
Advertisement
Table of Contents

Related Manuals for Vision Fitness T9600HRT


Summary of Contents for Vision Fitness T9600HRT
- Page 1 O w n e r ’ s G u i d e T 9 6 0 0 H R T P L AT F O R M T R E A D M I L L...
- Page 4 Some kinds of service to your Treadmill should only be performed by your VISION FITNESS retailer. Please contact your authorized VISION FITNESS retailer should service be required. If a question or problem arises which cannot be handled by your VISION FITNESS retailer, please contact us: VISION FITNESS P.O. Box 280 500 South C.P.
-
Page 5: Table Of Contents
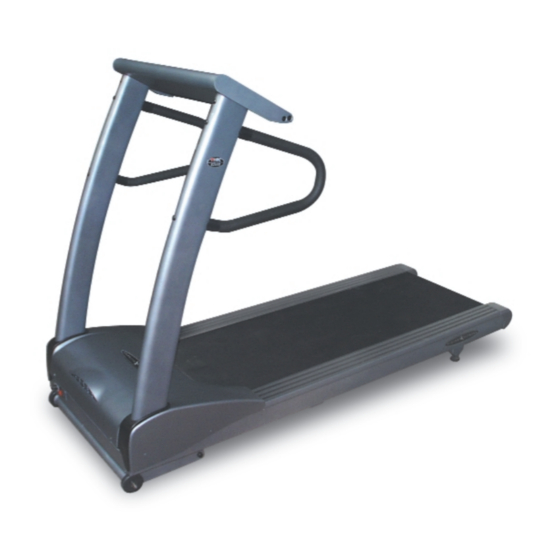
Table of Contents T 9 6 0 0 H R T SAFETY INSTRUCTIONS ..4 MOVING & LEVELING ... 7 POWER & SAFETY KEY ..8 PROGRAM DETAILS . - Page 7 CONSOLE HANDLEBARS SIDE RAILS RUNNING MOTOR BELT COVER LEVELERS TRANSPORT WHEELS T 9 6 0 0 H R T F U L L P L AT F O R M T R E A D M I L L...
-
Page 8: Safety Instructions
Unplug your VISION FITNESS Treadmill before moving it. CHILDREN • Keep children off your VISION FITNESS Treadmill at all times. • When the VISION FITNESS Treadmill is in use, young children and pets should be kept at least 10 feet away. - Page 9 WALL POWER TO TREADMILL This product is for use on a nominal 120-volt circuit, and has a grounding plug that looks like the plug illustrated below. A temporary adapter such as the one illustrated below may be used to connect this plug to a 2-pole receptacle as shown, if a properly grounded outlet is not available.
- Page 10 OTHER SAFETY TIPS FOR YOUR VISION FITNESS TREADMILL CAUTION! : If you experience chest pains, nausea, dizziness or shortness of breath, stop exercising immediately and consult your physician before continuing. • Do not wear clothing that might catch on any part of the Treadmill.
-
Page 11: Moving & Leveling
MOVING YOUR VISION FITNESS TREADMILL Your VISION FITNESS Treadmill has a pair of transport wheels built into the front legs. To move, firmly grasp the back end of the frame, carefully lift and roll. CAUTION: Our Treadmills are well-built and heavy, weighing up to 325 lbs.! Use care and additional help if necessary. -
Page 12: Power & Safety Key
Power switch, located at the front of the main frame. SAFETY KEY CLIP & TETHER Your VISION FITNESS Treadmill will not start unless the Safety Key is inserted into the keyhole in the center of the console case. You should attach the clip end to your clothing. -
Page 13: Program Details
T9600HRT PROGRAM DETAILS PROGRAM QUICK-KEYS We have made choosing a program simple and easy with our program Quick-Key feature. All you need to do is press one of the pre-set program Quick-Keys and you are on your way to starting your program. We have divided our programs into three categories;... -
Page 14: Program Details - Fat Burn
T9600HRT PROGRAM DETAILS - FAT BURN The Fat Burn programs use gradual changes in speed or elevation to increase your calorie burn, yet keep you within your Target Heart Rate Zone. Great for people who want to drop a few pounds, or just to keep a consistent exercise program moving along. -
Page 15: Program Details - Speed Training
T9600HRT PROGRAM DETAILS - SPEED TRAINING The Speed Training Programs use effort intervals and recovery intervals to help with your performance training. These programs are great for building speed and peak performance for all athletic activities. Set your heart rate goal,... -
Page 16: Program Details - Endurance
T9600HRT PROGRAM DETAILS - ENDURANCE TRAINING The Endurance Training Programs uses gradual increases in elevation and/or speed to develop endurance. These programs are great training tools for those who have set a personal goal of competing in a race, or for those who want to increase their endurance in other activities. -
Page 17: Feedback Display
T9600HRT FEEDBACK DISPLAY ALPHANUMERIC MESSAGE CENTER This is a display that will scroll the operation instructions in the top center display window. It will also display your feedback when the LED next to the appropriate word is lit. TIME Shown as Minutes:Seconds. View the Time remaining or the Time elapsed in your workout. - Page 18 T9600HRT FEEDBACK DISPLAY ELEVATION Shown as percentage of incline, Elevation is visible in the left-hand LED window. Indicates how steeply inclined the running surface is, to simulate running on a hill. SPEED Shown as Miles/Hour, Speed is visible in the right-hand LED window.
- Page 19 T9600HRT FEEDBACK DISPLAY PROFILE MATRIX WINDOW 10 X 21 The Center column will be the Segment Progress Bar. The bar will be displayed in GREEN and shows how much time is left in your current segment. This will take the segment time and divide it into...
-
Page 20: Features
T9600HRT FEATURES USER LOG-IN The console on the T9600HRT has a special feature that allows you to Log-In and save all data from your workout. To use this function follow these steps. PRESS USER LOG-IN BUTTON When selected, the green LED next to the button will be lit. - Page 21 T9600HRT FEATURES USER TOTALS BUTTON To use this function you will need to use the same User Log-In code and follow these three steps. PRESS USER TOTALS BUTTON When selected, the orange LED next to the button will be lit. Use the Arrow keys to enter your User I.D.
-
Page 22: Choosing Program
CHOOSE A PROGRAM Select the desired program by using one of the Quick-Keys or user program keys. You may also press START to enter the Manual mode. CHOOSING A LEVEL Choose Level using Arrow keys and press SELECT. The elevation & speed window will display the programs maximum elevation &... - Page 23 ENTERING YOUR WEIGHT Enter weight using Arrows and press START. The Alphanumeric Message Center window will dis- play “Weight lbs. 150” to let the user know what their Weight is. After you press START the Matrix will display a 3,2,1 count down and “beep”.
-
Page 24: About Heart Rate Training
GENERAL HEART RATE TRAINING RECOMMENDATIONS To use the Heart Rate Training Program, it is important to determine your Target Heart Rate Zone, using the chart below. After determining your Target Zone, you should use the treadmill in MANUAL mode to see if the Target Zone you have selected is correct. - Page 25 TRANSMITTER STRAP PLACEMENT Center the Transmitter Strap just below the breast or pectoral muscles, directly over your sternum with the VISION FITNESS logo facing out. Adjust the elastic strap length to avoid bouncing or sliding.
- Page 26 RATE OF PERCEIVED EXERTION Rate of Perceived Exertion (R.P.E.) is one of the easiest ways to monitor exercise intensity. By becoming familiar with the RPE scale, you can continually assess your level of intensity and insure a level of exertion that is comfortable.
-
Page 27: Heart Rate Training - Fat Burn
T9600HRT HEART RATE TRAINING - FAT BURN HEART RATE TRAINING - ELEVATION ONLY Program default is 32:00 minutes Enter Target Heart Rate, Time, & Weight. The treadmill has a manual mode warm up until you reach your Target Heart Rate. During the warm up mode you control both speed and elevation. - Page 28 CHOOSE PROGRAM TIME After you have chosen your Target Heart Rate, the time window will show the program default time of 32:00. You may change the Time, using either Arrow buttons. Press the SELECT button to enter your Time. The Minimum Time for this program is 5 minutes.
- Page 29 WARM UP MODE Now the treadmill is in the manual warm up mode. You are now in control of both the speed and elevation to reach your target Heart Rate Zone. Once a steady Heart Rate within 5+/- Beats Per Minute of your entered Target Zone is found, the console will beep 3 times and then enter the...
- Page 30 COOL DOWN MODE After you have completed your timed workout, the console will display: “Cool Down Mode, Press Stop to complete workout”. This is to let you know that your program has ended. You are now in a manual mode cool down and have control of the Speed and Elevation.
-
Page 31: Heart Rate Training - Speed Training
T9600HRT HEART RATE TRAINING - SPEED TRAINING HEART RATE TRAINING - SPEED ONLY Program default is 32:00 minutes Enter Target Heart Rate, Program Time, Work Time, Rest Time, & Weight. The treadmill has a manual mode warm up until you reach your Target Heart Rate. - Page 32 CHOOSE PROGRAM TIME After you have chosen your Target Heart Rate, the time window will show the program default time of 32:00. You may change the Time, using either Arrow buttons. Press the SELECT button to enter your Time. NOTE: The function window will blink and the time LED will be lit to let you know what time you have...
- Page 33 CHOOSE INTERVAL REST TIME After you have chosen your Program Time, you will now need to enter your HRT Interval Rest Time. This is the rest time between your Work Interval. There is no Heart Rate Feedback to control speed. To change the time, use either set of Arrow buttons to enter your Interval Rest Time and press the SELECT button.
- Page 34 WARM UP MODE Now the treadmill is in the manual warm up mode. You are now in control of both the speed and elevation to reach your target Heart Rate Zone. Once a steady Heart Rate within 5+/- Beats Per Minute of your entered Target Zone is found, the console will beep 3 times and then enter the...
- Page 35 COOL DOWN MODE After you have completed your timed workout, the console will display: “Cool Down Mode, Press Stop to complete workout”. This is to let you know that your program has ended. You are now in a manual mode cool down and have control of the Speed and Elevation.
-
Page 36: Heart Rate Training - Endurance
T9600HRT HEART RATE TRAINING - ENDURANCE HEART RATE TRAINING - ELEVATION & SPEED Program default is 32:00 minutes Enter Target Heart Rate, Time, & Weight. The treadmill has a manual mode warm up until you reach your Target Heart Rate. During the warm up mode you control both speed and elevation. - Page 37 CHOOSE PROGRAM TIME After you have chosen your Target Heart Rate, the time window will show the program default time of 32:00. You may change the Time, using either Arrow buttons. Press the SELECT button to enter your Time. The Minimum Time for this program is 5 minutes.
- Page 38 WARM UP MODE Now the treadmill is in the manual warm up mode. You are now in control of both the speed and elevation to reach your target Heart Rate Zone. Once a steady Heart Rate within 5+/- Beats Per Minute of your entered Target Zone is found, the console will beep 3 times and then enter the...
- Page 39 COOL DOWN MODE After you have completed your timed workout, the console will display: “Cool Down Mode, Press Stop to complete workout”. This is to let you know that your program has ended. You are now in a manual mode cool down and have control of the Speed and Elevation.
-
Page 40: Fitstrategy User Programs
CUSTOM USER PROGRAMS FITstrategy ™ Design your own Programs by setting the desired Speed and Elevation. All Programs have 10 intervals and a minimum program Time of 10 minutes. By designing your own programs you now can control your fitness goals workout by workout. - Page 41 ENTER SEGMENT SPEED The #1 column will blink. Press Speed Arrows to change the segment column Speed (Speed numeric values changing with red column). NOTE: The Alphanumeric Message Center will scroll: “Press select to move to next interval”. ENTER SEGMENT ELEVATION Then press the Elevation Arrows to change the segment column Elevation (notice Elevation numeric values changing with orange column).
- Page 42 SAVING SEGMENT DATA Press the SELECT button to store Speed and Elevation, then proceed to the next column. NOTE: Repeat entering segment speed and segment elevation until all 10 segments are completed. ENTERING YOUR WEIGHT After you have completed entering your segment data, you may now enter your Weight.
- Page 44 SOLUTION: The lubricating wax coating on the deck is wearing down and needs to be replenished; contact your VISION FITNESS retailer. PROBLEM: The Treadmill shuts off when elevated. SOLUTION: Check to make sure that the power cord is not stretched so tight that when the Treadmill is elevated the cord is pulled out of the wall outlet.
-
Page 45: Heart Rate Monitor
TROUBLESHOOTING YOUR HEART RATE MONITOR CHEST STRAP PROBLEM: No pulse reading appears SOLUTION: There may be a poor connection between the contact pads and skin. Remoisten electrodes. SOLUTION: Transmitter is not properly positioned. Reposition the chest strap. SOLUTION: Verify that the distance between transmitter and receiver is not beyond the recommended range of 36 inches. -
Page 46: Treadmill
COMMON TREADMILL QUESTIONS Q: Are the sounds my Treadmill makes normal? A: All Treadmills make a certain type of thumping noise due to the belt riding over the rollers. This noise will diminish over time, although it might not totally go away. With use, the belt will stretch, causing the belt to ride more smoothly over the rollers. -
Page 47: Tensioning The Belt
TENSIONING THE BELT If the running belt slips when used, use the supplied 8 Allen wrench to turn the left and right tension bolts clockwise -turn at a time until the belt no longer slips. CENTERING THE BELT If the running belt is too far to the right side, use the supplied 8 Allen wrench to turn the right tension bolt clockwise -turn at a time until the... -
Page 48: Home Warranty
LABOR - ONE YEAR VISION FITNESS shall cover the Labor cost for the repair of the device for a period of one year from the date of original purchase, so long as... - Page 49 VISION FITNESS shall not be responsible for incidental or consequential damages. Parts and Electronic components reconditioned to As New Condition by VISION FITNESS or its vendors may sometimes be supplied as warranty replacement parts and constitute fulfillment of warranty terms. Any warranty replacement parts shall be warranted for the remainder of the original warranty term.
-
Page 50: Fitness Guidelines
DEVELOPING A FITNESS PROGRAM WARM UP When you exercise you need more oxygen to fuel your muscles. This oxygen is carried to the muscles through blood. The increasing demands of exercise will cause increased breathing rate, heart rate, blood flow and blood temperature. - Page 51 FLEXIBILITY Before stretching, take a few minutes to warm-up as stretching a cold muscle can cause injury. When stretching you should start slowly, exhaling as you gently stretch the muscle. Try to hold each stretch for at least 15 to 30 seconds. Don’t bounce when you stretch. Holding a stretch is more effective and less of a risk for injury.
- Page 52 STANDING CALF STRETCH Standing about 3 feet from a wall, take one step forward with your left foot. Place your hands on the wall in front of you. Your elbows slightly bent, shoulders, hips, and feet are pointed directly towards the wall.
- Page 53 EXERCISE GUIDELINES The American Council of Sports Medicine (A.C.S.M.) recommends the following exercise guidelines, for healthy aerobic activity: Frequency: Exercise 3 to 5 days each week. Warm-up: Warm-up 5 to 10 minutes before aerobic activity. Duration: Maintain your exercise intensity for 20 to 60 minutes. Cool Down: Gradually decrease the intensity of your workout, then stretch to cool down during the last 5 to 10 minutes.
- Page 54 Longer term goals can lose some of the immediate motivation benefits. Short term goals are easier to achieve. Your VISION FITNESS Product console provides you with several readouts that can be used to record your progress. You can track Distance, Calories or Time.
- Page 55 SAMPLE GOALS: Goal-setting is a popular motivational technique. It’s important to set goals and reward yourself when initiating a new exercise program because you’re attempting to break current patterns and form a new habit. Whether you use this technique or another, make fitness a priority in your life. You can achieve the ultimate reward to yourself: you can establish the exercise habit! Some sample goals may be:...
- Page 64 500 South CP Avenue • P.O. Box 280 • Lake Mills. WI 53551 toll free 1.800.335.4348 • phone 1.920.648.4090 • fax 1.920.648.3373 www.visionfitness.com 2001 Vision Fitness. All Rights Reserved. Bio-Radius, Cool-Weave, Easy-8, and HRT are Trademarks of Vision Fitness. 8.01 Part #Z96TM53-OM18.09PRD OM18.09PRD REV1...
Need help?
Do you have a question about the T9600HRT and is the answer not in the manual?
Questions and answers
T9600 hey vision take lube or wax between board and belt