Table of Contents
Advertisement
Available languages
Available languages
Safe Operation Practices • Set-Up • Operation • Maintenance • Troubleshooting • Warranty
O
'
M
peratOr
s
anual
* Model 1P65BOB Shown
123 & 139 cc OHV Vertical Shaft Engine
WARNING
READ AND FOLLOW ALL SAFETY RULES AND INSTRUCTIONS IN THIS MANUAL
BEFORE ATTEMPTING TO OPERATE THIS MACHINE.
FAILURE TO COMPLY WITH THESE INSTRUCTIONS MAY RESULT IN PERSONAL INJURY.
MTD LLC, P.O. BOX 361131 CLEVELAND, OHIO 44136-0019
Printed In USA
Form No. 769-07390C
(December 6, 2012)
Advertisement
Chapters
Table of Contents

Related Manuals for MTD 1P65BOB Shown


Summary of Contents for MTD 1P65BOB Shown
- Page 1 READ AND FOLLOW ALL SAFETY RULES AND INSTRUCTIONS IN THIS MANUAL BEFORE ATTEMPTING TO OPERATE THIS MACHINE. FAILURE TO COMPLY WITH THESE INSTRUCTIONS MAY RESULT IN PERSONAL INJURY. MTD LLC, P.O. BOX 361131 CLEVELAND, OHIO 44136-0019 Printed In USA Form No. 769-07390C...
-
Page 2: Table Of Contents
Visit us on the web at www.mtdproducts.com See How-to Maintenance and Parts Installation Videos at www.mtdparts.com/KnowledgeCenter ◊ Call a Customer Support Representative at (800) 800-7310 or (330) 220-4683 ◊ Write to MTD LLC • P.O. Box 361131 • Cleveland, OH • 44136-0019... -
Page 3: Safe Operation Practices
Important Safe Operation Practices WARNING! This symbol points out important safety instructions which, if not followed, could endanger the personal safety and/or property of yourself and others. Read and follow all instructions in this manual before attempting to operate the equipment. Failure to comply with these instructions may result in personal injury. -
Page 4: Spark Arrestor
Maintenance & Storage Do not overfill fuel tank. Fill tank to full as indicated by the fuel level indicator installed inside of the fuel tank. Do not Keep the engine in safe working order over-fill to allow space for fuel expansion. On some models, a fuel level indicator may NOT be present, in this instance, Allow the engine to cool at least five minutes before fill the tank no more than 1/2 inch below the bottom of the... -
Page 5: Safety Labels
Safety Symbols This page depicts and describes safety symbols that may appear on this product. Read, understand, and follow all instructions on the machine before attempting to assemble and operate. Symbol Description READ THE OPERATOR’S MANUAL(S) Read, understand, and follow all instructions in the manual(s) before attempting to assemble and operate WARNING—GASOLINE IS FLAMMABLE Allow the engine to cool at least two minutes before refueling. -
Page 6: Set-Up
Set-Up Gas & Oil Checking Oil Level IMPORTANT: Be sure to check the oil while on a level surface with NOTE: The engine is shipped without gasoline or oil in the the engine stopped. engine. Running the engine with insufficient oil can cause serious engine damage and void the engine warranty. - Page 7 Extended Dipstick Fuel Requirements Remove the oil filler cap and wipe the dipstick clean. See CAUTION: Operating the engine with E15 or E85 Figure 3-3. fuel, an oil/gasoline mixture, dirty gasoline, or gasoline over 30 days old without fuel stabilizing additive may result in damage to your engine’s carburetor.
-
Page 8: Controls & Features
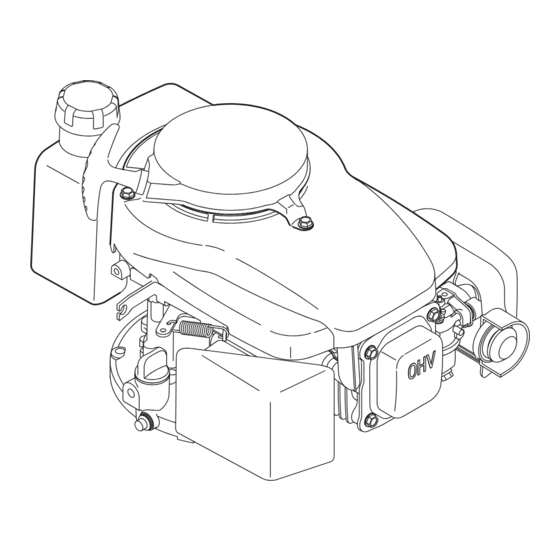
Controls and Features Engine Switch† Choke† Fuel Cap Fuel Shut-Off Valve† Air Cleaner Starter Handle Primer† Oil Fill Cap Oil Drain Spark Plug Muffler † If Equipped Figure 4-1 Choke Fuel Shut-Off Valve (If Equipped) (If Equipped) The choke control is located on the left side of the handle or on The fuel shut off valve is located on the engine to the right of the the engine below the engine switch and when activated, closes choke. -
Page 9: Operation
Operation Pre-Operation Check The engine is shipped without gasoline or oil in the engine. See the Set-Up Section of this manual for instructions on adding oil and gasoline. Determine The Starting System Before starting the engine, you must determine the type of starting system that is on your engine. -
Page 10: Maintenance & Adjustments
Manual Choke System (On the Engine) If equipped, turn on fuel valve located on the engine. See Figure 5-3. Pull out the choke knob located on the engine. NOTE: Use of the choke may not be necessary if the engine is warm or the air temperature is high. -
Page 11: Engine Maintenance
Engine Maintenance WARNING: Periodic inspection and adjustment of the engine is essential if Shut off the engine before performing high level performance is to be maintained. Regular maintenance any maintenance. To prevent accidental start-up, will also ensure a long service life. The required service intervals disconnect the spark plug boot. -
Page 12: Air Filter Service
Oil Service IMPORTANT: Used motor oil may cause skin cancer if repeatedly left in contact with the skin for prolonged periods. Although this • Check oil level regularly. is unlikely unless you handle used oil on a daily basis, it is still advisable to thoroughly wash your hands with soap and water as •... - Page 13 To clean foam element, remove it from the air filter cover and wash in a mild liquid detergent and water. Squeeze or press the foam element to rinse out dirt and water. Do not twist; this could damage or tear the foam element. Allow to dry thoroughly before using.
-
Page 14: Clean Engine
NOTE: When installing a new spark plug, tighten 1/2 turn WARNING: Accumulation of debris around muffler after the spark plug seats to compress the washer. When could cause a fire. Inspect and clean before every reinstalling a used spark plug, tighten 1/8-1/4 turn after the use. -
Page 15: Troubleshooting
Troubleshooting Problem Cause Remedy Engine Fails to start 1. Blade control disengaged (Lawn mower 1. Engage blade control. only). 2. Spark plug boot disconnected. 2. Connect wire to spark boot. 3. Fuel tank empty or stale fuel. 3. Fill tank with clean, fresh gasoline. 4. -
Page 16: Replacement Parts
Replacement Parts Component Part Number and Description 951-10292 Spark Plug 951-10732 Air Cleaner (Oval) 951-10298 Air Cleaner Kit (Square) 951-12738 Fuel Cap Assembly (Phase 3 Engine) 951-10358A Fuel Filter (800) 800-7310 or (330) 220-4683 Phone to order replacement parts or a complete Parts Manual (have your full model number and serial number ready). - Page 17 MTD Consumer Group Inc’s application for certification.
-
Page 18: Ez Start Promise
Add-on or modified parts that are not exempted by the Air Resources Board may not be used. The use of any non-exempted add-on or modified parts by the ultimate purchaser will be grounds for disallowing a warranty claims. MTD Consumer Group Inc will not be liable to warrant failures of warranted parts caused by the use of a non-exempted add-on or modified part. - Page 19 LEA Y RESPETE TODAS LAS NORMAS DE SEGURIDAD E INSTRUCCIONES INCLUIDAS EN ESTE MANUAL ANTES DE PONER EN FUNCIONAMIENTO ESTA MÁQUINA. SI NO RESPETA ESTAS INSTRUCCIONES PUEDE PROVOCAR LESIONES PERSONALES. MTD LLC. APARTADO POSTAL 361131 CLEVELAND, OHIO 44136-0019 Impreso en Estados Unidos de América Form No. 769-07390C...
- Page 20 Ver Vídeos demostrativos de instalación de mantenimiento y piezas en www.mtdparts.com/KnowledgeCenter ◊ Llame a un representante de Asistencia al Cliente al (800) 800-7310 ó (330) 220-4683 ◊ Escríbanos a MTD LLC • P.O. Box 361131 • Cleveland, OH • 44136-0019...
-
Page 21: Spanish
Medidas importantes de seguridad ¡ADVERTENCIA! La presencia de este símbolo indica que se trata de instrucciones de seguridad importantes que debe respetar para evitar poner en riesgo su seguridad personal y/o material y la de los demás. Lea y siga todas las instrucciones de este manual antes de poner en funcionamiento este equipo. - Page 22 Mantenimiento y Almacenamiento No llene demasiado el tanque de combustible. Llene el tanque completo indicado por el indicador de nivel Mantenga el motor en condiciones seguras de de combustible instalado en el interior del depósito de funcionamiento. combustible. No más de relleno para dejar espacio para Deje que motor se enfríe por lo menos cinco minutos antes la expansión del combustible.
- Page 23 Símbolos De Seguridad Esta página representa y describe la seguridad los símbolos que pueden parecer en este producto. Lea, comprenda, y siga todas instrucciones en la máquina antes procurar para reunir y operar. Símbolo Descripción LEA EL MANUAL(S) DEL OPERADOR Lea, comprenda, y siga todas instrucciones en el manual (manuales) antes procurar para reunir y operar ADVERTENCIA—...
-
Page 24: Configuración
Configuración Gasolina y aceite NOTA: No utilice aceites sin detergente ni aceite para motor de dos tiempos. Podría reducirse la vida útil del motor. NOTA: El motor se despacha sin gasolina ni aceite en su interior. NOTA: Un aceite sintético 5W30 puede ser utilizado para mejorar Hacer funcionar el motor sin suficiente aceite puede causarle la capacidad de inicio de clima frío (temperaturas por debajo de graves daños y anula la garantía del motor. - Page 25 Varilla de medición larga ¡ADVERTENCIA! La gasolina es sumamente Retire el tapón de llenado de aceite/la varilla de medición y inflamable y bajo determinadas condiciones es limpie la varilla de medición de aceite. Vea la Figura 3-3. explosiva. • Cargue combustible en un área bien ventilada y con el motor apagado.
-
Page 26: Controles Y Características
Controles y Características Interruptor del motor† Perilla de Tapa de la Estárter† gasolina Válvula de corte de combustible† Manija del Depurador de aire arrancador Cebador† Tapa del aceite Tubo de drenaje Bujía de encendido Silenciador † De Ser Equipado Figura 4-1 Perilla de Estárter Válvula de corte de combustible (De Ser equipado) -
Page 27: Funcionamiento
Funcionamiento Control previo al funcionamiento El motor se despacha sin gasolina ni aceite en su interior. Consulte la Sección Configuración incluida en este manual para ver las instrucciones para la carga de aceite y gasolina. Determinar el Sistema de Arranque Antes de arrancar el motor, debe determinar el tipo de sistema de arranque que está... - Page 28 Manual de Sistema del estrangulador (en el motor) Si lo tiene, a su vez de la válvula de combustible ubicado en el motor. Véa la Figura 5-3. Tire de la perilla del cebador ubicada en el motor. Vea el recuadro de la Figura 5-3. NOTA: Puede no ser necesario usar el cebador si el motor está...
-
Page 29: Mantenimiento Y Ajustes
Mantenimiento y Adjustes La inspección y los ajustes periódicos del motor son esenciales ADVERTENCIA: Apague el motor antes de realizar si se desea mantener un alto nivel de desempeño. El el mantenimiento. Para evitar una puesta en marcha mantenimiento regular también garantizará una prolongada accidental, desconecte la funda de la bujía. - Page 30 Mantenimiento del aceite IMPORTANTE: El aceite del motor usado puede causar cáncer de piel si entra en contacto con la piel de manera • Inspeccione el nivel de aceite regularmente. reiterada y por períodos prolongados. Si bien esto es improbable a menos que manipule aceite usado todos los •...
- Page 31 Para limpiar el elemento de espuma, retire del filtro de aire y lávese en detergente líquido y agua. Squeeze o presione el elemento de espuma para limpiar la suciedad y el agua. No retuerza, lo que podría dañar o romper el elemento de espuma.
- Page 32 Almacenamiento IMPORTANTE: La bujía debe estar firmemente asegurada. Una bujía que no se encuentre bien asegurada puede calentarse mucho y dañar el motor. PRECAUCIÓN: El no usar un aditivo estabilizador de combustible tales como STA-BIL® o en su Servicio con Filtro de Combustible totalidad haga funcionar el motor hasta que esté...
-
Page 33: Solución De Problemas
Solución de Problemas Problema Causa Solución El motor no arranca 1. El control de lámina se retiró. (Cortadora de 1. Contratar el control de lámina. césped sólo) 2. Alambre de bujía desconectado. 2. Unir el alambre a la bujía. 3. Depósito de combustible combustible vacío 3. - Page 34 Notas...
- Page 35 Inc no podrá denegar el cumplimiento de la garantía únicamente por la falta de los recibos. Como propietario del motor de equipos de exteriores, usted debe saber que MTD Consumer Group Inc. puede denegar la cobertura de la garantía si su motor o una pieza del mismo fallan debido a uso incorrecto, negligencia, mantenimiento indebido o a modificaciones no aprobadas.
-
Page 36: Piezas De Reemplazo
10. No se podrán usar piezas adicionales ni modificadas que no estén exentas de acuerdo con el Departamento de los Recursos del Aire (Air Resources Board). El uso de cualquier pieza adicional o modificada no exenta por el comprador final será causal de invalidez de los reclamos bajo garantía. MTD Consumer Group Inc no tendrá...
Need help?
Do you have a question about the 1P65BOB Shown and is the answer not in the manual?
Questions and answers