Table of Contents
Advertisement
Safe Operation Practices • Set-Up • Operation • Maintenance • Troubleshooting • Warranty
OPERATOR'S MANUAL
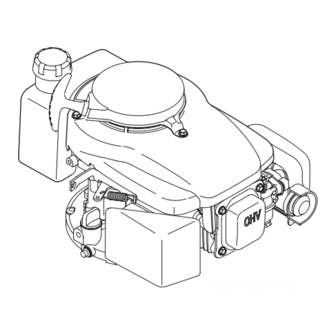
* Model 1P65BOB Shown
139 cc OHV Vertical Shaft Engine
WARNING
READ AND FOLLOW ALL SAFETY RULES AND INSTRUCTIONS IN THIS MANUAL
BEFORE ATTEMPTING TO OPERATE THIS MACHINE.
FAILURE TO COMPLY WITH THESE INSTRUCTIONS MAY RESULT IN PERSONAL INJURY.
MTD Products Ltd., P. O. Box 1386, KITCHENER, ONTARIO N2G 4J1
Printed In USA
769-06653C
10.15.12
Advertisement
Table of Contents

Related Manuals for MTD 139 cc OHV


Summary of Contents for MTD 139 cc OHV
- Page 1 READ AND FOLLOW ALL SAFETY RULES AND INSTRUCTIONS IN THIS MANUAL BEFORE ATTEMPTING TO OPERATE THIS MACHINE. FAILURE TO COMPLY WITH THESE INSTRUCTIONS MAY RESULT IN PERSONAL INJURY. MTD Products Ltd., P. O. Box 1386, KITCHENER, ONTARIO N2G 4J1 Printed In USA 769-06653C...
-
Page 2: Table Of Contents
To The Owner Thank You This Operator’s Manual is an important part of your new engine. It will help you prepare and maintain the engine for the best performance. Please read and understand the contents before operating the engine. Table of Contents Safe Operation Practices ........ -
Page 3: Safe Operation Practices
Important Safe Operation Practices WARNING! This symbol points out important safety instructions which, if not followed, could endanger the personal safety and/or property of yourself and others. Read and follow all instructions in this manual before attempting to operate the equipment. Failure to comply with these instructions may result in personal injury. -
Page 4: Spark Arrestor
Maintenance & Storage Do not overfill fuel tank. Fill tank to full as indicated by the fuel level indicator installed inside of the fuel tank. Do not Keep the engine in safe working order over-fill to allow space for fuel expansion. On some models, a fuel level indicator may NOT be present, in this instance, Allow the engine to cool at least five minutes before fill the tank no more than 1/2 inch below the bottom of the... -
Page 5: Safety Symbols
Safety Symbols This page depicts and describes safety symbols that may appear on this product. Read, understand, and follow all instructions on the machine before attempting to assemble and operate. Symbol Description READ THE OPERATOR’S MANUAL(S) Read, understand, and follow all instructions in the manual(s) before attempting to assemble and operate WARNING—GASOLINE IS FLAMMABLE Allow the engine to cool at least two minutes before refueling. -
Page 6: Set-Up
Set-Up Gas & Oil Checking Oil Level IMPORTANT: Be sure to check the oil while on a level surface with NOTE: The engine is shipped without gasoline or oil in the the engine stopped. engine. Running the engine with insufficient oil can cause serious engine damage and void the engine warranty. - Page 7 Extended Dipstick Fuel Requirements Remove the oil filler cap and wipe the dipstick clean. See CAUTION: Operating the engine with E85 fuel, an Fig. 3-3. oil/gasoline mixture, dirty gasoline, or gasoline over 30 days old without fuel stabilizing additive may result in damage to your engine’s carburetor.
-
Page 8: Controls & Features
Controls and Features Engine Switch† Choke† Fuel Cap Valve† Air Cleaner Starter Handle Primer† Oil Fill Cap Oil Drain Spark Plug † If Equipped Figure 4-1 Choke Fuel Shut-Off Valve (If Equipped) (If Equipped) The choke control is located on the left side of the handle or on The fuel shut off valve is located on the engine to the right of the the engine below the engine switch and when activated, closes choke. -
Page 9: Operation
Operation Pre-Operation Check The engine is shipped without gasoline or oil in the engine. See the Set-Up Section of this manual for instructions on adding oil and gasoline. Determine The Starting System Before starting the engine, you must determine the type of starting system that is on your engine. -
Page 10: Stopping Engine
Manual Choke System (On the Engine) If equipped, turn on fuel valve located on the engine. See Figure 5-3. Pull out the choke knob located on the engine. NOTE: Use of the choke may not be necessary if the engine is warm or the air temperature is high. -
Page 11: Maintenance & Adjustments
Engine Maintenance WARNING: Periodic inspection and adjustment of the engine is essential if Shut off the engine before performing high level performance is to be maintained. Regular maintenance any maintenance. To prevent accidental start-up, will also ensure a long service life. The required service intervals disconnect the spark plug boot. -
Page 12: Air Filter Service
Oil Service IMPORTANT: Used motor oil may cause skin cancer if repeatedly left in contact with the skin for prolonged periods. Although this • Check oil level regularly. is unlikely unless you handle used oil on a daily basis, it is still advisable to thoroughly wash your hands with soap and water as •... - Page 13 To clean foam element, remove it from the air filter cover and wash in a mild liquid detergent and water. Squeeze or press the foam element to rinse out dirt and water. Do not twist; this could damage or tear the foam element. Allow to dry thoroughly before using.
-
Page 14: Clean Engine
NOTE: When installing a new spark plug, tighten 1/2 turn WARNING: Accumulation of debris around muffler after the spark plug seats to compress the washer. When could cause a fire. Inspect and clean before every reinstalling a used spark plug, tighten 1/8-1/4 turn after the use. -
Page 15: Troubleshooting
Troubleshooting Problem Cause Remedy Engine Fails to start 1. Blade control disengaged. 1. Engage blade control. 2. Spark plug boot disconnected. 2. Connect wire to spark boot. 3. Fuel tank empty or stale fuel. 3. Fill tank with clean, fresh gasoline. 4. -
Page 16: Replacement Parts
Replacement Parts Component Part Number and Description 951-10292 Spark Plug 951-10732 Air Cleaner (Oval) 951-10298 Air Cleaner Kit (Square) 951-12738 Fuel Cap Assembly (Phase 3 Engine) 951-10300 Fuel Cap Assembly (Phase 2 Engine) 951-10358A Fuel Filter NOTE: Download a complete Parts Manual, refer to customer support on page 2. Be sure to have your model number and serial number ready. -
Page 17: Warranty
Designed, built and equipped so as to conform with all applicable regulations; and free from defects in materials and workmanship that cause the failure of a warranted part to be identical in all material respects to that part as described in MTD Consumer Group Inc’s application for certification. - Page 18 • Vapor lines NOTE: If you require warranty service in Canada and your product was sold by MTD Products Limited within Canada to the retailer you purchased it from in Canada then the MTD Consumer Group Inc portion of this warranty will be honored by MTD Products Limited in Canada.
Need help?
Do you have a question about the 139 cc OHV and is the answer not in the manual?
Questions and answers
I do not have an owners manual. Wondering how you drain the oil from the engine
ITPOPSbutwontrunmorethanafewseconds
how do i recharge the battery
How to replace spark plug
do i put unleaded gas in my lawnmower
Where would I get a Replacement carburetor