Table of Contents
Advertisement
Safe Operation Practices • Set-Up • Operation • Maintenance • Troubleshooting • Warranty
OPERATOR'S MANUAL
277cc, 357cc & 420cc OHV Horizontal Shaft Engine
WARNING
READ AND FOLLOW ALL SAFETY RULES AND INSTRUCTIONS IN THIS MANUAL
BEFORE ATTEMPTING TO OPERATE THIS MACHINE.
FAILURE TO COMPLY WITH THESE INSTRUCTIONS MAY RESULT IN PERSONAL INJURY.
MTD Products Ltd., P. O. Box 1386, KITCHENER, ONTARIO N2G 4J1
Printed In USA
769-06147F
09.23.14
Advertisement
Table of Contents

Subscribe to Our Youtube Channel
Related Manuals for MTD 31AH65KG500


Summary of Contents for MTD 31AH65KG500
- Page 1 READ AND FOLLOW ALL SAFETY RULES AND INSTRUCTIONS IN THIS MANUAL BEFORE ATTEMPTING TO OPERATE THIS MACHINE. FAILURE TO COMPLY WITH THESE INSTRUCTIONS MAY RESULT IN PERSONAL INJURY. MTD Products Ltd., P. O. Box 1386, KITCHENER, ONTARIO N2G 4J1 Printed In USA 769-06147F...
-
Page 2: Table Of Contents
To The Owner Thank You This Operator’s Manual is an important part of your new engine. It will help you prepare and maintain the engine for the best performance. Please read and understand the contents before operating the engine. Table of Contents Safe Operation Practices ........ -
Page 3: Safe Operation Practices
Important Safe Operation Practices WARNING! This symbol points out important safety instructions which, if not followed, could endanger the personal safety and/or property of yourself and others. Read and follow all instructions in this manual before attempting to operate the equipment. Failure to comply with these instructions may result in personal injury. - Page 4 Maintenance & Storage Do not overfill fuel tank. Fill tank to full as indicated by the fuel level indicator installed inside of the fuel tank. Do not Keep the engine in safe working order over-fill to allow space for fuel expansion. On some models, a fuel level indicator may NOT be present, in this instance, Allow the engine to cool at least five minutes before fill the tank no more than 1/2 inch below the bottom of the...
-
Page 5: Safety Labels
Safety Symbols This page depicts and describes safety symbols that may appear on this product. Read, understand, and follow all instructions on the machine before attempting to assemble and operate. Symbol Description READ THE OPERATOR’S MANUAL(S) Read, understand, and follow all instructions in the manual(s) before attempting to assemble and operate WARNING—GASOLINE IS FLAMMABLE Allow the engine to cool at least two minutes before refueling. -
Page 6: Set-Up
Set-Up Oil & Fuel Specifications Checking Oil Level on Engines with Quarter-Turn Oil Fill Caps NOTE: Be sure to check the oil while on a level surface with the IMPORTANT: Your equipment may or may not have been engine stopped. shipped with oil in the engine. - Page 7 Filling Oil Sump Checking Oil Level on Engines with Threaded Oil Fill Caps NOTE: Be sure to check the oil while on a level surface with the Be sure the engine is upright and level. engine stopped. Remove the oil fill cap dipstick from oil filler tube by To avoid engine damage, it is important to: rotating counter-clockwise and lifting the dipstick out of the engine.
- Page 8 Fuel Recommendations CAUTION: Operating the engine with E15 or E85 fuel, an oil/gasoline mixture, dirty gasoline, or gasoline over 30 days old that has not been stabilized using a fuel additive, may result in damage to your engine’s carburetor. Subsequent Fuel Level Indicator damage would not be covered under the Top View...
-
Page 9: Controls & Features
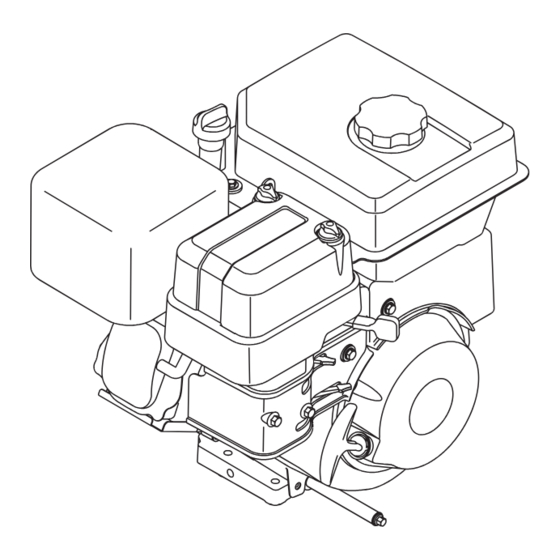
Controls and Features Oil Fill/Dipstick Muffler Fuel Fill Air Filter Cover Air Filter Thumb Screws Muffler Oil Fill/Dipstick Throttle Fuel Fill Primer Choke Fuel Shut-Off Starter Handle Control Oil Drain Electric Inlet & Choke Starter Button Throttle Oil Drain Figure 4-1 Throttle Fuel Fill It regulates the speed of the engine and will shut off the engine... -
Page 10: Operation
Operation Pre-Operation Check NOTE: Allow the engine to warm up for a few minutes after starting. The engine will not develop full power until it reaches IMPORTANT: Your equipment may or may not have been operating temperatures. shipped with oil in the engine. You must, however, check the oil Familiarize yourself with the engine symbols shown in Fig. - Page 11 If your house wiring is grounded and a G.F.I. • Momentarily move choke control back to “FULL three-Prong Wall Receptacle is not available at the CHOKE” position. location where your starter will be used, one must • Next, move the choke control to !/2 “CHOKE” be installed by a Licensed Electrician BEFORE USING position until engine runs smoothly.
- Page 12 Stopping the Engine & Short Term Storage Grasp the starter cord handle. • Pull rope out slowly until you feel drag. Stop engine in accordance with the equipment Operator’s • Without allowing the rope to retract, continue Manual. pulling the rope with one rapid full arm stroke. WARNING! To avoid unsupervised engine •...
-
Page 13: Maintenance & Adjustments
Maintenance Maintenance Schedule Each Use or Every Season Every Season Every Season First 5 Hours Service Dates Every 5 Hrs. or 25 Hours or 50 Hours or 100 Hours Check Engine Oil Level Change Engine Oil Check Air Cleaner (If equipped) Service Air Cleaner (If equipped) Check Spark Plug Replace Spark Plug... - Page 14 • Keep the disconnected spark plug wire securely Install the oil drain plug and tighten securely. away from the metal parts where arcing could Clean area around the oil drain plug. occur. Remove the oil fill cap dipstick. • Carefully attach the spark plug wire to the Fill with the recommended oil (See Set Up Section).
- Page 15 Visually inspect the spark plug. Discard the spark plug Replace paper element when dirty or damaged. Clean if there is apparent wear, or if the insulator is cracked or foam element or replace when damaged. chipped. Replace the plug if the electrodes are pitted, To clean foam element, separate it from the paper element burned or fouled with deposits.
- Page 16 Transporting Your Engine WARNING! Accumulation of debris around muffler could cause a fire. Inspect and clean before every WARNING! NEVER transport this engine inside of use. another vehicle or in any enclosed space if there is any gasoline in the tank. Fuel vapor or spilled fuel Fuel Storage may ignite.
- Page 17 Remove the rag from the spark plug hole. WARNING! To avoid severe injury or death, DO Install the spark plug. NOT pour fuel from engine or siphon fuel by mouth. Carefully disconnect the spark plug wire from the grounding post, if provided. To prevent serious injury from fuel fires, empty fuel tank by running engine until it stops from lack of fuel.
-
Page 18: Troubleshooting
Troubleshooting Problem Cause Remedy Engine Fails to start 1. Engine flooded 1. Wait at least 10 minutes before starting 2. Spark plug wire disconnected 2. Connect wire to spark plug 3. Fuel tank empty or stale fuel 3. Fill tank with clean, fresh gasoline 4. -
Page 19: Replacement Parts
Replacement Parts ENGINE AIR FILTER SPARK PLUG FUEL CAP FUEL FILTER 478-SUB 951-10292 951-10649A 731-05632 951-10652 483-SUB 951-10292 951-10649A 731-05632 951-10652 483-SUC 951-10292 951-10649A 731-05632 951-10652 490-SUB 951-10292 951-10649A 731-05632 951-10652 490-SUC 951-10292 951-10649A 731-05632 951-10652 490-WU 951-10292 951-10649A 731-05632 951-10652 178-L0 951-10298... -
Page 20: Warranty
Any warranted part that is not scheduled for replacement as required maintenance in the written instructions supplied is warranted for the warranty period stated above. If the part fails during the period of warranty coverage, the part will be repaired or replaced by MTD Consumer Group Inc according to subsection (4) below. - Page 21 NOTE: If you require warranty service in Canada and your product was sold by MTD Products Limited within Canada to the retailer you purchased it from in Canada then the MTD Consumer Group Inc portion of this warranty will be honored by MTD Products Limited in Canada.
Need help?
Do you have a question about the 31AH65KG500 and is the answer not in the manual?
Questions and answers