Jensen Phase Linear CD1213 Owner's Manual
Phase linear series am/fm/cd receiver
Hide thumbs
Also See for Phase Linear CD1213:
- Installation manual (6 pages) ,
- Installation manual (2 pages)
Advertisement
Available languages
Available languages
Quick Links
Download this manual
See also:
Installation Manual
Advertisement
Chapters

Related Manuals for Jensen Phase Linear CD1213


Summary of Contents for Jensen Phase Linear CD1213
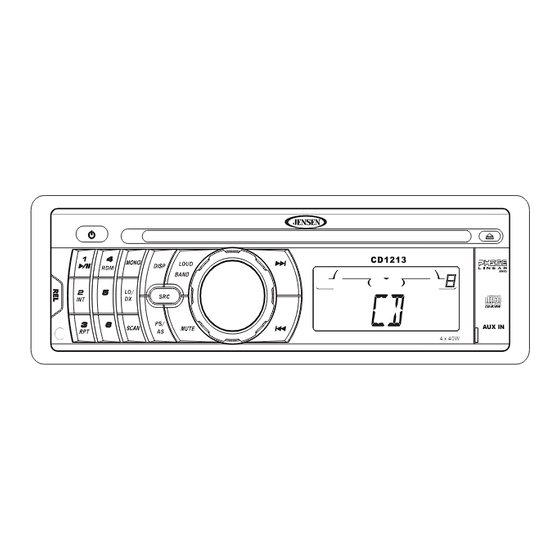
- Page 1 SERIES CD1213 Owner's Manual/Manual del Usario/Manual de L'Utilisateur AM/FM/CD Receiver Receptor AM/FM/CD Recepteur AM/FM/CD CD1213 AUX IN 4 x 40W...
- Page 2 CD1213...
-
Page 3: Table Of Contents
CD1213 Pour des instructions en Francais, référez-vous à la page 27. Para obtener instrucciones en Espa ol, diríjase a la página 13. ñ INTRODUCTION Contents Operating Instructions ... 2 Tuner Operation ... 5 CD Player Operation ... 7 Remote Control ... 9 Care and Maintenance ... -
Page 4: Operating Instructions
OPERATING INSTRUCTIONS 23 24 Power Press the power button (1) or any other button on the face of the receiver to turn the unit on when the ignition switch is on. Press the power button again to turn the receiver off. If the radio was left on when the ignition was last turned off, the receiver will turn on automatically when the ignition switch is again turned on. -
Page 5: Beep Tone
CD1213 Select Press the AUDIO CONTROL button (4) to step through the menu of audio functions: volume (VOL), bass (BAS), treble (TRB), balance (BAL), fader (FAD), and volume (VOL). When adjusting audio functions, the unit will automatically exit select mode and return to the normal display after five seconds or when another function is activated. -
Page 6: Front Panel Release
CONTROL to select from the following Beep Tone options: • BEEP ALL: Beep is heard any time a button is pressed (function activated). • BEEP 2ND: Beep is heard only when a secondary function is activated (press and hold). • BEEP OFF: Beep is not heard. -
Page 7: Tuner Operation
CD1213 TUNER OPERATION 23 24 AM/FM Band Selector (BAND) Press the BAND button (5) during radio play to switch between three FM bands and one AM band. “F1”, “F2”, “F3” or “AM” will appear in the display to indicate the band currently selected. Tuning Automatic Tuning Press the >>| button (14) to tune upward in... -
Page 8: Preset Stations
NOTE: The Scan function does not work correctly in “MANUAL” mode. Preset Stations Up to six stations on each band can be stored as presets and can then be instantly recalled by pressing the associated preset button on the front panel (19-24) or remote control. To store a station, turn the radio on and select the desired band and station. -
Page 9: Cd Player Operation
CD1213 CD PLAYER OPERATION 23 24 Insert CD With the label surface facing up, gently insert the disc into the CD slot (11) until the soft- loading mechanism engages and pulls the disc in. Disc play begins and “CDP PLAY” will appear in the display. -
Page 10: Cd Player Error Codes
Disc Repeat (RPT) Press the 3 RPT button (21) during disc play to continuously repeat the selected track. “S-- RPT” will appear in the display. Press 3 RPT again to stop repeating. “S--RPT” will disappear from the display, and regular play will resume. The repeat function will also be canceled when activating the scan or shuffle functions. -
Page 11: Remote Control
CD1213 REMOTE CONTROL The remote control will allow you to control the basic functions of your head unit. LOUD TR. DN TR. UP DISP SHUF The remote control sensor is located on the left side of the front panel to the left of the 3 RPT button (3). -
Page 12: Care And Maintenance
CARE AND MAINTENANCE CD Player The following guidelines will help you extend the life of your CD player: When cleaning the vehicle interior, do not get water or cleaning fluids on the unit. The CD player will not operate properly in extreme hot/cold or under damp conditions. -
Page 13: Troubleshooting
CD1213 TROUBLESHOOTING Problem Does not operate (display does not No power to yellow wire; no power to red wire light) Inline fuse blown No power to unit Inline fuse blown Not all speakers operate Incorrect splices or connections Speaker wires shorting to chassis ground or to each other Blows fuses Power wire shorting to ground... -
Page 14: Specifications
SPECIFICATIONS CEA Power Ratings Power output: 13 watts RMS X 4 channels into 4-ohms @ < 1% THD+N Signal to noise ratio: 70dBA below reference. (Reference: 1 watt, 4-ohms) Frequency response: 20Hz to 20kHz (-3dB), Auxiliary input used as source reference Reference supply voltage: 14.4VDC CD Player Signal-to-noise ratio: >90dBA... - Page 15 CD1213 For instructions in English, see page 1. Pour des instructions en Francais, référez-vous à la page 27. INTRODUCCIÓN Contenido Instrucciones de Funcionamiento... 14 Operación de Sintonizador... 18 Operación del Reproductor de CD ... 20 Control Remoto ... 22 Cuidado y Mantenimiento... 23 Resolución de Problemas ...
-
Page 16: Instrucciones De Funcionamiento
INSTRUCCIONES DE FUNCIONAMIENTO 23 24 Encendido Presione el botón de Encendido (1) o cualquier otro botón en el frente del receptor para encender la unidad cuando el interruptor de encendido está en ON. Presione el botón de encendido (1) nuevamente para apagar la unidad. - Page 17 CD1213 Seleccionar Presione el botón CONTROL DE AUDIO (4) para pasar por el menú de funciones de audio: volumen (VOL), graves (BAS), agudos (TRB), balance (BAL), fader (FAD), y volumen (VOL). Cuando ajusta funciones de audio, la unidad automáticamente saldrá del modo seleccionar y volver a la muestra normal después de cinco segundos o cuando otra función se activa.
-
Page 18: Entrada Auxiliar
activada, la unidad retornará a los niveles de graves y agudos seleccionados más recientemente. Tono Beep La función de tono beep permite la selección de un tono beep audible para ser escuchado cada vez que es presionado un botón en la cara de la radio. - Page 19 CD1213 restauración protege el circuito del microprocesador. Dado que el restaurar la unidad borrará la hora y las memorias preseleccionadas, sólo debería activarse luego de la instalación inicial después de haber completado el cableado, o si hay algún mal funcionamiento de alguno de los interruptores de la unidad.
-
Page 20: Operación De Sintonizador
OPERACIÓN DE SINTONIZADOR 23 24 Selector de Banda AM/FM (BAND) Presione el botón BAND (5) durante la reproducción de radio para intercambiar entre tres bandas de FM y una banda AM. “F1”, “F2”, “F3” o “AM” aparecerá en la pantalla para indicar la banda actualmente seleccionada. - Page 21 CD1213 parpadeará en la pantalla durante ese tiempo. Presione SCAN nuevamente para detener la exploración y reproducir la estación actual. NOTA: La función Scan no funcionan correctamente en modo “MANUAL”. Estaciones Prefijadas Pueden almacenarse hasta seis estaciones en cada banda como predeterminadas que luego pueden recuperarse presionando el botón de predeterminada asociada en el panel frontal (19-24) o el control remoto.
-
Page 22: Operación Del Reproductor De Cd
OPERACIÓN DEL REPRODUCTOR DE CD 23 24 Insertar CD Con la superficie de etiqueta hacia arriba inserte suavemente el disco dentro de la ranura de CD (11) hasta que enganche el mecanismo de carga y tome el disco. Comienza la reproducción del disco y aparecerá... - Page 23 CD1213 Búsqueda de Ingreso a Disco (INT) Durante la reproducción del disco, presione el botón 2 INT (20) para reproducir los primeros 10 segundos de cada pista en el disco. “S-- SCN” aparecerá en la pantalla. Cuando se alcanza la pista deseada, presione nuevamente 2 INT para finalizar la exploración y reproducir la pista seleccionada.
-
Page 24: Control Remoto
CONTROL REMOTO El control remoto le permitirá controlar las funciones básicas de su unidad central. LOUD TR. DN TR. UP DISP SHUF El sensor de control remoto está ubicado en el lado izquierdo del panel frontal a la izquierda del botón 3 RPT (3). Las funciones del control remoto son como siguen: •... -
Page 25: Reproductor De Cd
CD1213 CUIDADO Y MANTENIMIENTO Reproductor de CD Las siguientes guías le ayudarán a extender la vida de su reproductor de CD: Cuando limpia el interior del vehículo, no aplique agua o fluidos de limpieza en la unidad. El reproductor de CD podría no funcionar adecuadamente en calor o frío extremo o bajo condiciones de humedad. -
Page 26: Resolución De Problemas
RESOLUCIÓN DE PROBLEMAS Problema No funciona (la pantalla no enciende) Sin energía en el cable amarillo; sin energía en el cable rojo Fusible en línea quemado. Sin energía en la Unidad Fusible en línea quemado. No todos los parlantes funcionan Empalmes o Conexiones Incorrectos Cables de parlantes en corto a tierra del chasis o a algún otro parlante... -
Page 27: Especificaciones
CD1213 ESPECIFICACIONES Especificaciones de Potencia CEA Potencia de Salida: 13 Watts RMS x 4 canales dentro de 4-Ohms @ < 1% THD+N Relación Señal Ruido: 70dBA debajo de referencia. (Referencia: 1 Watt, 4-Ohms) Respuesta a Frecuencia: 20Hz a 20 kHz, -3dB, entrada auxiliar usada como fuente de referencia Voltaje de Alimentación de Referencia:... - Page 28 CD1213...
- Page 29 CD1213 For instructions in English, see page 1. Para obtener instrucciones en Espa ol, diríjase a la página 13. ñ COMMENCER Table des matières Instructions d’opération ... 28 Opération Tuner ... 32 Opération du lecteur CD... 34 Télécommande... 36 Soin et Maintenance... 37 Dépannage...
-
Page 30: Instructions D'opération
OPERATING INSTRUCTIONS 23 24 Puissance Pressez le bouton puissance (1) ou tout autre bouton sur la face du récepteur pour allumer l’appareil lorsque le commutateur d’allumage est allumé. Pressez le bouton puissance de nouveau pour mettre le récepteur en arrêt. Si la radio était en marche lorsque le commutateur d’allumage avait été... - Page 31 CD1213 Sélectionner Pressez le bouton AUDIO CONTROL (4) pour passer à travers le menu des fonctions audio : volume (VOL), basse (BAS), aigu (TRB), balance (BAL), équilibreur (FAD) et volume (VOL). Lorsque vous ajustez des fonctions audio l’appareil sélectionnera automatiquement le mode et reviendra à...
- Page 32 alors que la fonction égaliseur est active la fonction égaliseur reviendra à FLAT. Si la fonction égaliseur n’est pas active, l’appareil reviendra aux niveaus de basse et d’aigu les plus récemment choisis. Tonalité Bip La fonction de la tonalité bip permet la sélection d’une tonalité...
- Page 33 CD1213 lorsque le panneau avant est enlevé. La circuiterie de réinitialisation protège la circuiterie du microprocesseur. Puisque la réinitialisation de l’appareil effacera l’heure et la mémoire préréglée, il ne doit être activée que lors de l’installation initiale après que tout le câblage ne soit terminé...
-
Page 34: Opération Tuner
OPERATION TUNER 23 24 Sélecteur de bande AM/FM (BAND) Pressez le bouton BAND (5) pendant que la radio est allumée pour changer entre trois bandes FM et un bande AM. « F1 », « F2 », « F3 » ou « AM » apparaît dans l’affichage pour indiquer la bande actuellement sélectionnée. -
Page 35: Stations Préréglées
CD1213 la bande actuelle. L’appareil fera pause et jouera chaque station pendant cinq secondes et la fréquence de la station clignotera dans l’affichage pendant ce temps. Pressez SCAN de nouveau pour arrêter le scannage et écouter la station actuelle. A NOTER : La fonction Scan ne fonctionne pas correctement en mode «... -
Page 36: Sélection De Piste
OPERATION LECTEUR CD 23 24 Insérer le CD Avec la face étiquette en haut, insérez doucement le disque dans la fente pour CD (11) jusqu’à ce que le mécanisme à chargement doux s’engage et tire le disque vers l’intérieur. La reproduction du disque commence et « CDP PLAY »... -
Page 37: Ejection Du Disque
CD1213 Scannage de l’intro du disque (INT) Pendant la reproduction du disque, pressez le bouton 2 INT (20) pour jouer les 10 premières secondes de chaque piste sur le disque. « S--SCN » apparaîtra dans l’affichage. Lorsque la piste désirée est atteinte, pressez 2 INT de nouveau pour terminer la fonction de scannage et jouer la piste sélectionnée. -
Page 38: Télécommande
TELECOMMANDE La télécommande vous permet de commander les fonctions de base de votre installation de tête. LOUD TR. UP TR. DN DISP SHUF La sonde de la télécommande est située à gauche du panneau avant, à gauche du bouton 3 RPT (3). Les fonctions de télécommande sont comme suit : •... -
Page 39: Soin Et Maintenance
CD1213 SOIN ET MAINTENANCE Lecteur CD Les consignes suivantes vous aideront à prolonger la vie de votre lecteur CD : Lorsque vous nettoyez l’intérieur du véhi- cule ne faites pas tomber de l’eau ou des fluides quelconques sur l’appareil. Le lecteur CD ne fonctionnera pas bien dans des conditions de chaleur ou de froid extrêmes ou dans des conditions humides. -
Page 40: Dépannage
DEPANNAGE Problème Ne fonctionne pas (l’affichage en s’illu- Pas de puissance au fil jaune ; pas de puissance mine pas) au fil rouge Fusible en ligne sauté Pas de puissance à l’appareil Fusible en ligne sauté Tous les haut sparleurs ne fonctionnent Des greffes ou des branchements incorrects Les fils d’hauts parleurs font court-circuit à... -
Page 41: Spécifications
CD1213 SPECIFICATIONS CEA Power Ratings Sortie puissance : 13 watts RMS X 4 channels into 4-ohms @ < 1% THD+N Rapport signal au bruit : 70dBA sous référence (Référence : 1 watt, 4-ohms) Réponse en fréquence : 20Hz to 20kHz (-3dB), Entrée auxiliaire utilisée comme source de référence Voltage de fournitures référence : 14.4VDC... - Page 42 CD1213...
-
Page 43: Limited Warranty
CD or Multimedia Radios/Head Units Audiovox Electronics Corporation (“the Company”) is committed to quality and customer service, and are pleased to offer you this Warranty. Please read it thoroughly and contact the Company at 1-800-323-4815 with any questions. Who is covered? The Company extends this warranty to the original retail purchaser of products purchased through an authorized Audiovox retailer in the U.S.A., Puerto Rico or Canada. -
Page 44: Garantía Limitada
Radios del CD o de los Multimedia Audiovox Electronics Corporation ("la Compañía) es una corporación comprometida con la calidad y el servicio al cliente, y se complace en ofrecerle esta Garantía. Por favor, léala completamente y contacte a la Compañía al 1- 800-323-4815 por cualquier duda. -
Page 45: Garantie Limitée
Radios CD ou Multimédia / Unités principales Audiovox Electronics Corporation (la Société) s'engage à la qualité et au service des clients, et est content de vous offrir cette garantie. Nous vous prions de le lire attentivement et prendre contact avec la Société au 1-800-323- 4815 avec des questions. - Page 46 SERIES SERIES Audiovox Electronics Corporation 150 Marcus Boulevard Hauppauge, NY 11788 1-800-323-4815 www.audiovox.com ©2009 Audiovox v.060209 N1049...
Need help?
Do you have a question about the Phase Linear CD1213 and is the answer not in the manual?
Questions and answers