Table of Contents
Advertisement
Advertisement
Table of Contents

Related Manuals for LSC Minim


Summary of Contents for LSC Minim
- Page 1 LIGHTING CONTROL DESK OPERATOR MANUAL Version 1.0 July 2003 L.S.C. Lighting Systems (Aust) Pty Ltd A.B.N. 21 090 801 675 7 University Place, Clayton, Victoria, 3168 Australia Tel: +61 3 9561 5255 Fax: +61 3 9561 5277 Email: info@lsclighting.com.au Web site: www.lsclighting.com.au...
- Page 3 RECORD A CHASE [record chase] [F/A] To record a Chase in the current page, press (Chase number). Each step of a Chase consists of either a previously recorded Scene or a snapshot of the MINIM output. • [PAGE] [F/A] To add a Scene as a step, press (optional) (Scene number).
-
Page 5: Table Of Contents
CONTENTS QUICK REFERENCE __________________________________________________________ IFC INTRODUCTION___________________________________________________________ 2 FEATURES_______________________________________________________________________ 2 OPTIONS ________________________________________________________________________ 2 CARING FOR YOUR MINIM _________________________________________________________ 3 TERMINOLOGY ___________________________________________________________________ 3 SOFTWARE ______________________________________________________________________ 4 GETTING CONNECTED ____________________________________________________ 5 MAINS INPUT_____________________________________________________________________ 5 DMX512 OUTPUT__________________________________________________________________ 5 FRONT PANEL LAYOUT ___________________________________________________ 6 MODES OF OPERATION ___________________________________________________ 7... -
Page 6: Introduction
EVA rubber side profiles. OPTIONS A number of useful options are available from LSC to compliment the MINIM lighting desk. 19” rack mount brackets A pair of metal side brackets that easily attach to the MINIM chassis and allow you to install the desk into horizontal or vertical 19”... -
Page 7: Caring For Your Minim
A lighting “LOOK” is the collection of channels at their various levels (intensities) that are contributing to the output of the MINIM at any one time. A “look” may be made up of a collection of channels or a single scene (see below) or a combination of several scenes. It may even be a single channel. -
Page 8: Software
It differs from a Preset Master in that it does not have dedicated channel faders under its control. It “grabs” or stores the channels that it controls from other areas of the MINIM . Typically, it would be used to grab the current output of the MINIM. -
Page 9: Getting Connected
Plug the mains lead into the MAINS INPUT socket and connect it to a source of mains power. A Power Switch located next to the Mains Input connector allows you to switch the MINIM off and on without removing the mains lead. The Mains Input socket is fused with a M205 sized 500mA fuse. -
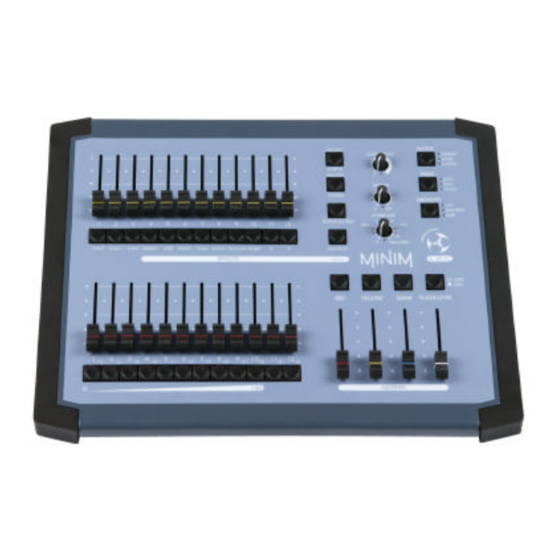
Page 10: Front Panel Layout
All functions for the MINIM are laid out in front of the operator in a clear and concise arrangement. The following chapters will now deal with each function. -
Page 11: Modes Of Operation
• SCENE mode. The Red Bank faders become PLAYBACKS and control the levels of recorded Scenes or Chases. You may freely change modes at any time during your operation of the MINIM and the current mode is always shown by the “LED” mode indicators beside the MODE button. -
Page 12: Wide Mode
Yellow Master and of course, you may use the CROSSFADE rotary fader to set the fade time. ADVANTAGE You have access to all of the channels that are available on the MINIM. This is most useful when you are recording Scenes as you can utilise all channels to create your Scenes. (See “Scene Mode”... -
Page 13: Fade Times
A fully manual fade is achieved by setting the crossfade times to 0 seconds. The fade will then instantly follow the position of the master fader as you move it. PLAYBACKS When the MINIM is in SCENE mode, the Red Bank faders are used to playback Scenes or Chases that you have recorded in them. SCENES When a Scene is recorded it looks at the current setting of the CROSSFADE rotary fader. -
Page 14: Memory Run
The MEMORY RUN mode is used to playback the previously recorded Scenes and Chases. The MINIM must also be in SCENE mode, so the Red Bank faders are acting as Playbacks for the stored memories. For memory based shows, this configuration (“scene” and “run”) is the common playback mode. -
Page 15: Scenes
Scene you are recording without destroying any previously stored memories. [record scene] To abandon the RECORD SCENE function, press a second time, prior to [F/A] pressing a (scene number) button. LSC Lighting Systems (Aust) Pty. Ltd. Page 11 of 27... -
Page 16: Playback A Scene
Hint; If you are required to record several “blind” Scenes during a performance, make some preparations by recording the required Scene numbers prior to the show. The MINIM will not record a Scene if there are no channels on the output so set only 1 channel ON at a low level and record it in the scene numbers. -
Page 17: Edit A Scene
To create a blackout, fade all three Masters to the fully down position and ensure that they have completed their fade by observing that their F/A LEDs are not flashing. [record scene] [F/A] Press (scene number to be deleted) LSC Lighting Systems (Aust) Pty. Ltd. Page 13 of 27... -
Page 18: Chases
To record a snapshot of the output as a step, create the desired look on the output, [record scene] then press Continue to record steps as above. [record chase] When all steps have been recorded, press to end. LSC Lighting Systems (Aust) Pty. Ltd. Page 14 of 27... - Page 19 (the required effect). The Pattern and Trigger buttons are a toggle function, where only one (or no) button can be selected at a time The Effects can be varied after recording by editing the Chase. LSC Lighting Systems (Aust) Pty. Ltd. Page 15 of 27...
-
Page 20: Playback A Chase
This function allows you to view the contents of a Playback fader or the Grab Master without revealing the Chase on stage. The Preview function will work irrespective of which mode (preset, wide or scene) the MINIM is in. [MEMORY] To preview a Chase, press the button until PREVIEW LED is lit. -
Page 21: Edit A Chase
To change the direction, hold down the button, then press (reverse) or [function] (forward), then release TO CHANGE PATTERN OF A CHASE [function] [random], [bounce] [single], To change the Chase pattern, hold down [function] then release LSC Lighting Systems (Aust) Pty. Ltd. Page 17 of 27... -
Page 22: Delete A Chase
, then release The step number selected above will now be deleted. If you delete all the steps of a chase then the MINIM keeps a blank (blackout) step as the first step, to enable the editing and inserting of new steps. -
Page 23: Grab Master
Scene that can be concurrently replayed along with the other 12 Playbacks on the Red Bank. [record scene] [F/A] ( To record the output of the MINIM in the Grab Master, press GRAB) The contents of the Grab Master (including its fade time), may be edited in exactly the same manner as a Scene. -
Page 24: Flash
There are no times associated with the FLASH function. All actions are instantaneous. ADD/SOLO MODE You may select what effect the FLASH/ASSIGN buttons have on the output of the MINIM, by selecting either ADD mode or SOLO mode. [add/solo] Pressing the button will toggle from one mode to the other. -
Page 25: Utilities
At the completion of the reset the F/A button stops flashing. LSC also suggests that a SOFT RESET is performed each time you start a new show, as it is a quick way to ensure that ALL memories are deleted and ensures that the console is set to the default operating state. - Page 26 Memory Module. This includes all Scenes and Chases. To load a show, plug-in the Memory Module to the ”COMMS PORT”. If a Memory Module is not plugged in or if the Memory Module is empty, then the MINIM will detect this and not flash the [F/A] (load) LED.
-
Page 27: Upgrading The Software
(PC) comm port to the MINIM (COMMS PORT) to enable new software to be loaded into the MINIM. On power up, the MINIM sends a request out of its Comm port asking if the mLINK program is listening. If mLINK is not there, the MINIM continues on and ignores any further communications. - Page 28 The cable requires 3 conductors, Tx, Rx and common. Cable type is a standard RS232 type serial cable fitted with a 9 pin D-type Male at the MINIM end and at the other with either a 9 pin or 25 pin D-type Female depending on the comm port connector on your computer.
-
Page 29: Audio Input
AUDIO INPUT The MINIM is fitted with a RCA (phono) type socket to accept an audio signal. The audio signal should have a nominal level of 1 volt RMS (line level). The audio signal can be used to trigger the stepping of a Chase (or chases) by selecting the BASS STEP function. -
Page 30: 10.0 Compliance Statements
10.0 COMPLIANCE STATEMENTS 10.1 CE & C TICK COMPLIANCE STATEMENT The MINIM range of lighting control desks from LSC Lighting Systems (Aust) Pty. Ltd. have been designed and tested to the European Committee for Electrotechnical Standardization (CENELEC) standard– EN55022 (Information Technology Equipment). -
Page 31: 11.0 Company Profile
MINIM Operator Manual V1.0 Company Profile 11.0 COMPANY PROFILE MINIM – entry level lighting The LSC name is synonymous console with manual/memory DMX512 control within the Entertainment Lighting Industry for producing leading edge lighting control products that are innovative, stylish and functional.
Need help?
Do you have a question about the Minim and is the answer not in the manual?
Questions and answers