Table of Contents
Advertisement
IQR4D
4 Camera DVR with Real Time D1 Recording
and Mobile/Internet Access
User Manual
TECHNICAL SUPPORT:
For Technical Support please contact your local distributor.
LIMITED WARRANTY:
This product is supplied with a 1 Year warranty. The Warranty excludes
products that have been misused, (including accidental damage) and damage
caused by normal wear and tear. In the unlikely event that you encounter a
problem with this product, it should be returned to the place of purchase.
Advertisement
Table of Contents

Subscribe to Our Youtube Channel
Related Manuals for IQ CCTV IQR4D


Summary of Contents for IQ CCTV IQR4D
-
Page 1: User Manual
IQR4D 4 Camera DVR with Real Time D1 Recording and Mobile/Internet Access User Manual TECHNICAL SUPPORT: For Technical Support please contact your local distributor. LIMITED WARRANTY: This product is supplied with a 1 Year warranty. The Warranty excludes products that have been misused, (including accidental damage) and damage caused by normal wear and tear. - Page 2 IQCCTV IQR4D – 4 Camera DVR Notes The power supply of this DVR is provided through DC12V (3 Amp) adapter. Please check the power outlet before installation and ensure it can meet the requirements of adaptor. Do not place the DVR at a place subject to rain or moisture.
-
Page 3: Table Of Contents
IQCCTV IQR4D – 4 Camera DVR Chapter 1 Overview ....................5 1.1 Introduction ....................5 1.2 Packaging and accessories ................5 1.3 Main features ....................5 1.4 Technical Specifications .................. 6 1.5 Product appearance and interface definition ..........7 1.6 Remote controller ..................8 1.7 Mouse ...................... - Page 4 IQCCTV IQR4D – 4 Camera DVR 4.7 Alarm setup ....................39 4.8 PTZ control ....................40 4.9 Network setup....................40 4.10 System setup ....................41 4.11 Host info ..................... 41 Chapter 5 Client software & Player ..............42 5.1 Client software ..................... 42 5.2 Video Player ....................
-
Page 5: Chapter 1 Overview
Chapter 1 - Overview 1.1 Introduction This IQR4D is a low-cost 4 Camera DVR with remote and mobile phone access. The DVR adopts the industry's most advanced technology including H.264 compression codec, providing the highest picture quality but efficient use of recording space. The DVR’s body is designed as a stylish small form that allows it to be stored away discreetly. -
Page 6: Technical Specifications
IQCCTV IQR4D – 4 Camera DVR 1.4 Technical Specifications Features Description Operating system Embedded LINUX OS Video compression H.264 Video/Audio input 4 CH BNC Video/ Audio output 1 CH BNC Alarm input/output Display spilt 1/4 Channel VGA output Support 600*800 1024*768 1280*1024@60Hz... -
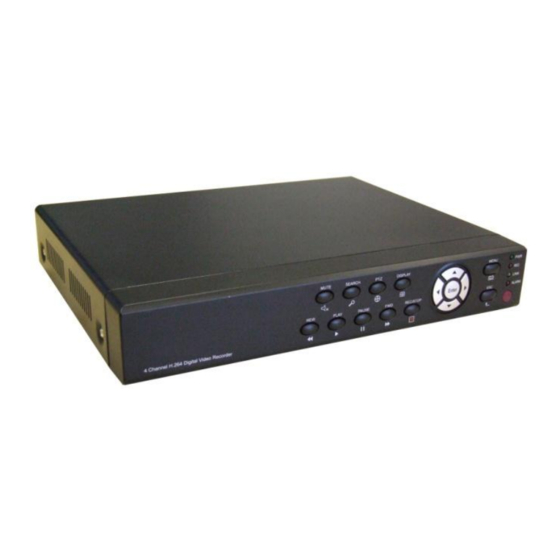
Page 7: Product Appearance And Interface Definition
IQCCTV IQR4D – 4 Camera DVR 1.5 Product appearance and interface definition 1.5.1 Front panel 1.5.2 Back panel Interface Description Physical interface 1~4 Video input Connect analog video signal input, standard BNC connector Video output CVBS output and connect the monitor... -
Page 8: Remote Controller
IQCCTV IQR4D – 4 Camera DVR 1.6 Remote controller Functional definition Spare keys Mute Channel selection; number keys PTZ Control Single and multi-split screen Quit shortcut menu Shortcut menu Direction buttons Exit / Return MENU Enter the main menu STARTREC... -
Page 9: Mouse
IQCCTV IQR4D – 4 Camera DVR 1.7 Mouse The DVR supports the use of a USB mouse to operate its menu structure. Simply plug the USB mouse into the corresponding ports on the back of the DVR and it is ready to use. -
Page 10: Chapter 2 Quick Installation
IQCCTV IQR4D – 4 Camera DVR Chapter 2 - Quick installation 2.1 HDD Installation Hard drive installation must be carried out by technicians to avoid damage to the equipment and hard drives. The DVR must be powered off before you plug in a hard drive. For best results please ensure that hard drives with SATA connections are used. -
Page 11: Shortcut Menu
IQCCTV IQR4D – 4 Camera DVR Please Note: It is acceptable to leave the DEVICE ID (identification number of the DVR) as ‘000000’, which is displayed on right side in corresponding input box (as detailed in the image above). However we recommend setting up a password when the remote controller is in an environment with other DVR’s nearby. -
Page 12: Ptz Control
IQCCTV IQR4D – 4 Camera DVR 2.4.7 PTZ Control Click right button in the main interface and select ‘PTZ control’: PTZ speed (fast or slow), Zoom, Focus and Iris options are controllable from this interface. Cruise setting: Select the PTZ channel... - Page 13 IQCCTV IQR4D – 4 Camera DVR using the mouse and thus zooming into that corresponding area. 2.4.10 PIP (Picture in Picture) In the single-channel (full-screen mode), you can see floating images of other channels.
-
Page 14: Chapter 3 Advanced Settings
IQCCTV IQR4D – 4 Camera DVR Chapter 3 - Advanced settings 3.1 Main menu The main menu has the ‘PLAYBACK’, ‘RECORD’, ‘HDD’, ‘BASIC’, ‘ADVANCED’ and ‘Exit’ options, as shown below: Please Note: The setup of all the submenus below will not be effective until ‘Enter’ is pressed. -
Page 15: Video Search
IQCCTV IQR4D – 4 Camera DVR REC.MODE: available in the two modes of startup recording and timing recording. When powered up: Starts recording when as soon as the unit is powered (It works only if the corresponding channel is enabled in the ‘Channel’ option.) ... - Page 16 IQCCTV IQR4D – 4 Camera DVR Month: displaying the record information of every day in the current month. A green block indicates normal recording, a red block indicates alarm recording, and the background color indicates no recording. Click a date on this bar to search the recorded information of every hour of that day.
-
Page 17: Backup
IQCCTV IQR4D – 4 Camera DVR When you have selected a certain record file from the record list (i.e. by moving the cursor up and down) press ‘Enter’ to access the playback screen. If ‘Record Time Superimposition’ has already been enabled in the ‘Basic Setup’ screen, the playback screen will display the clock of recording;... -
Page 18: Hard Drive Management
IQCCTV IQR4D – 4 Camera DVR 3.5 Hard drive management Enter the Hard drive Management screen from ‘Main Menu’ > ’HDD’, as shown below: STATUS: After the hard drive is connected, the system will detect if the hard drive is correct automatically. -
Page 19: Basic Setup
IQCCTV IQR4D – 4 Camera DVR 3.6 Basic setup Enter the Basic Setup screen from ‘Main Menu’ > ’Basic’, as shown below: The Basic Setup screen includes the 6 options: System Language, Date/Time Setup, Password, Camera Setup, Video/Audio Setup and Exit. -
Page 20: User Password
IQCCTV IQR4D – 4 Camera DVR The system time, date format, time format, time zone and summer time can be set up in this screen. 3.6.3 User password DEVICE ID: Enter digits directly to set up the DVR number; PASSWORD: Press ‘Enter’ to select ‘ENABLE’ or ‘DISABLE’ the user password. If this option is enabled, the user has to enter his/her password to log in successfully;... - Page 21 IQCCTV IQR4D – 4 Camera DVR 3.6.4 CAMERAS Move the cursor to the ‘CAMERAS’ option (the icon is surrounded by a yellow frame to indicate selection), and press ‘Enter’ to enter the setup screen of this option, as shown below: NAME: Move the cursor to the input box of this option, and press ‘Enter’...
-
Page 22: Advanced
IQCCTV IQR4D – 4 Camera DVR 3.6.5 VIDEO/AUDIO Move the cursor to the ‘VIDEO/AUDIO’ option (the icon is surrounded by a yellow frame to indicate selection), and press ‘Enter’ to enter the setup screen of this option, as shown below: MONITOR RESOLUTION: Left-click or press ‘Enter’... - Page 23 IQCCTV IQR4D – 4 Camera DVR 3.7.1 Alarm Move the cursor to the ‘Alarm’ option (the icon is surrounded by a yellow frame to indicate selection), and press ‘Enter’ to enter the setup screen of this option, as shown below:...
-
Page 24: System Info
IQCCTV IQR4D – 4 Camera DVR SSL: a secure link transmission protocol, who’s ‘Off’ or ‘On’ state is determined by the mailbox server. ‘Off’ is usually chosen. SMTP PORT: the mailing port of the mailbox server, usually being 25, with the exception of a few mailboxes, such as the mailing port of the GMAIL server whose port number is 465. -
Page 25: Motion Detection
IQCCTV IQR4D – 4 Camera DVR 3.7.3 Motion detection Enter the Motion Detection screen from ‘Main Menu’ > ’Advanced ‘, as shown below: MD Channel and STATUS: Each channel has a corresponding switch. Press ‘Enter’ to select motion detection ‘On’ or ‘Off’. -
Page 26: Mobile Phone Monitoring
IQCCTV IQR4D – 4 Camera DVR 3.7.4 Mobile phone monitoring The mobile phone monitoring function allows users to access the DVR from their smartphones and is compatible with Android, Blackberry, iPhone, Nokia (Symbian) and Windows Mobile. The procedure is as follows: Enter the following screen from ‘Main Menu’... -
Page 27: Network Setup
IQCCTV IQR4D – 4 Camera DVR 3.7.6 PTZ Enter the ‘PTZ’ screen from ‘Main Menu’ > ’Advanced’, as shown below: CHANNEL: selecting the channel to which the dome camera is connected (to select any of the latter 4 channels, click ‘Next Page’) - Page 28 IQCCTV IQR4D – 4 Camera DVR When one ADSL line is connected to one DVR only you can select Internet connection within the PPPOE mode, which will connect the DVR directly. Then press ‘Enter’ to select PPPOE in the connection mode to enter the PPPOE Setup screen. After entering the broadband user name and password, click ‘Enter’...
- Page 29 IQCCTV IQR4D – 4 Camera DVR DDNS Setup Click ‘DDNS Setup’ to enter the following screen: DDNS: with the two options of ‘ON’ and ‘OFF’; when a domain name resolution server is available, please select DDNS ‘ON’. SERVICE: The user may select the desired DDNS server.
-
Page 30: Domain Name Application
IQCCTV IQR4D – 4 Camera DVR 3.8 Domain name application Step 1: Create account First open www.noip.com click the Create Account option (as shown below), and fill in the required fields on the new account form. Step 2: Confirm your account Once you have submitted your account information into the new user form, they will send a confirmation email to the address you provided. - Page 31 IQCCTV IQR4D – 4 Camera DVR Filling in the Hostname Information Fill in the Hostname: box with a name of your choosing. It can be anything you like. If you choose a name that's already in use, an error will be generated and you can then try a different hostname.
-
Page 32: Port Forwarding
IQCCTV IQR4D – 4 Camera DVR Step 6: Configure your router for Port Forwarding Setting up Port Forwarding is covered in the next section 3.9. Step 7: Run your services With the above configuration in place, and if you've gotten a successful result from the Can... - Page 33 IQCCTV IQR4D – 4 Camera DVR Step 2: In the menu on the left side of the page, look for the Advanced menu and then click on Port Forwarding.
-
Page 34: Chapter 4 Dvr Network
IQCCTV IQR4D – 4 Camera DVR Step 3: Select the service you want to forward We're using HTTP (web server) in this example. You can choose from the other pre-defined ones available or define your own custom service using the Add Custom Service button to use PC Anywhere or Remote Desktop for example. - Page 35 IQCCTV IQR4D – 4 Camera DVR Step 6: Check the finished rule for accuracy and then you are finished. Please Note: Because most routers use NAT (Network Address Translation), you can only open a specific port or ports to one computer at a time. For example: If you have 2 web servers on your network, you cannot open port 80 to both computers.
-
Page 36: Functional Characteristics
IQCCTV IQR4D – 4 Camera DVR Chapter 4 - DVR network 4.1 Functional characteristics The DVR supports LAN and WAN access, as well as IP and domain name access. 4.2 Installation and download of controls Automatic installation of plug-ins unit: First add the IP address of the DVR as a reliable site of the system. -
Page 37: Ie Login
IQCCTV IQR4D – 4 Camera DVR 4.3 IE login Log in the system after the plug-in unit has been installed. For example, if the domain name of the DVR is ‘dvrtest05.eicp.net’ and its port is 80, enter the domain name in the IE address bar. -
Page 38: Record Playback
IQCCTV IQR4D – 4 Camera DVR 4.5 Record playback Click ‘PLAYBACK’ to enter the Record Playback screen, as shown below: First select the date of the record to be played and the channel and record types, and then click ‘Search’. The eligible record files will appear in the file list, with the bold numbers denoting dates with record data, as shown in the figure above. -
Page 39: Recording Mode
IQCCTV IQR4D – 4 Camera DVR 4.6 Recording mode Click ‘Setup’ > ’RECORD’ to enter the remote recording mode, as shown below: The setup method is the same as the mainframe menu. See ‘Recording Mode’ in Chapter 3 for details. -
Page 40: Ptz Control
IQCCTV IQR4D – 4 Camera DVR 4.8 PTZ control Click ‘Setup’ > ’PTZ‘ to enter the PTZ Control mode. See Figure 5-6: See Chapter 3 ‘Network Setup’ in this manual for the setup method. 4.9 Network setup Click ‘Setup’ > ’Network Setup’ to enter the Network Setup mode, as shown below:... -
Page 41: System Setup
IQCCTV IQR4D – 4 Camera DVR 4.10 System setup Click ‘Setup’ > ’Setting’ to enter the Setting screen, as shown below: INTERNET: setting the code stream; the higher the code stream is, the clearer the remote image will be, but the network bandwidth must be high, otherwise the image may have a delay. -
Page 42: Chapter 5 Client Software & Player
IQCCTV IQR4D – 4 Camera DVR Chapter 5 - Client software & Player 5.1 Client software Open the Client software file ‘, operate one of these two files and install it according to the remarks. Once installed the, open the software and the user will be prompted with a Login interface as detailed below: IP ADDRESS:Enter IP address or Domain Name... -
Page 43: Video Player
IQCCTV IQR4D – 4 Camera DVR 5.2 Video Player Open the PLAYER installation program PlaybackSetup.exe in the CD Drive. After the successful installation, double-click the program icon (Playback software) on the desktop: Click ‘File (F)’ as shown in the following image, select 'open the local files (F)'... - Page 44 IQCCTV IQR4D – 4 Camera DVR There will be .264 files in the file list, select one of the files to be played. Click 'OPEN' as shown in the following image: Then click 'PLAY' option as shown in the following image:...
- Page 45 IQCCTV IQR4D – 4 Camera DVR After clicking 'PLAY' option, to enter the following interface as shown in the following image: ① Function Definition Function Definition Icon Icon ① Recording Schedule All video Play Forward, Play backward Increase video Pause, STOP...
- Page 46 IQCCTV IQR4D – 4 Camera DVR Audio Setup: Click ‘SETTING’> ‘AUDIO CHANNEL SETUP’ > ‘Normal video Bar ‘as shown below: Select the channel audio to be played and then click 'OK':...
-
Page 47: Appendix 1. Frequently Asked Questions
IQCCTV IQR4D – 4 Camera DVR Appendix 1 – Frequently Asked Questions How do I recover a forgotten password? Please contact a technician or the manufacturer if you have forgotten the password. Please set a safe password that is easy to remember (don’t set simple passwords like 123456). - Page 48 IQCCTV IQR4D – 4 Camera DVR 12. Motion detection does not work? Ensure the motion detection time and zones are setup correctly particularly the sensitivity settings. 13. Alarm does not work? Ensure the alarm settings and connections are correctly setup, and make sure that alarm signal inputs are correct.
-
Page 49: Appendix 2 Hard Drive Space Calculation Table
IQCCTV IQR4D – 4 Camera DVR Appendix 2 - Hard Drive Space Calculation Table This DVR hard drive space in relation to the resolution is detailed in the table below (units are in Megabytes (MB) per Channel per Hour): Bit rate...
Need help?
Do you have a question about the IQR4D and is the answer not in the manual?
Questions and answers