
Subscribe to Our Youtube Channel
Related Manuals for IQ CCTV HD 960H


Summary of Contents for IQ CCTV HD 960H
- Page 1 960H HD CCTV SYSTEM 4 Channel 960H DVR with 4x 20m IR Bullet Cameras / 4x 20m IR Dome Cameras IP65 HDMI Weatherproof Resolution Output Night Vision Rated User Manual Version 1...
-
Page 2: Table Of Contents
Contents Safety Instructions ……………………………………………………………. Chapter 1. Features ………………………………………………..………..… 1.1. DVR Features ………………………………………………... 1.2. Camera Features ……………………………………………. 1.3. Contents ……………………………………………………… Chapter 2. Overview …………………………………………………………... 2.1. Front Panel …………………………………………………... 2.1.1. DVR Front Panel ……………………………………… 2.2. Rear Panel …………………………………………………..2.2.1. RS485/Sensor/Alarm Port Functions ……………….. 2.3. - Page 3 5.3.3.4. Log Search ………………………………..5.3.4. Network …………………………………………………. 5.3.4.1. Network Set …………………………………. 5.3.4.2. Mobile Set …………………………………… 5.3.4.3. Router’s Port Forwarding ………………….. 5.3.4.4. Sub Stream …………………………………. 5.3.4.5. Email Set ……………………………………. 5.3.4.6. DDNS Set …………………………………… 5.3.5. System ………………………………………………….. 5.3.5.1. HDD Set …………………………………….. 5.3.5.2. PTZ Set ……………………………………… 5.3.5.3.
- Page 4 6.3.4. Local Setting …………………………………………… 6.3.5. Logout ………………………………………………….. 6.4. Mobile Viewing Access Instructions ……………………….. Chapter 7. Specifications ……………………………………………….……. 7.1. DVR Specifications ………………………………………….. 7.2. Camera Specifications ……………………………….……… Appendices …………………………………………………………………..… Appendix 1. Operation Function Table …………………………. Appendix 2. Alarm Record Setting ……………………………… Appendix 3. Troubleshooting ……………………………………. Appendix 4.
-
Page 5: Safety Instructions
Safety Instructions 1. Please read the instruction manual carefully before using the equipment. 2. Please make sure to use the PSU supplied with the DVR and cameras. 3. All equipment should be placed in an area away from water and moisture. 4. -
Page 6: Chapter 1 Features
Chapter 1 Features DVR Features (IQR960D4): l H. 264 video compression format: supports 1080P resolution l G.711 audio compression format l HD 960H, WD1, WHD1 and WCIF Recording Playback Embedded real-time Linux2.6 operation system l l VGA and HDMI Outputs l... -
Page 7: Contents
IQCCTV IQ960DVR User Manual Contents 1x IQR960D4 DVR 4x IQC960B-K / 4x IQC960V-K Camera 1x 1TB Hard Drive 1x 4 Power Splitter 4x 18m Video Cable 1x 1m HDMI Cable 1x USB Mouse 1x Ethernet/Network Cable 1x Remote Control 1x DVR Power Supply 1x Camera Power Supply... -
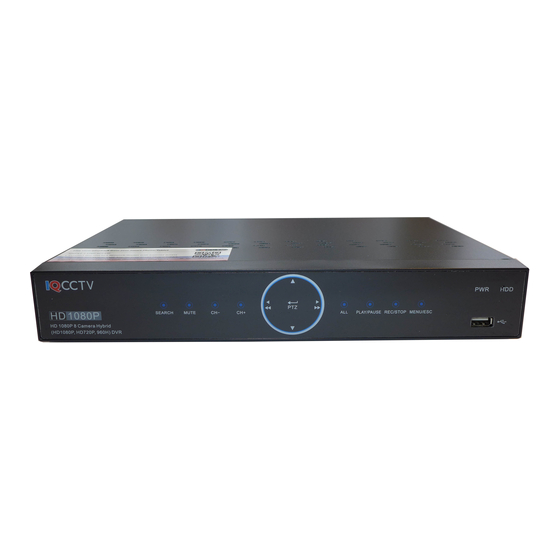
Page 8: Chapter 2 Overview
IQCCTV IQ960DVR User Manual Chapter 2 Overview 2.1 Front Panels 2.1.1. DVR Front Panel Item Key title or Indicator Remark Function & Description If the “Green” indicator is on the system is getting Power Indicator power normally. IR Receiver Receives IR signal from Remote Controller When the “Red”... -
Page 9: Rear Panel
IQCCTV IQ960DVR User Manual Play/Pause Play record file, Pause record file Rec/Stop Begin record, stop record Menu/ESC Enter into main menu/exit Menu USB PORT Rear Panel Item Physical port Connection method Video input Connect CH1-4 or 1-8 (Virtual) video input device interface Video output Connect monitor output (BNC interface) -
Page 10: Rs485/Sensor/Alarm Port Functions
IQCCTV IQ960DVR User Manual 2.2.1 RS485/Sensor/Alarm port functions • Alarm input: Connect [-] port of your sensor to G (GND) pin, and [+] port to channel input according to the alarm device you purchased. • Alarm output: Connect to the two ports marked with “out” •... -
Page 11: Mouse Operation
IQCCTV IQ960DVR User Manual 2.4. Mouse Operation TYPE Function In menu lock mode - Enter into pop-up menu and click any sub menu to go into the Log-in window. In menu unlock mode - Enter into pop-up menu, and then clicking left key to enter into any sub menu directly. -
Page 12: Chapter 3 Dvr Connection
IQCCTV IQ960DVR User Manual Chapter 3 DVR Connection 3.1 HDD Installation Caution Please do not Install or take out hard drive when DVR is running. HDD Installation (1) Cut power to the DVR (2) Unscrew the screws and open DVR upper cover carefully (3) Insert the Power Cord and data cable into Pin of hard drive securely (4) Remove the screws on the HDD bracket. -
Page 13: Chapter 4 Dvr Boot Up
IQCCTV IQ960DVR User Manual Chapter 4 DVR Boot Up a4: DVR Boot up 4.1 System Initialization After powering the DVR and pressing the Power button on the front panel, you will enter into the system initializing screen shown as below. After initialization, the setup wizard will begin. -
Page 14: Live Interface
IQCCTV IQ960DVR User Manual 3. System Configuration In this section the user can set the time, date DST and NTP as shown below. 4. Network Configuration Set the network configuration as shown below. 4.2. Live Interface After finishing setup wizard the system will enter into <Live> screen. The image below shows the 16-split display defaulted by system. - Page 15 IQCCTV IQ960DVR User Manual Please Note: When the internal HDD is not connected or an error occurs, the character “H” will appear on the first channel of the live screen and accompany buzzer alarm. If you want to close the buzzer alarm, please enter into [Main menu-Alarm] to set HDD loss and alarm output to “off”.
-
Page 16: Chapter 5 Dvr Menu
IQCCTV IQ960DVR User Manual Chapter 5 DVR Menu Pop-up Menu After finishing system initialization, click the right key of mouse on the main interface mode to enter into Pop-up Menu. In this menu, the user can change parameter setting and operate the Main Menu, Multi-Pics, PTZ, Auto Cruise, Zoom in/out, Rec. - Page 17 IQCCTV IQ960DVR User Manual Live set Display Output Set Privacy Zone Record Parameters Record Schedule Main Stream Record Search Clip Set Record Playback Search Backup Event Search Log search Network Set Sub stream Main Menu Email Set Network Mobile S et DDNS Set Motion Detection Alarm...
-
Page 18: Main Menu
IQCCTV IQ960DVR User Manual Main Menu On <Live> mode, click the [Menu] button on the front panel or Remote controller to enter into the Main menu interface. In Main Menu mode, you can control device management settings, such as Display, Record, Network, Search, System and Advanced setting. 5.3.1. -
Page 19: Output Mode
IQCCTV IQ960DVR User Manual Click [APPLY] button on the bottom of the sub-menu windows to accept the changes and click the [OK] button when prompted to save. If you want to cancel the modification, click [Exit] button to exit the menu. When clicking [DEFAULT] button, all the system default values will be reset to default value. -
Page 20: Privacy Zone
IQCCTV IQ960DVR User Manual Picture 5-4 Click the [Live] button to pop up the interface as shown in Picture 5-5. This allows the user to perform a channel sequence setting. Similarly, Click the [Spot output] option and set relative parameters. Picture 5-5 5.3.1.3 Privacy Zone... -
Page 21: Record Set
IQCCTV IQ960DVR User Manual 5.3.2 Record set 5.3.2.1 Record parameters Click [Main menuàRecordàRecord Para] to enter into the interface shown in the image 5-7 below. Ø Channel: Setup the channel desired. Ø Record: Set up the record status. Enable/Disable of each channel Ø... -
Page 22: Main Stream
IQCCTV IQ960DVR User Manual Once the desired time schedule has been selected, click the [APPLY] button to save the options. To restore to factory default settings, click the [DEFAULT] button. Please Note: Under the <record> menu and <search> menu, original color stands for no record, “Red”... -
Page 23: Search
IQCCTV IQ960DVR User Manual 5.3.3 Search 5.3.3.1 Record Search Click the [Main MenuàSearchàRecord Search] to enter into the interface as shown on the following page. Ø Channel: Select the channel(s) that you desire to search. Ø Date Search: In the Video Search screen, the user can search for all the records in a specific date. -
Page 24: Time Axis Setup, File Clip, Zoom In/Out
IQCCTV IQ960DVR User Manual 5.3.3.3 Time Axis setup, file clip and zoom in/out 1) The DVR supports the processing control bar function when playing back record files as shown in Picture 5-12 (Up to 4 CH is available). Click [ ] icon beside the processing bar to pop up the interface shown as Picture 5-13 Picture 5-12 Picture 5-13... -
Page 25: Event Search
IQCCTV IQ960DVR User Manual Ø Clip and backup: When one channel is playing-back, the [ ] icon will appear in the [Play control] bar as shown in Picture 5-14. Click the icon to start video clip function, then click it again to end the function. -
Page 26: File Backup
IQCCTV IQ960DVR User Manual 5.3.3.5 File Backup 5.3.3.5.1 Back-up File Based on Event In the [File List] mode, to backup records, check the boxes which correspond to the records and click [Backup] button to enter into the below windows. Select USB as backup device and click the [Apply] button and then enter into the window as shown below. -
Page 27: Back-Up File Based On Time
IQCCTV IQ960DVR User Manual 5.3.3.5.2 Back-up File Based on Time This functions allows the user to back-up recorded files based on time. Please follow below steps to back up these files. 1. Input the start time and end time on the time edit box 2. -
Page 28: Log Search
IQCCTV IQ960DVR User Manual 5.3.3.4 Log Search Go to the [Main menuàSearchàLog] option to enter into the Log search interface as shown below. This menu allows the user to preview the log information searched. Click the [Backup] button to export all the log information. -
Page 29: Network
IQCCTV IQ960DVR User Manual 5.3.4 Network 5.3.4.1 Network set Enter the Network by going to [Main menuà Networkà Network] and be presented with the screen below. After selecting network mode, the user can enter details such as DHCP, PPPOE or static allocation. - Page 30 IQCCTV IQ960DVR User Manual When selecting the DHCP from the Type A, the router will automatically allocate an IP address for your DVR. After restarting each time, the IP address captured by your DVR may be different. Therefor, port forwarding is required when you visit a remote DVR. To do to this; 1.
- Page 31 IQCCTV IQ960DVR User Manual When selecting the PPPoE option from the Type drop down list. The user can input the user name and password provided by ISP and set the Media and HTTP port. To gain access to the DVR remotely via the public network by using the IP address captured after registering a domain name and HTTP port.
-
Page 32: Mobile Set
IQCCTV IQ960DVR User Manual 5.3.4.2 Mobile Set The IQR DVR range is currently compatible with mobile phones running Android, Windows Mobile and Symbian operating systems. As well as, iPhone and Black berry on 3G networks. To configure, please follow the steps below; 1. -
Page 33: Sub Stream
IQCCTV IQ960DVR User Manual 5.3.4.4 Sub stream Go to [Main menuàNetworkàSub Stream] to enter into the interface shown as Picture 5-32 Ø Video: allow you open or close the sub stream output. If you select “Enable” system will select sub-stream preview and guarantee image quality once network is unstable. Ø... -
Page 34: Ddns Set
IQCCTV IQ960DVR User Manual 1. Choose to enable the Email function by choosing ‘Enable’ from the drop down menu. 2. SSL: This is a security link transport protocol. You can encrypt your communication info (including your email) using SSL to prevent hackers from monitoring your email or communication info and even your password. -
Page 35: System
IQCCTV IQ960DVR User Manual 5.3.5 System 5.3.5.1 HDD Set Click the [Main menuàDeviceàHDD] to enter into the interface shown as shown in the picture below. When the DVR is connected to a HDD, the system will automatically detect if the HDD is normal or not. -
Page 36: Ptz Set
IQCCTV IQ960DVR User Manual 5.3.5.2 PTZ Set Click the [Main MenuàDeviceàPTZ] to enter into the below window, shown below. Firstly, select the channel you desire to control and set PTZ protocol (Pelco-D or Pelco-P). Then select the Baud Rate (1200, 2400, 4800, 9600), Data bit (8, 7, 6, 5), Stop bit (1, 2), Parity Check (None, Odd, Even, Mark, Space), Address Code and Cruise status respectively. -
Page 37: Users
IQCCTV IQ960DVR User Manual Click the [DST Setup] button to enter into the below interface shown as Picture 5-40, to configure the DST status and mode. Click the [NTP setup] to enter into the interface shown as Picture 5-41, to enable/disable the NTP function. -
Page 38: Information
IQCCTV IQ960DVR User Manual Select one <common user> and click <Apply>. Then enter into the <Authority set> interface as shown below. Only the Admin user is authorized to set common user’s authority. Ø Log Search: Check all the system logs. Ø... -
Page 39: Advanced
IQCCTV IQ960DVR User Manual 5.3.6 Advanced 5.3.6.1 Motion Click the [Main menuàAlarmàMotion] to enter into the interface as shown below. Ø Channel: Enable/disable the motion function for any channel. Ø Area: Click the [Setup] button to enter into area setup interface. Ø... -
Page 40: Alarm Set
IQCCTV IQ960DVR User Manual 5.3.6.2 Alarm Set Click the [Main MenuàAlarmàAlarm] to enter into the Alarm menu (Below). This menu allows the user to set alarms based on different statuses. Ø No: Select one desired channel Ø I/O Status: Choose between the following three options – NO (Normal Open), NC (Normal Close) and OFF. -
Page 41: Maintain
IQCCTV IQ960DVR User Manual Alarm Type Function Video Sends an alarm when the DVR can’t receive video signal (such as Loss camera damage, broken cables or damaged to the power supply). When an object moves into motion detection area, the alarm will be Motion triggered. -
Page 42: Event
IQCCTV IQ960DVR User Manual Ø Load Setting: Load the parameters in the U flash disk to device. After loading successfully, the system will auto restart. Ø Save Setting: Save the parameters of device to a flash disk. Note: 1. Do not take out the USB memory or break the power during the update 2. -
Page 43: Menu Lock
IQCCTV IQ960DVR User Manual 5.4. Menu Lock To access the system safety feature, click the [ ] icon to lock the system interface when leaving the DVR. To login to the DVR again, input the device code and password to unlock the interface (as shown below). -
Page 44: Pip Mode
IQCCTV IQ960DVR User Manual To set a pre-set point, please see the following steps; 1. Total: Set up pre-set point quantity 2. Cur Point: Indicates the starting point cruised. System default point is 01. The model supports up to 255 pre-set points. 3. -
Page 45: Manual Record
IQCCTV IQ960DVR User Manual 5.10 Manual Record To start the manual record function, click [ ] button on the Front panel or Remote controller. Please stop recording manually once manual record is activated. 5.11 Stop record To quickly stop recording, click the icon [ ] or [Stop] button on the front panel or remote controller. -
Page 46: Chapter 6 Web Application
IQCCTV IQ960DVR User Manual Chapter 6 Web Application /Mobile Manager 6.1 ActiveX Control Download and Installation Open your web browser and input the IP address and web port of DVR, for example, http://172.18.6.202:8080/. If your computer is connected to Internet, it will download and install “ActiveX”... - Page 47 IQCCTV IQ960DVR User Manual Picture 6-1 If running the web application for the first time, the download will take roughly one minute to finish and install the ActiveX controls.
-
Page 48: Web Application Manager Log-In
IQCCTV IQ960DVR User Manual 6.2 Web Application Manager Log-in After ActiveX controls are installed, please input user name, password and client port. Then select <Main stream> or <sub stream>, and tick-select <Open All Channels Preview>. Now, click the [Log-in] button, to access the DVR remotely and monitor live video images using Web browser. -
Page 49: Menu Bar
IQCCTV IQ960DVR User Manual 6.3.1 Menu Bar Menu bar includes [Live], [Replay], [Configuration], [Path Configuration] and [Logout] options. 6.3.1.1 Live Display After running the Web Application Manager on your local PC, the system will be defaulted to enter into <Live> interface. Click the [Play] button to Open/close live images and enter into on-spot record and Capture, quad, 9-split or 16-split mode by operating the control bar on the bottom of screen. -
Page 50: Ptz Control
IQCCTV IQ960DVR User Manual 6.3.1.2 PTZ Control ① PTZ moving Direction control: Control PTZ camera’s direction. The middle button allows the user to [Auto-cruise]. ② : PTZ speed control bar ③ : Iris, Focus and Zoom control ④ : Preset setting/clear; Start cruise /stop cruise 6.3.1.3 Video control Adjust video Hue Adjust video brightness... -
Page 51: Playback
IQCCTV IQ960DVR User Manual 6.3.2 Playback Click the [ ] icon to enter into <playback> menu. 6.3.2.1 Record search To search for a record, select the day you want to check and check the <synchronous Playback> button and the channels that you desire to view. Then, select a record type (Normal record, Alarm record and All) and click <... -
Page 52: Playback Control
IQCCTV IQ960DVR User Manual 6.3.2.2 Playback control 6-10. Playback Control Bar Description Description Play Open/close audio Pause Volume adjust Stop Playback control bar (x1/2,1/4,1/8, normal, x2, x4, x8) By frame Stop playing Clip Single channel mode Snapshot Quad mode Download Full screen Open all the channels Toggle between original proportions and... -
Page 53: Configuration
IQCCTV IQ960DVR User Manual Record file download Click the [ ] icon to enter into the below interface. Tick-select the recorded file you want to download and click [Start download] The System will download the recorded file in turn and save to the local PC. 6.3.3 Configuration 6.3.3.1 Display Configuration... -
Page 54: Record
IQCCTV IQ960DVR User Manual Privacy zone: Each channel can set up to four privacy zones as shown below. For details on how to set parameters please refer to section 5.3.1.3. To delete one privacy zone, please firstly select one zone and click the <Clear> button, then click <Save> on the right corner. 6.3.3.2 Record Click the <Record>... -
Page 55: Network Parameters
IQCCTV IQ960DVR User Manual Main Stream: For detailed settings, please refer to DVR local setting (shown as Picture 6-16). This option allows the user to modify the resolution, frame rate, Bit rate and audio of the record channel. 6.3.3.3 Network Parameters Unfold the <Network>... - Page 56 IQCCTV IQ960DVR User Manual Picture 6-19 Picture 6-20 Sub stream (shown below): Relative parameters should be consistent with the DVR local settings. Email setting: Click the [Email setting] option to set alarm email configuration parameters (shown below). Please note that the detailed parameters should be consistent with DVR local setting.
- Page 57 IQCCTV IQ960DVR User Manual DDNS Setting Once the DDNS has been applied service, the user can enable the <DDNS> function under any one network type mode (Static, DHCP and PPPoE). Once this has been done, the user can remotely visit the DVR through domain name (http://domain name: port No). Please note that the details in this setting should be consistent with DVR local setting.
-
Page 58: System
IQCCTV IQ960DVR User Manual 6.3.3.4 System Click the <System> to unfold its sub-options: HDD, PTZ, General and Users. HDD: Allows the user to check the HDD status and overwritten time. Please note that the details in this setting should be consistent with DVR local setting. PTZ: Configuration (shown below): Please note that the details in this setting should be consistent with DVR local setting. - Page 59 IQCCTV IQ960DVR User Manual General: This option allows the user to check the DVR’s language, video system and also set system time, date format, DST and NTP. Please note that the details in this setting should be consistent with DVR local setting. Users: In the users menu, configure the user name and password as shown below.
-
Page 60: Advanced
IQCCTV IQ960DVR User Manual Information: Check out device name, number, type, MAC address, software version, IE version and hardware version. 6.3.3.5 Advanced Click the <Advanced> option to unfold its sub-options: Motion, I/O Alarm System update, Load default, Events and system maintain. - Page 61 IQCCTV IQ960DVR User Manual Motion Detection: This menu allows the user to configure the <Sensitivity>, <Alarm out>, <Alarm record> and <Alarm Capture> of the DVR. Please note that the details in this setting should be consistent with DVR local setting. System update: This section allows the user to upgrade DVR system remotely.
- Page 62 IQCCTV IQ960DVR User Manual B. Click the <Start update> button and the processing bar will display the current upgrade status Load Default: Recover defaulted parameters of the DVR remotely. Please note that the details in this setting should be consistent with DVR local setting. Events: The events section allows the user to configure abnormal type, buzzer output time, alarm email and the message shown in alarm screens.
-
Page 63: Local Setting
IQCCTV IQ960DVR User Manual Maintain: Allows the user to set auto system maintain for DVR remotely. Please note that the details in this setting should be consistent with DVR local setting. 6.3.4 Local setting Under the <Local setting> option, the user can set the record path of any recorded file (Live record and Playback clip file). - Page 64 IQCCTV IQ960DVR User Manual iPhone 1) Connect your phone to the internet using 3G or WIFI 2) Download and install the free IQCMS app from the App Store. 3) After finishing installation, the [IQCMS] icon will be displayed to mobile phone interface shown as Picture 1 4) Tab the IQCMS icon to open the app Picture 1...
- Page 65 IQCCTV IQ960DVR User Manual To add a new device, click the [Add] button at the top right, then you can input the device name, address (ip or domain name), port, user name and password. The Channels property can be retrieved from the device. To delete a device from list, swipe the device name you want to delete, then tap the delete button next to the device name.
- Page 66 IQCCTV IQ960DVR User Manual Open a channel Tab the Cross button on one of the view windows to enter the channel list window. After, select one channel to open on the previous window Remote Playback Tab Remote Playback on Main Menu will show the playback entry. You will be able to play one channel of remote device after 2 steps.
- Page 67 IQCCTV IQ960DVR User Manual Recording streaming The IQCMS apps allows the user to record streaming when viewing live video. To do this, tap button and then tap channel label on the bottom panel to start recording. Please note that only the channels which are viewing can be recorded. Recording will stop if you close the channel or leave live page.
- Page 68 IQCCTV IQ960DVR User Manual Add and delete device The device manager allows the user to add or delete device, and also modify device properties. Tab the [Device Manager] in the Main Menu to open the interface as shown below. To add a new device, click "Add" button at the top right, then you can input the device name, Login address (ip or domain name), Media port, user name and password etc.
- Page 69 IQCCTV IQ960DVR User Manual Open a device Tab the button to open the device list as below, then select one of devices in the list. This will open all channels in the list automatically. Open a channel Tap the cross button on one of the view windows to enter the channel list window. Once in the channel list menu, select one channel to open to view.
- Page 70 IQCCTV IQ960DVR User Manual Video snapshot When monitoring live, tap the button to show 5 labels on bottom panel. Tapping these labels will enable the user to take snapshots. Remote Playback Tab the Remote Playback on the main menu to bring up a calendar view. The calendar will use black points to show days where recording takes place.
- Page 71 IQCCTV IQ960DVR User Manual To control the camera, maximize a camera window and open PTZ mode. Tab the arrows on the side of camera window to control camera move side to side or up and down. Other control buttons allow Zoom, Force, Iris, PTZ speed and Preset. Below shows a list of functions supported in the PTZ control function.
-
Page 72: Chapter 7. Specifications
IQCCTV IQ960DVR User Manual Chapter 7. Specifications 7.1. DVR Specifications IQR960D4 Operating System Linux Control Mode Touch Screen, Remote Control, USB Mouse, Network Video/Audio Input 4 Video, 2 Audio Video/Audio Output 1 Video, 1 Audio Outputs VGA, HDMI Alarm Output RS485 Display Resolution HD960H (960x578) -
Page 73: Appendices
IQCCTV IQ960DVR User Manual Appendices Appendix 1. Operation Function Table Type Title Description Time setting Set system date/time, display format and day-light saving time Language select Set system language Set CH title and position; adjust image colour Channel setting parameter value; set CH display to ON / Off and time display/recording time overlaying to On/Off. - Page 74 IQCCTV IQ960DVR User Manual Remote Set local CH display, record, alarm, PTZ control parameter set of parameter value via network Network download Backup record file via network System info Check device ID, software version and MAC address Auxiliary In addition to illustrating pictures. Generally indicate function optional parameter value of previous menu.
-
Page 75: Appendix 2. Alarm Record Setting
IQCCTV IQ960DVR User Manual Appendix 2. Alarm Record Setting Under the record mode, [ ] icon or [ ] icon will appear on the screen, and an alarm will be issued. If the user has configured the record type to <Normal> on the <Scheduled> mode, once one alarm has occurred, the record will be saved as Normal record. -
Page 76: Appendix 3. Troubleshooting
IQCCTV IQ960DVR User Manual Appendix 3. Troubleshooting 1. Q: What can I do if the system does not detect the HDD? A: Check if the power supply system is properly connected and data cord and power cables are securely connected. 2. -
Page 77: Appendix 4. Usage Maintenance
IQCCTV IQ960DVR User Manual Appendix 4. Usage Maintenance To maximize the use of your new DVR, please follow the steps below; 1. Close the [OFF] button on the front panel to avoid losing data. 2. Make sure DVR is kept away from heating source. 3. -
Page 78: Appendix 5. Iqc960B-K Bullet Camera Installation
IQCCTV IQ960DVR User Manual Appendix 5. IQC960B-K Bullet Camera Installation 1. Select a suitable pos on the wall or ceiling to install the camera and map out the holes for the bracket. 2. Drill a hole in the middle of area on the wall or ceiling where the camera is to be mounted, to allow the power and video cable to be fe cable can be surface mounted by taking the cabling out through the side of the bracket. -
Page 79: Appendix 6. Iqc960V-K Dome Camera Installation
IQCCTV IQ960DVR User Manual Appendix 6. IQC960V-K Dome Camera Installation unscrewing the fixing screw using the Allen key supplied. 2. Rotate the upper ring of the camera, it will unscrew from the dome base. Be careful when handling the camera as the parts are not fixed to the upper ring or the camera ‘ball’. -
Page 80: Appendix 6. Quick Guide
IQCCTV IQ960DVR User Manual QUICK GUIDE Multi Camer Power Connection Use the supplied power Plug & Play splitter lead to power more Cable than one camera. Appendix 7. Quick Guide Plug & Play Cable Contents Power Supply for camera(s) Power Lead (Do not use DVR PSU) 1x USB Mouse 4x IQC960B-K Camera (Bullet) / IQC960V-K Camera (Dome) - Page 81 Manufactured for: TECHNICAL SUPPORT For technical support, please contact your local distributor. Alternatively, call 0871 222 1430 LIMITED WARRANTY This product is supplied with a 12 month warranty. The warranty excludes products that have been misused (including accidental damage) and damage caused by normal wear and tear.
Need help?
Do you have a question about the HD 960H and is the answer not in the manual?
Questions and answers