Table of Contents
Advertisement
Advertisement
Table of Contents

Related Manuals for Invacare Taurus


Summary of Contents for Invacare Taurus
- Page 2 TABLE OF CONTENTS INTRODUCTION ………..……………………………..……………….………1 IMPORTANT PRECAUTIONS ………………………..………………………2 SAFETY INFORMATION ON ELECTROMAGNETIC INTERFERENCE (EMI) ……..………………………………………………………………………3 IDENTIFICATION OF PARTS ………………..………………………………4 OPERATING YOUR SCOOTER ………………………………………..……7 DISASSEMBLING YOUR SCOOTER ……………………………..………10 ASSEMBLING YOUR SCOOTER ………………………………………….12 CHARGING THE BATTERIES ……………………………………………...13 CARE AND MAINTENANCE ………………………………………………..16 TROUBLESHOOTING …………………………………………….…………17 DISCLOSURE FORM ………………..………………………………………19 WARRANTY TERMS AND CONDITIONS …………………………………20...
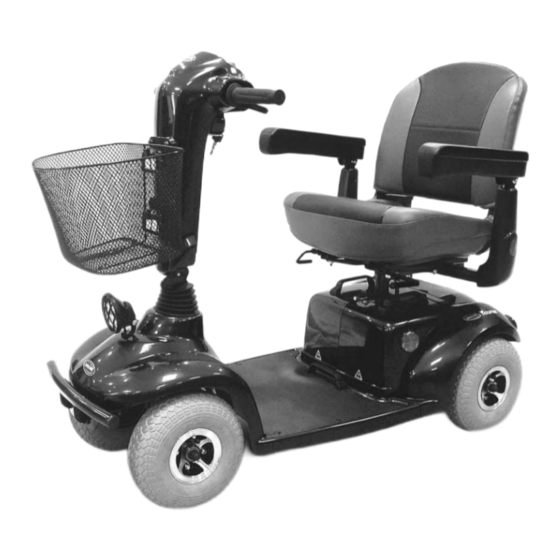
- Page 3 Thank you and congratulations on purchasing your new Invacare Mobility Scooter. It is designed to provide you with transportation indoors and outdoors. We pride ourselves on providing safe and comfortable products. Our goal is to ensure your complete satisfaction with our product. We are certain that you will enjoy your Invacare mobility scooter.
- Page 4 Only one person at a time can ride an Invacare Mobility Scooter. Maximum load is 127 kgs / 280 lbs. Turn key off before getting on or off your scooter. Always drive carefully with your feet on the floorboard and be aware of others in your area.
- Page 5 This electric vehicle was successfully tested in accordance with international standards as to its compliance with EMI regulations. However, Electromagnetic Fields, such as those generated by radio and television transmitters, and cellular phones, can influence the function of the electric vehicle. Also, the electrics used in our vehicles can generate a low level of EMI, which however remain within the tolerances permitted by law.
- Page 6 Before attempting to drive this scooter on your own, it is important that you familiarize yourself with the controls, and how to operate.
- Page 7 Speed Dial The Rabbit means fast and the turtle means slow. By turning this knob, you can control the total speed transferred to the thumb controls. Self Diagnostic Warning Lights Flashing of lights indicates there is a problem with the scooter. See page 17 for more information.
- Page 8 Seat Rotation Lever Pull the lever up to rotate the seat. Please be careful when getting on or off the scooter with the seat in a swiveled position. The stability of the scooter may be compromised. Seat Slide Lever Pull the lever up to move the seat forward or reverse. Seat Height Adjuster There are four holes on the seat tube to adjust the seat height.
- Page 9 Before beginning your journey with your new scooter, make sure that the scooter is on a level surface and clear of any obstacles. Although your scooter is able to climb slopes, it is safer to practice on a level surface. You can make the following adjustments to increase your comfort when driving: adjust seat height and location.
- Page 10 9. If you are finished riding for the day, immediately recharge the batteries. See CHARGING THE BATTERIES, page 13, 14 and 15. Release thumb levers and allow scooter to stop completely before changing from forward to reverse, or reverse to forward. When turning a corner, swing the front wheels wide, because the back wheels will turn more tightly.
- Page 11 Do not transverse the obstacle or try to turn the machine around. Rain test: Invacare has tested it’s scooters in accordance with ISO 7176 part 9. This provides the end user sufficient time to remove the scooter from a rain storm and retain operation.
- Page 12 Extreme care must be taken when assembling or disassembling the scooter. Please take care near any moving parts and finger traps, between opening and closing parts. Taking apart your scooter enables you to save space when keeping it in storage or to carry it along in your vehicle when going away from home. Having the scooter disassembled is easier than ever since no tools are required.
- Page 13 Figure 5. Unplug the front-to-rear harness (G). Figure 7. Remove the Front Basket (H) by lifting. Figure 9. There are 6 main parts after disassembling the scooter. It consists of the front, rear sections, seat, basket, and two battery cases. Figure 6.
- Page 14 Before assembly, please inspect all connector, wiring and looms for any evidence of damage. If there is then do not use the scooter and contact your local dealer. To assemble the scooter, you can repeat the disassembly directions in reverse. Abbreviated directions are given below. Refer to the Figures on pages 10 –...
- Page 15 Your Invacare scooter is equipped with two sealed, service free 12V. 36Ah. rechargeable batteries and one 24V/5A charger. Batteries must be charged before using the scooter for the first time and should be recharged after each day’s use. Be sure the power switch is in the OFF position and the free-wheeling lever is not in freewheel mode.
- Page 16 7. The battery charger lights will normally be red and yellow at this point. Check whether you can hear the fan running. If the lights are not on or the fan is not running, turn OFF. Disconnect the battery charger and check the fuse for burnout.
- Page 17 Fully charge batteries at lease once a month, more if you use the scooter regularly. Charge after each trip exceeding 3 kilometers / 1.86 miles. If storing your scooter for some time (one month or more) make sure that the batteries are fully charged, and on returning, charge them again before using scooter.
- Page 18 SERVICING: An authorized dealer should do all maintenance and repair of your scooter that relates to electronics, batteries, motor parts, and tyres, and use Authorised Invacare Parts ONLY. We recommend that you have your scooter inspected and serviced at least once a year.
- Page 19 Here are some suggestions about solving problems you may have with your scooter. There are five LED lights and one Self-Diagnostic Warning Light on the Control Panel. To check the Self-Diagnostic Warning Lights, turn on the key and count the number of blinks on the Warning Lights. Number of Flashes Battery needs...
- Page 20 The scooter will not move when the key is turned on: 1. Check battery gauge on the control panel. All the LED Lights should be 2. Check the Self-Diagnostic Warning Light. It should be steady. If it is flashing, see chart on page 17 for problem identification. 3.
- Page 21 REQUIREMENTS FOR INFORMATION DISCLOSURE, DOCUMENTATION AND LABELLING MODEL DESIGNATION: TAURUS SCOOTER (HS390) ISO TEST REQUIREMENT METHOD Overall Length with Legrest ISO 7176 Pt 5 Overall Width ISO 7176 Pt 5 Folded Length ISO 7176 Pt 5 Folded Width ISO 7176...
- Page 22 1. Only Invacare scooters purchased at full price are warranted against defective workmanship and materials. 2. If a defect or fault is discovered the Invacare dealer from whom the scooter was obtained should be notified immediately. 3. The manufacturer will not accept responsibility for damage caused by misuse or non-observance of the instructions set out in the user manual.
Need help?
Do you have a question about the Taurus and is the answer not in the manual?
Questions and answers