
Related Manuals for Excalibur RS-351-EDP


Summary of Contents for Excalibur RS-351-EDP
- Page 1 RS-351-eDP Keyless entry & Remote Start Operation guide June 10, 2013 Temporary cover. Color cover is in a separate fi le.
-
Page 2: Table Of Contents
Table Of Contents Introduction ���������������������������������������������������������������������������������������������� 3 The Transmitter���������������������������������������������������������������������������������������� 4 Transmitter Functions ����������������������������������������������������������������������������� 4 Other Remote Start Features������������������������������������������������������������������ 7 Low Battery Automatic Starting ������������������������������������������������������������� 7 Turbo Timer Feature ������������������������������������������������������������������������������ 7 Pit-Stop Feature ������������������������������������������������������������������������������������ 7 Manual Transmission Starting ��������������������������������������������������������������� 7 Using The Valet Switch ��������������������������������������������������������������������������� 8 The Status Light ��������������������������������������������������������������������������������������... -
Page 3: Introduction
Introduction Congratulations on your purchase of this convenience system by Omega Research & Development, Inc�, a world leader in vehicle security and conveince products since 1975� This system is designed to offer ease of use and it’s modular design allows for many features to be customizable to suit your needs�... -
Page 4: The Transmitter
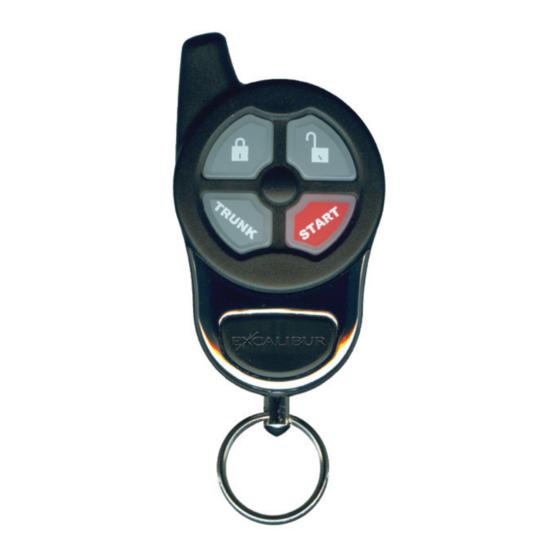
The Transmitter Transmitter part numbers: with antenna: 147-03 without antenna: 146-07S “lock” “unlock” Call your dealer or visit button button www.caralarm.com to order replacement transmitters. “trunk” “start” Transmitter battery replacement: button button Remove the small screw from the lower back case, and separate the transmitter halves�... - Page 5 Transmitter Functions (cont’d) TRUnK ReLeaSe/ CHanneL 2: Press and hold the “TRUNK” button for 3 seconds� • THE TRUNK WILL OPEN, THE DOORS WILL UNLOCK, THE PARKING LIGHTS WILL FLASH TWICE THEN ILLUMINATE FOR 30 SECONDS, AND THE HORN WILL HONK TWICE� •...
- Page 6 Transmitter Functions (cont’d) PanIC MODe: Press & Hold the LOCK or UNLOCK button for 3 seconds� • THE HORN WILL SOUND, THE PARKING LIGHTS WILL FLASH AND THE DOORS WILL LOCK OR UNLOCK, DEPENDING ON THE TRANSMITTER BUTTON USED� • TO DEACTIVATE PANIC, SIMPLY PRESS THE LOCK OR UNLOCK BUTTON AGAIN�...
-
Page 7: Other Remote Start Features
Other Remote Start Features LOw BaTTeRy aUTOMaTIC STaRTIng This feature will automatically start the engine if the vehicle battery drops below 11 volts or the interior temperature drop to 15 (or 32) degrees fahrenheit� You must activate these features each time you park your car to use them� They can be acti- vated one of two ways: Method 1 - Valet Switch •... -
Page 8: Using The Valet Switch
Other Remote Start Features (cont’d) 4) Press LOCK on the transmitter� The engine will shut down (unless turbo timer is on) and the status light will flash every 2 seconds to indicate it is ready to be remote started� nOTe: Manual transmission starting is canceled if you enter the vehicle after per- forming the setup procedure�... - Page 9 The Status Light (cont’d) 5) Flashing Fast (after activating remote start): The system is in the process of start- ing the engine� Remote Starting Diagnostics Whenever the system is placed into Valet Mode, the Status Light illuminates solid. However, when this first occurs, the Status Light will flash 1 to 6 flashes be- fore resuming solid illumination�...
-
Page 10: Programming Transmitters
Programming Transmitters Standard Programming: Using this method to program additional or replacement transmitters does not turn on or otherwise affect the Unauthorized Transmitter Alert (UTA) feature� Step 1 Have all transmitters which are to operate the system at hand� Then, turn the ignition “on”�... -
Page 11: User Programmable Features
Programming Features (cont’d) ~ The horn will honk, the status lights, and the parking lights will flash equal to the selected setting. Step 5 If you wish to change more features, repeat steps 3 & 4 at this time� Step 6 To exit programming, turn the ignition key “ON” then “OFF”� Or, you can wait 10 seconds for programming mode to expire�... -
Page 12: Installer Programmable Features
User Programmable Features (cont’d) Feature #5 Doors Lock with Ignition On (press “unlock” button to program) - DeFaULT (press “lock” button to program) This feature configures the system to automatically lock the vehicle’s doors every time that the ignition switch is turned on� The following feature #6 controls the automatic unlocking operations�... - Page 13 Installer Programmable Features (cont’d) cranking. It uses a fixed crank time determined by installer feature #7. “Tachless Lo” sensitivity mode looks for a voltage increase of 0�5v after cranking� It uses a fixed crank time determined by installer feature #7. “Tach wire”...
- Page 14 Installer Programmable Features (cont’d) Feature #7 Starter Cranking Time 0�7 Second (press “lock” button to program) - DeFaULT 1�00 Second (press “unlock” button to program) 1�5 Seconds (press “trunk” button to program) 2�25 Seconds (press “start” button to program) This feature determines the crank time of the 1st start attempt when in “Tachless” & “Crank Only”...
-
Page 15: Programmable Features Matrix
Programmable Features Matrix Feature #12 Data Port Protocol D2D (Trilogix) (press “lock” button to program) - DeFaULT aDS (iData) (press “unlock” button to program) This feature determines which data protocol is used on the data port� Choose this based on the interface module protocol being used� nOTe: Intellikit modules only support the D2D protocol�... - Page 16 Back Cover Color cover is in a separate file.
Need help?
Do you have a question about the RS-351-EDP and is the answer not in the manual?
Questions and answers