
Related Manuals for Little Wonder Optimax 9270-12-59


Summary of Contents for Little Wonder Optimax 9270-12-59
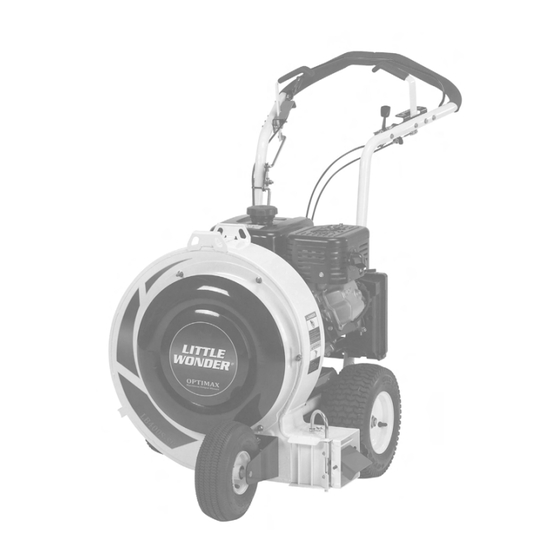
- Page 1 Self Propelled Maximum Output Blower MODELS: 9270-12-59 GX270 HONDA SP 9390-12-59 GX390 HONDA SP Owners Manual and Safety Instructions for OPTIMAX BLOWER...
- Page 2 CALIFORNIA Proposition 65 Warning WARNING Diesel engine exhaust and some The engine exhaust from this product of its constituents are known to the contains chemicals known to the State State of California to cause cancer, of California to cause cancer, birth birth defects and other reproductive defects or other reproductive harm.
-
Page 3: Table Of Contents
BLOWER IMPORTANT MESSAGE On behalf of everyone at Little Wonder, we would like to thank you for your purchase of a Little Wonder Gasoline Powered Optimax Blower. This professional blower was designed to the highest standards to ensure you many hours of uninterrupted service. -
Page 4: Safety
SAFETY LITTLE WONDER BLOWER This symbol means: NOTICE !!! ATTENTION! Unauthorized modifications may present extreme BECOME ALERT! safety hazards to operators and bystanders and could also result in product damage. Your safety and the safety of others is involved. Schiller Grounds Care, Inc. strongly warns against, Signal word definitions rejects and disclaims any modifications, add-on accessories or product alterations that are not... - Page 5 LITTLE SAFETY WONDER BLOWER MAINTENANCE SAFETY When refueling or checking fuel level: - Stop the engine and allow to cool; In general - Do not smoke; Maintain machine according to manufacturer's - Refuel outdoors only; schedule and instructions for maximum safety - Use a funnel;...
- Page 6 SAFETY LITTLE WONDER BLOWER SAFETY DECALS An important part of the safety system incorporated in this blower are the warning labels found on the blower. Replace labels if damaged or illegible. Read and understand the operator manual. Pay particular attention to all sections regarding safety.
-
Page 7: Set Up Instructions
SET-UP INSTRUCTIONS LITTLE WONDER BLOWER SET-UP INSTRUCTIONS 1. Open box. Remove upper handle and cardboard insert. 2. Cut the back of the box open. Use lower handle to roll unit out of the box. 3. Locate hardware package. 4. Install upper handle to lower handle with (4) 3/8-16 x 1-34 carriage bolts and (4) 3/8-16 flanged nylon insert nuts from the hardware package. -
Page 8: Set Up Instructions
SET-UP INSTRUCTIONS LITTLE WONDER BLOWER 8. Move the deflector control lever to the front of the slot. Adjust the jam nuts on the cable fitting so the deflector is completely closed. Lock the nuts against the bracket when the adjustment is correct. 9. -
Page 9: Controls
LITTLE CONTROLS WONDER BLOWER SWITCH (A) Move to the “OFF” position to stop the engine. Move to the “ON” position before starting engine. THROTTLE (B) Controls engine speed and the amount of air being blown. CHOKE (C) Move to the “CHOKE” position to apply the choke. Move to the “RUN”... -
Page 10: Maintenance
MAINTENANCE LITTLE WONDER BLOWER MAINTENANCE INSTRUCTIONS Lubricate chains every 40 hours or weekly, whichever comes first. Use a teflon containing chain lubricant Stop engine and remove the spark plug wire before such as bicycle chain lube that does not attract performing any maintenance. -
Page 11: Adjustments
LITTLE ADJUSTMENTS WONDER BLOWER DEFLECTOR LEVER DEFLECTOR CHAIN If the horizontal deflector door moves during opera- tion, tighten the deflector lever pivot bolt to increase the The sprocket needs to be installed on the deflec- tension on the friction washers. just enough to keep the tor as shown. -
Page 12: Adjustments
LITTLE ADJUSTMENTS WONDER BLOWER SPEED / DIRECTION CONTROL LEVER WHEEL CHAIN TENSION If the speed/direction control lever moves during opera- If the wheel drive chain becomes too slack, the tension tions, tighten the s pivot bolt just enough to increase the needs to be increased or it can run off the sprockets. -
Page 13: Belt Replacement
BELT REPLACEMENT LITTLE WONDER BLOWER ENGINE- DRIVE DISC BELT 1ST STAGE REDUCTION BELT 1. Remove front cover and fan from blower. Figure 2 2. Move the deflector control lever all the way back. 1. Remove the wheel chain covers and wheel chains. Disconnect the deflector return spring from the 2. -
Page 14: Chain Replacement
LITTLE CHAIN REPLACEMENT WONDER BLOWER DIFFERENTIAL CHAIN WHEEL CHAINS If there is no more adjustment, the wheel chains need to be replaced. (Figure 3) If this chain is worn or becomes too slack it must be replaced. There is no adjustment. NOTE: Wheel chains need to be replaced in pairs to keep the adjustment even from one side to the other. -
Page 15: Driven Disc / Differential Replacement
LITTLE DRIVEN DISC / DIFFERENTIAL REPLACEMENT WONDER BLOWER DRIVEN DISC REPLACEMENT DIFFERENTIAL REPLACEMENT Figure 4 1. Disconnect the clutch cable at the clutch bail. If 1. If the shafts are removed or the differential needs necessary the bail may be squeezed together to to be replaced, the equivalent of one or two remove it from the handle to get enough slack. -
Page 16: Storage / Torque Specifications
LITTLE STORAGE / TORQUE SPECIFICATIONS WONDER BLOWER STORAGE To prevent possible explosion or ignition of vaporized To put the equipment into service after an extended fuel, do not store equipment with fuel in tank or period of storage. carburetor in an enclosure with open flame (for example, 1. -
Page 17: Parts Section
PARTS SECTION... -
Page 18: Intake Guard Assy
INTAKE GUARD ASSY LITTLE WONDER FIGURE 1 BLOWER ITEM PART NO. DESCRIPTION ITEM PART NO. DESCRIPTION 4166183 LABEL-INTAKE GUARD 4165218.7 ASSY-GUARD INTAKE 64123-54 BLT-HEX 5/16-18X.75 64268-02 NUT-FL NYLON LOCK 5/16-18 64229-02 NUT 5/16-18 4165926.10 INTAKE PANEL-CENTER BLT-HEX 7/16-20 x 1-3/4 GR8 64123-253 (USED ON 9270 MODELS) 64123-127... -
Page 19: Housing Assy
LITTLE HOUSING ASSEMBLY WONDER FIGURE 2 BLOWER 45 44 ITEM PART NO. DESCRIPTION ITEM PART NO. DESCRIPTION 64141-6 NUT 5/16-18 64268-02 NUT-NYLON LOCK 5/16-18 4166820 S-HOUSING SP BLOWER 4165125.10 SPACER-ENGINE, 3GA 4166187 LABEL-BLOWER SIDE 64139-24 BLT-WLF 3/8-16X1 4167369 LABEL-WARNING/DANGER 4165476.10 GUARD-BELT 910517 BLT-WLF 5/16-24 X 1-3/8... -
Page 20: Handles
HANDLE ASSEMBLY LITTLE WONDER FIGURE 3 BLOWER... - Page 21 HANDLE ASSEMBLY LITTLE WONDER FIGURE 3 BLOWER ITEM PART NO. DESCRIPTION ITEM PART NO. DESCRIPTION 4166779 S-HANDLEUPPER W/ GRIP 4167557.10 HANDLE-BLOWER LOWER 64123-61 BLT-HEX 5/16-18 X 1-3/4 64123-283 BLT-HEX 1/4-20 X 1-3/4 64123-98 BLT-HEX 1/4-20X2-1/2 64163-55 WASHER-.531 x 2.00 x .125 64163-29 WASHER-21/64 X 1 X 11GA 4166170-01...
-
Page 22: Engine Assy
TRANSMISSION ASSY LITTLE WONDER FIGURE 4 BLOWER 65 64 18 68 18 15... - Page 23 LITTLE TRANSMISSION ASSEMBLY WONDER FIGURE 4 BLOWER ITEM PART NO. DESCRIPTION ITEM PART NO. DESCRIPTION 4166271.7 WLDMT-DECK,SP 64168-2 COTTER-HAIRPIN .08 X 1.19 4165055 GT DIFFERENTIAL D16 64141-6 NUT-WLF 5/16-18 4130975 BRG-BALL FLUSH MT TWO BLT 5/8 7 64229-03 NUT-NYLON LOCK 3/8-16 4165061 SPROCKET-DRIVE #43-8 64144-34...
-
Page 24: Muffler Guards ........................................... Figure 4
LITTLE HONDA MUFFLER GUARDS WONDER FIGURE 5 BLOWER 9HP HONDA 13HP HONDA ITEM PART NO. DESCRIPTION ITEM PART NO. DESCRIPTION MUFFLER PLATE HONDA 910156 910158 STANDOFF 5/8 910159 STANDOFF 5/16 NUT WIZ FLANGE 10-24 910531 SCREW SELF TAPPING M5 X 16 910532 SCREW SELF TAPPING M5 X 25 910533... -
Page 26: Warranty
LITTLE WONDER will repair or replace, at its option, any part or parts of the product found to be defective in ma- terial or workmanship during the warranty period. Warranty repairs and replacements will be made without charge for parts or labor.
Need help?
Do you have a question about the Optimax 9270-12-59 and is the answer not in the manual?
Questions and answers