
Subscribe to Our Youtube Channel
Related Manuals for PROEL FREE10LT


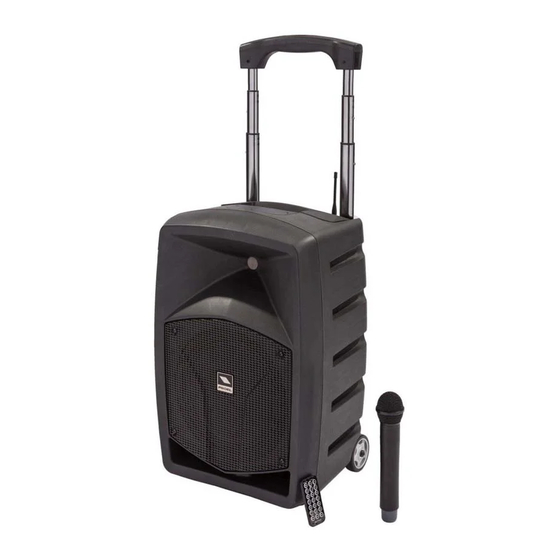
Summary of Contents for PROEL FREE10LT
- Page 1 FREE10LT Portable Sound System USER’S MANUAL ENGLISH ITALIANO 96MAN00094-REV.18/14...
- Page 2 This page is intentionally left blank.
-
Page 3: Table Of Contents
PACKAGING, SHIPPING AND COMPLAINT WARRANTY AND PRODUCTS RETURN MAINTENANCE AND DISCLAIMER POWER SUPPLY USER’S WARNINGS AND CE CONFORMITY INTRODUCTION DESCRIPTION MAIN PANEL OPERATIONS WIRELESS MICROPHONE OPERATIONS REMOTE CONTROL OPERATIONS VRLA BATTERY OPERATIONS AND REPLACEMENT OPTIONAL WIRELESS MIC INSTALLATION FREE10LT - TECHNICAL SPECIFICATION... -
Page 4: Disposal Of Old Electrical & Electronic Equipment
DISPOSAL OF OLD ELECTRICAL & ELECTRONIC EQUIPMENT This marking shown on the product or its literature, indicates that it should not be disposed with other household wastes at the end of its working life. To prevent possible harm to the enviroment or human health from uncontrolled waste disposal, please separate this from other types of wastes and recycle it responsibly to promote the sustainable reuse of material resources. -
Page 5: Packaging, Shipping And Complaint
Proel S.p.A. will verify damage on returned units, and when the unit has been properly used and warranty is still valid, then the unit will be replaced or repaired. Proel S.p.A. is not responsible for any "direct damage" or "indirect damage" caused by product defectiveness. -
Page 6: User's Warnings And Ce Conformity
• The use of this wireless microphone equipment in some countries could be intended for professional use, so the licensability depends on the country it operates. Proel suggests the user to contact the appropriate telecommunications authority concerning proper licensing. •... -
Page 7: Introduction
MP3 player or how to set your microphone. FREE10LT is battery powered combo sound systems with a full set of features and the sound you don’t expect from this kind of products. It includes a versatile MP3 player with USB port, SD slot and BLUETOOTH connection, featuring a large LCD and remote control. - Page 8 This potentiometer sets the level of the effect applied to the CH2, CH3 MIC inputs and wireless mic. 11. MASTER This potentiometer sets the general level of all signals. 12. ON GREEN LED that shows the “ON” status of the FREE10LT.
- Page 9 13. SD SLOT This slot is where you can insert a SD MEMORY CARD containing audio files. 14. USB SLOT This slot is where you can insert an USB FLASH DRIVE containing audio files. 15. MODE SWITCH Pressing this switch you can select the source containing audio files between SD, USB or external Bluetooth player device.
- Page 10 Try this option if you have problems to set a new BT connection. Device Information: selecting this option the following info screen will appear, showing the name and address of the FREE10LT Bluetooth receiver. Exit: returns to the main screen. PLAY/PAUSE This button plays or pauses the current audio file.
- Page 11 INTRO: it plays the first 10 seconds of each song contained in the current folder. ALL: same as normal playing but when it reaches the latest song it restarts from the first. SINGLE ONE: it plays only the current song then stops. FOLDER: it plays all song contained in the current folder.
- Page 12 OFF: the internal battery is disconnected or not present. 25. POWER Use this switch to power ON or OFF the FREE10LT. The FREE10LT is "ON" when the switch is in the "I" position. NOTE: The internal battery is charging even if the FREE10LT is OFF.
-
Page 13: Wireless Microphone Operations
This is the antenna connector of the first receiver, where you have to connect the antenna supplied with FREE10LT. In order to obtain a good transmission, raise up the receiving antenna during use and place the receiver away from other metal objects and no more than 30m from the transmitter. - Page 14 33. VOLUME+PWR Volume potentiometer and ON / OFF switch of the wireless receiver. 34. CHANNEL SELECT BUTTONS Pressing these buttons you can change the receiving channel. TIP: with the transmitter OFF, select a free channel in the receiver. In order to do this, check the RF LED while scrolling the channels: if the channel is free the RF LED stays OFF (if the transmitter is also OFF and there are no radio interferences in proximity).
- Page 15 Every time you change the transmission channel in the FREE10LT you have to set the same channel also in the transmitter using the IR SYNC. Place the transmitter IR port close to the receiver IR port and press ASC: the RF LED lights to confirm the channel sync.
- Page 16 Every time you change the transmission channel in the FREE10LT you have to set the same channel also in the transmitter using the IR SYNC. Place the transmitter IR port close to the receiver IR port and press ASC: the RF LED lights to confirm the channel sync.
-
Page 17: Remote Control Operations
REMOTE CONTROL OPERATIONS The use of the player and its remote control depends on the type of media utilized. Some buttons are active or not active depending if an SD CARD, a USB memory or a BLUETOOTH device is used to reproduce the audio files. PLAY/PAUSE This button plays or pauses the current audio file. -
Page 18: Vrla Battery Operations And Replacement
REMOTE CONTROL BATTERY REPLACEMENT To use the remote control for the first time you need to remove the protective sticker as shown in the figure. When the battery of the remote control is discharged, you need to replace it with a new one of the same type. Instructions about how to open the battery compartment are printed on the remote control body. -
Page 19: Optional Wireless Mic Installation
OPTIONAL WIRELESS RECEIVER INSTALLATION Follow the instructions below to install the optional wireless receiver. 1. Remove the rear cover from the box unscrewing the 2 screws (Figure 1). 2. Separate the cables from the cover (Figure 2). 3. Insert the cables in the correspondent connectors on the FR2R receiver (Figure 3 and 4). 4. -
Page 20: Free10Lt - Technical Specification
FREE10LT - TECHNICAL SPECIFICATION MIXER Section MONO inputs 2 x MIC/LINE IN (COMBO) STEREO inputs 1 x LINE IN (2xRCA + mini-jack) Internal Effect ECHO Outputs MONO LINE OUT (JACK) Main EQ 2-band EQ (HIGH + LOW) WIRELESS Section Wireless Receiver... - Page 21 MANUTENZIONE E LIMITAZIONI D’USO ALIMENTAZIONE AVVERTENZE PER L’UTILIZZO E CONFORMITÀ CE INTRODUZIONE DESCRIZIONE FUNZIONI DEL PANNELLO PRINCIPALE FUNZIONI DEL MICROFONO WIRELESS FUNZIONI CONTROLLO REMOTO SOSTITUZIONE DELLA BATTERIA DEL CONTROLLO REMOTO SOSTITUZIONE DELLA BATTERIA VRLA INSTALLAZIONE RICEVITORE WIRELESS OPZIONALE FREE10LT – SPECIFICHE TECNICHE...
-
Page 22: Trattamento Del Dispositivo Elettrico Od Elettronico A Fine Vita
Sostanze liquide sono penetrate all’interno del prodotto. • Il prodotto è caduto e si è danneggiato. • • Il prodotto non funziona normalmente esibendo una marcato cambio di prestazioni. • Non intervenire sul prodotto. Rivolgersi a un centro di assistenza autorizzato Proel. -
Page 23: Imballaggio, Trasporto E Reclami
Pulire il prodotto unicamente con un panno asciutto. • I Prodotti Proel sono destinati esclusivamente ad un utilizzo specifico di tipo sonoro: segnali di ingresso di tipo audio (20Hz-20kHz). Proel declina ogni responsabilità per danni a terzi causati da mancata manutenzione, manomissioni, uso improprio o installazione non eseguita secondo le norme di sicurezza. -
Page 24: Avvertenze Per L'utilizzo E Conformità Ce
AVVERTENZE PER L’UTILIZZO E CONFORMITÀ CE • I Prodotti Proel sono conformi alla direttiva LVD 2006 / 95 / EC, secondo lo standard EN 60065. • PROEL S.p.A dichiara che questo prodotto (escluso il sistema del radio microfono) è conforme ai requisiti essenziali ed alle altre disposizioni pertinenti stabilite dalla direttiva 2004/108/EC (EMC), secondo gli standard EN 55103-1 e EN 55103-2. -
Page 25: Introduzione
DESCRIZIONE I sistemi FREE di PROEL vi offrono la possibilità di suonare la vostra musica o amplificare il vostro suono in libertà, senza preoccuparvi di dove collegare il cavo di alimentazione, di come collegare il lettore MP3 o di come regolare il microfono. - Page 26 Potenziometro per la regolazione del livello dell’effetto interno applicato all’ingresso CH2, CH3 ingresso MIC e per il radiomicrofono. 11. MASTER Potenziometro per la regolazione del livello generale di tutti i segnali. 12. ON LED VERDE che indica quando il FREE10LT è acceso.
- Page 27 13. SD SLOT In questa fessura potete inserire una memoria tipo SD (SD MEMORY CARD) contenente file audio. 14. USB SLOT In questa fessura potete inserire una memoria tipo USB (USB FLASH DRIVE) contenente file audio. 15. MODE SWITCH Premendo questo tasto si sceglie la sorgente contenente i file audio fra SD, USB o un lettore Bluetooth esterno.
- Page 28 Provate ad usare questa opzione se avete problemi nel connettere un nuovo dispositivo. Device Information: Scegliendo questa opzione appare la seguente schermata con il nome e l’indirizzo del ricevitore Bluetooth di FREE10LT. Exit: ritorna alla schermata principale. PLAY/PAUSE Questo tasto esegue o ferma la riproduzione del file audio corrente.
- Page 29 RANDOM: riproduce tutte le canzoni contenute in tutte le memorie e cartelle casualmente. INTRO: riproduce i primi 10 secondi di ogni canzone contenuta nella cartella corrente. ALL: come in NORMAL ma quando raggiunge l’ultima canzone riparte dalla prima. SINGLE ONE: riproduce solo il file corrente al termine si ferma. FOLDER: riproduce tutti i file audio contenuti nella cartella corrente.
- Page 30 - SPENTO: la batteria interna è scollegata o assente. 25. POWER Usare questo tasto per accendere e spegnere il FREE10LT. Il FREE10LT è acceso "ON" quando il tasto è in posizione "I". NOTA: la batteria interna si carica anche se il FREE10LT è spento.
-
Page 31: Funzioni Del Microfono Wireless
Il sistema wireless FR2 è composto di 3 unità: il ricevitore FR2R, il trasmettitore a mano FR2H e il trasmettitore body pack FR2B. Il FREE10LT è fornito di serie con un microfono wireless a mano (FR2R + FR2H). E’ possibile aggiungere al sistema un microfono wireless a mano (FR2R + FR2H) o un trasmettitore bodypack (FR2R + FR2B), permettendo l’uso simultaneo di 2 radiomicrofoni senza interferenza reciproca. - Page 32 33. VOLUME+PWR Potenziometro per la regolazione del volume e interruttore ON/OFF del ricevitore. 34. TASTI SELEZIONE CANALE Premendo questi tasti è possibile cambiare il canale di ricezione. Nota: con il trasmettitore spento, scegliete un canale libero per il ricevitore. Controllare il LED RF mentre si scorrono i canali: se il canale è...
- Page 33 Ogni volta che si cambia il canale di trasmissione nel FREE10LT occorre sincronizzare lo stesso canale nel trasmettitore usando l’IR. Per farlo posizionare la porta IR del trasmettitore vicino alla porta IR del ricevitore e premere ASC: a sincronizzazione avvenuta il LED RF si accende.
- Page 34 Ogni volta che si cambia il canale di trasmissione nel FREE10LT occorre sincronizzare lo stesso canale nel trasmettitore usando l’IR. Per farlo posizionare la porta IR del trasmettitore vicino alla porta IR del ricevitore e premere ASC: a sincronizzazione avvenuta il LED RF si accende.
-
Page 35: Funzioni Controllo Remoto
FUNZIONI CONTROLLO REMOTO L’uso del media player e del controllo remoto dipendono dal tipo di supporto utilizzato. Alcuni tasti sono attivi o inattivi a seconda del dispositivo SD CARD, USB memory o BLUETOOTH usato per riprodurre i file audio. PLAY/PAUSE Questo tasto esegue o ferma la riproduzione del file audio corrente. -
Page 36: Sostituzione Della Batteria Del Controllo Remoto
SOSTITUZIONE DELLA BATTERIA DEL CONTROLLO REMOTO Per usare il controllo remoto per la prima volta occorre rimuovere la linguetta adesiva come da figura. Quando la batteria del controllo remoto è scarica, è necessario sostituirla con una nuova dello stesso tipo. Le istruzioni su come aprire il vano batterie sono stampate sul fondo del controllo remoto. -
Page 37: Installazione Ricevitore Wireless Opzionale
INSTALLAZIONE RICEVITORE WIRELESS OPZIONALE Seguire le istruzioni sottostanti per installare il ricevitore opzionale. 1. Rimuovere il coperchio dal telaio svitando le 2 viti (Figura 1). 2. Separare I cavi dal coperchio (Figura 2). 3. Inserire I cavi nei corrispondenti connettori sul ricevitore FR2R (Figura 3 e 4). 4. -
Page 38: Free10Lt - Specifiche Tecniche
FREE10LT – SPECIFICHE TECNICHE Sezione MIXER Ingressi MONO 2 x MIC/LINE IN (COMBO) Ingressi STEREO 1 x LINE IN (2xRCA + mini-jack) Effetto Interno ECHO Uscite MONO LINE OUT (JACK) EQ Main EQ 2-bande (ALTI + BASSI) Sezione RADIOMICROFONO Ricevitore Wireless... - Page 39 Questa pagina è intenzionalmente lasciata vuota.
- Page 40 PROEL S.p.A. (World Headquarters - Factory) Via alla Ruenia 37/43 64027 Sant’Omero (Te) – Italy Tel: +39 0861 81241 Fax: +39 0861 887862 www.proel.com...
Need help?
Do you have a question about the FREE10LT and is the answer not in the manual?
Questions and answers