Table of Contents
Advertisement
Available languages
Available languages
Quick Links
Advertisement
Chapters
Table of Contents

Related Manuals for PROEL FREE10


Summary of Contents for PROEL FREE10
- Page 1 FREE10 Portable Sound System USER’S MANUAL ITALIANO ENGLISH 96MAN00057‐REV.16/12 ...
- Page 2 This page is intentionally left blank. ...
-
Page 3: Table Of Contents
IN CASE OF FAULT............................ 5 PACKAGING, SHIPPING AND COMPLAINT ....................5 WARRANTY AND PRODUCTS RETURN ..................... 5 MAINTENANCE AND DISCLAIMER ......................5 POWER SUPPLY............................5 USER’S WARNINGS AND CE CONFORMITY ....................6 INTRODUCTION ............................7 DESCRIPTION ............................7 MAIN PANEL OPERATIONS ........................7 WIRELESS MICROPHONE OPERATIONS ....................10 CD/DVD/MP3 PLAYER and REMOTE CONTROL OPERATIONS ............... 13 REMOTE CONTROL BATTERY REPLACEMENT ..................18 VRLA BATTERY OPERATIONS AND REPLACEMENT ................18 OPTIONAL WIRELESS MIC INSTALLATION....................19 FREE10 ‐ TECHNICAL SPECIFICATION..................... 20... -
Page 4: Disposal Of Old Electrical & Electronic Equipment
DISPOSAL OF OLD ELECTRICAL & ELECTRONIC EQUIPMENT This marking shown on the product or its literature, indicates that it should not be disposed with other household wastes at the end of its working life. To prevent possible harm to the enviroment or human health from uncontrolled waste disposal, please separate this from other types of wastes and recycle it responsibly to promote the sustainable reuse of material resources. Household users should contact either the retailer where they purchased this product, or their local ... -
Page 5: In Case Of Fault
This warranty does not extend to damage resulting from improper installation, misuse, neglect or abuse. Proel S.p.A. will verify damage on returned units, and when the unit has been properly used and warranty is still valid, then the unit will be replaced or repaired. Proel S.p.A. is not responsible for any "direct damage" or "indirect damage" caused by product defectiveness. MAINTENANCE AND DISCLAIMER ... -
Page 6: User's Warnings And Ce Conformity
• LICENSING INFORMATION: The radio equipment operates in the 863‐865 MHz harmonized European band dedicated to SRD (short range devices) like wireless microphone and IEM personal monitor systems, so in the countries specified in the below table no personal license is required for use it. • The use of this wireless microphone equipment in some countries could be intended for professional use, so the licensability depends on the country it operates. Proel suggests the user to contact the appropriate telecommunications authority concerning proper licensing. • This equipment may be capable of operating on some frequencies not authorized in your country. Please contact your national authority to obtain information on authorized frequencies for wireless microphone products in your region. ... -
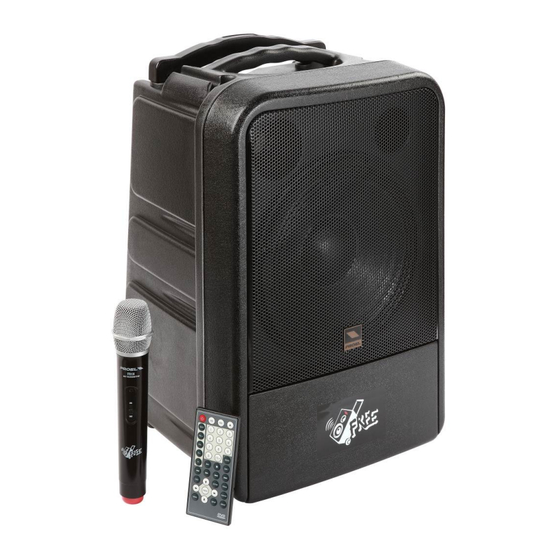
Page 7: Introduction
INTRODUCTION Thank you for choosing this PROEL product and for your trust in our brand, synonymous of professionalism, accuracy, high quality and reliability. All our products are CE approved and designed for continuous use in professional systems. DESCRIPTION PROEL FREE10 gives you the freedom to perform your music or play your sound anywhere without worrying about where to plug the power cord, how to connect your MP3 player or how to set your microphone. FREE10 is a battery powered combo sound system with a full set of features and the sound you don’t expect from this kind of products. It features a CD/DVD/MP3 player with USB port and remote control able to play not only audio but also video files, with a dedicated video output for connecting an external display. The UHF license‐free module (863‐865 MHz) provides a clean and hassle‐free wireless connection with the provided handheld microphone for the maximum freedom of movement. An additional wireless module with the choice of handheld or bodypack transmitter with headset microphone is available as optional. A full set of functions, including built‐in effect and voice priority switch, are available for the best ... - Page 8 1. MIC 1 IN This is a female combo connector that accepts a XLR or a JACK plug from any dynamic balanced or unbalanced microphone. The XLR input is wired as follows: Pin 1 = shield or ground Pin 2 = + positive or "hot" Pin 3 = ‐ negative or "cold" The JACK input is wired as follows: Tip = + positive or "hot" Sleeve = shield or ground 2. MIC 1 LEVEL This potentiometer sets the level of the MIC 1 IN input. 3. MIC 2 IN Same as MIC 1 IN input. 4. MIC 2 LEVEL This potentiometer sets the level of the MIC 2 IN input. 5. AUX 1 IN This is a female jack connector that accepts JACK plug from any line level unbalanced source. The JACK input is wired as follows: Tip = + positive or "hot" Sleeve = shield or ground 6. AUX 1 LEVEL This potentiometer sets the level of the AUX 1 IN input. 7. AUX 2 IN (RCA) These are two RCA female connectors that accept two RCA plug from LEFT and RIGHT channels of a line level auxiliary source, or a MINI JACK (3.5mm) female connector that accepts a STEREO MINI JACK plug from Computer/CD/DVD/MP3 players. Each RCA input is wired as follows: Tip = + positive or "hot" Sleeve = shield or ground The MINI JACK is wired as follows: Tip = positive signal of left channel Ring = positive signal of right channel Sleeve = shield or ground 8.
- Page 9 Here’s where you plug in your mains supply cord. You should always use the mains cord supplied with the device. Be sure that your device is turned off before you plug the mains supply cord into an electrical outlet. 22. FUSE holder Here is where the mains protection fuse is placed. REPLACE THE PROTECTION FUSE ONLY WITH SAME TYPE AS SHOWN ON THE PRODUCT. IF AFTER THE SUBSTITUTION, THE FUSE INTERRUPTS AGAIN THE APPARATUS WORKING, DO NOT TRY AGAIN THEN CONTACT THE PROEL SERVICE CENTER. 23. POWER Use this switch to power ON or OFF the FREE10. The FREE10 is "ON" when the switch is in the "I" position. NOTE: The internal battery is charging even if the FREE10 is OFF. ...
-
Page 10: Wireless Microphone Operations
24. 12‐24V DC INPUT This is the input where to connect an external DC source to supply the FREE10 and/or charge the FREE10 internal battery. 25. CHARGE This LED indicates the battery charging status as follows: ‐ fixed GREEN: the internal battery is fully charged. ‐ fixed RED: the internal battery is being charged. ‐ flashing GREEN/RED: the internal circuit is testing the battery. ‐ OFF: the internal battery is disconnected or not present. 26. LOW This RED LED indicates when the FREE10 has been turned on but the battery needs to be re‐charged. 27. HIGH This GREEN LED indicates when the FREE10 has been turned on and the battery is in good status. WIRELESS MICROPHONE OPERATIONS The FR1 Wireless Microphones system provided with the FREE10 is a UHF, quartz controlled, fixed frequency device that provides a reliable, high‐quality signal transmission. The FR1 Wireless Microphone system features 3 units: FR1R receiver, FR1H handheld transmitter and FR1B body pack transmitter. The FREE10 is provided as standards with one handheld wireless microphone (FR1R + FR1H at 864.300 MHz). An additional wireless handheld microphone (FR1R + FR1H at 863.675 MHz) or bodypack (FR1R + FR1B at ... - Page 11 FR1H is the UHF wireless microphone handheld transmitter. 31. MICROPHONE GRILLE This grid protects the microphone capsule and includes a pop filter. The microphone uses a dynamic capsule with a cardioid unidirectional figure. 32. LOW BAT RED LED This LED shows the battery status: • When the microphone is switched ON, the LED will light for about 1 second. • If the batteries are charged, the LED will turn off (even if the microphone is switched on and operative). • The LED will light again if the batteries are near to be exhaust to indicate that they must be replaced as soon as possible. 33. ON/OFF ON/OFF switch. 34. MICROPHONE BODY In order to open the microphone case and to access the batteries compartment, just push the red cap with a finger and use the other hand to slide the microphone body down. 35. BATTERIES COMPARTMENT AND FREQUENCY The microphone is powered by 2 type AA ...
- Page 12 FR1B is the UHF wireless bodypack transmitter. 36. AUDIO INPUT 3,5mm mini jack input socket to connect the supplied headset microphone. 37. ON GREEN LED that shows the “ON” status of the bodypack. 38. LOW BAT RED LED that shows the battery status: the LED will light if the batteries are near to be exhaust, to indicate that they must be replaced as soon as possible. 39. ON/OFF and LEVEL CONTROL This potentiometer is used for switching ON the bodypack and for adjusting the level of the microphone. 40. BATTERY COMPARTMENT Sliding down the lower part of the bodypack you can access to the battery compartment. To operate the microphone needs 2 type AA alkaline batteries. NOTE: the microphone is able to operate also with 2 Ni‐MH rechargeable batteries, but in this case the operating time is less. 41. CLIP Clip for hooking the bodypack to the belt. 42. FREQUENCY On the back side of bodypack a sticker shows the operating frequency of the transmitter. ...
-
Page 13: Cd/Dvd/Mp3 Player And Remote Control Operations
CD/DVD/MP3 PLAYER and REMOTE CONTROL OPERATIONS The use of the player and its remote control is depending to the type of media that is reproduced. When a music CD is reproduced, some buttons are active and some others are not active, the same is when a DVD, a DIVX movie or a photo CD are reproduced. The figure below shows the CD/DVD/USB player panel. 43. DISC SLOT Insert a disc into this slot to play it. Compatible disc are: Standard CD, CD‐R, CD‐RW, standard DVD, DVD‐R, DVD+R. Compatible contents are: Standard CD audio, MP3 audio files, m4a apple lossless audio, standard DVD movies, DIVX movies, JPG photos. NOTE: the video content must be standard, HD video cannot not reproduced. 44. STOP This button stops the current playing media (song or video) and go back to the first content of the current media (CD, DVD or USB key). 45. DOWN/REV If pressed one time skips to previous media content (song or video). If pressed and held rewinds the media backward. 46. UP/CUE If pressed one time skips to next media content (song or video). If pressed and held wind the media forward. 47. PLAY/PAUSE This button plays or puts in pause the current media content (song or video). 48. EJECT This button ejects the disc. 49. DISC Press this button to select the media contents of the inserted disc. 50. USB Press this button to select the media contents of the USB memory key plugged in. 51. FOLDER SKIP NEXT When a disc or USB key includes media contents divided into separate folders, pressing this button you ... - Page 14 go to the next folder. 52. FOLDER SKIP PREVIOUS When a disc or USB key includes media contents divided into separate folders, pressing this button you go to the previous folder. 53. IR REMOTE CONTROL RECEIVER This is where the Infra Red receiver is located: aim the remote controller here. 54. LCD DISPLAY Information about the current content is displayed here. More detailed information is displayed on a screen attached to the video out port (14). 55. USB PORT This is where to plug your USB memory key in. Here below the remote control functions are explained. BUTTONS ALWAYS ACTIVE PLAYING AUDIO AND VIDEO 56. STAND‐BY Press this button to turn on the player or to put it in standby. Putting the player in standby you can save the battery charge, but for a better result the use the ON/OFF switch on potentiometer (9). The buttons (48)(49)(50) have the same functions explained above. The standard play buttons (44)(45)(46)(47)(51)(52) have the same functions explained above. 57. MUTE This button mutes the audio of the player. 58. VOL+ This button increases the volume of the player. 59. VOL‐ This button decreases the volume of the media player. 60. PT+ This button increases the pitch of the audio and the speed of the video of the player. 61. PT‐ This button decreases the pitch of the audio and the speed of the ...
- Page 15 depends to the contextual menu that appears on the screen). CD TRACK BUTTONS 67. NUMBER These buttons allow to select directly a specified track if the media is an audio CD. THE FOLLOWING BUTTONS HAVE A SPECIFIC FUNCTION DEPENDING TO THE MEDIA CONTENT. IF A BUTTON HAS NO USE FOR THE MEDIA CONTENT, THE TEXT “INVALID KEY” APPEARS ON THE VIDEO SCREEN. 68. AUDIO If the media played has an audio content, pressing this button you can choose between: LEFT channel played on both outputs, RIGHT channel played on both outputs, MIXED MONO signal played on both outputs, STEREO standard signal played normally. This information is displayed only on the VIDEO screen. 69. OSD When playing a media some information about the media appears on the LCD display and on the TV screen. Pressing this button you can choose the displayed information. When an audio CD is played you can choose between: track time, remaining track time, total disk time, remaining total disk time, none. When a video DVD is played you can choose between: time of chapter, playing info, remaining time of chapter, total movie time, remaining movie time, none. For other media files the OSD displayed info depends to the media content. 70. PROG Using this button you can program a sequence of media files, audio tracks, video. The programming of the contents must be made using the VIDEO screen as shown in the following images: Press play button to start the sequence. 71.
- Page 16 If it is pressed two times activates and all the files in the current folder are repeated (only if the media contents is divided into more than one folder). If it is pressed three times activates and all the files in the current media are repeated (for standard audio CD this function will be active pressing the button two times). The fourth pressing de‐actives the repeat and the “RPT” text disappear from LCD screen. NOTE: only the same type of media are repeated. 73. ZOOM This button activates the digital zoom of images and movies. Press the button several time for increasing the zoom: ZOOM x2, x3, x4, x1/2, x1/3, x1/4. 74. MENU The MENU button shows on the VIDEO screen the contextual menu of a standard DVD inserted into the disc player. Each standard DVD has a contextual menu where you can choose the language, the chapters, the special contents: 75. SUB‐T During the play back of a DVD movie, by pressing this button you can choose the subtitles if available. 76. SETUP ...
- Page 17 Pressing this button the following screen will appears. Here is where you can set the typical options of a video player. Use the cursor buttons to navigate between the menu and the options. HOW TO SELECT THE MEDIA CONTENT CD‐R, DVD‐R and USB memory keys can contain different types of file. For choosing which type of file you want to play, after inserting the support into the player press STOP immediately and the following screen will appears: Using the cursor keys you can choose between audio files, photos or video. Choose the type of file you want to play and press ENTER. IMPORTANT: each time you turn it on, the disc player recognizes the media support and restart the same media content (audio, movie, photos) from the same position or from the beginning. If the latest media content was a movie or photos, when you turned it on again the player plays the movie or photos. If you have no VIDEO screen and you want to play from the same support an audio file REMEMBER ALWAYS TO RE‐ SELECT THE MEDIA CONTENT AS AUDIO BEFORE TURNING OFF THE DISC PLAYER. ...
-
Page 18: Remote Control Battery Replacement
REMOTE CONTROL BATTERY REPLACEMENT To use the remote control for the first time you need to remove the adhesive sticker as show in figure. When the battery of the remote control is discharged, you need to replace it with a new one of the same type. Instructions about how to open the battery compartment are printed on the remote control body. BE CAREFUL: DANGER OF EXPLOSION IF BATTERY IS INCORRECTLY REPLACED. REPLACE ONLY WITH SAME TYPE: CR 2025 LITHIUM MANGANESE DIOXIDE BATTERY. The battery contains Perchlorate Material – special handling may apply, it should not be disposed with other household wastes at the end of its working life. To prevent possible harm to the environment or human health from uncontrolled waste disposal, please separate this from other types of wastes and recycle it. ... -
Page 19: Optional Wireless Mic Installation
OPTIONAL WIRELESS MIC INSTALLATION Follow the instructions below to install the optional wireless microphone. 1. Remove the rear cover from the box unscrewing the 4 screws. 2. Remove the jumper indicated in the photo. 3. Insert the cable in the correspondent connector on the FR1R receiver. 4. Cut the plastic tie fixing the wires to the cover. 5. Mount the FR1R receiver into the slot using the same 4 screws. ... -
Page 20: Free10 - Technical Specification
FREE10 ‐ TECHNICAL SPECIFICATION Wireless System Modulation Mode FM Frequency Range UHF: 863‐865 MHz Frequency Stability ±0.0005% ‐75 dB Sensitivity ‐95 dBm Adjacent Channel Rejection S/N > 40 dB AF Output 80 dB Distortion < 85 dB Wireless Receiver FR1R Handheld Transmitter FR1H Bodypack Transmitter FR1B (optional) Headset Microphone HS1 (optional) Amplifier System Speaker 1" horn loaded compression driver, 10" woofer Continuous Power 100 W Program Power 180 W Distortion 1% ( at 10W ) Frequency Response 50Hz ‐ 18KHz, ‐3dB Disc Unit CD/DVD/MP3 player with USB port Inputs ... - Page 21 AVVERTENZE PER LA SICUREZZA ......................22 IN CASO DI GUASTO..........................23 IMBALLAGGIO, TRASPORTO E RECLAMI....................23 GARANZIE E RESI............................ 23 MANUTENZIONE E LIMITAZIONI D’USO ....................23 ALIMENTAZIONE............................ 23 AVVERTENZE PER L’UTILIZZO E CONFORMITÀ CE ................. 24 INTRODUZIONE............................25 DESCRIZIONE ............................25 FUNZIONI DEL PANNELLO PRINCIPALE....................25 FUNZIONI DEL MICROFONO WIRELESS ....................28 FUNZIONI del RIPRODUTTORE CD/DVD/MP3 e del CONTROLLO REMOTO .......... 31 SOSTITUZIONE DELLA BATTERIA DEL CONTROLLO REMOTO ..............36 SOSTITUZIONE DELLA BATTERIA VRLA ....................36 INSTALLAZIONE RADIO‐MICROFONO OPZIONALE ................37 FREE10 – SPECIFICHE TECNICHE ......................38...
-
Page 22: Trattamento Del Dispositivo Elettrico Od Elettronico A Fine Vita
TRATTAMENTO DEL DISPOSITIVO ELETTRICO OD ELETTRONICO A FINE VITA Il marchio riportato sul prodotto o sulla documentazione indica che il prodotto non deve essere smaltito con altri rifiuti domestici al termine del ciclo di vita. Per evitare eventuali danni all’ambiente si invita l’utente a separare questo prodotto da altri tipi di rifiuti e di riciclarlo in maniera responsabile per favorire il riutilizzo sostenibile delle risorse materiali. Gli utenti domestici sono invitati a contattare il rivenditore presso il quale è stato acquistato il prodotto o ... -
Page 23: In Caso Di Guasto
GARANZIE E RESI • I Prodotti Proel sono provvisti della garanzia di funzionamento e di conformità alle proprie specifiche, come dichiarate dal costruttore. • La garanzia di funzionamento è di 24 mesi dopo la data di acquisto. I difetti rilevati entro il periodo di ... -
Page 24: Avvertenze Per L'utilizzo E Conformità Ce
Per evitare danni alla linea d’alimentazione dell’apparato, non mettere in trazione il cavo d’alimentazione e non utilizzare un cavo attorcigliato. • Per evitare il danneggiamento del cavo d’alimentazione dell’apparato, assicurarsi che questo non venga calpestato o schiacciato da oggetti pesanti. AVVERTENZE PER L’UTILIZZO E CONFORMITÀ CE • I Prodotti Proel sono conformi alla direttiva LVD 2006 / 95 / EC, secondo lo standard EN 60065. • PROEL S.p.A dichiara che questo prodotto (escluso il sistema del radio microfono) è conforme ai requisiti essenziali ed alle altre disposizioni pertinenti stabilite dalla direttiva 2004/108/EC (EMC), secondo gli standard EN 55103‐1 e EN 55103‐2. • PROEL S.p.A dichiara che il radio‐microfono (incluso con il prodotto) è conforme ai requisiti essenziali ed alle altre disposizioni pertinenti stabilite dalla direttiva R&TTE 1999 / 5 / EC secondo gli standard EN ... -
Page 25: Introduzione
INTRODUZIONE Grazie per aver scelto un prodotto PROEL e della fiducia riposta nel nostro marchio, sinonimo di professionalità, accuratezza, elevata qualità ed affidabilità. Tutti i nostri prodotti sono conformi alle normative CE per utilizzazione continua in impianti di diffusione sonora. DESCRIZIONE PROEL FREE10 vi consente la libertà di suonare la vostra musica o amplificare il vostro sound ovunque senza la preoccupazione di dover collegare la presa di rete o di come collegare il vostro lettore MP3 o il microfono. FREE10 è un sistema sonoro combinato alimentato a batteria e dotato di un set completo di funzioni e di un suono di qualità inusuale per questa tipologia di prodotto. Esso dispone di un lettore CD/DVD/MP3 con porta USB e controllo remoto, capace di riprodurre non solo contenuti audio ma anche video. Il modulo UHF (863‐865 MHz) in dotazione e il microfono a mano permettono di amplificare la voce con la massima libertà di movimento. E’ possibile aggiungere un modulo wireless aggiuntivo, scegliendo tra ... - Page 26 1. MIC 1 IN Connettore COMBO che accetta un XLR o un JACK da qualsiasi microfono dinamico bilanciato o sbilanciato. Le terminazioni dell' ingresso XLR sono le seguenti: Pin 1 = schermo o massa Pin 2 = + positivo o "caldo" Pin 3 = ‐ negativo o "freddo" Le terminazioni dell' ingresso JACK sono le seguenti: Tip (punta) = + positivo o "caldo" Sleeve (manicotto) = schermo o massa 2. MIC 1 LEVEL Potenziometro per la regolazione del livello dell’ingresso MIC 1 IN. 3. MIC 2 IN Come ingresso MIC 1 IN. 4. MIC 2 LEVEL Potenziometro per la regolazione del livello dell’ingresso MIC 2 IN. 5. AUX 1 IN Connettore JACK che accetta uno spinotto JACK da qualsiasi sorgente a livello linea. Le terminazioni dell' ingresso JACK sono le seguenti: Tip (punta) = + positivo o "caldo" Sleeve (manicotto) = schermo o massa 6. AUX 1 LEVEL Potenziometro per la regolazione del livello dell’ingresso AUX 1 IN. 7. AUX 2 IN (RCA) Due connettori femmina RCA, bianco e rosso, che accettano due RCA maschio dai canali sinistro e destro di una sorgente ausiliaria con livello linea (Computer/CD/DVD/MP3) oppure un connettore femmina MINI JACK (3.5mm) che accetta un JACK MINI STEREO maschio da una sorgente ausiliaria. Ogni ingresso RCA è terminato come segue: Tip (punta) = + positivo o "caldo" Sleeve (manicotto) = schermo o massa Il MINI JACK è terminato come segue: Tip (punta) = segnale positivo del canale sinistro Ring (anello) = segnale positivo del canale destro Sleeve (manicotto) = schermo o massa ...
- Page 27 Questo selettore imposta la tensione di rete della linea elettrica del vostro paese (tipicamente è già impostato di fabbrica e non è necessario cambiarlo). L'impostazione 115V è per le linee elettriche da 105‐ 120V~ e l'impostazione 230V è per le linee elettriche da 210‐240V~. ATTENZIONE una sbagliata impostazione della linea elettrica AC LINE VOLTAGE può danneggiare seriamente l'amplificatore interno. 21. AC~ SOCKET Inserire in questa presa il cavo di alimentazione di rete, utilizzando esclusivamente il cavo in dotazione. Accertarsi che l'altoparlante sia spento prima di collegarlo alla rete. 22. FUSE holder In questo vano è inserito il fusibile di protezione principale di rete. RIMPIAZZARE IL FUSIBILE DI PROTEZIONE ESCLUSIVAMENTE CON UN FUSIBILE CON LE MEDESIME CARATTERISTICHE RIPORTATE SUL PRODOTTO. SE DOPO LA SOSTITUZIONE, IL FUSIBILE INTERROMPE NUOVAMENTE IL FUNZIONAMENTO DELL'APPARATO, NON INSISTERE E CONTATTARE IL SERVIZIO ASSISTENZA PROEL. ...
-
Page 28: Funzioni Del Microfono Wireless
23. POWER Usare questo tasto per accendere e spegnere il FREE10. Il FREE10 è acceso "ON" quando il tasto è in posizione "I". NOTA: la batteria interna si carica anche se il FREE10 è spento. 24. 12‐24V DC INPUT Questo è l’ingresso a cui collegare una alimentazione DC esterna per alimentare il FREE10 o caricare la batteria interna. 25. CHARGE LED che indica lo stato di carica della batteria: ‐ VERDE fisso: la batteria interna è completamente carica. ‐ ROSSO fisso: la batteria interna si sta caricando. ‐ VERDE/ROSSO lampeggiante: il circuito interno sta controllando la batteria. ‐ SPENTO: la batteria interna è scollegata o assente. 26. LOW Questo LED rosso indica quando il FREE10 è acceso ma la batteria richiede di essere ricaricata. ... - Page 29 FR1H è il radiomicrofono a mano UHF. 31. GRIGLIA MICROFONO La griglia protegge la capsula microfonica e incorpora un filtro anti‐pop. La capsula microfonica è di tipo dinamico con figura a cardioide unidirezionale. 32. LOW BAT RED LED LED che indica lo stato di carica della batteria: • Quando il microfono viene acceso, il LED si illumina per circa 1 secondo. • Se le batterie sono cariche, il LED si spegne e resta spento anche a microfono acceso e funzionante. • Il LED si illumina nuovamente a microfono acceso quando lo stato di carica delle batterie si sta esaurendo, per comunicare che occorre sostituirle al più presto. 33. ON/OFF Tasto di accensione. 34. CORPO MICROFONO Per aprire il microfono ed accedere al vano batterie, premere sul bottone rosso con un dito e usare l’altra mano per far scorrere il corpo del microfono verso il basso. 35. VANO BATTERIE e FREQUENZA Per funzionare il microfono necessita di 2 batterie alcaline tipo AA tipo. NOTA: il microfono è in grado di funzionare anche con due batterie ricaricabili al Ni‐MH, ma in tal caso la durata del funzionamento è più breve. Un adesivo posto nel vano batterie indica la frequenza di trasmissione. ...
- Page 30 FR1B è il trasmettitore bodypack UHF. 36. AUDIO INPUT Ingresso mini jack da 3,5mm per il collegamento al trasmettitore del microfono in dotazione. 37. ON Indicatore LED VERDE che l’accensione del bodypack. 38. LOW BAT Indicatore LED ROSSO che indica lo stato della batteria: il LED si accende quando lo stato di carica delle batterie si sta esaurendo, per comunicare che occorre sostituirle al più presto. 39. ON/OFF e CONTROLLO LIVELLO Questo potenziometro è usato per accendere il bodypack e per regolare il livello del microfono. 40. VANO BATTERIE Facendo scorrere la parte bassa del bodypack si accede al vano batterie. Per funzionare il microfono necessita di 2 batterie alcaline tipo AA. NOTA: il microfono è in grado di funzionare anche con due batterie ricaricabili al Ni‐MH, ma in tal caso la durata del funzionamento è più breve. 41. CLIP Clip per agganciare il bodypack alla cintura. 42. FREQUENZA Sul retro del bodypack è indicata la frequenza del trasmettitore. ...
-
Page 31: Funzioni Del Riproduttore Cd/Dvd/Mp3 E Del Controllo Remoto
FUNZIONI del RIPRODUTTORE CD/DVD/MP3 e del CONTROLLO REMOTO L’utilizzo del riproduttore e del controllo remoto dipende dal tipo di media che viene riprodotto. Quando un CD musicale è riprodotto, alcuni tasti sono attivi e altri no. Lo stesso avviene con un DVD, un disco DIVX o un photo CD. La figura sottostante mostra il pannello del lettore CD/DVD/USB. 43. DISC SLOT Inserire un disco in questa fessura per riprodurlo. I dischi compatibili sono: Standard CD, CD‐R, CD‐RW, standard DVD, DVD‐R, DVD+R. I contenuti compatibili sono: Standard audio CD, file MP3 audio, file audio m4a apple, filmati standard DVD, filmati DIVX, foto JPG. NOTA: il contenuto video deve essere standard, i video HD non sono riprodotti. 44. STOP Questo tasto arresta la riproduzione corrente (audio o video) e ritorna al primo contenuto del media corrente (CD, DVD o chiavetta USB). 45. DOWN/REV Se premuto una volta passa alla traccia precedente (audio o video). Se tenuto premuto riavvolge il contenuto all’indietro. 46. UP/CUE Se premuto una volta passa alla traccia successiva (audio o video). Se tenuto premuto avvolge il contenuto in avanti. 47. PLAY/PAUSE Questo tasto esegue o mette in pausa il contenuto corrente (audio o video). 48. EJECT Questo tasto espelle il disco. 49. DISC Premere questo tasto per selezionare i contenuti di un disco inserito. 50. USB Premere questo tasto per selezionare i contenuti di una chiavetta USB inserita. 51. FOLDER SKIP NEXT Quando un disco o una chiavetta USB hanno contenuti divisi in separate cartelle, premendo questo ... - Page 32 52. FOLDER SKIP PREVIOUS Quando un disco o una chiavetta USB hanno contenuti divisi in separate cartelle, premendo questo tasto si passa alla cartella precedente. 53. IR REMOTE CONTROL RECEIVER Qui è dove è posizionato il ricevitore a Infrarossi: puntare il controllo remoto qui. 54. LCD DISPLAY Le informazioni sul contenuto corrente sono mostrate qui. Informazioni più dettagliate sono mostrate sullo schermo eventualmente collegato alla uscita video (14). 55. USB PORT Slot per la chiavetta di memoria USB. Di seguito sono spiegate le funzioni del controllo remoto. TASTI SEMPRE ATTIVI RIPRODUCENDO SIA AUDIO CHE VIDEO 56. STAND‐BY Premere questo tasto per accendere o mettere in attesa (stand‐by) il lettore. Mettendo in stand‐by il lettore si conserva l’energia della batteria, ma per un maggior risparmio di energia è consigliato l’uso del tasto ON/OFF sul potenziometro (9). I tasti (48)(49)(50) hanno la stessa funzione spiegata in precedenza. I tasti di riproduzione standard (44)(45)(46)(47)(51)(52) hanno le stesse funzioni spiegate in precedenza. 57. MUTE Questo tasto silenzia l’uscita audio del lettore. 58. VOL+ Questo tasto aumenta il volume del lettore. 59. VOL‐ Questo tasto abbassa il volume del lettore. 60. PT+ Questo tasto aumenta il tono e la velocità dell’audio e del video del lettore. 61. PT‐ Questo tasto diminuisce il tono e la velocità dell’audio e del video ...
- Page 33 TASTI CD TRACK 67. NUMBERS Questi tasti permettono di selezionare direttamente una traccia specifica se è inserito un CD audio. I SEGUENTI TASTI HANNO UNA FUNZIONE SPECIFICA DIPENDENTE DAL SUPPORTO MULTIMEDIALE. SE IL TASTO NON HA UN USO PER QUEL SUPPORTO, IL TESTO “INVALID KEY” APPARE SULLO SCHERMO VIDEO. 68. AUDIO Se il supporto ha un contenuto di tipo audio, premendo questo tasto si può scegliere tra: LEFT canale sinistro su entrambe le uscite, RIGHT canale destro su entrambe le uscite, MIXED MONO canali sinistro e destro mixati in mono su entrambe le uscite, STEREO canale stereo standard. Questa informazione è mostrata solo sullo schermo VIDEO. 69. OSD Mentre si riproduce un contenuto multimediale, le informazioni appaiono sul display LCD e sullo schermo TV. Premendo questo tasto è possibile scegliere le informazioni visualizzate. Quando è riprodotto un CD audio, le informazioni possono essere: tempo traccia, tempo traccia rimasto, tempo totale disco, tempo rimanente totale del disco, niente. Quando è riprodotto un DVD video, le informazioni possono essere: tempo del capitolo, info, tempo rimasto del capitolo, tempo trascorso totale del video, tempo rimanente alla fine del video, niente. Per altri file multimediali, le informazioni OSD mostrate variano secondo il contenuto. 70. PROG Usando questo tasto è possibile programmare una sequenza di file multimediali, tracce audio e video. La programmazione dei contenuti deve essere fatta usando lo schermo TV come mostrato nelle seguenti immagini: Premere il tasto play per far partire la sequenza. 71.
- Page 34 Se premuto due volte, si attiva e tutti i file nella cartella corrente sono ripetuti (ovviamente solo se il contenuto del supporto è diviso in più cartelle). Se premuto tre volte, si attiva e tutti i file nel supporto corrente sono ripetuti (per i CD audio standard questa funzione si attiva premendo due volte). La quarta pressione del tasto disattiva la ripetizione e la scritta “RPT” scompare dal display LCD. NOTA: solo lo stesso tipo di contenuto è ripetuto. 73. ZOOM Questo tasto attiva l’ingrandimento digitale delle immagini o del video. Premere il tasto più volte per cambiare lo zoom: ZOOM x2, x3, x4, x1/2, x1/3, x1/4. 74. MENU Il tasto MENU mostra sullo schermo VIDEO il menu contestuale di un DVD standard inserito nell’unità disco. Ogni DVD standard ha un menu contestuale dove è possibile scegliere la lingua, i capitoli, i contenuti speciali: 75. SUB‐T Durante la riproduzione di un film DVD, premendo questo tasto si possono scegliere i sottotitoli se disponibili. ...
- Page 35 76. SETUP Premendo questo tasto, compaiono sullo schermo VIDEO le schermate seguenti, nelle quali è possibile impostare le tipiche opzioni di un riproduttore video. Usare i tasti cursore per navigare tra i menu e le rispettive opzioni. COME SELEZIONARE UN CONTENUTO MULTIMEDIALE CD‐R, DVD‐R e chiavette di memoria USB possono contenere differenti tipi di file. Per scegliere quale tipo di file riprodurre, dopo aver inserito il supporto nel lettore premere STOP immediatamente e la seguente schermata apparirà: Usando I tasti cursore è possibile scegliere fra file audio, foto o video. Scegliere il tipo di file che si desidera riprodurre e premere ENTER. IMPORTANTE: ogni volta che si accende il lettore, questo riconosce il supporto multimediale e riparte riproducendo lo stesso contenuto (audio, video, foto) dalla stessa posizione o dall’inizio. Se l’ultimo contenuto riprodotto era video o foto, quando viene riacceso il lettore riproduce video o foto. Se non si ha uno schermo VIDEO collegato e si vuole riprodurre un file audio dallo stesso supporto occorre RICORDARSI SEMPRE DI RI‐SELEZIONARE IL TIPO DI CONTENUTO MULTIMEDIALE COME AUDIO PRIMA DI SPEGNERE IL LETTORE.
-
Page 36: Sostituzione Della Batteria Del Controllo Remoto
SOSTITUZIONE DELLA BATTERIA DEL CONTROLLO REMOTO Per usare il controllo remoto per la prima volta occorre rimuovere la linguetta adesiva come da figura. Quando la batteria del controllo remoto è scarica, è necessario sostituirla con una nuova dello stesso tipo. Le istruzioni su come aprire il vano batterie sono stampate sul fondo del controllo remoto. ATTENZIONE: RISCHIO DI ESPLOSIONE SE LA BATTERIA NON VIENE MONTATA CORRETTAMENTE. SOSTITUIRE SOLAMENTE CON LO STESSO TIPO: CR 2025 LITHIUM MANGANE SE DIOXIDE BATTERY. ... -
Page 37: Installazione Radio-Microfono Opzionale
INSTALLAZIONE RADIO‐MICROFONO OPZIONALE Seguire le seguenti istruzioni per installare il radio‐microfono opzionale. 1. Rimuovere il coperchio posteriore svitando le 4 viti indicate. 2. Rimuovere il ponticello a filo indicato nella foto 3. Inserire il cavo nel corrispondente connettore sul ricevitore FR1R. 4. Tagliare la fascetta che fissa il cavo al coperchio. 5. Fissare il ricevitore FR1R nel vano usando le stesse 4 viti. ... -
Page 38: Free10 - Specifiche Tecniche
FREE10 – SPECIFICHE TECNICHE Radio microfono Modulazione FM Banda di Frequenza UHF: 863‐865 MHz Stabilità Frequenza ±0.0005% ‐75 dB Sensibilità ‐95 dBm Reiezione Canali S/N > 40 dB Potenza AF 80 dB Distorsione < 85 dB Ricevitore Wireless FR1R Trasmettitore a mano (Handheld) FR1H Trasmettitore a corpo (Bodypack) FR1B (opzionale) Microfono Headset HS1 (opzionale) Amplificatore Altoparlante 1" horn loaded compression driver, 10" woofer Potenza Continua 100 W Potenza di Programma 180 W Distorsione 1% ( at 10W ) Risposta in Frequenza 50Hz ‐ 18KHz, ‐3dB Unità Disco CD/DVD/MP3 player con porta USB Ingressi ... - Page 39 Questa pagina è intenzionalmente lasciata vuota.
- Page 40 PROEL S.p.A. (World Headquarters ‐ Factory) Via alla Ruenia 37/43 64027 Sant’Omero (Te) – Italy Tel: +39 0861 81241 Fax: +39 0861 887862 www.proel.com ...
Need help?
Do you have a question about the FREE10 and is the answer not in the manual?
Questions and answers