Table of Contents
Advertisement
Quick Links
¤
XL
The Extra Loud & Clear
XL-30 AMPLIFIED TELEPHONE
(line powered)
Operating Instructions
©AMERIPHONE®, 12082 Western Avenue, Garden Grove, CA 92841
(714) 897-1111 or (800) 772-2889 TTY/TDD
(714) 897-0808 or (800) 874-3005 VOICE
(714) 897-4703 FAX email: ameriphonecs@plantronics.com web: www.ameriphone.com
∆
M47402
©AMERIPHONE®
XL-30 5270-3321
6/02
11
Advertisement
Table of Contents

Related Manuals for Ameriphone XL-30


Summary of Contents for Ameriphone XL-30
-
Page 1: Operating Instructions
The Extra Loud & Clear XL-30 AMPLIFIED TELEPHONE (line powered) Operating Instructions ©AMERIPHONE®, 12082 Western Avenue, Garden Grove, CA 92841 (714) 897-1111 or (800) 772-2889 TTY/TDD (714) 897-0808 or (800) 874-3005 VOICE (714) 897-4703 FAX email: ameriphonecs@plantronics.com web: www.ameriphone.com ∆... -
Page 2: Important Safety Instructions
Any repairs or alteration made by the Ameriphone Warranty. Do not open this product user to this equipment, or equipment malfunctions, may except as may be directed in this owner’s manual. -
Page 3: Table Of Contents
Introducing the XL-30 Warranty Service ..................2 Sales Receipt ....................2 Help from Ameriphone ................2 Features ....................3 Setting up Your XL-30 Installing the Backup Batteries ..............4 Setting the Dialing Mode ................4 Connecting for Desk or Wall Mount ............4 Desktop Use ..................4 For Wall Mounting ................5 Using Your XL-30 Incoming Voice Volume ................6... -
Page 4: Introducing The
Amplified Telephone from Ameriphone. These Operating Instructions and the associated Quick Operating Guide pro- vide you with the information you need to use your XL-30 effectively and safely. ¤ Read this manual thoroughly before using your telephone. Keep the manual near the telephone for easy reference. -
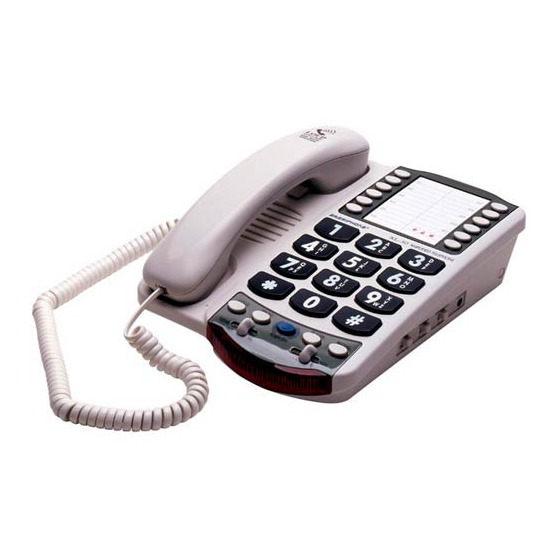
Page 5: Features
Features on the XL-30 PULSE/TONE switch AUDIO OUTPUT jack Phone line connection AUDIO DIAL RINGER RING TONE Off Lo Hi OUTPUT RING TONE switch RINGER volume switch Phone number directory MEMORY button ¤ REDIAL button FLASH button HOLD PROG REDIAL... -
Page 6: Setting Up Your
P (pulse) if you have rotary dialing. Installing the Backup Batteries Connecting for Desk or Wall Mount To add extra brightness to the XL-30’s ring flasher when you receive calls, Desktop Use install one 9 Volt alkaline battery 1. -
Page 7: For Wall Mounting
Setting up Your XL-30 (cont.) Line Cord Handset (Curly) Cord Figure 4 - Connecting the Components Figure 6 - Mounting Bracket for Wall Mounting 2. Lift the handset and listen for a dial tone. 3. Locate a desired wall phone The phone is ready to use. -
Page 8: Using Your
Setting up Your XL-30 Using Your XL-30 (cont.) 6. Once the lower nail head has Incoming Voice Volume been inserted, insert the UPPER You can adjust the volume of incom- nail head into the phone's ing calls by simply sliding the VOL bracket and slide the phone control. -
Page 9: Incoming Voice Tone
Repeated incremental expo- Incoming Voice Tone Caution: sure to amplification levels greater The XL-30 provides extra amplifica- than 18 dB may be harmful to individ- tion in the sound frequency range uals without hearing disabilities. Therefore, do not remove the warn- you need to boost. -
Page 10: Hold
Note: If you pick up an extension company such as Call Waiting and phone on the same line when the 3-Way Calling. XL-30 is on HOLD, the XL-30 will release the HOLD and you can continue your conversation on the extension phone. -
Page 11: Special Features
Special Features 1. Lift the handset and press PROG Programming the Memory as shown in Figure 17. Buttons You can automatically dial twelve 2. Enter the phone number on the programmed telephone numbers keypad (Figure 18) just as you using the memory buttons shown in would dial it normally. -
Page 12: Direct Audio Output
Direct Audio Output The AUDIO OUTPUT socket allows A cochlear adapter cord is available you to connect the XL-30 to a hearing from Ameriphone that can be used to aid, neck loop, cochlear implant or plug the XL-30 directly into a speech other assistive listening devices. -
Page 13: Troubleshooting Chart
XL-30. dialed when button. See: “Programming the memory Your XL-30 has been tested and found to meet Memory buttons”, button pressed the standards for a Class B digital device, as P. 9. specified in Part 15 of the FCC Rules. These See “Setting Up... -
Page 14: Warranty
United States or Canada. Within 30 days of the date of purchase, return your XL-30 to the place where you pur- Ameriphone warrants the XL-30 telephone chased it for immediate replacement. After 30... -
Page 15: Specifications
For Wall Mounting ....5 Direct Audio Output ....10 Tone control range Features........3 Full range: 300 to 3000Hz using one Flash ..........8 slide control. Help from Ameriphone ....2 Hold ..........8 Dimensions Incoming Voice Tone ....7 Size: 9 " x 7" x 3 "...
Need help?
Do you have a question about the XL-30 and is the answer not in the manual?
Questions and answers