Table of Contents
Advertisement
Quick Links
GPSmile 61CS
Portable Automobile Navigation System
Product User Manual
Registered information
HOLUX and GPSmile are trademarks of HOLUX Technology,
Inc. All other trademarks belong to registered companies.
The contents of this manual will be modified
without further notice.
The operation temperature for the product is
between -10℃~60℃.
Operating or recharging in an environment with a
temperature over 50℃ might cause the system to
malfunction. However, this should be considered a
normal phenomenon. Please do not operate under
extreme temperatures.
Advertisement
Table of Contents

Subscribe to Our Youtube Channel
Related Manuals for Holux GPSmile 61CS


Summary of Contents for Holux GPSmile 61CS
- Page 1 GPSmile 61CS Portable Automobile Navigation System Product User Manual Registered information HOLUX and GPSmile are trademarks of HOLUX Technology, Inc. All other trademarks belong to registered companies. The contents of this manual will be modified without further notice. The operation temperature for the product is between -10℃~60℃.
-
Page 2: Safety Precautions
Safety Precautions Select the install location must be cautiously. HOLUX • will not bear any responsibility if the user does not follow the correct device installing procedure. About the power adapter: • 1. Do not use the power adapter in a wet environment. -
Page 3: Table Of Contents
Content Preface ..............1 Copyright ............... 1 Precautions and Notices ..........2 Package Contents ............3 Device and Main Accessory ........3 Motorbike RAM Mount Accessory (Optional) ..4 Optional accessory ..........4 Basic Operation ............5 Introduction............5 Front View ............5 Rear View ............ - Page 4 Time/ Language ..........28 Time Format ..........29 Time Zone ............. 30 Language ............31 Bluetooth............32 System setup ............ 36 GPS ............... 37 Factory Reset ..........39 Shortcut ............40 Mass Storage Mode ........45 Version Information ........47 Calibrate Screen ..........
-
Page 5: Preface
Please read all instructions thoroughly for a full understanding of the products’ features. Copyright Without the written consent of HOLUX Technology, Inc, this manual, including the product and the software, may not be duplicated, transmitted, recorded or saved on storage devices. -
Page 6: Precautions And Notices
Precautions and Notices Please thoroughly read this manual of operating instructions and explanations. Only use original factory approved batteries and accessories to prevent unexpected damage. If the correct procedures were not followed for operation or incompatible accessories were connected, this is a violation of the warrantee agreement and will automatically void the warrantee. -
Page 7: Package Contents
Package Contents Device and Main Accessory Your product should include the following accessories: GPSmile 61CS Cradle DC-DC Adapter Car Charger Screw kit (main accessory) -
Page 8: Motorbike Ram Mount Accessory (Optional)
Motorbike RAM Mount Accessory (Optional) 1. U-bolt Rail Mount 2. Device Base Plate 3. Motorcycle Handlebar 4. Double Socket Arm Base 5. Plastic Cushion 6. Square Rubber Neck 7. Screw kit (bolts, washers, spacers, nuts for motorbike RAM mount) Optional accessory Bluetooth headset... -
Page 9: Basic Operation
Basic Operation Introduction Front View Main menu button 4.3’’ LCD touch screen Power button Rear View Micro SD card slot (Under battery cover) Mini-USB connector (Under battery cover) Battery cover... -
Page 10: Accessories
Accessories Cradle Screw I/O cap I/O interface... -
Page 11: Getting Started
Getting Started Install Cradle 1. Loosen the screw of screw cradle top. 2. Open the cap of cradle top. 3. Open the I/O cap. - Page 12 4. Insert the device concave into the cradle tabs. ※ Please make sure the I/O pin is not wet or dirty. Concave 5. Slide the GPS into the cradle fitting holes to secure. 6. Make sure the device is tightly fixed with the bracket, and gently close the cradle...
-
Page 13: Remove Cradle
Remove Cradle 1. Loosen the screw of cradle top. 2. Open the cradle cap and remove the device. 3. Restore the I/O cap... -
Page 14: Install Motorcycle Ram Mount (Optional)
Install motorcycle RAM mount (Optional) 「A」Device Base Plate 「B」Double Socket 「C」Motorcycle Handlebar Base Thread the bolts and nuts (screw kit of main accessory) to attach the「A」to cradle. Tighten the nuts to secure the「A」. - Page 15 There are two solutions to install Motorcycle RAM mount: 「motorcycle handlebar」or 「brake/ clutch」. Method 1: To install at handlebar with U- bolt (1) 「U-bolt」slip into 「Square rubber Neck」to protect the handlebar from scratching.
- Page 16 (2) Place the U-bolt around the handlebar, and thread the ends through the 「C」. (3) To avoid slip, place 「plastic cushion」 between「U-bolt」 and handlebar. (4) Tighten the nuts to secure the base. Do not over tighten.
- Page 17 Method 2: To install at clutch/brake clamp bracket (1) Remove the two factory bolts on your clutch/brake clamp bracket. (2) Thread the new bolts (Screw kit of RAM mount) through the washers,「C」, spacers, and clamp bracket. (3) Tighten the bolts to secure the base.
- Page 18 Attach the ball of the 「C」with one side of 「B」. Align the ball of the 「A」with the other side of「B」. Tighten the knob slightly.
- Page 19 ※ Note: Damage due to modifications, improper installation, road hazards or accident, are not covered. HOLUX does not liable for any injury, loss, or damage, direct or consequential, arising out of improper installation, or inability to use product.
-
Page 20: Install/ Remove Battery
Install/ Remove Battery Please make sure the battery is installed before using the device. 1. Open the battery lid. 2. Install or Remove the battery. Printing side facing up 3. Restore the battery lid. -
Page 21: Charging Battery
Charging Battery Connect the car charger or AC adapter to charging. The charging temperature for the product is between 0℃~45℃. 1. Open the battery lid. AC adapter 2. Connect the USB adapter to a wall outlet. ※ AC adapter (5V/2A) is an optional accessory. -
Page 22: Install Sd Card (Optional)
Install SD Card (Optional) 1. Open the battery lid and remove the battery. 2. Open SD card slot. 3. Insert SD card with its chip facing down and flat into the SD card slot. - Page 23 4. Push upward to lock the SD card slot. 5. Put into the battery. 6. Restore the battery lid.
-
Page 24: Device Connection Diagram
Damage due to modifications, improper installation, road hazards or accident, are not covered. HOLUX does not liable for any injury, loss, or damage, direct or consequential, arising out of improper installation, or inability to use product. -
Page 25: Operating Methods
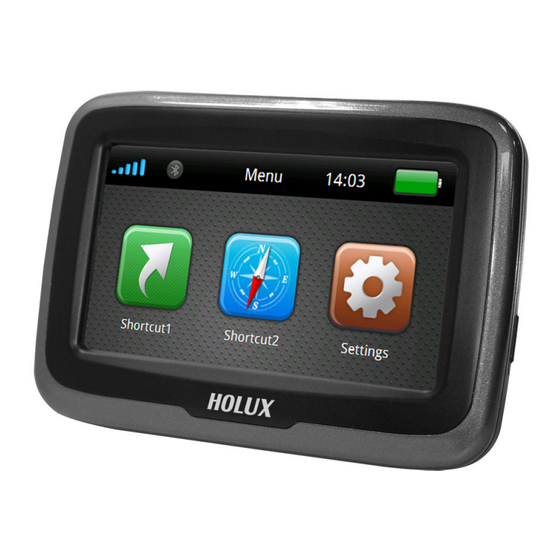
Operating Methods Startup/ Shutdown Please press and hold the power button for several seconds to turn on/ off the device. ON/OFF Power button When the device is turned on, the screen will show the main screen consisting of three functions: Shortcut1, Shortcut2 and settings. -
Page 26: Hot Key
Hot key Press the [Hot key] to enter the [Brightness/ Volume] setup menu. Click button on the bottom-left corner screen to access Bluetooth setup menu. Hot key For details, please refer to the [Brightness/Volume] and [Bluetooth] sections. -
Page 27: Battery Status
Battery Status The icon displays the remaining battery power. The icon means the battery power is lower than 15%, please charge the battery immediately. -
Page 28: Function Menu
※ For first setting, you can click the icon directly to enter 「Setting」- 「Shortcut」menu to setting. ※ Notes: .GPSmile 61CS is only compatible with WinCE 6.0 programs. .Each 3rd party application has different settings of COM port and screen resolution. Therefore, Holux does not guarantee the compatibility of each program. -
Page 29: Settings
Settings After starting up the system, select the [Settings] button to enter. The settings menu appears as shown above. The following sections describe these buttons and functions. You can customize the device settings such as brightness/ volume, Time/Language, Bluetooth, and System. -
Page 30: Brightness/ Volume
Brightness/ Volume Click [Brightness/volume] button to access Brightness/volume setup menu. Select button to increase/decrease brightness. There are ten levels. Select button to adjust volume. There are ten levels. Click button to go back to the previous page. - Page 31 ※Tip: Press the [Hot key] on the top of the device to quickly access [Brightness/ Volume] setup menu.
-
Page 32: Time/ Language
Time/ Language Click [Time/Language] button to access Time/ Language setup menu. -
Page 33: Time Format
Time Format Select [Time Format] to enter time format setup menu. Select preferred time format from the menu. Click button to go back to the previous page. -
Page 34: Time Zone
Time Zone Select [Time Zone] to enter time zone setup menu. Select button to choose the correct time zone. Click button to go back to the previous page. -
Page 35: Language
Language Select [Language] to enter language setup menu. Select preferred language from the menu. Click button to go back to the previous page. -
Page 36: Bluetooth
Bluetooth Click [Bluetooth] button to access Bluetooth setup menu. Click button to search bluetooth devices. - Page 37 The graphic shown below indicating the Bluetooth is searching new devices. During the Bluetooth searching process, users can cancel the process by click button. Press the button and a message appears on the screen; press the button to exit the search, or press the button to continue searching.
- Page 38 After completed the scanning process, GPSmile 61CS will display a list of scanned devices. Select the particular Bluetooth device from the list, and click the "Connect” button to enable the function.
- Page 39 When no devices were found during the scanning process, the following message will be shown on screen. Click button to go back and retry the Bluetooth scanning process again.
-
Page 40: System Setup
System setup Click [System] button to access system setup menu. In system setup menu, the items contain [GPS]、[Factory Reset]、[Shortcut]、[Mass Storage Mode]、[Version Information] and [Calibrate Screen]. The followings describe these buttons and functions. -
Page 41: Gps
Satellite signal Satellite strength number Positioning status GPS measured GPS Estimated Height Position Error ※ When searching satellite signal, GPSmile 61CS will display 「Acquiring」. When「3D fixed」is displayed, 61CS has fully acquired the GPS signal and is ready for use. - Page 42 Reset GPS Click button to reset GPS. Click button to go back to the previous page. Note: When the device is not in use for more than 3 days, reset GPS will allow 61CS to acquire the GPS signal much faster!
-
Page 43: Factory Reset
Factory Reset Select [Factory Reset] to restore the factory default settings. Click button to restore to factory defaults. Click button to go back to the previous page. ※ Note: once the device is reset to factory defaults, all settings you set will be erased. -
Page 44: Shortcut
Shortcut Select [Shortcut] to access shortcut setup menu. To set shortcuts on main menu to a program, please see the example below on how to select the shortcuts. - Page 45 To set the shortcut1: Step1. Click [Shortcut1] icon to enter shortcut1 setup menu. On the shortcut1 page, set [Application Path], [Name] and [Icon]. Step2. Click [Application Path] to enter folder list page. Select button to choose the correct folder icon. Click the .exe file in folders directly to specify the program as the...
- Page 46 ※ Note: If you store the application program in “Resident Flash” and “SD card”; click [Application Page] icon, the page will display “Resident Flash” and “SDMMC (SD card)” two folders. ※ How to place files in SD card: (1) Create a folder in SD card.
- Page 47 Step3. Click [Name] to enter input title menu. Use digital keypad on the screen to input the title name. You can input English (uppercase/ lowercase), number and symbol. After input value, click to save the value and return. Click button to go back to the previous page.
- Page 48 Step4. Click [Icon] to enter the icon list menu. Select button to switch the icon list page, and click the icon to setup directly. Click button to go back to the previous page. Step5. After input [Application Path], [Name] and [Icon], click to save the setting.
-
Page 49: Mass Storage Mode
Mass Storage Mode Select enter [Mass Storage Mode] and connect device to a computer, SD card files are now accessible from the connected PC. The page below indicates the device not yet connected to a... - Page 50 The page below indicated the device is now connected to a...
-
Page 51: Version Information
Version Information The screen displays the OS and AP version information. -
Page 52: Calibrate Screen
Calibrate Screen Select [Calibrate Screen] to start the screen calibration procedure. Use the finger/stylus and touch the cross at the center of the screen. Continue the calibration by touching the cross. The system setting page will return when adjustment is finished. -
Page 53: Warranty Statement
Holux Technology, or repairs done by anyone other than Holux Technology and authorized retail/service providers. -
Page 54: Technical Support
Technical Support If there are any questions regarding the use of this • product, please log on to the website www.holux.com and see the FAQ. Maintenance Service HOLUX Technology, Inc. +886-3-6687000 website: www.holux.com FAQ: FAQ.holux.com Contact your nearest dealer, for further support. -
Page 55: Federal Regulations
Federal Regulations This device complies with Part 15 of the FCC rules. Operation is subject to the following two conditions: (1) This device may not cause harmful interference, and (2) this device must accept any interference received, including interference that may cause undesired operation. FEDERAL COMMUNICATIONS COMMISSION INTERFERENCE STATEMENT This equipment has been tested and found to comply with... - Page 56 grantee of this device could void the user's authority to operate this equipment. RF Exposure Warning This equipment must be installed and operated in accordance with provided instructions and the antenna(s) used for this transmitter must be installed to provide a separation distance of at least 20 cm from all persons and must not be co-located or operated in conjunction with any other antenna or transmitter.
Need help?
Do you have a question about the GPSmile 61CS and is the answer not in the manual?
Questions and answers