
Subscribe to Our Youtube Channel
Related Manuals for Shure LX1


Summary of Contents for Shure LX1
-
Page 1: User Guide
LX Wireless System LX Wireless System User Guide 2002, Shure Incorporated Printed in U.S.A. 27D8654 (BK) -
Page 2: Read Me First
English READ ME FIRST! To get your system up and running in just a few minutes, follow the simple in- structions on this page. For more detailed information, refer to the sections of this guide that apply to your system. Receiver Connections 1. -
Page 3: Table Of Contents
........Connecting a Lavalier Microphone or Instrument Cable to the LX1 . -
Page 4: System Components
Each LX system contains a combination of the following items: • One of the following transmitters: LX1 Body-Pack Transmitter, with your choice of instrument cable or microphone, LX2 Hand-Held Microphone-Transmitter with your choice of interchangeable micro- phone heads: ... -
Page 5: System Features
WA503 accessory kit lets you front-mount antennas. • Power/Battery Fuel Gauge. The LX1 and LX2 transmitters include a three-light gauge that indicates both “power on” and the amount of battery life remaining. (Refer to the Checking the Transmitter Battery section.) •... -
Page 6: Lx1 Body-Pack Transmitter Features, Controls & Indicators
LX1 BODY-PACK TRANSMITTER FEATURES, CONTROLS & INDICATORS FIGURE 2 1. Antenna. A flexible wire antenna is permanently attached to the bottom of the LX1 body-pack transmitter. For best operation, the antenna must hang in the vertical position, and should not be coiled or bundled. -
Page 7: Lx2 Hand-Held Transmitter Features, Controls & Indicators
Wireless LX2 HANDHELD MICROPHONE-TRANSMITTER FEATURES, CONTROLS, & INDICATORS (FIGURE 3) Ñ Ñ Ñ Ñ Ñ Ñ Ñ Ñ Ñ Ñ Ñ Ñ Ñ Ñ Ñ Ñ Ñ Ñ Ñ Ñ Ñ Ñ Ñ Ñ Ñ Ñ Ñ Ñ Ñ Ñ Ñ... -
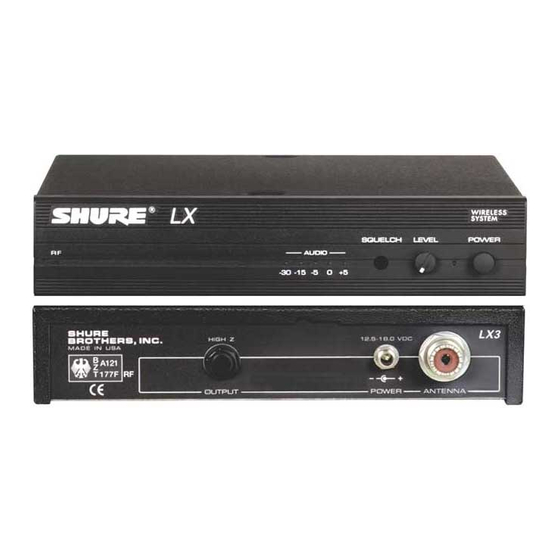
Page 8: Lx3 Receiver Features, Controls & Indicators
9. Antenna Connector. UHF-type connector provides connection to the supplied -wave antenna or to coax cable used with a remote antenna. They also provide connection to the optional Shure WA421 remote antenna cable kit used with optional WA380 telescoping and WA490 cable-type... -
Page 9: Lx4 Diversity Receiver Features, Controls & Indicators
8. Antenna Connectors. UHF-type connectors provide connection to the supplied -wave antennas or to coax cable used with remote antennas. They also provide connection to the optional Shure WA421 remote antenna cable kit used with optional WA380 telescoping and WA490 cable–type -wave antennas. -
Page 10: Receiver Mounting
Step 1. 3. If you are not going to front mount the antennas with a Shure WA503 Front Mount Conversion Kit, insert the plastic plugs into the holes in the brackets. -
Page 11: Receiver Connections
Improved LX4 diversity performance may be obtained by installing one or both anten- na(s) at a remote location and separating them by 1.5 meters (60 inches) or more. Shure WA380 telescoping or WA490 cable-type -wave antennas are recommended for remote location, and they should be connected to the receiver via WA421 Extension... -
Page 12: Transmitter Setup
English TRANSMITTER SETUP LX1 Body-Pack Transmitter Battery Installation (Figure 9) 1. With the transmitter POWER PWR/OFF switch in the OFF position, press down on the OPEN side of the battery compartment cover, slide it back and flip it open. ... -
Page 13: Checking The Transmitter Battery
9V alkaline battery. Actual times depend on the type and brand of bat- tery used. Connecting a Microphone or Instrument Cable to the LX1 (Figure 11) 1. Connect the microphone cable or instrument cable to the transmitter input jack. -
Page 14: Attaching The Lx1 To A Belt Or Guitar Strap
Attaching the LX1 to a Belt or Guitar Strap (Figure 12) Attach the LX1 body-pack transmitter clip to a belt, waistband, or guitar strap by de- pressing the tab marked PRESS and slipping the belt or strap between the transmitter body and the belt clip, as shown in Figure 11. -
Page 15: Operating Lx1 Body-Pack Systems
3. If you are using a lavalier microphone, clip the mic to your tie, lapel, or other gar- ment. If you are using a headset, put the headset on. If you are using a Shure WM98 microphone, insert it into an A98KCS horn mount and clamp it to your horn. If you are using an instrument adapter cable, plug the cable into the instrument. -
Page 16: Operating The Lx2 Hand-Held System
English OPERATING THE LX2 HAND-HELD SYSTEM (FIGURE 15) Ñ Ñ Ñ Ñ Ñ Ñ Ñ Ñ Ñ Ñ Ñ Ñ Ñ Ñ Ñ Ñ Ñ Ñ Ñ Ñ Ñ Ñ Ñ Ñ Ñ Ñ Ñ Ñ Ñ Ñ Ñ Ñ Ñ Ñ Ñ Ñ Ñ Ñ Ñ Ñ Ñ... -
Page 17: Gain And Squelch Adjustment
Wireless GAIN AND SQUELCH ADJUSTMENT Adjusting the Transmitter Audio Gain Level (Figure 16) The transmitter audio gain level has been factory pre-set to provide satisfactory out- put in most applications. However, for loud singers or high-output musical instruments, the preset level may be too high, as indicated by the constant glow of the red light on the receiver audio level meter. -
Page 18: Adjusting The Receiver Squelch Control
Shure WA405 Antenna/Power Distribution Kit or the WA470 Passive Antenna Splitter to minimize the number of antennas and reduce interference. • Use the Shure WA302 Instrument Cable when using the LX1 transmitter with a musi- cal instrument. •... -
Page 19: Troubleshooting
The table below identifies some common problems and their solutions. If unable to solve a problem, contact your dealer or the Shure Service Department at 847-866-5733 (7:30 am to 4:00 pm CST). In Europe, call 49-7131-72140; other international users call Shure in the U.S.A. -
Page 20: Specifications
-20° to 50° C (–4° to 122° F). NOTE: Battery characteristics may limit this range. Overall Dimensions LX1: 83 mm H x 64 mm W x 26 mm D (3 in.) LX2/58, LX2/BETA 58: 241 mm L x 51 mm Dia. (9 x 2 in.) -
Page 21: Furnished Accessories
LX3, LX4 Receivers: Approved under the Notification provision of FCC Part 15. Certified by IC in Canada under TRC-78. LX1, LX2, LX3, LX4: RA Type Approved to MPT 1345, MPT 1350, ETS 300 422. BZT Type Approved to FTZ 17TR 2019, BAPT 122 R1. -
Page 22: Replacement Parts
Licensing: A ministerial license to operate this equipment may be required in certain areas. Consult your national authority for possible requirements. Shure Transmitters Models LX1 and LX2 may be used in the countries and frequency ranges listed in Table 1. - Page 23 Wireless TABLE 1 Country Code LX1, LX2 (169 – 250 MHZ) 230 – 250 MHZ * 174 – 223 MHZ * 174 – 223 MHZ * 174 – 223 MHZ * 174 – 223 MHZ * 174 – 223 MHZ * 174 –...
- Page 24 Shure Incorporated (“Shure”) hereby warrants that these products are free from defects in material and workmanship for a period of one year from date of purchase. At its option, Shure will repair or replace the defective product and promptly return it to you.
- Page 26 Trademark Notices: The stylized Shure logo, and the word “Shure” are registered trademarks of Shure Incorporated in the United States. “Pelican” is a registered trademark of Pelican Products, Inc. SHURE Incorporated Web Address: http://www.shure.com 5800 W. Touhy Avenue, Niles, IL 60714–4608, U.S.A.
Need help?
Do you have a question about the LX1 and is the answer not in the manual?
Questions and answers