JBL LSR4328P Owner's Manual
Studio monitors
Hide thumbs
Also See for LSR4328P:
- Specifications (7 pages) ,
- Owner's manual (51 pages) ,
- Owner's manual (52 pages)
Table of Contents
Advertisement
Advertisement
Table of Contents

Related Manuals for JBL LSR4328P


Summary of Contents for JBL LSR4328P
- Page 1 LSR4328P, LSR4326P Studio Monitors Owner’s Manual...
-
Page 3: Important Safety Instructions
Important Safety Instructions WARNING: Read these instructions. Keep these instructions. • To reduce the risk of fi re or electrical shock, do not expose the apparatus to rain or moisture. Heed all warnings. • The apparatus shall not be exposed to dripping or Follow all instructions. -
Page 4: Table Of Contents
Appendix C: Wiring Requirements ..........34 Appendix D: Mounting Specifications ........37 Appendix E: SPL Calibration ............38 Appendix F: Error Messages and Troubleshooting ....39 Appendix G: ..41 Important Information About LSR4300 Firmware Specifications ................42 Warranty Statement ..............46 JBL Professional Contact Information ........47... -
Page 5: Introduction
Finally, we’ve included a number of technical appendices and specifications at the end of this manual. Note that this manual covers the model LSR4328P and LSR4326P Studio Monitors. Separate owner’s manuals are provided for the model LSR4312SP Subwoofer and for the LSR4300 Control Center software. - Page 6 Indicates that an LED is lit red. Features The LSR4300 Series combines stunning sound and legendary JBL design with innovative new technologies. The end result is a product that is nothing short of revolutionary – a monitoring system suitable for use in the most demanding music, broadcast, and postproduction applications.
- Page 7 Introduction - Features HiQnet™ Networking The LSR4300 Series also incorporates the new Harman HiQnet™ protocol that networks all the speakers in a system together and allows full control from the provided wireless remote control or from any computer via a standard USB connection and LSR4300 Control Center Software.
-
Page 8: Other Features
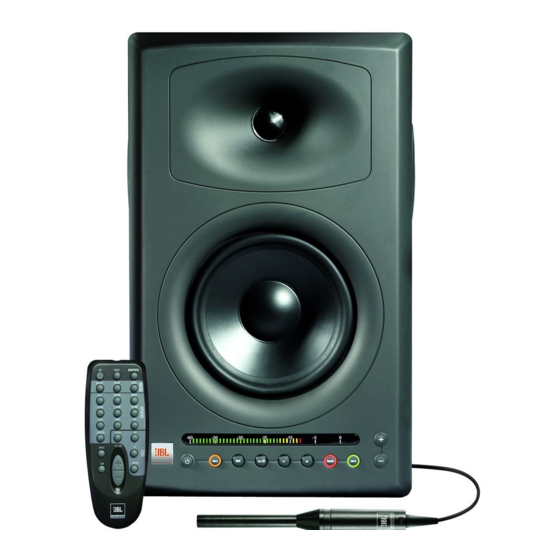
• Custom designed transducers specially engineered to deliver clean, crisp sound. The LSR4328P model features an 8-inch low frequency woofer, while the LSR4326P model offers a 6.25-inch woofer, both coupled with a 1-inch soft-dome high frequency transducer. All transducers are self-shielded, with Neodymium motor structures for exceptional transient response and superb power handling. -
Page 9: Quick Start
• CAT5 networking cable • AC power cord • This owner’s manual The LSR4326/PAK and the LSR4328P/PAK include: • Two speakers, each with the above items • LSR4300 Accessory Kit containing: Calibration microphone and mic clip Infrared wireless remote control... - Page 10 6. Make all required audio connections to the rear panel of your monitors. Both the LSR4328P and LSR4326P models are both able to accommodate one analog and two digital input signals. (See page 23 in this manual for more information on audio connections.)
- Page 11 Quick Start +4dBV (switch IN) or -10dBu (switch OUT) to match the nominal level of the signal source. If you don’t know how to set the switch, consult the documentation for the signal source. Most professional devices operate at +4dBV while most consumer devices operate at -10dBu.
- Page 12 8. Power up your signal source, then press the front panel POWER button on any speaker. All speakers in the system will power on (the JBL Logo will go from dimly to brightly lit.) To avoid “thumps” which can damage your speakers, always power up the signal source FIRST and your LSR4300 monitors LAST.
-
Page 13: Reference
Below is a listing and description of each. 1. Power Indicator – The JBL logo lights at different levels. It is illuminated dimly whenever the LSR4300 is connected to an AC power source, indicating the speaker is in “standby”... - Page 14 The LSR4300 models include protective limiting. Limiting occurs when the output signal exceeds -2 dBFS or the second LED from the right is illuminated (in the LSR4328P) or -5 dbFS or the fifth LED from the right is illuminated (in the LSR4326P).
- Page 15 Reference - Front Panel You can calibrate your LSR4300 system so that the meter display will show how much SPL the speaker is contributing at the listening position. For more information, see Appendix E on page 38 in this manual. 4.
- Page 16 Reference - Front Panel When a brand new LSR4300 speaker is first powered on or if its factory settings have been restored (see page 30 in this manual), the RMC button lights steadily to indicate that an RMC calibration needs to be performed. For more information, see page 25 in this manual.
- Page 17 Reference - Front Panel 9. PRESET – Allows you to select and activate one of six factory EQ presets, or a seventh “current setting” preset. To recall a preset, press the PRESET button. It will flash. While flashing, use the + or – buttons to select the desired preset.
- Page 18 Reference - Front Panel When a preset is selected, the LF and HF buttons will illuminate to indicate whether the currently selected preset has LF and/or HF boost or cut. The preset becomes active when the PRESET button stops flashing (after approximately 3 seconds). If no preset is selected during that time (that is, the +/- buttons have not been pressed), or if you select Preset 0, or if you press the PRESET button a second time, the system will return to its current settings.
- Page 19 Reference - Front Panel S/PDIF input selected (channel A) S/PDIF input selected (channel B) AES/EBU input selected (channel A) AES/EBU input selected (channel B) After changing the input source, the Active Input display on the rear panel will indicate the current selection. When monitoring digital (S/PDIF or AES/EBU) signal, the rear panel DIP switches must be set correctly in order to determine which channel is being reproduced.
-
Page 20: Rear Panel
In addition, by pressing both the + and – buttons at the same time, they can be used to alter the brightness of all front panel buttons and the Meter Display. There are six settings; at the lowest setting, all buttons and meter segments are completely off, and only the JBL logo glows to indicate power. - Page 21 Reference - Rear Panel 4. RMC Microphone Input – 1/8″ connector for the supplied RMC calibration microphone. CAUTION: This input connector provides +15 volts of phantom power, so be sure to not connect any device other than the supplied RMC calibration microphone to this connector.
-
Page 22: Remote Control
Reference - Remote Control Remote Control The provided infrared wireless remote control allows you to make adjustments to your LSR4300 system without leaving the mix position. The remote control duplicates all the controls found on the speaker front panel (such as power on, volume adjust, soloing, input select, EQ adjustment and preset selection) and adds the following extra functions: •... - Page 23 4. SUBWOOFER controls – These controls have no function with LSR4328P and LSR4326 monitors; they are used to access various features of the LSR4312SP subwoofer.
-
Page 24: Speaker Placement
Ideally, they should be placed on suitable speaker stands and well away from boundaries such as walls, ceilings, and large pieces of furniture. The LSR4328P and LSR4326P are equipped with mounting points, to allow wall and ceiling mounting using industry-standard mounting hardware. -
Page 25: Ac Power Connections
It also makes it possible for all speakers in the system to be controlled using the supplied wireless remote control and/or LSR4300 Control Center Software. Up to eight LSR4328P or LSR4326P speakers can be interconnected in a single network. HiQnet enables coordinated RMC calibration so sound arriving at the mix position from all speakers is precisely balanced. - Page 26 Reference - AC Power Connections/Network Connections and DIP Switch Settings The illustrations below show typical network interconnections for both stereo and surround sound use. Networking interconnections and DIP switch settings for stereo use Networking interconnections and DIP switch settings for surround use At least one LSR4300 monitor in a networked system must have its LEFT DIP switch set to ON.
-
Page 27: Audio Connections
Reference - Audio Connections Audio Connections The LSR4328P and LSR4326P speakers are equipped to accommodate a range of analog and digital signal input sources. You can connect two digital sources and one analog source to each speaker and switch between them using front panel controls, or the wireless remote control and/or LSR4300 Control Center software. -
Page 28: Rmc Room Mode Correction
Reference - Audio Connections/RMC™ Room Mode Correction To route an incoming AES/EBU two-channel signal to another speaker, use an cable with XLR plugs on both ends to connect the AES/EBU OUT of the first speaker to the AES/EBU IN of the second speaker. -
Page 29: Performing An Rmc Calibration
Performing An RMC Calibration To get the benefit of JBL’s revolutionary RMC technology, RMC calibration should be performed The RMC calibration process is simple and easy, taking only a few moments to complete. RMC settings remain in memory even after the speakers are powered down, so typically the process only needs to be performed one time. - Page 30 Reference - Performing An RMC Calibration Following are step-by-step instructions for performing an RMC calibration: 1. Make sure all LSR4300 monitors are positioned as intended. 2. Using the mic clip, attach the provided calibration microphone to a mic stand and place the mic at the mix position, oriented vertically, at ear level.
- Page 31 Reference - Performing An RMC Calibration Do not block the signal coming from any speaker while performing RMC calibration. 5. Each speaker in the system will sequentially emit a reference tone and its meter will show a left-to-right “chase” pattern that indicates the system is calibrating. The RMC procedure produces a fairly loud swept sine wave calibration tone that can surprise you when you hear it for the first time.
-
Page 32: Equalization
Reference - Performing An RMC Calibration/Equalization The supplied calibration microphone must be connected to perform RMC. If the RMC button is pressed and held for 3 seconds or longer and no mic is connected, the meter display will flash to indicate an error condition, and all RMC settings currently in memory will be erased. - Page 33 Reference - Equalization The LSR4328P and LSR4326P provide six factory EQ presets. (A complete listing of all parameters for the factory presets is presented in Appendix A). To recall a preset, press the front panel PRESET button on any networked speaker (it will begin blinking), then use the + or –...
-
Page 34: Restoring Factory Settings
Reference - Restoring Factory Settings/ LSR4300 Control Center Software Restoring Factory Settings Setting all DIP Switches to the ON position and re-powering a speaker clears all user settings (such as RMC calibration and EQ settings) stored in the speaker’s memory. To clear the memory of a speaker and recall the factory EQ presets: 1. -
Page 35: Appendix A: Eq Presets
Appendix A: EQ Presets Appendix A: EQ Presets All factory EQ presets use an LF corner frequency of 500 Hz and a HF corner frequency of 2.0 kHz. Preset 1: LF 0 dB, HF = +2.0 dB • Preset 2: LF +1.5 dB, HF = 0 dB •... - Page 36 Appendix A: EQ Presets Preset 4: LF 0 dB, HF = -1 dB • Preset 5: LF 0 dB, HF = -2 dB • Preset 6: LF -1.5 dB, HF = 0 dB •...
-
Page 37: Appendix B: System Block Diagram
Appendix B: System Block Diagram Appendix B: System Block Diagram... -
Page 38: Appendix C: Wiring Requirements
Under no circumstances should the safety ground wire be removed from the AC power connector. When using balanced sources with the LSR4328P or LSR4326P, either the XLR or T/R/S input connector can be used, since the circuit is common to both. However, both inputs should not be used simultaneously. - Page 39 Unbalanced Sources When using unbalanced sources, there are more possibilities to introduce ground loops into a system. The LSR4328P and LSR4326P offer several ways to help alleviate potential problems with unbalanced equipment. While there are only HOT and GROUND/SHIELD connections from unbalanced sources, it is recommended that high quality twisted pair cable be used.
-
Page 40: Digital Audio Connections
Diagram D details the connections using single conductor shielded cable with a Tip/Ring/ Sleeve or XLR plug for the LSR4328P / LSR4326P input. Single conductor cable should be used as a last resort as it provides the greatest likelihood of problems. The “HOT” (+) signal should be connected to the tip of the Tip/Ring/Sleeve plug. -
Page 41: Appendix D: Mounting Specifications
Appendix D: Mounting Specifications Appendix D: Mounting Specifications Mounting points are provided for use with readily available industry standard mounting brackets. Mounting points are located on the bottom of the LSR4328P and LSR4326P models. Fastener specifications Type: M6 metric thread Length: 1 inch (25.4 mm) plus the thickness of the mounting plate. -
Page 42: Appendix E: Spl Calibration
Appendix E: SPL Calibration Appendix E: SPL Calibration The chart below shows the SPL (Sound Pressure Level) delivered by the speaker when the listening position is 1 meter (3.3 feet), 2 meters (6.6 feet) and 3 meters (roughly 10 feet). You can create a visual reference for any listening distance using a readily-available Sound Pressure Level (SPL) meter and a pink-noise source. -
Page 43: Appendix F: Error Messages And Troubleshooting
Appendix F: Error Messages and Troubleshooting Appendix F: Error Messages and Troubleshooting Under certain circumstances, the meter display on the speaker will indicate an “error message.” Following is a list of conditions that cause an error message to be displayed, and the corrective action required to cancel the error message. - Page 44 Check the fuse. If blown, replace with the spare anywhere on the provided in the fuse holder in the IEC power speaker. connector. If speaker fails to power-up please call JBL Customer Service. Upon boot –up, USB connection and/or Check all network connections to make sure the CAT5...
-
Page 45: Appendix G: Important Information About Lsr4300 Firmware
• If after performing a firmware update, an incorrect firmware type has been loaded, ie: if firmware intended for an LSR4328P has been installed in an LSR4326P, or vice versa, upon power up all LEDs of the display will flash, the LEDs to the left of -15 will be green. -
Page 46: Specifications
Specifications (Unless otherwise noted, all specifications are for both LSR4328P and LSR4326P models) System Frequency Response (+/- 1.5 dB): 50 Hz – 20 kHz (LSR4328P) 55 Hz – 20 kHz (LSR4326P) Enclosure Resonance Frequency: 41 Hz (LSR4328P) 52 Hz (LSR4326P) - Page 47 Specifications Power Rating: 13 watts LSR4326P, 18 watts LSR4328P Full Power Rating (100 hrs. IEC 58 watts IEC Pink Noise LF Channel Only pink noise, 6dB crest Factor): Wattage Rating: AC at 1/8 power IEC Pink Noise 60 watts Maximum Current: AC at maximum power output (audio) 120V AC line 2.2A...
- Page 48 For this reason, any current JBL product may differ in some respect from its published description, but will always equal or exceed the...
- Page 49 Who Pays for What? JBL will pay all labor and material expenses for all repairs covered by this warranty. Please be sure to save the original shipping cartons because a charge will be made if replacement cartons are requested.
-
Page 50: Warranty Statement
LENGTH OF THIS WARRANTY. EXCLUSION OF CERTAIN DAMAGES JBL’S LIABILITY IS LIMITED TO THE REPAIR OR REPLACEMENT, AT OUR OPTION, OF ANY DEFECTIVE PRODUCT AND SHALL NOT INCLUDE INCIDENTAL OR CON- SEQUENTIAL DAMAGES OF ANY KIND. SOME STATES DO NOT ALLOW LIMITA-... -
Page 51: Jbl Professional Contact Information
Product Registration: Register your product online at www.jblpro.com/registration Outside the USA: Contact the JBL Professional Distributor in your area. A complete list of JBL Professional international distributors is provided at our U.S.A.website - www.jblpro.com En Dehors des Etats-Unis: Contacter votre Distributeur JBL Professional. Une liste complète de nos distributeurs internationaux est disponible sur le site web - www.jblpro.com... - Page 52 Part Number: Rev. 101305, 352712-003 09/06...