Table of Contents

Related Manuals for Orion AVM-57188BTG


Summary of Contents for Orion AVM-57188BTG
- Page 1 AVM-57188BTG DVD/VCD/CD/WMA/MP3 PLAYER WITH FM/MW RECEIVER BUILT-IN NAVIGATION SYSTEM INSTRUCTION MANUAL DISP OPEN MUTE AV IN BAND/ POWER PLEASE READ THIS MANUAL BEFORE USING THE EQUIPMENT.
-
Page 2: Table Of Contents
Thank you for buying this product, please read through these operating instructions, so you will know how to operate your model properly. After you have finished reading the instructions, put them away in a safe place for future reference . CONTENTS PRECAUTIONS FRONT PANEL... -
Page 3: Precautions
PRECAUTIONS PRECAUTIONS 1. Be sure to connect the color coded leads according to the diagram. Incorrect connections may cause the unit to malfunction or damage the vehicles electrical system. 2. Be sure to connect the speaker (-) leads to the speaker (-) terminal. Never connect the left and right channel speaker cables each other or to the vehicle body. - Page 4 PRECAUTIONS PRECAUTIONS This unit can play the following discs only: Size of disc Recorded material Type of disc Label on the disc Sound and moving 12cm pictures Sound and moving 12cm pictures 12cm Sound only 12cm Sound only NOTE: The unit is compatible with VCD1.0/2.0/3.0 version and DVCD disc. Do not use your disc with paste Do not attempt to modify the residue or ink attached.
-
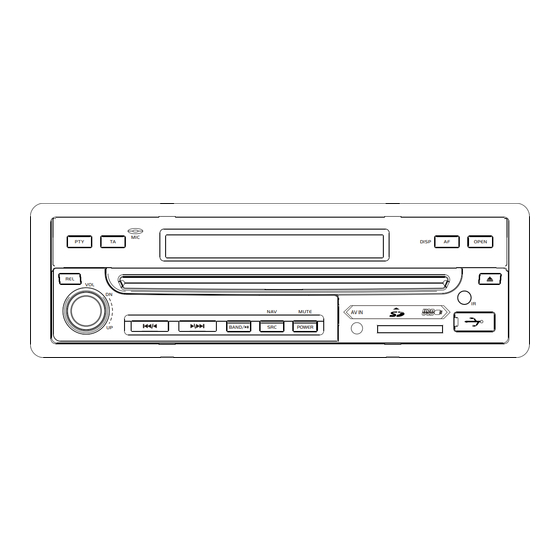
Page 5: Front Panel
FRONT PANEL FRONT PANEL DISP OPEN MUTE AV IN BAND/ POWER TILT MENU... - Page 6 FRONT PANEL 1. MIC 12.SD slot Insert an SD/MMC card, the unit will play 2. TA the files from SD/MMC card automatically. Press this button to turn on/off TA function. NOTE: Once the SD/MMC card could not eject after pressing, just pull it out manually. 3.
-
Page 7: System Menu
SYSTEM MENU The users can perform operation by touching screen directly. RADIO OPERATION RDS OPERATION Display status of the disc MONO EON:OFF REG:OFF 65.00MHz MONO 2: 67.10M 1: 65.00M PTY:NONE 65.00MHz 3: 70.40M 4: 72.50M PTY: 5: 74.00M 6: 65.00M Seek- Seek+ Page2... -
Page 8: System Menu
SYSTEM MENU MULTI-- PLAYER OPERATION SETUP OPERATION TOUCH ON THE TOP LEFT POSITION In DVD mode, the touching screen displays TO ENTER SOURCE INTERFACE. as following after touch at random position. The unit will return to previous mode display screen if any operation is not perform in 5 seconds. - Page 9 SYSTEM MENU SYSTEM SETUP OPERATION 3.Audio Touch on the AUDIO button and the screen will display as following: Clock Sys Key Beep Local Area Volume Front Rear Audio Video Exit L-front Volume:19 Clock Sys R-front Set the time display mode(12H/24H) Front Rear Audio Video...
- Page 10 SYSTEM MENU GPS Mix SW Clock Adjust SW Control Night Lum GPS Volume Touch Adjust Front Rear Audio Video Exit Front Rear Audio Video Exit Clock Adjust adjust the time by touch GPS Mix SW To select item your want to set ON:the navigation guidance does not (hour, minute, second) interrupt the head unit...
- Page 11 SYSTEM MENU SW Control SW CONTROL INSTALLATION To set 8 short-cut bottons for the Before installing the SW control, steering wheel remote control. please make sure all the wires are in good condition. For installation, please refer to the illustrations below: 1.
-
Page 12: Remote Control
REMOTE CONTROL REMOTE CONTROL Installing the battery Slide the tray out on the back of the remote control and insert the battery with the plus (+)and minus(-)poles pointing in the proper direction. Use and care of the remote control Point the remote control in the direction of the front panel to operate to use it. - Page 13 REMOTE CONTROL 7. GOTO/ # 1. POWER/ In DVD mode, press the button and the Press the button to turn on the unit; cursor button to select TITLE, C HAPTER, Press and hold to turn off the unit. AUDIO, S UBTITLE,A NGLE ,T T TIM E, In power on,p ress to mute the device.
- Page 14 REMOTE CONTROL /PTY 18. CLEAR In radio mode, press to switch the RDS Press the button to clear the erroneous program type. number what you import. In DVD/VCD mode, press to play slowly. 12. ZOOM/AF Press to pause playing and press again In radio mode, press to function AF on/off.
-
Page 15: Basic Operation
BASIC OPERATION 1.Reset the Unit Note: When operating the unit for the first After selecting the desired mode, time or after replacing the car battery, you can adjust the current level by you must reset the unit. pressing VOL buttons on the Remove the guard against theft front panel remote control. -
Page 16: Radio Operation
RADIO OPERATION Select radio mode 3.Recalling a preset station Press SRC button on the remote control A total of 30 preset stations (18-FM,12-MW) or on the panel to select RADIO mode. are available in memory. NOTE: Touch on left top area of the Press button on the remote control screen to display the sources screen... -
Page 17: Radio Operation
RADIO OPERATION RDS (RADIO DATA SYSTEM) OPERATION PTY(Programme Type)Tuning The RDS allows you to receive a The PTY function allows you to search variety of information such as traffic for stations with a particular Program information,station names,and to Type. Touching Page1 button on the radio automatically retune to a stronger display screen to switch to the RDS screen. -
Page 18: Bluetooth Operation
BLUETOOTH OPERATION HANDS-FREE PHONE *The Bluetooth setting is required for a The unit is compatible with Bluetooth mobile phone. Read the Owner s Manual international standard wireless of the mobile phone. cummunication technology. *After paired ,the unit can connect with You can place a hands-free call by a the mobile phone automatically. - Page 19 BLUETOOTH OPERATION Receiving a Call BLUETOOTH AUDIO FUNCTION When a call is received, a received call Audio information of a bluetooth sound rings ,and the calling is announced compatible mobile phone,portable in the display. Press button on player,etc.,is by wireless controll- the screen to starts the call.
-
Page 20: Dvb-T Operation
TV OPERATION 4. Search a channel TV OPERATIONS 4.1 Automatic Searching There are three ways to search a channel downwards automatically as below: press button on the remote control; press button on the panel; PAL-BG 0: 44.25 1: 55.75 touch on SEEK- button on the touch screen. Ant-1 CH:0 2: 63.75... -
Page 21: Dvd/Vcd/Cd Operation
DVD/VCD/CD OPERATION DVD OPERATION 5.Playing Tracks in Random Order 1.Basic operation uring VCD/CD playback, when pressing (1) Insert a disc into the disc loading RDM button, RANDOM will slot,the unit will play automatically appear on the display, the unit plays * You can eject a disc by pressing any track at random and the number button. - Page 22 DVD/VCD/CD OPERATION 12.Changing the audio language 9.On-screen display an be done by pressing the AUDIO In DVD mode, press to display Title button to switch between languages Elapsed, Title Remain, Chapter and audio systems during playback. Elapsed, Chapter Remain, Display Off. Selection options switch as follows: In VCD/CD mode, press to display Single Elapsed, Single Remain, Total...
- Page 23 DVD/VCD/CD OPERATION 18. Changing the viewing angle discs own preferencewill be used. *Regarding SETUP MENU, please refer to (Multi-angle) With DVDs featuring multi-angle (scenes the following pages for more details. shot from multiple angles) recordings, *Some functions may vary depending on press the ANGLE button to switch bet- the types of models or formats of the disc.
-
Page 24: System Setup
SYSTEM SETUP Some DVD titles may be recorded in special SYSTEM SETUP formats. In such cases, the DVD titles will When you press SETUP button on the always appear on the screen in their original remote control or press MENU button on the format,regardless of which TV display format panel, the setup menu will be displayed. - Page 25 SYSTEM SETUP 2.1 DOLBY DIGITAL SETUP PAGE 3. PREFERENCE SETUP PAGE 3.1 AUDIO AUDIO SETUP PAGE DOLBY DIGITAL SETUP AUDIO: Sets the preferred audio language as the default when playing DVD. (IF DVD support these languages) GO TO SPEAKER SETUP PAGE PREFERENCE PAGE ENGLISH AUDIO...
- Page 26 SYSTEM SETUP 4. PASSWORD SETUP PAGE 3.4 PARENTAL PARENTAL: The parental control function 4.1 PASSWORD MODE works in conjunction with the different censorship classes assigned to DVDs. PASSWORD MODE: Sets the function These classes help to control the types operation to be ON for locking the parental of DVDs that the family watches.
- Page 27 SYSTEM SETUP SETTING THE TV SCREEN SIZE Multi-aspect ratio suit to different TV screen size. TV Screen Size Picture format 16:9 on Disc Pan Scan Letter-box Wide Screen 16:9 Function supported by DVD discs There are many functions available on DVD discs and the functions vary per player and per manufacturer.
-
Page 28: Mp3 Operation
MP3 OPERATION Note: MP3 OPERATION * This function can be operated using the remote control or touch top right 1.Playing a disc, an SD/MMC card or corner of screen to be functioned. a USB device containing files * If you make a mistake, press CLEAR Connect a USB device or insert a disc into button to clear. -
Page 29: Navigation Operation
NAVIGATION OPERATION NAVIGATION OPERATION he GPS system can navigate with voice hen you do not drive on your preset line, the system will reset the line automatically to get the destination. Press OPEN button on the unit to open the TFT screen, the SD card slot is on Press button on the touchable screen this position (shown as illustration). -
Page 30: Installation
INSTALLATION INSTALLATION Notes Before finally installing the unit, connect the wiring temporarily, making sure that all connections are correct and the unit and the system are properly working. Use only the parts included with unit to ensure proper installation. The use of unauthorized parts can cause malfunctions and can void the guarantee. - Page 31 INSTALLATION INSTALLATION Install the unit Detach the unit 1.Install the mounting bracket into the 1.Detach the removable trim ring dashboard of the car. And adjust the 2.Insert the keys supplied to the unit at mounting bracket to horizontal both sides of the unit (shown as illustrated) 2.Fix the mountiong bracket into place until they click.
-
Page 32: Cable Connection
CABLE CONNECTION CABLE CONNECTION Black/Black Plug RADIO ANTENNA INPUT Black/White Plug AUX IN-L Black/Black Plug GPS ANT Brown/Yellow Plug REVERSE VIDEO IN Brown/Brown Plug Black/Yellow Plug WOOF OUT EXOTERIC VIDEO INPUT Gray/Yellow Plug REAR VIDEO OUT 1 Dark gray/White Plug AUDIO OUT F.L Gray/Yellow Plug REAR VIDEO OUT 2... -
Page 33: Specification
SPECIFICATION GENERAL power requirement ----------------------------------------------------------------------- DC/12V(10.8~16V) grounding system ---------------------------------------------------------------------------------negative type max: current consumption ---------------------------------------------------------------------------- 15 ADC max: power output --------------------------------------------------------------------------------------- 4X50W load impedance ------------------------------------------------------------------------------------ 4 dimensions--------------------------------------------------------------------------------------178X165X50MM weight----------------------------------------------------------------------------------------------------------2.6KG DVD PLAYER S/N ratio ---------------------------------------------------------------------------------more than 70dB(1kHz) dynamic range -------------------------------------------------------------------------more than 70dB(1kHz) distortion ------------------------------------------------------------------------------------------less than 0.2% video output ------------------------------------------------------------------------------ 1.0Vp--p+0.2V/75 audio output (RCA) -------------------------------------------------------------------- 1.5Vrms+0.3V 10K FM TUNER... -
Page 34: Trouble Shooting
TROUBLE SHOOTING TROUBLE SHOOTING Common problems Symptom Remedy Cause Power doesn't switch ON . Leads and connectors are Confirm once more that all connections The unit doesn't operate. incorrectly connected are correct A fuse has blown Fix the problem causing the blown fuse and replace the old fuse with a new one of the same capacity Noise and other factors are... - Page 35 TROUBLE SHOOTING Problem during DVD playback Symptom Remedy Cause Playback is not possible The loaded disc has a different Replace the disc with one featuring the region number from this unit same region number as this unit Dialog language (and The DVD playing does not You cannot switch among multiple subtitle language) can not...
Need help?
Do you have a question about the AVM-57188BTG and is the answer not in the manual?
Questions and answers