Allworx 6x Installation Manual
Hide thumbs
Also See for 6x:
- Installation manual (22 pages) ,
- Overview (9 pages) ,
- How to configure (6 pages)
Table of Contents
Advertisement
Quick Links
Advertisement
Table of Contents

Related Manuals for Allworx 6x


Summary of Contents for Allworx 6x
- Page 1 ® Allworx 6x Server Installation Guide...
- Page 2 Allworx. © 2009 Allworx Corp, a wholly owned subsidiary of PAETEC Holding Corp. All rights reserved. Allworx is a registered trademark of Allworx Corp. All other names may be trademarks or registered trademarks of their...
-
Page 3: Table Of Contents
12.3 Industry Canada............................16 12.4 Radio and Television Interference ......................16 13 Wall Mount Template ..........................18 300 Main Street • East Rochester, NY 14445 • Toll Free 1-866-ALLWORX • 585-421-3850 • www.allworx.com © 2009 Allworx. All rights reserved Version 2. Revised: January 26, 2009... -
Page 4: Installation Overview
7. Network Installation Each of these steps will be described in the following sections. 300 Main Street • East Rochester, NY 14445 • Toll Free 1-866-ALLWORX • 585-421-3850 • www.allworx.com © 2009 Allworx. All rights reserved Version 2. Revised: January 26, 2009... -
Page 5: Unpacking
2 Unpacking Open the box and carefully unpack it. Save all shipping and packaging materials. Verify all items against the parts list shown in Table 1. If any items are missing, contact your dealer or Allworx Customer Support at 866- 255-9679. -
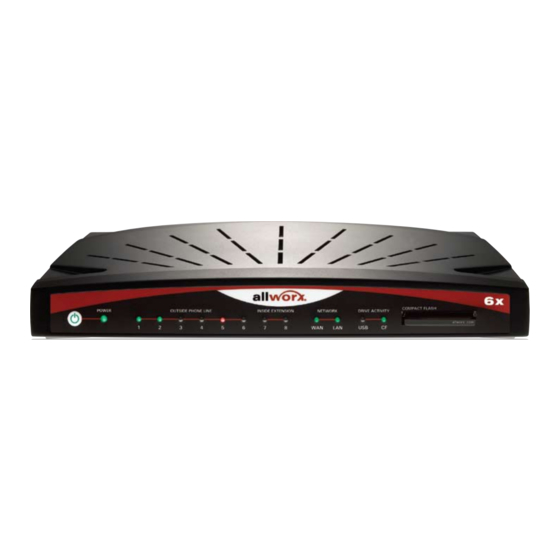
Page 6: Chassis Views
Drive Activity LEDs – Green indicates mounted drive; flashes off for activity Compact Flash Slot – Accepts Type I or Type II Compact Flash Card 300 Main Street • East Rochester, NY 14445 • Toll Free 1-866-ALLWORX • 585-421-3850 • www.allworx.com © 2009 Allworx. All rights reserved Version 2. - Page 7 Ground connecting screw 5.5 x 2.1 mm power jack. Input 12 VDC @ 1A, center positive 300 Main Street • East Rochester, NY 14445 • Toll Free 1-866-ALLWORX • 585-421-3850 • www.allworx.com © 2009 Allworx. All rights reserved Version 2. Revised: January 26, 2009...
-
Page 8: Mechanical
1/8” between the bottom of the screw head and the wall. 3. Slide unit onto mounting screws. Adjust screw height if necessary to insure a snug fit against the wall. Caution: The Allworx server must be securely mounted to the wall to avoid equipment damage or personal injury. - Page 9 6x Server Installation Guide Figure 3: Wall Mount Orientation Correct Orientation Wrong Orientation 300 Main Street • East Rochester, NY 14445 • Toll Free 1-866-ALLWORX • 585-421-3850 • www.allworx.com © 2009 Allworx. All rights reserved Version 2. Revised: January 26, 2009 Page 5...
-
Page 10: Electrical
Red very briefly indicating that the reset sequence has begun. Once the 6x is in Safe Mode, the front panel lights will be displayed as shown in Table 3. Front Panel Light... -
Page 11: Accessories (Optional)
If more space is desired, use the USB External Hard Drive option (see section 6.3) or 300 Main Street • East Rochester, NY 14445 • Toll Free 1-866-ALLWORX • 585-421-3850 • www.allworx.com © 2009 Allworx. All rights reserved Version 2. -
Page 12: Door Relay/Paging Amplifier/Diagnostic Port
The contacts are rated 30 VDC @ 1A. Warning: Do not exceed the contact rating. 300 Main Street • East Rochester, NY 14445 • Toll Free 1-866-ALLWORX • 585-421-3850 • www.allworx.com © 2009 Allworx. All rights reserved Version 2. - Page 13 Table 4: Door Relay Pinout Should Allworx Customer Support instruct you to capture diagnostic data, connect a null modem serial cable from the Door and Paging Relay connector to the serial port on a PC. Configure the PC port in accordance with...
-
Page 14: Configuring Handsets And Lines
7.2 SIP Allworx and 3 -party SIP handsets connect to the server through the site’s network to the 6x LAN port. See Section 8, Server Configuration and Section 9, Data Network for more information. The Allworx 6x supports SIP trunks for outside line services. Refer to the Allworx System Administrator’s Guide for information on configuring SIP trunks. -
Page 15: Server Configuration
6x Server Installation Guide 8 Server Configuration The Allworx 6x provides an administrative interface to configure and administer the server. The administrative interface is accessed using a web browser. Assuming the network settings are set to their factory defaults, the steps to connect to this interface are: 1. -
Page 16: Data Network
The Local Area Network (LAN) and Wide Area Network (WAN) data network ports are 10BaseT/100BaseTX auto-sensing and auto-MDI/MDIX ports. The Allworx 6x is a sophisticated network appliance that must be properly configured before being connected to the LAN and WAN. -
Page 17: Configuration Example
6x Server Installation Guide 10 Configuration Example Figure 5: Configuration Example 300 Main Street • East Rochester, NY 14445 • Toll Free 1-866-ALLWORX • 585-421-3850 • www.allworx.com © 2009 Allworx. All rights reserved Version 2. Revised: January 26, 2009 Page 13... -
Page 18: Physical And Environmental Specifications
Humidity 15% ~ 90% RH, Non-condensing Table 9: Physical and Environmental Specifications 300 Main Street • East Rochester, NY 14445 • Toll Free 1-866-ALLWORX • 585-421-3850 • www.allworx.com © 2009 Allworx. All rights reserved Version 2. Revised: January 26, 2009... -
Page 19: Regulatory Notices
300 Main Street • East Rochester, NY 14445 • Toll Free 1-866-ALLWORX • 585-421-3850 • www.allworx.com © 2009 Allworx. All rights reserved Version 2. -
Page 20: Industry Canada
There is no guarantee, however, that interference will not occur in a particular 300 Main Street • East Rochester, NY 14445 • Toll Free 1-866-ALLWORX • 585-421-3850 • www.allworx.com © 2009 Allworx. All rights reserved Version 2. - Page 21 A préscrites dans le Règlement sur le brouillage radioélectrique édicte par le Ministere des Communications du Canada. 300 Main Street • East Rochester, NY 14445 • Toll Free 1-866-ALLWORX • 585-421-3850 • www.allworx.com © 2009 Allworx. All rights reserved Version 2.
-
Page 22: Wall Mount Template
6x Server Installation Guide 13 Wall Mount Template 300 Main Street • East Rochester, NY 14445 • Toll Free 1-866-ALLWORX • 585-421-3850 • www.allworx.com © 2009 Allworx. All rights reserved Version 2. Revised: January 26, 2009 Page 18...
Need help?
Do you have a question about the 6x and is the answer not in the manual?
Questions and answers