
Related Manuals for Drive Medical Geo


Summary of Contents for Drive Medical Geo
- Page 1 POWER CHAIR (Item #’s S35001696, S35001697, S35002696, S35002697) OWNER’S MANUAL...
-
Page 2: Table Of Contents
Control panel How to operate your power chair How to set to freewheel mode BATTERY CHARGING AND CARE………………………………………..Charging the battery - Battery Replacing Geo batteries / charger INSPECTION AND MAINTENANCE……………………………………..…. Inspection Regular checking record Battery, fuse and tire Storage TROUBLE SHOOTING AND SPECIFICATION…………….………………... -
Page 3: Preface And Introduction
1 . P R E FA C E A N D I N T R O D U C T I O N Please carefully read this owner’s manual before using the power chair. Improper use of the power chair could result in, injury. -
Page 4: Safety Notice
◆ power chair. ■ The Geo power Chair is only to be used by one person at a time Do not carry passengers on your power chair. (including children) ■ Do not use this power chair to carry or haul goods The maximum weight with occupant is 250 lbs. -
Page 5: While Driving
2 . S A F E T Y N O T I C E ■ Do not use your power chair under any of the conditions. On roads with heavy traffic or roads that are operate, snow-covered, or icy. ◆ Do not drive at night. -
Page 6: While Driving
6. Check the joystick lever to ensure it operates correctly. 7. Make sure the electromagnetic brake works correctly. Warning! Do not set in the freewheel mode when driving on a gradient. ◆ Always re-engage the anti-freewheel device before use. Fail to do so may result in injury. ◆... - Page 7 The Geo Power chair has undergone extensive incline testing. Our results show that the maximum incline your Geo can safely climb is six degrees at maximum weight capacity. Six degrees is the angle of most handicap access ramps. Any attempt to climb a steeper slope may put your scooter into an unstable position.
-
Page 8: Labeling
Labeling Carefully read all the labeling on the power chair before driving it. Do not remove any labels from the power chair. NEVER LIFT POWER CHAIR BY THE FRONT OR REAR SHROUD 2 . S A F E T Y N OT I C E... -
Page 9: Emi
Attention: It is very important that you read this information regarding the possible effects of electromagnetic interference on your Geo power chair. ■ ELECTROMAGNETIC INTERFERENCE (EMI) FROM RADIO WAVE SOURCES... -
Page 10: Parts Introduction
Attention: Other types of hand-held devices, such as cordless phones, laptop computers, AM/FM radios, TV sets, CD players, cassette and small appliances such as electric shavers and hair dryers are not , likely to cause EMI problems to your powered power chair . ■... -
Page 11: Operation
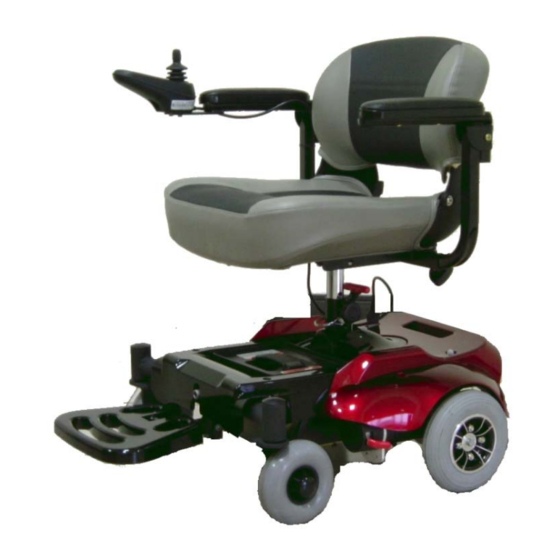
PARTS DESCRIPTION 1﹒ Controller 2﹒ Armrest 3﹒ Seatback 4﹒ Seat 5﹒ Drive Wheel 6﹒ Caster Wheel 7﹒ Footrest 8﹒ Battery Pack 5 . O P E R AT I O N... - Page 12 JOYSTICK AND CONTROLLER Your power wheelchair is operated by a joystick and controller. The Geo is currently available with P&G VR 2 controller. VSI Series CONTROL FUNCTIONS 1. ON/OFF Button 2. Battery Gauge 3. Joystick 4. Maximum Speed / Profile Indicator 5.
- Page 13 ◆ Speed / Profile Decrease Button This button decreases the maximum speed setting or, if the control system is programmed for drive profile operation, selects a lower drive profile. ◆ Horn Button Press the button to sound the horn. ◆ Speed / Profile Increase Button This button increases the maximum speed setting or, if the control system is programmed for drive profile operation, selects a faster drive profile.
- Page 14 Suggestion 1. You should recharge the batteries after each time the power chair is used to ensure maximum range. The batteries should be charged at least once a week, even if the power chair is not used. 2. After charging or replacing a new battery, drive the power chair for 2-3 minutes to make sure the battery capacity is sufficient.
- Page 15 ▇ To remove the seat 1. Turn the power OFF. 2. Make sure the Geo is not in freewheel mode. 3. Pull the seat rotate lever while pulling up on the seat to remove. ▇ To change the seat height 1.
-
Page 16: How To Set To Freewheel Mode
Warning Do not use your Geo Power Chair while the drive motors are disengaged unless you are in the presence of an attendant! Do not disengage the drive motors when on an incline as the power chair may roll down,... -
Page 17: Battery Charging And Care
6 . B AT T E RY C H A R G I N G A N D C A R E BATTERIES The Geo Power Chair uses two long- lasting, 12 volt, deep-cycle batteries. These batteries are sealed ◆... -
Page 18: Battery
◆ We also recommended that the batteries are not charged for more then 24 hours. ◆ When your Geo batteries are fully charged, unplug the charging cable from the wall outlet. ◆ Disconnect the charging cable from the Geo. ◆... -
Page 19: Battery
The batteries supplied with the power chair are sealed and as such are maintenance free with no risk of battery leakage. Please follow the steps below to clean the battery. 1. Turn the Geo power switch to OFF. Power Pack 2. -
Page 20: Inspection And Maintenance
5. Connect the red cable to the positive (+) battery terminal and black cable to the negative (-) on the other battery. 6. Connect up the fused cable between the two batteries and close the battery pack... Warning 1. The wiring system and charger are well situated in the battery pack while being assembled in plant. -
Page 21: Regular Checking Record
General(Mechanical Troubleshooting) ♦power chair rolls straight (no excessive drag or pull to one ○ ○ side). Arms ♦Secure but easy to release; adjustment levers engage properly. ○ ○ ♦Adjustable height arms operate and lock securely. ○ ○ ♦Pivot point free of wear and looseness. ○... -
Page 22: Battery, Fuse And Tire
■ Battery Refer to the section titled “BATTERY CHARGING AND CARE” Suggestion Ask for help from your Geo dealer to inspect or replace the fuse as the steering shroud must be removed for access ■ Tires The condition of the tires depends on how you drive and use your power chair. -
Page 23: Storage
DISASSEMBLING THE GEO The Geo can be disassembled in to four pieces, the seat (weight 18 lbs), the front section (weight 26.5 lbs),the rear section (35.5 lbs) and battery pack (weight 21 lbs), without any tools. Please follow the steps. -
Page 24: Trouble Shooting And Specification
Warning After assembling the Geo make absolutely certain the tiller adjustment knob is fully tightened. 8 . T R O U B L E S H O OT I N G A N D S P E C I F I C AT I O N ■... - Page 25 Limited driving distance ♦Batteries not fully charged. ♦Charge batteries overnight or ensure 10 hours of charge between uses. Make sure setting on charger is correct. ♦Batteries weak won’t hold charge. ♦Replace batteries Batteries not charging. ♦Charger not working ♦Replace charger. ♦Battery connections loose.
- Page 26 SPECIFICTIONS MODEL ITEM Dimension (L×W×H ) 35.8×21×32.2 inches Weight, with batteries 43.6 / 95.9 Kg/lbs Without batteries 34.6/76.1 Kg/lbs Battery 12V 12Ah×2 Motor 180W×2 Charger DC24V 2A Off-board Caster wheels 6“×2 Solid Drive wheels 8“×2 Solid Driving system Direct drive the rear wheel Brake system Electromagnetic brakes Top speed...
-
Page 27: Warranty
If a system trip occurs, you can find out what has happened by counting the number of blink on the battery gauge that are flashing. Overleaf is a list of self-help actions. Try to use this list before you contact your service agent. - Page 28 One Year Limited Warranty: - Electronic controller - Drive train components Drive will repair these products with new or refurbished parts, free of charge, in the USA for one (1) year from the original date of purchase in the event of defective materials or workmanship.
-
Page 29: Warranty Registration
TELEPHONE EMAIL Warranty Registration Please type or print. Serial # _______________________________________ Date Purchased ____/____/____ Owner Name ____________________________________________________________ Address _________________________________________________________________ City ____________________________________ State ________ Zip ________ Additional Required Owner Information... - Page 30 Please indicate your understanding of your scooter by completing the following information. ________ I have read and fully understand _______ Owner’s Manual, especially sections on operating instructions, safety guidelines, maintenance and battery instructions. _______ Scooter Warranty Battery Instructions – only sealed lead acid or gel cell type batteries should be used.
- Page 31 …………………………………… ………………………………………………………………………………………… Warranty Application Form Name Date of Birth Year Month Address Model Power chair VIN: Motor Serial No: Controller # Date of Purchase Year Month Purchaser Signature...
- Page 32 Drive Medical 99 Seaview Blvd Port Washington, NY 11050 516.998.4600 (Phone) 516.998.4601 (Fax) 877.224.0946 (Toll Free) 877.390.6628 (Toll Free) www.drivemedical.com...
Need help?
Do you have a question about the Geo and is the answer not in the manual?
Questions and answers
I fully charged my batteries and plugged it all in..but it won't turn on..but when I have the charger hooked up to it..It will show the battery lights illuminating if I hit power or the the horn button
If the Drive Medical Geo device won't turn on despite fully charged batteries but shows battery lights when the charger is connected, possible issues include:
1. Loose or bad battery connection – Check all battery connections to ensure they are secure.
2. Circuit breaker tripped – Reset the circuit breaker by pressing the button and wait a few minutes.
3. Joystick not centered – Make sure the joystick is in the center position before turning on the control system.
4. External signal preventing operation – If the charger is still connected, it may prevent the chair from operating. Disconnect the charger.
5. Control system or joystick fault – Check all connections and ensure no fault codes (blinking lights) are present. If faults persist, contact a service agent.
Check for any blink codes on the joystick to help identify specific faults.
This answer is automatically generated