Table of Contents
Advertisement
Quick Links
O N E - W A Y F M A U T O M A T I C / M A N U A L
T R A N S M I S S I O N R E M O T E S T A R T E R
_____________
User Guide
It is the responsibility of the vehicle operator to ensure their vehicle
is parked in a safe and responsible manner.
1. a) Manual transmission: When leaving the vehicle, it is the user's
responsibility to ensure that the gearshift lever is in the NEUTRAL
position and the parking brake is engaged in order to avoid accidents
upon remote starting.
b) Automatic transmission: When leaving the vehicle, it is the user's
responsibility to ensure that the gearshift lever is in "Park" in order to
avoid accidents upon remote starting.
(Note: Make sure that the automatic vehicle cannot start in "Drive".)
2. It is the user's responsibility to ensure that the remote starter is
disabled or put into valet mode before servicing.
Designed & engineered in Canada
INDUSTRY CANADA USER NOTICE:
Operation is subject to the following two conditions: (1) this device may not cause interference, and (2)
this device must accept any interference, including interference that may cause undesired operation of
the device.
To reduce potential radio interference to other users, the antenna type and its gain should be so chosen
that the equivalent isotropically radiated power (EIRP) is not more than that required for successful
communication.
NOTE: The manufacturer is not responsible for any radio or TV interference caused by unauthorized
modifications to this equipment. Such modifications could void the user's authority to operate the
equipment
Doc#: 100819
Rev:1.0
© 2010
WARNING
- 1W-FM-A/M-HD -
- FcN -
Canada
Advertisement
Table of Contents

Related Manuals for Directed Electronics ONE-WAY FM AUTOMATIC/MANUAL TRANSMISSION


Summary of Contents for Directed Electronics ONE-WAY FM AUTOMATIC/MANUAL TRANSMISSION
- Page 1 O N E - W A Y F M A U T O M A T I C / M A N U A L T R A N S M I S S I O N R E M O T E S T A R T E R _____________ User Guide WARNING...
-
Page 2: Table Of Contents
Table of Contents Government regulations ........................3 Introduction ..........................3 Using the Remote Control ....................... 4 Vehicle Presets ..........................4 Heater ............................4 Windshield Wipers & Radio & Headlights ..................4 Arming the Starter Kill ........................4 Remote-Starting Your Vehicle ......................5 Setting Your Vehicle Into Ready Mode .................. -
Page 3: Government Regulations
Government regulations This device complies with part 15 of the FCC Rules. Operation is subject to the following two conditions: (1) This device may not cause harmful interference, and (2) this device must accept any interference received, including interference that may cause undesired operation. This equipment has been tested and found to comply with the limits for a Class B digital device, pursuant to part 15 of the FCC Rules. -
Page 4: Using The Remote Control
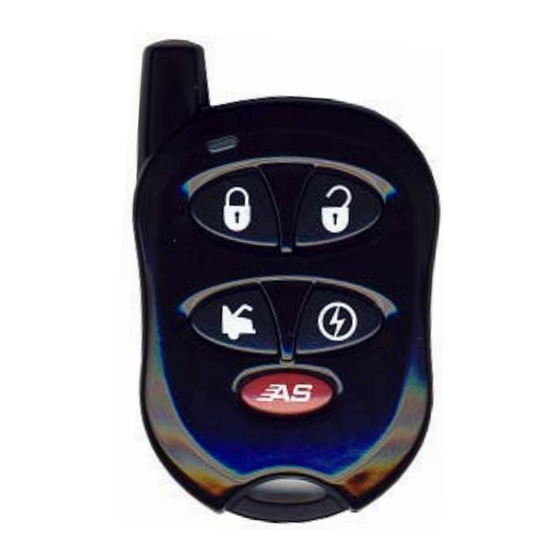
Using the Remote Control Your Remote Car Starter is equipped with a 5-button multi-channel remote control. It can operate two independent vehicles equipped with a Remote Car Starter (see Multi-Car Operation page-12, later in this Guide, for second-car transmitter functions). The functions of the transmitter are as follows: LOCK: Locks the DOORS and arms the STARTER KILL. -
Page 5: Remote-Starting Your Vehicle
Note: If the Starter Kill is installed, the vehicle will benefit from a protection against starter motor damage that could occur after remote-starting the engine should the user, by force of habit, turn the ignition key to the CRANK position. The Starter Kill (if installed) can be configured by the installer either to Passive Mode (so as to arm automatically) or Active Mode (so as to require the user’s intervention for arming). -
Page 6: Remote-Starting
neutral position. 2. With the engine already running, apply the 2. With the engine already running, apply the parking brake once and release the brake parking brake twice within 10sec. pedal. Make sure to release the brake pedal. The parking lights will flash 3 times quickly and remain lit. -
Page 7: Remote Trunk Release
The parking lights will flash twice to confirm that the doors have been unlocked. Remote Trunk Release If your system was installed with the Remote Trunk Release option, you can open your trunk by pressing the button for 3 seconds on the remote transmitter. In addition, this will also disarm the OEM style alarm. -
Page 8: Panic Mode
The LED on the antenna will come ON solid to indicate that the vehicle has successfully entered Valet mode. To put the system into Valet mode using the TRANSMITTER (Remote Valet Mode): Press the buttons simultaneously until the parking lights flash three times. The LED on the antenna will come ON solid to indicate that the vehicle has successfully entered Valet mode. -
Page 9: Extended Run Time
To enter Cold Weather Mode: Rapidly press twice. The remote’s LED will start flashing. Press and hold until the parking lights will flash for 2 seconds, pause, and then flash three times. To exit Cold Weather Mode, do any one of the following actions: Open the hood. -
Page 10: Advanced Features: Installation-Programmable Options
This constant pulse can be configured to activate certain functionalities such as rolling down the windows – Please refer to your installer to see if your vehicle is compatible with this option. Advanced Features: Installation programmable Options The Remote Car Starter was designed with flexibility and OEM integration in mind. With its programmable options, this unit can single-handedly control nearly any electrical system in your vehicle. -
Page 11: Home Valet Tm " Mode
Remove the ignition key from the ignition switch. The engine will continue running. Exit the vehicle and close all doors, hood and trunk. Press the button; this will lock the doors, arm the OEM-style alarm (if configured|) and confirm that the vehicle is in Turbo Mode. The engine will shut down after 60 seconds. -
Page 12: Horn Chirp Timing
AUX 1 can be programmed to trigger the horn every time the button is pressed, or when button is pressed twice within 3 seconds. When horn confirmation is activated, panic mode is enabled. If horn confirmation is disabled, panic mode will not be available. Horn Chirp Timing The pulse duration can be configured by your installer (from 5 ms to 200 ms). -
Page 13: Troubleshooting Poor Transmitting Range
Diagnostic table: 1x = power interruption 4 x = Doors intrusion 3x = Hood 6x = Ignition Troubleshooting Poor Transmitting Range Many factors may affect the operating range of the transmitter. Some of these are: The condition of the battery in the transmitter. The operating environment (for example: downtown radio-frequency noise, airports, cellular phone towers…) Metal: any type of metal will affect operating range. -
Page 14: Diagnostics - Parking Light Flash Table
Diagnostics – Parking Light Flash Table Parking lights flashes Description Doors locked. Trunk released. Start signal received from the remote. Runtime has expired Doors unlocked 2 fast Valet mode is deactivated 2 slow Shutdown by remote Shutdown by brake 4 fast A remote start was attempted while the brake pedal is engaged.
Need help?
Do you have a question about the ONE-WAY FM AUTOMATIC/MANUAL TRANSMISSION and is the answer not in the manual?
Questions and answers