Table of Contents
Advertisement
Advertisement
Table of Contents

Subscribe to Our Youtube Channel
Related Manuals for Physio Logic Physio logic


Summary of Contents for Physio Logic Physio logic
- Page 1 Auto Inflate Blood Pressure Monitor Instruction Manual Features: • Fuzzy Logic Technology • Auto memory for up to 90 readings • One-Touch Operation • Easy-to-read Display • Date and Time indications • AC Adapter • WHO Blood Pressure Classification Indicator •...
-
Page 2: Table Of Contents
Table of Contents Fuzzy Logic measuring technology ..... . 3 Statement of accuracy ....... . . 3 About blood pressure . -
Page 3: Fuzzy Logic Measuring Technology
Fuzzy Logic Measuring Technology This Physio Logic™ monitor uses the oscillometric method to detect your blood pressure. Before the cuff starts inflating, the device will establish a baseline cuff pressure equivalent to the air pressure. Your Physio Logic™ monitor will determine the appropriate inflation level based on one's pressure oscillations, followed by cuff deflation. -
Page 4: Blood Pressure Standard
Blood Pressure Standard The Joint National Committee on prevention, detection, evalua- tion, and treatment of high blood pressure has developed a blood pressure standard, according to which areas of low and high risk blood pressure are identified. This standard is a guideline as blood pressure varies among different people and different age groups... -
Page 5: Before Taking A Measurement
Before Taking a Measurement To help you obtain more accurate readings: • Urinate if necessary. • Remove any clothing and jewellery from your left arm. Placing the cuff on anything other than bare skin can result in an inaccurate reading. •... -
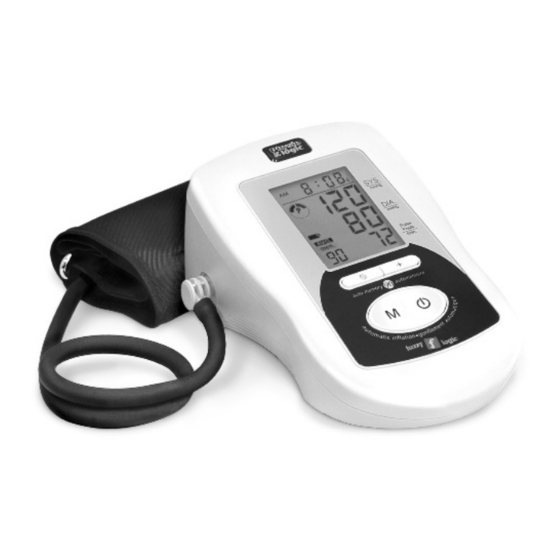
Page 6: Name / Function Of Each Part
Name / Function of Each Part LCD display Date / Time - Set button Memory recall button Arm Cuff Battery compartment On / Off / Start button Air Tube and Connector AC Adaptor Jack PC Link Socket 4 x AA (LR06) size, 1.5 V Batteries (not included) AC Adaptor... -
Page 7: Display Explanation
Display Explanation Date / Time indicator Blood pressure classification risk Systolic pressure indicator Weak battery Diastolic pressure mark Pulse rate Memory sequence number Pulse mark Appears when measurement value is stored in memory or is recalled from memory Pulse Mark: Shows the pulse rate per minute. Appears when batteries should be replaced. -
Page 8: Installing Batteries
1. Connect the AC adapter with the AC adapter jack in the back of the unit. 2. Plug the AC adapter into the socket. Please use a Physio Logic AC adapter (12V DC, 600mA). Caution: 1. Please unload the batteries when operating with the AC mode for a longer period of time. -
Page 9: Recalling Memory
Recalling Memory 1. To read memory values, press the "M" key. The memory values will be shown on the LCD display. The average measurement will be shown first and a new press of the “M” key will show the last measurement. 2. -
Page 10: Time Adjustment
Time Adjustment 1. To adjust the date / time in the monitor, press the Set key The display will show a blinking number showing the month. 2. Change the month by pressing the “ ” Key. Each press will increase the number by one in a cycling manner. Press the Set again to confirm the entry, and the screen will show a blinking number representing the date. -
Page 11: Applying The Arm Cuff
Applying the Arm Cuff 1. Insert the cuff’s connecting tube into the unit. 2. Unwrap the arm cuff, leaving the “Index” end of the cuff through the D-ring of the cuff. 3. Put your left arm through the cuff loop. Position the artery mark ( ) at the middle of your arm above the elbow, in line with your middle finger. -
Page 12: Taking A Measurement
Taking a Measurement 1. Press the On / Off / Start button. All displays will appear for approximately one second before returning to “0”. 2. The unit will automatically inflate to the appropriate inflation level based on the user’s pulse oscillations. Measurement will then begin. -
Page 13: Blood Pressure Classification Risk Indicator
Blood Pressure Classification Risk Indicator The World Health Organization (WHO) and National High Blood Pressure Education Program Coordinating Committee have developed a blood pressure standard, classifying blood pressure ranges into 4 stages. This unit is equipped with a blood pressure classification indicator, which promptly indicates the risk level (prehypertension / stage 1 hypertension / stage 2 hypertension) of the result after each measurement on the LCD display. -
Page 14: Troubleshooting
Troubleshooting Symptom: No display when the On / Off / Start button is pressed. Correction: If the batteries have run down, replace them with new alkaline batteries. If the batteries are not in the correct position, re-insert them with the correct polarities. Symptom: EE mark shown on display or the blood pressure value is displayed excessively low (high). -
Page 15: Data Transfer To Pc
Data Transfer to PC Data transfer accessories: ® 1. Physio Logic BP Manager software CD-Rom (PC compatible) Note: The BP Manager software must be used with Windows 2000 or XP operating systems. 2. USB cable. BP Manager software installation: Place the BP Manager CD-Rom in your computer’s CD-Rom drive and follow instructions on screen. -
Page 16: Specifications
: Type BF Device and cuff are designed to provide special protection against electrical shocks. * Specifications are subject to change without notice. Consumer Info-Line: 1-800-363-2381 AMG MEDICAL INC. 8505 Dalton, Montreal, QC H4T 1V5 www.amgphysiologic.com www.amgmedical.com P/N 803-077 REV: 1.0 0205...
Need help?
Do you have a question about the Physio logic and is the answer not in the manual?
Questions and answers