
Related Manuals for Ametek Sorensen XDL 35-5


Summary of Contents for Ametek Sorensen XDL 35-5
- Page 1 XDL Series Single Output DC Power Supply Operation Manual Models: XDL 35-5 XDL 35-5P XDL 56-4 XDL 56-4P M370294-01 Rev A www.programmablepower.com...
-
Page 3: Contact Information
About AMETEK AMETEK Programmable Power, Inc., a Division of AMETEK, Inc., is a global leader in the design and manufacture of precision, programmable power supplies for R&D, test and measurement, process control, power bus simulation and power conditioning applications across diverse industrial segments. -
Page 4: Table Of Contents
Table of Contents Introduction Specification Safety Installation Connections Initial Operation Manual Operation Remote Operation (XDL 35-5P & XDL 56-4P only) Remote Commands Maintenance Calibration Instructions en Francais Bedienungsanleitung auf Deutsch Istruzioni in Italiano Instrucciones en Español Warranty Information... -
Page 5: Introduction
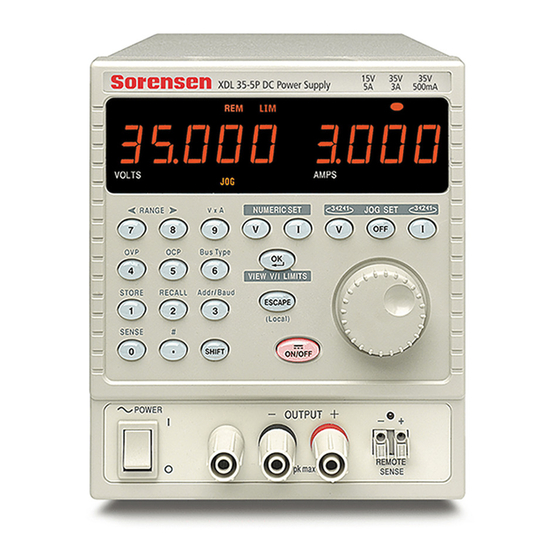
Introduction Unmatched Precision, Unrivalled Performance The XDL series represents the ‘next generation’ of laboratory power supplies offering an unparalleled level of precision. Voltage and current are controlled using 16 bit DACs enabling voltages to be set to 1mV resolution even at full output. Indeed, the accuracy is sufficient for the PSU to be used as a calibration source for most hand-held DMMs. - Page 6 Fully Programmable via GPIB, RS232 or USB The XDL 35-5P and XDL 56-4P incorporate a full bus interface permitting remote control and readback via either GPIB (IEEE-488), RS232 or USB. The GPIB interface conforms fully with IEEE-488.2 and IEEE-488.1. The serial interface can be used as a conventional RS232 interface or as part of a multi- instrument addressable RS232 chain.
-
Page 7: Specification
Specification General specifications apply for the temperature range 5°C to 40°C. Accuracy specifications apply for the temperature range 18°C to 28°C after 1 hour warm-up with no load and calibration at 23°C. Typical specifications are determined by design and are not guaranteed. OUTPUT Voltage/Current Ranges: XDL 35-5... - Page 8 Over-voltage Protection: Range 1V to 40V (XDL 35-5), 1V to 62V (XDL 56-4) (OVP) Resolution 0·1V; accuracy ± (2% + 0·5V) Response time typically 100µs Over-current Protection: Range 0·01A to 5·5A (XDL 35-5), 0·01A to 4·4A (XDL 56-4) (OCP) Resolution 0·01A; accuracy ± (0·2% + 0·01A) Response time typically 35ms Protection Functions: Output trips off for OVP, OCP, over-temperature and Sense miswiring.
-
Page 9: Emc
This instrument has been designed to meet the requirements of the EMC Directive 2004/108/EC. Compliance was demonstrated by meeting the test limits of the following standards: Emissions EN61326 (1998) EMC product standard for Electrical Equipment for Measurement, Control and Laboratory Use. Test limits used were: Radiated: Class B Conducted: Class B... -
Page 10: Safety
Safety This power supply is a Safety Class I instrument according to IEC classification and has been designed to meet the requirements of EN61010-1 (Safety Requirements for Electrical Equipment for Measurement, Control and Laboratory Use). It is an Installation Category II instrument intended for operation from a normal single phase supply. -
Page 11: Installation
Installation Check that the instrument operating voltage marked on the rear panel is suitable for the local supply. Should it be necessary to change the operating voltage, proceed as follows: 1) Disconnect the instrument from all voltage sources. 2) Remove the screws which retain the top cover and lift off the cover. 3) Change the transformer connections following the appropriate diagram below: BROWN BROWN... -
Page 12: Connections
Connections Front Panel Connections The load should be connected to the positive (red) and negative (black) terminals marked OUTPUT. Remote sense connections to the load, if required, are made from the positive (+) and negative (−) REMOTE SENSE terminals. Remote sense operation is selected from the keyboard or via a remote control interface (XDL 35-5P &... - Page 13 USB (XDL 35-5P & XDL 56-4P only) The USB port is connected to instrument ground. It accepts a standard USB cable. The Windows plug-and-play functions should automatically recognise that the instrument has been connected. Alarm Outputs The recessed 2-pin connector marked Alarm provides access to an opto-isolated NPN switching transistor, the function of which can be set from the keyboard, see the Alarms section of this manual.
-
Page 14: Initial Operation
Initial Operation This section of the manual is a general introduction to the controls and operation of the instrument and is intended to be read before using the power supply for the first time. In this manual front panel keys, connections and display indicators are shown in capitals, e.g. - Page 15 Jog Control The rotary 'jog' control permits the output voltage or current limit to be incremented or decremented in steps with a resolution set by the JOG SET keys; the output immediately follows the setting, i.e. no OK is required. At power-up jog is always off.
-
Page 16: Manual Operation
Manual Operation New users should first read the Initial Operation chapter which describes the operating principles of the keypad and rotary jog control. Set Voltage The left-hand display shows the set voltage to a resolution of 1mV, except when the instrument is in constant current (CI) mode. -
Page 17: Set Current Limit
Set Current Limit With the output off, the right-hand display shows the current limit to a resolution of 1mA (0·1mA on the 500mA range). The current limit can be set directly from the numeric keypad: press the NUMERIC SET I key, enter the new value using the numeric keys and confirm by pressing OK. -
Page 18: Connection To The Load
Range Selection The instrument has three ranges: 35V/3A, 15V/5A and 35V/500mA (XDL 35-5); 56V/2A, 25V/4A and 56V/500mA (XDL 56-4). The selected range is shown by an illuminated indicator below the appropriate legend at the top right-hand side of the instrument; when the 500mA range is selected the indicator legend is mA to emphasise that the current meter now shows milliamps not amps. - Page 19 Sense Miswiring Trip The output will be tripped off if the voltage between an output terminal and its corresponding sense terminal exceeds approximately 1V; this will happen if the sense wires are wired at the load to the wrong output or if an attempt is made to draw power from the sense wires. If the sense terminals are miswired in this way the display shows the message SENSE triP and the output is turned off.
-
Page 20: Output Protection
Over-Current Protection Over-Current Protection (OCP) can be set from 0·01A to 5·5A (XDL 35-5), 0·01A to 4·4A (XDL 56-4). If the output current exceeds the set OCP the output is shut down (typically within 35ms). To set OCP press SHIFT, OCP; the 10mA step JOG indicator will start flashing and the jog rotary control can be used to increment/decrement the OCP setting in 10mA steps. -
Page 21: Recall Settings
Store Settings The instrument can store 10 set-ups in non-volatile memory; the parameters stored are range, voltage, current limit, OVP and OCP. The output state and remote sense setting are not stored. To store a set-up press SHIFT, STORE, store no., OK; the store no. is any key 0 to 9. After key-presses SHIFT, STORE, the display shows StorE - ;... - Page 22 Alarm output 'closed' when over-voltage trip occurs Alarm output 'closed' when any trip occurs (factory default) Buzzer off Buzzer on (factory default). A single beep indicates confirmation, a double beep indicates a wrong entry. Jog digit flashes, JOG indicator only flashes when jog is 'hidden' JOG indicator always flashes, except when 'hidden' (factory default) JOG indicator doesn't flash, except when 'hidden' (lazy flash) Loads default calibration parameters.
-
Page 23: Remote Operation (Xdl 35-5P & Xdl 56-4P Only)
Remote Operation (XDL 35-5P & XDL 56-4P only) The instrument can be remotely controlled via its RS232, USB or GPIB interfaces. When using RS232 it can either be the only instrument connected to the controller or it can be part of an addressable RS232 chain which permits up to 32 instruments to be addressed from one RS232 port. -
Page 24: Rs232 Interface
RS232 Interface RS232 Interface Connector The 9-way D-type serial interface connector is located on the instrument rear panel. The pin connections are as shown below: Name Description No internal connection Transmitted data from instrument Received data to instrument No internal connection Signal ground No internal connection RXD2... - Page 25 All instruments on the interface must be set to the same baud rate and all must be powered on, otherwise instruments further down the daisy chain will not receive any data or commands. The other parameters are fixed as follows: Start Bits: 1 Parity: None Data Bits: 8...
- Page 26 Because of the asynchronous nature of the interface it is necessary for the controller to be informed that an instrument has accepted the listen address sequence and is ready to receive commands. The controller will therefore wait for Acknowledge code, 06H, before sending any commands, The addressed instrument will provide this Acknowledge.
-
Page 27: Gpib Interface
USB Interface The USB interface allows the instrument to be controlled using RS232 protocol via a computer’s USB port. This is useful where the computer’s standard RS232 COM ports are fully utilised or non-existent. The instrument is supplied with a disk containing drivers for various versions of Windows, including Win98 and 2000. - Page 28 GPIB IEEE Std. 488.2 Error Handling – Query Error Register The IEEE 488.2 error (addressed to talk with nothing to say) is handled as follows. UNTERMINATED If the instrument is addressed to talk and the response formatter is inactive and the input queue is empty then the error is generated.
-
Page 29: Status Reporting
Status Reporting This section describes the complete status model of the instrument. Note that some registers are specific to the GPIB section of the instrument and are of limited use in an RS232 environment. Standard Event Status and Standard Event Status Enable Registers These two registers are implemented as required by the IEEE Std. - Page 30 The Limit Event Status Register is read and cleared by the LSR1? command. The Limit Event Status Enable register is set by the LSE1<nrf> command and read by the LSE1? command. Bit 7 - not used Bit 6 - not used Bit 5 - Set when an output sense trip has occurred Bit 4 -...
- Page 31 Status Model Power on Settings The following instrument status values are set at power on: Status Byte Register Service Request Enable Register † Standard Event Status Register = 128 (pon bit set) Standard Event Status Enable Register † Execution Error Register Query Error Register Parallel Poll Enable Register †...
-
Page 32: Remote Commands
Remote Commands RS232 Remote Command Formats Serial input to the instrument is buffered in a 256 byte input queue which is filled, under interrupt, in a manner transparent to all other instrument operations. The instrument will send XOFF when approximately 200 characters are in the queue. XON will be sent when approximately 100 free spaces become available in the queue after XOFF was sent. -
Page 33: Command List
Each query produces a specific which is listed along with the command in <RESPONSE MESSAGE> the remote commands list. is ignored except in command identifiers. e.g. '*C LS' is not equivalent to '*CLS'. <WHITE SPACE> is defined as character codes 00H to 20H inclusive with the exception of the NL <WHITE SPACE>... - Page 34 V1O? return the output readback voltage – response is <nr2>V<rmt> where <nr2> is in Volts I1O? return the output readback current – response is <nr2>A<rmt> where <nr2> is in Amps RANGE1 <nrf> set the voltage range to <nrf> where <nrf> has the following meaning: 0=15V(5A), 1=35V(3A), 2=35V(500mA) XDL 35-5P 56-4P:...
-
Page 35: Error Messages
System and Status Commands Resets the instrument to the factory default settings − (see Factory Defaults section) with *RST the exception of all remote interface settings. EER? Query and clear Execution Error Register. The response format is nr1<rmt>. QER? Query and clear Query Error Register. The response format is nr1<rmt> *CLS Clear Status. -
Page 36: Maintenance
Maintenance The Manufacturers or their agents overseas will provide a repair service for any unit developing a fault. Where owners wish to undertake their own maintenance work, this should only be done by skilled personnel in conjunction with the service manual which may be purchased directly from the Manufacturers or their agents overseas. - Page 37 XDL 56-4 & XDL 56-4P Step/Range Settings Adjust for:- Load Detail 1, 56V 2A 0.01V 2A 10mV ± 0.5mV o/p 0V 2, 56V 2A 0.01V 2A 0.010V on display V readback zero 3, 56V 2A 35V 2A 35V ± 0.5mV o/p V span 4, 56V 2A 35V 2A...
-
Page 38: Instructions En Francais
Sécurité Ce système alimentation est un instrument de classe de sécurité 1 conforme à la classification IEC et il a été conçu pour satisfaire aux exigences de la norme EN61010-1 (Exigences de sécurité pour les équipements électriques de mesure, de contrôle et d'utilisation en laboratoire). Il s'agit d'un instrument de Catégorie II d'installation devant être exploité... - Page 39 Installation Vérifier que la tension de fonctionnement de l’instrument portée sur le panneau arrière convient à l’alimentation locale. En cas de nécessité de changer de tension de fonctionnement, procéder comme suit : Déconnecter l’instrument de toutes les sources de tension. Déposer les vis qui retiennent le couvercle supérieur et soulever ce dernier.
- Page 40 Montage Cet instrument convient à la fois à l’utilisation sur établi et au montage en baie. Il est livré avec des pieds pour le montage sur établi. Les pieds avant comprennent un mécanisme de basculement pour obtenir l’angle optimal du panneau. Un kit baie est disponible auprès des constructeurs ou de leurs agents à...
- Page 41 Connexions Connexions du panneau avant La charge devra être connectée aux bornes positive (rouge) et négative (noire) marquées OUTPUT (sortie). Les connexions de détection à distance sur la charge, si nécessaire, sont réalisées à partir des bornes positive (+) et négative (−) REMOTE SENSE (détection à distance). Le fonctionnement en détection à...
- Page 42 USB (XDL 35-5P & XDL 56-4P seulement) Le port USB est connecté à la masse de l’instrument. Il accepte les câbles USB standard. Les fonctions "plug-and-play" de Windows devraient automatiquement reconnaître le fait que l’instrument a été connecté. Sorties d’alarme Le connecteur à...
-
Page 43: Utilisation Initiale
Utilisation initiale Cette section du manuel est une introduction générale aux commandes et au fonctionnement de l’instrument et est censée être lue avant d’utiliser le générateur pour la première fois. Dans ce manuel, les touches, connexions et indicateurs d’affichage du panneau avant sont présentés en lettres capitales, par ex. - Page 44 Appuyer sur SHIFT illumine la touche et donne accès aux fonctions marquées au-dessus des touches numériques (par ex. STORE, RECALL (rappeler), etc.). Lorsque l’on sélectionne une fonction en appuyant sur l’une de ces touches, SHIFT est annulé (la touche SHIFT n’est plus allumée).
- Page 45 Affichage L’affichage montre la tension sur la gauche (5 chiffres) et l’intensité sur la droite (4 chiffres). Ces affichages à 7 segments sont également utilisés pour présenter des invites lors de certains réglages de fonctions (par ex. l’enregistrement ou le rappel en mémoire ou le réglage d’adresses de télécommande) à...
-
Page 46: Fonctionnement Manuel
Fonctionnement manuel Les nouveaux utilisateurs devront d’abord lire le chapitre Utilisation initiale qui décrit les principes de fonctionnement du clavier et de la molette de commande pas à pas. Réglage de la tension L’affichage de gauche montre la tension réglée avec une résolution de 1mV, excepté quand l’instrument est en mode d’intensité... - Page 47 Noter qu’en mode d’intensité constante, la tension réelle est mesurée et affichée à une résolution de seulement 10mV ; le chiffre 1mV affiche zéro de façon permanente. Davantage de détails sur la commande pas à pas sont donnés dans le chapitre Utilisation initiale. Réglage de la limite d’intensité...
- Page 48 Sortie d’intensité instantanée La commande de limite d’intensité peut être réglée pour limiter l’intensité de sortie continue à des niveaux descendant jusqu’à 1mA (0·1 mA sur la plage 500mA). Cependant, communément à tous les générateurs de précision d’établi, un condensateur est connecté sur la sortie pour conserver la stabilité...
- Page 49 ESCAPE pour quitter sans changer d’état. La détection à distance est désactivée en appuyant de nouveau sur SHIFT, SENSE ; la touche OK clignote et le témoin au-dessus des bornes de détection à distance s’éteint pour montrer que la détection locale sera restaurée si l’on appuie sur OK.
- Page 50 décrémenter le réglage OVP par pas de 100mV. Appuyer sur OK pour confirmer le nouveau réglage ; pour quitter sans saisir une nouvelle valeur, appuyer sur ESCAPE. Le réglage par défaut d’usine est de 40,0V (XDL 35-5), 62,0V (XDL 56-4). Si l’OVP se déclenche, l’affichage présente le message OUP triP et la sortie est coupée.
- Page 51 Déclenchement de température Si la température limite de sûreté interne est dépassée en raison, par exemple, de l’obstruction des évents du ventilateur, la sortie est coupée et l’affichage indique OTP triP . Appuyer sur ESCAPE à cet instant réaliser l’une de ces deux choses : i.
- Page 52 sélection avec la touche OK. Les mémoires vides sont indiquées par un – clignotant sur chaque position de chiffre. A tout moment avant d’appuyer sur la touche OK, la fonction de rappel peut être quittée sans rappeler une configuration en appuyant sur ESCAPE ou en attendant 10 secondes après la dernière saisie au clavier.
- Page 53 Réglages par défaut d’usine Les réglages par défaut de sortie d’usine (qui s’appliqueront à la première mise en marche) sont les suivants : Plage : 35V/3A (XDL 35-5); 56V/2A (XDL 56-4) Tension : 1,000V Limite d’intensité : 1,000A OVP : 40V (XDL 35-5);...
-
Page 54: Bedienungsanleitung Auf Deutsch
Sicherheit Diese Stromversorgung wurde nach der Sicherheitsklasse (Schutzart) I der IEC-Klassifikation und gemäß den europäischen Vorschriften EN61010-1 (Sicherheitsvorschriften für Elektrische Meß-, Steuer, Regel- und Laboranlagen) entwickelt. Es handelt sich um ein Gerät der Installationskategorie II, das für den Betrieb von einer normalen einphasigen Versorgung vorgesehen ist. - Page 55 Vorbereitung des Geräts Kontrollieren Sie ob die auf der Geräterückseite angegebene Betriebsspannung dem örtlichen Netz entspricht. Falls die Betriebsspannung umgestellt werden muss ist wie folgt vorzugehen: Das Gerät von jeglichen Spannungsquellen trennen. Schrauben der Abdeckung lösen und diese abnehmen. Die Transformatoranschlüsse nach folgender Zeichnung umstellen: Abdeckung wieder montieren und mit den gleichen Schrauben festschrauben.
- Page 56 Montage Dieses Gerät kann sowohl auf einem Tisch als auch in einem Einschub montiert werden und wird mit Füßen zur Tischmontage geliefert. Die vorderen Füße sind verstellbar, um einen optimalen Aufstellwinkel zu erreichen. Ein Einschubgehäuse zum Einbau der Stromversorgungen aus der XDL Serie ist über den Hersteller oder Ihren Fachhändler erhältlich.
- Page 57 Anschlüsse Anschlüsse auf der Vorderseite Die Last wird an die positive (rot) und negative (schwarz) Anschlussbuchse mit der Bezeichnung OUTPUT angeschlossen. Ein Fernfühleranschluss, soweit erforderlich, erfolgt über die Plus (+) und Minus (−) Klemmen mit der Bezeichnung REMOTE SENSE. Der Fernfühler-Betrieb wird über die Tastatur oder eine Fernsteuerungs-Schnittstelle (nur XDL 35-5P &...
- Page 58 USB (nur XDL 35-5P & XDL 56-4P) Der USB-Port ist mit der Geräteerde verbunden. Es wird ein normales USB-Kabel verwendet. Durch die „Plug-and-Play“ Funktionalität unter Windows wird der Anschluss des Netzgeräts normalerweise automatisch erkannt. Alarm-Ausgänge Der versenkt eingebaute 2-polige Anschluss mit der Bezeichnung „Alarm“ ist mit einem opto- gekoppelten NPN Schalttransistor verbunden, dessen Funktion von der Tastatur aus eingestellt werden kann (siehe Abschnitt „Alarmfunktionen“...
-
Page 59: Erstmalige Inbetriebnahme
Erstmalige Inbetriebnahme Dieser Abschnitt des Handbuches dient als allgemeine Einführung zu den Bedienelementen und dem Betrieb des Geräts. Vor dem erstmaligen Einsatz des Netzgeräts sollten Sie diesen Abschnitt durchlesen. Die Tasten auf der Vorderseite, die Anschlussbuchsen und die Displayinformationen werden in diesem Handbuch in Großbuchstaben dargestellt, z. - Page 60 weitere Taste zur Ausführung einer Funktion gedrückt wurde, wird die jeweilige Funktion ungültig (gleiche Wirkung wie das Drücken der Taste ESCAPE). Die Taste SHIFT ist eine Umschalttaste, d. h. sie wird durch wiederholtes Drücken ein- und ausgeschaltet. SHIFT wird zusätzlich durch Drücken der Taste ESCAPE oder der Tasten SET V bzw.
- Page 61 Das Display Das Display zeigt links die Spannung (5 Ziffern) und rechts den Stromwert (4 Ziffern) an. Mit Hilfe des 7-Segment Displays können aber auch Informationen für bestimmte Funktionseinstellungen angezeigt werden (z. B. Speicherinformationen oder die Adresseneinstellung bei der Fernbedienung) indem der begrenzte „Zeichensatz“ des 7-Segment Displays voll genutzt wird. Hierbei handelt es sich notwendigerweise um eine Mischung aus Klein- und Großbuchstaben.
-
Page 62: Manueller Betrieb
Manueller Betrieb Erstbenutzer sollten zunächst das Kapitel „Erstmalige Inbetriebnahme“ lesen, um sich mit der prinzipiellen Funktionsweise von Tastatur und Drehregler vertraut zu machen. Einstellen der Spannung Das linke Display gibt die Spannung mit einer Auflösung von 1 mV an, es sei denn das Gerät arbeitet im Konstantstrombetrieb (CI). - Page 63 Einstellen der Strombegrenzung Bei ausgeschaltetem Ausgang zeigt das rechte Display den Strombegrenzungswert mit einer Auflösung von 1 mA an (0,1 mA im Bereich 500 mA). Der Strombegrenzungswert kann direkt über die numerische Tastatur eingegeben werden: hierzu die Taste NUMERIC SET I drücken, den neuen Wert über die Tastatur eingeben und mit OK bestätigen.
- Page 64 Höhe der Ausgangsspannung auf und erzeugt beim Kurzschließen des Ausgangs durch seine Entladung einen Stromimpuls, auf den die Strombegrenzung keinen Einfluss hat. Bereichswahl Das Netzgerät verfügt über drei Bereiche: 35 V/3 A, 15 V/5 A und 35 V/500 mA (XDL 35-5); 56 V/ 2A, 25 V/4 A und 56 V/500 mA (XDL 56-4).
- Page 65 Um Instabilität und dynamisches Fehlverhalten zu vermeiden muss darauf geachtet werden, dass eine gute Verbindung zwischen jedem Ausgangs- und Fernfühlerkabel besteht. Dies wird erreicht indem man entweder die Kabel miteinander verdrillt oder ein abgeschirmtes Koaxialkabel verwendet (die Fernfühlerleitung bildet hierbei den Innenleiter). Auch ein Elektrolytkondensator der direkt den Lastanschluss überbrückt kann hilfreich sein.
- Page 66 neue Einstellung bestätigt. Mit der Taste ESCAPE kann die Einstellung rückgängig gemacht werden. Der werksseitig voreingestellte Wert ist 40,0 V (XDL 35-5), 62,0 V (XDL 56-4). Wurde der Überspannungsschutz ausgelöst, erscheint die Meldung OUP triP auf dem Display und der Ausgang wird abgeschaltet. Durch Drücken auf ESCAPE wird die Meldung ausgeblendet, das Display zeigt nun die Einstellwerte für Spannungs- und Strombegrenzung an.
- Page 67 Während V x A angezeigt ist, wird die Schrittfunktion wird vorübergehend deaktiviert (die JOG Anzeigen sind ausgeschaltet). Temperaturschutz Bei Überschreiten der internen Temperaturgrenze (z. B. weil die Lüfter blockiert sind) schaltet sich der Ausgang aus und das Display zeigt die Meldung OTP triP .
- Page 68 Spannungs- und Stromeinstellungen im Display. Das Display blinkt um darauf aufmerksam zu machen, dass eine Einstellung aufgerufen wurde. Durch Drücken einer Ziffer nach der anderen können beliebige Speichernummern aufgerufen werden (ohne dass jedes Mal SHIFT, RECALL gedrückt werden muss) bevor die gewählte Speichernummer schließlich mit OK bestätigt wird.
- Page 69 Standardeinstellungen Vom Werk aus wurden folgende Standardeinstellungen gesetzt, die beim ersten Einschalten des Geräts gültig sind: Bereich: 35 V/3 A (XDL 35-5); 56 V/2 A (XDL 56-4) Spannung: 1,000V Strombegrenzung: 1,000A OVP: 40 V (XDL 35-5); 62 V (XDL 56-4) OCP: 5·5 A (XDL 35-5);...
-
Page 70: Istruzioni In Italiano
Sicurezza Questo alimentatore appartiene alla Categoria di Sicurezza 1 secondo la classifica IEC ed è stato progettato in modo da soddisfare i criteri EN61010-1 (requisiti di Sicurezza per Apparecchiature di misura, controllo e per uso in laboratorio). È uno strumento di Categoria II di installazione e inteso per funzionamento con un’alimentazione normale monofase. - Page 71 Installazione Verificare che la tensione di esercizio stampigliata sul pannello posteriore corrisponda a quella erogata dalla rete di alimentazione locale. Qualora sia necessario cambiare la tensione di esercizio, osservare le seguenti istruzioni: 1) Staccare lo strumento da tutte le fonti di alimentazione. 2) Svitare le viti che fissano il coperchio superiore e togliere il coperchio.
- Page 72 Montaggio Lo strumento può essere montato su banco o su rack. Viene fornito provvisto di piedini destinati al montaggio su banco. I piedini anteriori sono dotati di un meccanismo che consente di orientare a piacimento il pannello. Il rack destinato al montaggio degli alimentatori della serie XDL può essere acquistato direttamente dal Costruttore o dal rivenditore di fiducia.
- Page 73 Collegamenti Collegamenti al pannello frontale Collegare il carico ai morsetti positivo (rosso) e negativo (nero) contrassegnati OUTPUT. Gli eventuali collegamenti al carico dei rilevatori remoti si effettuano dai morsetti contrassegnati REMOTE SENSE (RILEVATORE REMOTO) positivo (+) e negativo (−). L'inserimento dei rilevatori remoti si effettua dalla tastiera o dall'interfaccia di controllo remota (solo per il XDL 35-5P &...
- Page 74 USB (solo per il XDL 35-5P & XDL 56-4P) La porta USB viene collegata alla messa a terra dello strumento ed ospita un cavo USB standard. Le funzioni plug-and-play di Windows dovrebbero riconoscere automaticamente che lo strumento è stato collegato. Uscite degli allarmi Il connettore a 2 pin incassato contrassegnato dalla dicitura Alarm (Allarme) consente di accedere al transistor di commutazione NPN optoisolato, la cui funzione può...
-
Page 75: Primo Utilizzo
Primo utilizzo La presente sezione riporta la descrizione generale dei comandi e del funzionamento dello strumento e deve essere letta attentamente prima di utilizzare l'alimentatore per la prima volta. Nel presente manuale i tasti, i collegamenti e i segnalatori del display sul pannello anteriore sono indicati in lettere maiuscole, ad es. - Page 76 quando viene premuto una seconda volta, la sua funzione viene disattivata. È anche possibile annullare la selezione del tasto SHIFT premendo ESCAPE oppure SET V o SET I. Manopola di variazione graduale La manopola sullo strumento consente di aumentare o diminuire gradualmente la tensione o la corrente erogata al valore impostato tramite i tasti JOG SET (impostazione variazione graduale);...
- Page 77 gamma 500 mA, il segnalatore è contrassegnato dalla dicitura mA per indicare che il display per la corrente visualizza i valori in mA. Gli altri segnalatori sotto il display sono: CI, che segnala che lo strumento si trova nella modalità corrente costante; LIM, che lampeggia quando si preme il tasto VIEW V/I LIMITS per segnalare il limite impostato per la tensione/la corrente;...
-
Page 78: Funzionamento In Manuale
Funzionamento in manuale Si invitano tutti gli utenti novizi a leggere attentamente il capitolo Primo utilizzo, che descrive i principi di funzionamento della tastiera e della manopola variazione graduale. Impostazione della tensione Il display a sinistra visualizza la tensione impostata a una risoluzione di 1 mV, ad eccezione di quando lo strumento funziona nella modalità... - Page 79 Impostazione del valore max di corrente Ad erogazione di corrente disinserita, il display a destra visualizza il valore max alla risoluzione di 1 mA (0,1 mA sulla gamma 500 mA). La corrente può essere impostata direttamente dal tastierino numerico: premere il tasto V sotto NUMERIC SET, digitare il nuovo valore tramite i tasti numerici e confermarlo premendo OK.
- Page 80 Selezione della gamma Lo strumento offre tre gamme di esercizio: 35 V/3 A, 15 V/5 A e 35 V/500 mA (XDL 35-5); 56 V/500 mA (XDL 56-4). La gamma selezionata viene indicata dal segnalatore luminoso sotto la rispettiva dicitura nel lato destro dello strumento; quando si seleziona la gamma 500 mA, il segnalatore visualizza la dicitura mA per indicare che il contatore di corrente registra i valori in milliampere e non in ampere.
- Page 81 Il XDL 35-5P & XDL 56-4P è dotato di un'uscita sul pannello posteriore e di morsetti di rilevamento, particolarmente utili quando lo strumento viene montato in un rack. I morsetti di rilevamento sul pannello posteriore devono essere sempre utilizzati con i collegamenti di uscita sul pannello posteriore.
- Page 82 Si noti che il valore impostato per l'OVP non viene cambiato quando si cambia la gamma (ad es. il valore di 38 V impostato per l'OVP rimane valido sulla gamma 15 V); è compito dell'operatore cambiarlo. Si noti che è anche possibile impostare l'OVP su un valore inferiore alla tensione predefinita. Qualora l'alimentatore funzioni nella modalità...
- Page 83 Protezione magnetotermica sovratemperature Qualora venga superato il valore max ammesso per la temperatura interna, ad esempio in caso di ostruzione delle ventole, l'erogazione di corrente viene disinserita e il display visualizza il messaggio OTP triP . Premendo ESCAPE viene eseguita una delle due operazioni indicate qui di seguito: i.
- Page 84 tasto OK. Le memorie vuote sono indicate dal lampeggio del simbolo – per ogni tasto numerico digitato. Prima di confermare l'operazione con il tasto OK, è possibile uscire dalla funzione Richiamo senza richiamare nessun valore impostato premendo ESCAPE o aspettando 10 secondi dalla digitazione dell'ultimo valore.
- Page 85 Impostazioni di fabbrica Le impostazioni di fabbrica (adottate alla prima accensione dello strumento) sono: Gamma: 35 V/3 A (XDL 35-5); 56 V/2 A (XDL 56-4) Tensione: 1,000 V Limite di corrente: 1,000 A OVP: 40 V (XDL 35-5); 62 V (XDL 56-4) OCP: 5,5 A (XDL 35-5);...
-
Page 86: Instrucciones En Español
Seguridad Esta fuente de alimentación es un dispositivo de Clase de Seguridad I según la clasificación del IEC y ha sido diseñado para cumplir con los requisitos de la norma EN61010-1 (Requisitos de Seguridad para Equipos Eléctricos para la Medición, Control y Uso en Laboratorio). Es un instrumento de Categoría de Instalación II propuesto para ser usado con un suministro monofásico normal. - Page 87 Instalación Compruebe que el voltaje de funcionamiento del instrumento indicado en el panel posterior es adecuado para el suministro eléctrico local. Si es necesario cambiar el voltaje de funcionamiento, realice lo siguiente: 1) Desconecte el instrumento de todas las fuentes de voltaje. 2) Extraiga los tornillos que sujetan la tapa superior y levante la tapa.
- Page 88 Montaje Este instrumento se puede utilizar en un banco o montar en un soporte. Se suministra con patas para el montaje en banco. Las patas delanteras incluyen un mecanismo inclinable para ajustar el ángulo óptimo del panel. El fabricante o sus agentes internacionales puede suminitrar un kit de soporte para montar los suministros de corriente de la Serie XDL.
- Page 89 Las patillas 2, 3 y 5 se pueden utilizar como una interfaz convencional RS232 con comunicación XON/XOFF. Las patillas 7, 8 y 9 se utilizan cuando el instrumento se utiliza en modo RS232 direccionable. Las tomas de tierra de señal se conectan a la toma de tierra del instrumento. La dirección RS232 se ajusta desde el teclado.
-
Page 90: Funcionamiento Inicial
Funcionamiento inicial Esta sección del manual es una introducción general a los controles y el funcionamiento del instrumento, y debe leerse antes de conectar el suministro eléctrico por primera vez. En este manual, las teclas del panel frontal, las conexiones y los indicadores de pantalla se muestran en mayúsculas, ej. - Page 91 Al pulsar SHIFT se encenderá la tecla y dará a las teclas numéricas las funciones marcadas encima (ej.: STORE, RECALL, etc.). Cuando se selecciona una función pulsando una de estas teclas, se cancela SHIFT (la tecla SHIFT ya no se enciende). Las pulsaciones de teclas adicionales necesarias para completar la función seleccionada se describen detalladamente en las secciones siguientes.
- Page 92 Pantalla La pantalla muestra el voltaje a la izquierda (5 dígitos) y la corriente a la derecha (4 dígitos). Estas pantallas de 7 segmentos también se utilizan para mostrar mensajes durante algunos ajustes de funciones (ej.: almacenamiento/recuperación de memoria o ajuste de dirección de control remoto) mediante el ‘conjunto de caracteres’...
-
Page 93: Funcionamiento Manual
Funcionamiento manual Los nuevos usuarios deben leer el capítulo Funcionamiento inicial que describe los principios de funcionamiento del teclado y el control giratorio Jog (cambio). Voltaje ajustado La pantalla izquierda muestra el voltaje ajustado con una resolución de 1mV, excepto cuando el instrumento está... - Page 94 Límite de corriente ajustado Con la salida desactivada, la pantalla derecha muestra el límite de corriente con una resolución de 1mA (0,1mA en el régimen 500mA). El límite de corriente se puede ajustar directamente desde el teclado numérico; pulse la tecla NUMERIC SET I, introduzca el nuevo valor con las teclas numéricas y confime con OK.
- Page 95 Salida de corriente instantánea El control de límite de corriente se puede ajustar para limitar la corriente de salida continua a niveles de hasta 1mA (0,1 mA en el régimen 500mA). Sin embargo, comúnmente a todos los suministros de corriente en banco de precisión, un condensador está conectado a la salida para mantener la estabilidad y una respuesta transitoria correcta.
- Page 96 Para evitar la inestabilidad y problemas de respuesta transitoria, se debe tener cuidado para garantizar un correcto acoplamiento entre cada salida y cable de detección. Esto se puede realizar uniendo los dos cables o utilizando un cable coaxial blindado (detección a través del interior).
- Page 97 Si se deconecta la OVP, la pantalla mostrará el mensaje OUP triP y la salida se desconectará. Si se pulsa ESCAPE en este punto, se borrará el mensaje y la pantalla mostrará el voltaje preajustado y el límite de corriente. Cuando se haya eliminado la causa del OVP (o se haya cambiado el límite de OVP), la salida se podrá...
- Page 98 Desconexión de temperatura Si se sobrepasa el límite de seguridad de temperatura interna, por ejemplo, porque se han bloqueado los orificios de ventilación del ventilador, la salida se desconecta y la pantalla mostrará OTP triP . Si se pulsa ESCAPE en este punto se ejecutará una de las siguientes acciones: i.
- Page 99 OK. Las memorias vacías vienen indicadas por el parpadeo de – en todas las posiciones de dígitos. En cualquier momento antes de pulsar la tecla OK, se puede salir de la función de recuperación sin recuperar un ajuste pulsando ESCAPE o esperando 10 segundos desde la última entrada de datos.
- Page 100 Ajustes predeterminados de fábrica Los ajustes predeterminados de fábrica (que se aplican cuando se enciende el instrumento por primera vez) son los siguientes: Régimen: 35V/3A (XDL 35-5); 56V/2A (XDL 56-4) Voltaje: 1,000V Límite de corriente: 1,000A OVP: 40V (XDL 35-5); 62V (XDL 56-4) OCP: 5,5A (XDL 35-5);...
- Page 101 AMETEK will, at its expense, deliver the repaired or replaced Product or parts to the Buyer. Any warranty of AMETEK will not apply if the Buyer is in default under the Purchase Order Agreement or where the Product or any part...
Need help?
Do you have a question about the Sorensen XDL 35-5 and is the answer not in the manual?
Questions and answers