Table of Contents
Advertisement
Available languages
Available languages
T 100
TREADMILL OWNER'S MANUAL
MANUEL DU PROPRIÉTAIRE DU TAPIS ROULANT
MANUAL DEL PROPIETARIO DE LA CAMINADORA
Read the TREADMILL GUIDE before using this OWNER'S MANUAL.
Lire le GUIDE D'UTILISATION DU TAPIS ROULANT avant de se servir du présent MANUEL DU PROPRIÉTAIRE.
Lea la GUÍA DEL USUARIO DE LA CAMINADORA antes de usar este MANUAL DEL PROPIETARIO.
Advertisement
Table of Contents

Related Manuals for Horizon Fitness T100


Summary of Contents for Horizon Fitness T100
- Page 1 T 100 TREADMILL OWNER’S MANUAL MANUEL DU PROPRIÉTAIRE DU TAPIS ROULANT MANUAL DEL PROPIETARIO DE LA CAMINADORA Read the TREADMILL GUIDE before using this OWNER’S MANUAL. Lire le GUIDE D’UTILISATION DU TAPIS ROULANT avant de se servir du présent MANUEL DU PROPRIÉTAIRE. Lea la GUÍA DEL USUARIO DE LA CAMINADORA antes de usar este MANUAL DEL PROPIETARIO.
- Page 2 ENGLISH FRANÇAIS ESPAÑOL...
- Page 3 ENTER YOUR SERIAL NUMBER IN THE BOX BELOW: SERIAL NUMBER: HORIZON T100 TREADMILL MODEL NAME: » Refer to the SERIAL NUMBER and MODEL NAME when calling for service.
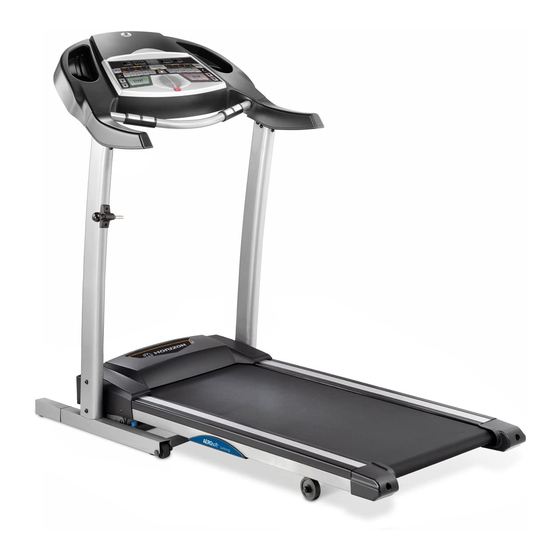
- Page 4 READING RACK WATER BOTTLE HOLDER TOUCH PAD PANEL CONSOLE WARNING AVERTISSEMENT ADVERTENCIA ATTACH SAFETY KEY CLIP TO CLOTHING BEFORE STARTING. TO ATTACHER LA PINCE DE LA CLÉ DE SÉCURITÉ AUX VÊTEMENTS AVANT DE METTRE L’APPAREIL SUJETE LA LLAVE DE SEGURIDAD A SU ROPA ANTES DE COMENZAR. PARA EVITAR AVOID INJURY, STAND ON THE SIDE RAILS BEFORE STARTING EN MARCHE.
-
Page 5: Tools Included
TOOLS INCLUDED: PRE ASSEMBLY 5 mm Allen Wrench 6 mm T-Wrench UNPACKING Screwdriver Place the treadmill carton on a level flat surface. It is recommended that you place a PARTS INCLUDED: protective covering on your floor. Take CAUTION when handling and transporting this unit. -
Page 6: Assembly Step
ASSEMBLY STEP 1 Open HARDWARE BAG 1. HARDWARE BAG 1 CONTENTS : Slide the left FRAME EXTENSION TUBE onto SCREW (A) the CONSOLE MAST SUPPORT TUBE. Bolt 15 mm in place using 2 SCREWS (A) on the side. Qty: 4 Repeat on the other side. - Page 7 ASSEMBLY STEP 2 Open HARDWARE BAG 2. HARDWARE BAG 2 CONTENTS : Slide the LEFT CONSOLE MAST BOLT (B) SPRING WASHER (C) FLAT WASHER (D) ARC WASHER (E) 15 mm 15 mm 15 mm 17 mm down onto the CONSOLE MAST Qty: 8 Qty: 8 Qty: 4...
-
Page 8: Console Mast
ASSEMBLY STEP 3 Open HARDWARE BAG 3. HARDWARE BAG 3 CONTENTS : Insert LEFT HAND GRIP onto upright CONSOLE MAST. BOLT (B) SPRING WASHER (C) FLAT WASHER (D) ARC WASHER (F) 15 mm 15 mm 15 mm 18 mm Qty: 6 Qty: 4 Qty: 4 Qty: 2... - Page 9 ASSEMBLY STEP 4 HARDWARE BAG 4 CONTENTS : SCREW (G) ARC WASHER (H) 10 mm 12 mm CONSOLE Qty: 4 Qty: 4 HAND GRIP POST Open HARDWARE BAG 4. ARC WASHERS (H) Slide the CONSOLE onto the HAND GRIP POSTS. SCREWS (G) Attach the HAND GRIP POSTS to the CONSOLE using 4 SCREWS (G) and 4 ARC WASHERS (H)
- Page 10 ASSEMBLY STEP 5 Open HARDWARE BAG 5. HARDWARE BAG 5 CONTENTS : Attach DECK LOCK PIN to the LEFT SCREW (I) CONSOLE MAST using 2 SCREWS (I). 15 mm Qty: 2 Insert CUP HOLDER into right console pocket. CUP HOLDER CONSOLE LEFT CONSOLE MAST DECK LOCK PIN...
- Page 11 ASSEMBLY STEP 6 Open HARDWARE BAG 6. HARDWARE BAG 6 CONTENTS : NOTE: lock latch must be securely engaged SCREW (J) 12 mm before proceeding with assembly. (See page Qty: 4 folding instructions in TREADMILL GUIDE.) Attach the right END CAP using 2 SCREWS (J).
- Page 13 TREADMILL OPERATION This section explains how to use your treadmill’s console and programming. The BASIC OPERATION section in the TREADMILL GUIDE has instructions for the following: • LOCATION OF THE TREADMILL • USING THE SAFETY KEY • FOLDING THE TREADMILL •...
-
Page 15: Console Operation
CONSOLE OPERATION Note: There is a thin protective sheet of clear plastic on the overlay of the console that should be removed before use. A) MONITOR DISPLAY: Speed, time, pulse, distance, incline, and calories. B) STOP: Press to pause/end your workout. Hold for 3 seconds to reset the treadmill. C) START: Simply press to begin exercising or starts your program. -
Page 16: Finishing Your Workout
MONITOR DISPLAY • SPEED: Shown as MPH. Indicates how fast your walking or running surface is moving. • TIME: Shown as minutes:seconds. View the time remaining or the time elapsed in your workout. • PULSE: Shown as beats per minute. Used to monitor your heart rate (displayed when contact is made with the pulse grips). •... -
Page 17: Quick Start Up
PROGRAMS MANUAL: Allows “on the fly” manual speed and incline changes. ROLLING HILLS: Creates the feel of walking or running over hills. WEIGHT LOSS: Keeps user in their optimal fat burning zone. FAT BLAST: Burn fat at an increased rate. CARDIO BURN: Burns calories and tones muscles. - Page 19 LIMITED HOME-USE WARRANTY...
- Page 20 AT YOUR OWN Horizon Fitness warrants the frame against defects not originally intended or compatible with the RISK and Horizon Fitness shall have no liability for in workmanship and materials for the lifetime of equipment as sold.
- Page 22 FRANÇAIS...
- Page 23 INSCRIRE LE NUMÉRO DE SÉRIE DANS LES CASES CI-DESSOUS : NUMÉRO DE SÉRIE : TAPIS ROULANT HORIZON T100 MODÈLE : » Indiquer le NUMÉRO DE SÉRIE et le MODÈLE lors de tout appel de service.
- Page 24 SUPPORT DE LECTURE PORTE-BIDON CLAVIER TACTILE CONSOLE WARNING AVERTISSEMENT ADVERTENCIA ATTACH SAFETY KEY CLIP TO CLOTHING BEFORE STARTING. TO ATTACHER LA PINCE DE LA CLÉ DE SÉCURITÉ AUX VÊTEMENTS AVANT DE METTRE L’APPAREIL SUJETE LA LLAVE DE SEGURIDAD A SU ROPA ANTES DE COMENZAR. PARA EVITAR AVOID INJURY, STAND ON THE SIDE RAILS BEFORE STARTING EN MARCHE.
-
Page 25: Outils Inclus
OUTILS INCLUS : PRÉ-ASSEMBLAGE Clé Allen de 5 mm Clé à manche en T de 6 mm DÉBALLAGE Tournevis Poser l’emballage du tapis roulant sur une surface plane. Il est conseillé de placer une PIÈCES INCLUSES : toile de protection sur le sol. Prendre des PRÉCAUTIONS pour le maniement et le transport de cette unité. - Page 26 ÉTAPE 1 DE L’ASSEMBLAGE Ouvrir le SAC DE VISSERIE 1. CONTENU DU SAC DE VISSERIE 1 : Glisser le TUBE DE RALLONGE DE CADRE VIS (A) gauche sur le TUBE-SUPPORT DE MONTANT 15 mm DE CONSOLE. Le boulonner avec 2 VIS (A) Quantité...
- Page 27 ÉTAPE 2 DE L’ASSEMBLAGE Ouvrir le SAC DE VISSERIE 2. CONTENU DU SAC DE VISSERIE 2 : Abaisser le MONTANT DE BOULON (B) RONDELLE RONDELLE RONDELLE 15 mm ÉLASTIQUE (C) PLATE (D) EN ARC (E) CONSOLE GAUCHE sur le TUBE- Quantité...
- Page 28 ÉTAPE 3 DE L’ASSEMBLAGE Ouvrir le SAC DE VISSERIE 3. CONTENU DU SAC DE VISSERIE 3 : Insérer la POIGNÉE GAUCHE dans le MONTANT DE LA CONSOLE. BOULON (B) RONDELLE RONDELLE RONDELLE PLATE (D) EN ARC (F) 15 mm ÉLASTIQUE (C) 15 mm 18 mm Quantité...
- Page 29 ÉTAPE 4 DE L’ASSEMBLAGE CONTENU DU SAC DE VISSERIE 4 : VIS (G) RONDELLE EN ARC (H) 10 mm 12 mm Quantité : 4 Quantité : 4 CONSOLE POSTE DE LA POIGNÉE Ouvrir le SAC DE VISSERIE 4. Faire glisser la CONSOLE dans les POSTES DES RONDELLES POIGNÉES.
- Page 30 ÉTAPE 5 DE L’ASSEMBLAGE Ouvrir le SAC DE VISSERIE 5. CONTENU DU SAC DE VISSERIE 5 : Fixer la GOUPILLE DE VERROUILLAGE VIS (I) DE LA PLATE-FORME au MONTANT DE 15 mm Quantité : 2 CONSOLE GAUCHE avec 2 VIS (I). Insérer le PORTE-BIDON dans le trou droit de la console.
- Page 31 ÉTAPE 6 DE L’ASSEMBLAGE Ouvrir le SAC DE VISSERIE 6. CONTENU DU SAC DE VISSERIE 6 : REMARQUE : Avant de procéder à VIS (J) 12 mm l’assemblage, s’assurer que le verrou de la Quantité : 4 plate-forme est bien enclenché. (Consulter le GUIDE D’UTILISATION DU TAPIS ROULANT pour les instructions de pliage.) Fixer le CHAPEAU D’EXTRÉMITÉ...
- Page 33 FONCTIONNEMENT DU TAPIS ROULANT La présente section explique comment utiliser et programmer la console du tapis roulant. La section FONCTIONNEMENT DE BASE du GUIDE D’UTILISATION DU TAPIS ROULANT comporte des instructions relatives à ce qui suit : • EMPLACEMENT DU TAPIS ROULANT •...
-
Page 35: Fonctionnement De La Console
FONCTIONNEMENT DE LA CONSOLE Remarque : Avant d’utiliser la console, il faut enlever la fine pellicule protectrice en plastique qui la recouvre. A) ÉCRAN D’AFFICHAGE: Vitesse, durée, fréquence cardiaque, distance, inclinaison et calories. B) STOP (ARRÊT) : Appuyer sur cette touche pour faire une pause/terminer une séance d’entraînement. Tenir la touche pendant 3 secondes pour réinitialiser le tapis roulant. - Page 36 ÉCRAN D’AFFICHAGE • SPEED (VITESSE) : Indiquée en mi/h. Affichage de la vitesse de déplacement de la bande. • TIME (DURÉE) : Indiquée en minutes et secondes. Affichage de la durée restante ou écoulée des exercices. • PULSE (FRÉQUENCE CARDIAQUE) : Indique les battements par minute. Permet à l’utilisateur de surveiller sa fréquence cardiaque (s’affiche lorsque le contact est établi avec les deux poignées du cardio-fréquencemètre).
-
Page 37: Mise En Marche Rapide
PROGRAMMES MANUAL (MANUEL): Permet des changements manuels de la vitesse et de l’inclinaison en cours d’exercice. ROLLING HILLS (CÔTES): Donne l’impression de marcher ou de courir en montée et en descente. WEIGHT LOSS (PERTE DE POIDS) : Maintient l’utilisateur dans la zone optimale où il brûle les graisses. FAT BLAST (PULVÉRISATION DES CELLULES GRAISSEUSES) : Brûle les cellules graisseuses à... - Page 39 GARANTIE LIMITÉE – USAGE DOMESTIQUE...
- Page 40 Horizon Fitness prend à sa charge les frais de main- en relation avec l’achat, l’utilisation, la réparation ou d’œuvre pour la réparation de l’appareil pendant 90 jours l’entretien de l’équipement.
- Page 42 ESPAÑOL...
- Page 43 ESCRIBA EL NÚMERO DE SERIE EN LAS SIGUIENTES CASILLAS: NÚMERO DE SERIE: CAMINADORA HORIZON T100 MODELO: » Cuando llame para solicitar servicio haga referencia al NÚMERO DE SERIE y al NOMBRE DE MODELO.
- Page 44 ESTANTE DE LECTURA CAVIDAD PARA BOTELLA DE AGUA PANEL DE CONTROL TÁCTIL CONSOLA WARNING AVERTISSEMENT ADVERTENCIA ATTACH SAFETY KEY CLIP TO CLOTHING BEFORE STARTING. TO ATTACHER LA PINCE DE LA CLÉ DE SÉCURITÉ AUX VÊTEMENTS AVANT DE METTRE L’APPAREIL SUJETE LA LLAVE DE SEGURIDAD A SU ROPA ANTES DE COMENZAR. PARA EVITAR AVOID INJURY, STAND ON THE SIDE RAILS BEFORE STARTING EN MARCHE.
-
Page 45: Piezas Incluidas
HERRAMIENTAS PREENSAMBLAJE INCLUIDAS: Llave Allen de 5 mm DESEMPAQUE Llave en T de 6 mm Destornillador Coloque la caja en que viene la caminadora sobre una superficie plana y nivelada. Le recomendamos colocar una cubierta protectora sobre el piso bajo la máquina. Tenga PIEZAS INCLUIDAS: CUIDADO al transportar y mover esta unidad. - Page 46 PASO 1 DE ENSAMBLAJE Abra la BOLSA DE TORNILLERÍA 1. CONTENIDO DE LA BOLSA DE TORNILLERÍA 1: Meta el TUBO EXTENSOR IZQUIERDO TORNILLO (A) DEL BASTIDOR en el TUBO DE SOPORTE 15 mm DEL POSTE DE LA CONSOLA. Fíjelo con 2 Cantidad: 4 TORNILLOS (A) en un lado.
- Page 47 PASO 2 DE ENSAMBLAJE Abra la BOLSA DE TORNILLERÍA 2. CONTENIDO DE LA BOLSA DE TORNILLERÍA 2: Meta el POSTE IZQUIERDO DE LA PERNO (B) ARANDELA ARANDELA ARANDELA 15 mm ELÁSTICA (C) PLANA (D) DE ARCO (E) CONSOLA hacia abajo en el TUBO Cantidad: 8 15 mm 15 mm...
- Page 48 PASO 3 DE ENSAMBLAJE Abra la BOLSA DE TORNILLERÍA 3. CONTENIDO DE LA BOLSA DE TORNILLERÍA 3: Introduzca la EMPUÑADURA IZQUIERDA en el POSTE VERTICAL DE LA CONSOLA. PERNO (B) ARANDELA ARANDELA ARANDELA 15 mm ELÁSTICA (C) PLANA (D) DE ARCO (F) Cantidad: 6 15 mm 15 mm...
- Page 49 PASO 4 DE ENSAMBLAJE CONTENIDO DE LA BOLSA DE TORNILLERÍA 4: TORNILLO (G) ARANDELA DE ARCO (H) 10 mm 12 mm Cantidad: 4 Cantidad: 4 CONSOLA POSTE DE LA EMPUÑADURA Abra la BOLSA DE TORNILLERÍA 4. ARANDELAS Meta la CONSOLA en los POSTES DE LAS DE ARCO (H) EMPUÑADURAS.
- Page 50 PASO 5 DE ENSAMBLAJE Abra la BOLSA DE TORNILLERÍA 5. CONTENIDO DE LA BOLSA DE TORNILLERÍA 5: Fije el PASADOR DE BLOQUEO DE LA TORNILLO (I) PLATAFORMA al POSTE IZQUIERDO DE LA 15 mm Cantidad: 2 CONSOLA con 2 TORNILLOS (I). Introduzca el PORTABOTELLAS dentro de la cavidad derecha de la consola.
- Page 51 PASO 6 DE ENSAMBLAJE Abra la BOLSA DE TORNILLERÍA 6. CONTENIDO DE LA BOLSA DE TORNILLERÍA 6: NOTA: Es necesario que el mecanismo de TORNILLO (J) 12 mm bloqueo de la plataforma esté bien metido Cantidad: 4 antes de seguir con el proceso de ensamblaje (consulte las instrucciones para levantar la plataforma en la GUÍA DEL USUARIO DE LA CAMINADORA).
- Page 53 FUNCIONAMIENTO DE LA CAMINADORA Esta sección explica cómo usar y programar la consola de su caminadora. La sección de FUNCIONAMIENTO BÁSICO en la GUÍA DEL USUARIO DE LA CAMINADORA contiene instrucciones para lo siguiente: • DÓNDE COLOCAR SU CAMINADORA • USO DE LA LLAVE DE SEGURIDAD •...
-
Page 55: Funcionamiento De La Consola
FUNCIONAMIENTO DE LA CONSOLA Nota: La consola tiene una cubierta plástica delgada de protección que es necesario quitar antes de usar la consola. A) PANTALLA: Velocidad, tiempo, pulso, distancia, inclinación y calorías. B) STOP (PARAR): Oprima para hacer una pausa o terminar su sesión de ejercicio. Sostenga oprimida esta tecla durante 3 segundos para poner en ceros la consola. - Page 56 PANTALLA • SPEED (VELOCIDAD): Aparece en millas/hora; indica a qué velocidad se mueve la superficie para caminar o correr. • TIME (TIEMPO): Aparece en minutos:segundos; indica el tiempo restante o el que ha pasado en su sesión de ejercicio. • PULSE (PULSO): Aparece como latidos/minuto; indica su ritmo cardíaco (cuando se sujetan ambas empuñaduras con sensor de pulso).
-
Page 57: Inicio Rápido
PROGRAMAS P1 MANUAL: Le permite al usuario hacer cambios de velocidad y de inclinación sin necesidad de detenerse. P2 ROLLING HILLS (SUCESIÓN DE COLINAS): Crea la sensación de caminar o correr por colinas. P3 WEIGHT LOSS (CONTROL DE PESO): Le mantiene en su zona óptima para quemar grasas. P4 FAT BLAST (QUEMAR GRASA): Quema grasa rápidamente. - Page 59 GARANTÍA LIMITADA PARA USO EN EL HOGAR...
- Page 60 PIEZAS Y COMPONENTES ELECTRÓNICOS • 90 DÍAS modificaciones no autorizadas o no recomendadas • La obligación de Horizon Fitness de acuerdo a esta por Horizon Fitness. Horizon Fitness garantiza los componentes garantía se limita a cambiar o reparar, a opción de electrónicos y todas las piezas originales durante un...
- Page 64 Nos interesa saber si usted tiene algún problema y queremos We want to know if you have a problem and we Horizon Fitness tient à ce qu’on lui signale tout problème tener la oportunidad de corregir la situación. want to have an opportunity to correct it for you.
Need help?
Do you have a question about the T100 and is the answer not in the manual?
Questions and answers