
Related Manuals for Alber e-fix


Summary of Contents for Alber e-fix
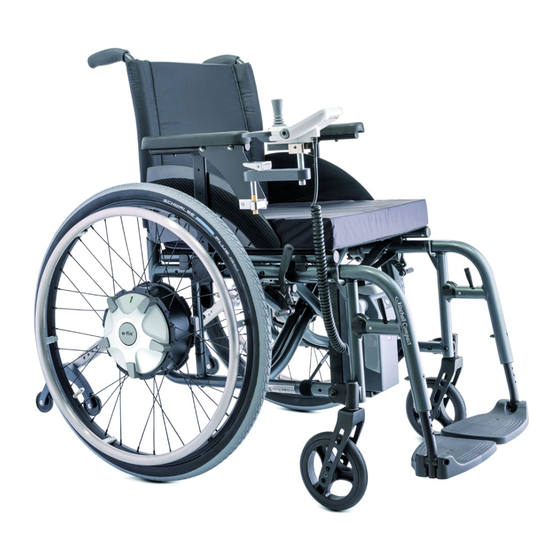
- Page 1 Gebrauchsanweisung User’s Manual Mode d'emploi du dispositif e·fix Instrucciones de uso e·fix Istruzioni per l'uso di e·fix Brugsvejledning Gebruiksaanwijzing Bruksanvisning e·fix Bruksanvisning till e·fix...
- Page 2 21 22 15 16 17...
-
Page 5: Table Of Contents
Contents Introduction The first attempts at driving Standard scope of delivery Suggestions on driving with e·fix Technical data Dangerous ground Wheels Driving Mounting the wheels Driving with manually operated wheelchair wheels Removing the wheels Driving with e·fix wheels in manual mode Driving with e·fix wheels in electrically Batteries powered mode... -
Page 6: Introduction
As a matter of fact, you will instantly realize just how easy and effortless it is to use the e·fix when your alber distributor teaches you step by step the practical handling of it. This instruction... - Page 7 Important safety instructions - Please observe them closely! In the interest of your safety, the e·fix may only be operated by people who: · have been taught how to use the e·fix · are physically and mentally capable to use the e·fix in all possible situations of employment The instruction session is part of the delivery package.
-
Page 8: Standard Scope Of Delivery
Standard scope of delivery Optional accessories · 2 e·fix wheels · Swing out holding device for control unit · Control unit with holding device · Tilt supports · Control unit holding device for attendant · Batteries plus bag · charger ·... -
Page 9: Technical Data
Technical data Range with a 12 Ah battery: approximately 12 km (**) Range with a 17 Ah (*) battery: approximately 22 km (**) Maximum speed: 6 km/h Maximum gradient: 18 % (if 120 kg load is added, please stay within the wheelchair manufacturer's limitations) 2 x 12 Volt / 12 Ah or 2 x 12 Volt / 17 Ah Batteries:... -
Page 10: Wheels
Wheels Mounting the Wheels The two electrically powered wheels are the heart of the e·fix. The wheelchair's standard manual wheels are exchanged with the e·fix wheels as follows. Please lift the wheelchair somewhat. · Remove the wheelchair's left wheel according to the wheelchair's user's manual. -
Page 11: Removing The Wheels
· Repeat all these steps to mount the e·fix wheel on the other side. Removing the Wheels If you want to transport the wheelchair, you can remove the e·fix wheels and fold the wheelchair. Before driving always make sure that both ·... -
Page 12: Batteries
· Connect the interface [25] as shown in the drawing to Batteries the batteries. Make sure that the cables are inside the opening [26]. 3.1.1 Inserting the batteries It is standard that the manufacturer attaches the specifically designed bag intended for the batteries to your wheelchair when the e·fix is mounted. -
Page 13: Removing The Batterie
3.1.2 Never use batteries other than those checked Removing the batteries and provided by alber. The use of other batteries can cause damage to the electronics or result in the malfunctioning of your e·fix. The batteries only need removing when the wheelchair requires folding for transportation. -
Page 14: Charging The Batteries
[29]. the battery pack. 12 Volt · Insert the plug [c] of the alber charger [e] into the · Connect the charger to a mains power supply. charging socket [d] on the adapter [a]. Close the sliding window of the interface ·... -
Page 15: Charging Reserve Batteries
· Connect the charge converter [f] to the cigarette lighter Switch off the battery charger when charging is completed. of your car. · Withdraw the battery charger plug [41] from the socket · Observe the operating instructions enclosed with the [38]. -
Page 16: Safety Instructions For Sliding Window
Safety Hint on the sliding window Important Safety Hints - please observe ! · Always keep the sliding window of the interface closed! · Only open the sliding window when connecting the charger and/or changing the fuse. Close the sliding window again! Should liquid enter the interface (e.g. -
Page 17: Information On The Batteries
Therefore the batteries should, when-ever possible, always The batteries of your e·fix can be recharged be connected to the automatic charger. The alber automatic charger switches from charging to maintaining or discharged in any position. They are considered as safe as dry batteries and certified the charge once the batteries are fully charged, which for airline transportation by DOT and IATA. -
Page 18: Control Unit
4.1.1 Control unit Removing the control unit · Deactivate the e·fix by pressing the On/off switch [8] – the display goes out [2]. Prior to initial use · Pull the plug [5] from the control unit. The standard delivery package of the e·fix includes mounting its various components. - Page 19 An alternative method is to remove the control unit [1] 4.1.2 from the offsetting component [32] so that an accompanying Installing the control unit person can operate it from a bracket at the rear of the wheelchair (see Chapter 10). ·...
-
Page 20: Push Buttons And Displays
4.2.2 Push buttons and displays Displays After switching on the e·fix and on completion of the 4.2.1 automatic system check, various messages appear in the On/off switch display [2]: Use the button [8] to switch the e·fix on and/or off. ·... - Page 21 · If the symbol as well as Code 4 or 5 appear and a 4.2.3 continuous tone is heard, the wheels are not correctly Adjustment wheel for selecting the speed positioned in the wheel receivers. Insert the wheels correctly in the wheel receivers on the The speed which the e·fix should achieve when the joystick wheelchair (see Chapter 2.1) is pushed as far as it will go, can be selected infinitely...
- Page 22 4.2.5 Indoor/Outdoor button By pressing the Indoor/Outdoor button [32], the wheelchair driver has two factory-set parameter combinations. When Indoor is activated a "I" appears in the display [2], when the Outdoor function is activated, a "0" appears. See table below: Function Indoor setting Outdoor setting...
- Page 23 4.2.6 · Automatic switch-off time - the period of time in which Programming possibilities the e·fix remains ready to operate without switching off automatically for the purpose of saving energy. The parameters set in the previous chapter, can be adapted to the individual requirements of the wheelchair driver and ·...
-
Page 24: Joystick
The wheelchair curves to the Joystick right driving forward. (The curve's radius depends on the joystick's movement). The joystick of the e·fix can be compared to a fictional combination of steering wheel, clutch and gas pedal of a car. Basically all of the wheel-chair driver's control commands are directed to the e·fix wheels by the joy stick. - Page 25 The wheelchair drives The wheelchair curves left straight backwards. driving forward. (The curve's radius depends on the joystick's movement). The wheelchair curves to the The middle position of the joystick remains without function, right driving backwards. (The i.e. the wheels do not move and are blocked by the built- curve's radius depends on in brakes.
-
Page 26: Adjustment
Adjustments When the e·fix is mounted at an plant, the control unit is placed in the position indicated by the wheelchair driver at the time he ordered the e·fix. Generally this position is on the same height as the armrest and cannot be moved vertically. -
Page 27: Swivel Arm
· Withdraw the plug [5] from the control unit [1]. Swivel arm (available as accessory) · Release the clamping lever [33] and slide the control unit [1] out of the offsetting component [32]. To simplify driving to table edges, we recommend mounting the optional swivel arm [12]. -
Page 28: Tilt Supports
· Secure the tilt support in the holding device [a] with the Tilt Support quick pins [b]. Press the locking mechanism in the center (available as optional accessory) of the locking pin and push the pin entirely into the holding device. Since most wheelchairs come with tilt support, the tilt support is available only as an optional accessory. - Page 29 · Assembly and repairs as well as any other work done on unintentionally setting down on too high kerbs, particularly the e·fix must be carried out by Ulrich Alber GmbH + Co. KG the toothed sections [d] in the tilt supports may be subject or any other personnel authorized by to above average loading.
- Page 30 Condition of toothed section Swivel the tilt supports as shown: · Toothed section [d] sits tight within the holder [e] and the adjusting tube [f] and cannot be twisted: tilt supports can continue to be used. · Toothed section [d] can be twisted within the holder [e] or the adjusting tube [f]: teeth are twisted –...
-
Page 31: Operation
more confident moving the joystick thus driving in a more Operation precise manner. · Increase the speed slowly. We advise you always to choose Safety of the Driver a low speed level when driving inside. Safety and comfort of the driver are the first priority. It is, therefore, indispensable to get to know your e·fix and Further Suggestions to Drive with the e·fix its driving quality thoroughly. - Page 32 · Never drive parallel to steep slopes. The center of gravity Please note that the driving quality and the may change inadvertently, which may result in the brake reaction is also influenced by the two wheelchair‘s tilting sideways. front wheels. Therefore, please make sure that there is the same air pressure in both tyres and that ·...
-
Page 33: Dangerous Ground
Slopes with a maximum gradient of 18 % can Dangerous ground and dangerous situations be driven on with the e·fix without the assistance of an escorting person. However, important prerequisites are faultless tyre treads, correct Taking into account his driving skills and physical abilities, the e·fix driver decides for himself which routes he will tyre air pressure, a completely safe terrain and a travel. - Page 37 Error messages in the display Code Signal tone Cause Help 4 (! lights up) Continuous tone Communication wheel - left - Insert left wheel correctly in the wheel receiver - 25 A fuse defect - left wheel defect 5 (! lights up) Continuous tone Communication wheel - right - Insert right wheel correctly in the wheel receiver...
- Page 38 Changing the battery's fuse If excessive strain is put on some of the e·fix components, in rare cases you may have to change the fuses of the batteries which do not require moving from the wheel chair for this purpose. ·...
- Page 39 · Slide the control unit [1] into the offsetting component Dismantle the control unit in reverse order if it is to be [32] and secure it with the clamping lever [33]. used again directly by the wheelchair occupant. You can decide which of the individual components [32 - 36] should ·...
- Page 40 11.1 Liability Warranty Neither Ulrich Alber GmbH + Co. KG nor its agents or The time of warranty for the e·fix amounts to 24 months authorized dealers and sales representatives will be liable (6 months for the batteries) from the date of purchase, and for the safety, reliability or performance of the e·fix or for...
-
Page 41: Driving With Manually Operated Wheelchair Wheels
Index Adjustments Error messages in the display Adjustment wheel for selecting speed Further suggestions to drive with the e-fix Batteries Bag for the batteries Bow-type handle General information on the batteries Changing the battery's fuse Horn Charging the batteries Cleaning... -
Page 42: Range
Tilt support – important safety note On/Off Switch Torque socket Operation Transportation Performance Warranty Programming possibilities Wheels Push buttons and displays Range Recycling Removing the batteries Removing the control unit Removing the wheels Safety instructions Safety of the driver Speed Standard delivery package Stub axle Swivel arm... - Page 43 Ulrich Alber GmbH + Co. KG Telefon (07432) 2006-0 Vor dem Weißen Stein 21 Telefax (07432) 2006-299 72461 Albstadt-Tailfingen www.ulrich-alber.de 20.0001.4.01.03...
- Page 44 är möjligt. Vänligen tag miljöansvar och återvinn denna produkt genom din lokala återvinningsstation. Ce produit vous a été fourni par alber, un fabricant qui respecte l'environnement. Il est conforme à la directive 2002/96/CE Rebut des équipements électriques et électroniques(WEEE). Ce produit peut contenir des substances qui pourraient être nocives à l'environnement si elles sont déposées dans des endroits inappropriés (remblais par exemple) et non conformes à...
- Page 45 Produktinformation / Product Information Questo prodotto è stato fornito da un fabbricante in conformità alla direttiva "gestione dei rifiuti di apparecchiature elettriche ed elettroniche (RAEE)" 2002/96/CE. Questo prodotto può contenere delle sostanze che potrebbero essere dannose per l'ambiente se eliminato in luoghi non appropriati (punti di raccolta)conformemente alla legislazione in vigore.
Need help?
Do you have a question about the e-fix and is the answer not in the manual?
Questions and answers