Table of Contents
Advertisement
Quick Links
www.scican.com
&
P0
Rinse and hold
P1
Regular wash
P2
Regular wash and dry
P3
Heavy duty wash
P4
Heavy duty wash and dry
• Service Guide
• Manuel maintenance
Website:
• Wartungsanleitung
www.yourCEBA.com
Customer Service:
• Manuale di manutenzione
Phone: 1-916-335-6113
Email:
Support@yourCEBA.com
Product Information and Technical Support:
Phone: 509-747-5027
email:
Info@yourCEBA.com
HYDRIM L110wd / HYDRIM L110w Service Guide 96-108019 Rev 3.0
Copyright 2005 SciCan. All rights reserved.
®
®
Advertisement
Table of Contents

Related Manuals for SciCan HYDRIM L110wd


Summary of Contents for SciCan HYDRIM L110wd
- Page 1 Website: • Wartungsanleitung www.yourCEBA.com Customer Service: • Manuale di manutenzione Phone: 1-916-335-6113 Email: Support@yourCEBA.com Product Information and Technical Support: Phone: 509-747-5027 email: Info@yourCEBA.com HYDRIM L110wd / HYDRIM L110w Service Guide 96-108019 Rev 3.0 www.scican.com Copyright 2005 SciCan. All rights reserved.
-
Page 2: Table Of Contents
Copyright 2005 SciCan. All rights reserved. HYDRIM is a registered trademark of SciCan, Division of Lux and 5.2 Power On Problems ..... . .24 Zwingenberger. - Page 3 Copyright 2005 SciCan. Tous droits réservés. 5.5 Système hydraulique ..... .60 HYDRIM est une marque déposée de SciCan, Division of Lux and Hydrim L110wd Zwingenberger.
- Page 4 5.3 Probleme mit der Steuerung ... . .92 HYDRIM ist ein eingetragenes Warenzeichen von SciCan, Division of 5.4 Fehlercodes ......93 Lux and Zwingenberger.
- Page 5 6.13 Smontare la pompa di scarico ...133 Hydrim L110wd ..... .124 6.14 Smontare la pompa di circolazione .
-
Page 6: Introduction
Do not permit any person other than certified personnel to supply parts for, service, or maintain a Hydrim L110wd or Hydrim L110w. SciCan shall not be liable for incidental, special, or consequential damages caused by any maintenance or services performed on the Hydrim L110wd or Hydrim L110w by a third party, including lost profits, any commercial loss, economic loss, or loss arising from personal injury. - Page 7 1. Introduction The Hydrim L110wd and Hydrim L110w are designed to complement the STATIM family of autoclaves by quickly and hygienically preparing soiled instruments for sterilization. The Hydrim L110wd and Hydrim L110w work like most domestic dishwashers. The operator loads the instruments, closes the door, and selects the wash cycle. Both the Hydrim L110wd and Hydrim L110w automatically dispense cleaning solution via a dosing mechanism.
-
Page 8: Customer Service
1. Introduction The Hydrim L110w instrument washer: The program duration and consumption details are shown in the chart below: Program Wash Time* Water Usage Temperature P0 - Rinse and 30˚C / 86˚F 8 minutes 4 L / 1 gallon Hold P1 - Regular wash 50˚C / 122˚F 20 minutes... -
Page 9: Specifications
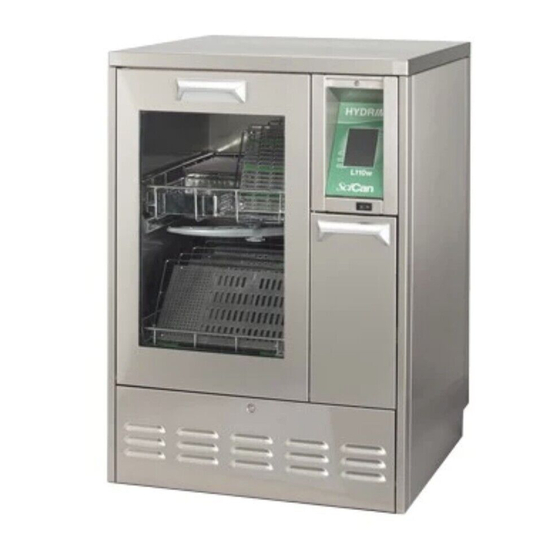
1. Introduction 1.2 Specifications Hydrim L110wd washer disinfector: Dimensions: Height (free-standing) 850 mm Height (built-in) 810 mm Width 600 mm Depth 600 mm Depth with Door Open 1143 mm Weight 85 kg Running Noise 58 dB wash 78 dB dry Cold Water Connection "... -
Page 10: Safety Information
1. Introduction 1.2 Specifications Hydrim L110w instrument washer: Dimensions: Height (free-standing) 850 mm / 33.5" Height (built-in) 810 mm / 32" Width 600 mm / 23.75" Depth 600 mm / 23.75" Depth with Door Open 1143 mm / 45" Weight 85 kg / 187 lbs Running Noise 58 dB wash... - Page 11 Reporting It is vital for SciCan to learn of any problem in the field. This information will help SciCan solve the problem quickly and improve product reliability in new units. Section 9 of this service manual contains a service report form that should be completed and returned to SciCan’s Toronto office.
-
Page 12: Hardware Specifications
1.5 Shipping Instructions The unit should be serviced on site. If it is necessary to send the unit back to SciCan, follow these instructions. Before shipping the unit, run the Rinse and Hold cycle to remove most of the water from the system. -
Page 13: Installation
The unit must be connected to the water supply in accordance with local and national plumbing codes. SciCan recommends a hard plumbing installation within 1.5 m / 5 ft. of the unit. If additional distance is necessary, commercial grade plumbing hose, similar to washing machine installation, must be used to minimize possible leaks. -
Page 14: Water Softener
2. Installation 2.3 Water Softener The Hydrim has an integrated water softening system and is shipped with the softening salt setting at 0. If you are in an area where the water hardness is higher than normal, the use of water softening salts may improve the cleaning results. To use the water softening system, you will first need to determine the hardness of your local tap water. -
Page 15: Drainage
2. Installation If you have set the water softener to any setting above 0, the SALT indicator flashes when you need to refill the salt container. salt container lid To add water softening salts, follow these steps: 1. Unscrew the salt container lid. 2. -
Page 16: Setup And Installation Tips
A water pressure of 7 - 145 psi / 0.5 - 10 bar (gauge) is required. Make sure that the hot and cold water hoses are connected to their respective inlet connectors (not reversed) at the back of the unit. Note: The Hydrim L110wd has only a cold water inlet. -
Page 17: Optional Installation Configurations
2. Installation 2.7 Optional Installation Configurations Option 1. Free Standing . 7 5 " m / 2 3 6 0 0 m 6 0 0 / 2 3 . 7 5 " Option 2. Under Counter + 3 0 " 1 . -
Page 18: Controller Software Functions
Adjustment from 1 to 99 can be made with button 1 (down) and button 2 (up). *Factory preset to 0 for Hydrim L110wd-D02 and L110w-M01 and to 2 for L110wd-M02 HYDRIM L110w/wd Service Guide... -
Page 19: Hydrim L110W/Wd Service Guide
The user will have to reset the unit in order to run another cycle. 11. For Hydrim L110wd a combination of buttons 3 and button 5 pressed together is also used after a power down occurrence, as a reset. The unit will indicate error 7 “E7” and the previous selected program LED will be flashing after powering the unit up, as an indication of cycle interrupted. -
Page 20: Routine Maintenance
3. Routine Maintenance These steps should be performed prior to inspecting the unit. 3.1 Filters Inspect the coarse and fine filters as follows: 1. Open the unit’s door and remove the wash trolleys. 2. Grasp the handle in the center of the coarse filter and turn it 90˚... -
Page 21: Hoses
2. Make sure that the hoses are clean, free of debris, and not kinked. 3. Make sure that the inlet valves are free of debris. 4. Return the hoses to the unit or replace them if there is a problem. Hydrim L110wd power cord intake hose drain... -
Page 22: Schematics
4. Schematics 4.1 Hydraulic Schematic – Hydrim L110wd D D r r y y e e r r Drye r cold water cold water valve valve input input Condenser Condenser water water output output Condensation Condensation Circulating pump Circulating pump... -
Page 23: Hydrim L110W/Wd Service Guide
4. Schematics 4.1 Hydraulic Schematic – Hydrim L110w Drye r hotwater valve coldwater valve Mixing tap temperature sensor Circulating pump Dosing pump D1=Cleaner Temperature sensor Drain hose Drain pump HYDRIM L110w/wd Service Guide Page 22... -
Page 24: Electrical
4. Schematics 4.2 Electrical Hydrim L110wd / Hydrim L110w HYDRIM L110w/wd Service Guide Page 23... -
Page 25: Troubleshooting
5. Troubleshooting 5.1 Primary Assessment 1. Check the water connections both on the back of the unit and from the water source. 2. Check the power connection from both the unit and from the source. 3. Check the drainage. 4. Check if there are any leaks coming from the unit or if the water pressure has dropped significantly. -
Page 26: Fault Codes
Timeout on water evacuation from the failure chamber Disinfection failure Disinfection failure Water temperature less then disinfection Washing chamber (Hydrim L110wd) temperature during disinfection cycle Disinfection Disinfection failure The timer maintained by the master Washing chamber timer error controller is different with more than 5 %... -
Page 27: Hydraulic Overview
5. Troubleshooting 5.5 Hydraulic Overview Shower top Open air channel Exhaust valve Overflow channel Upper wash Regeneration chamber Heat exchanger Water inlet Lower wash Regeneration valve Drain valve To the pot Heat Float in the Salt container exchange ground tube Pressure switch Electrical... -
Page 28: Taking Apart And Reassembling The Unit
Sharp metal edges are exposed. Be careful, and wear long sleeves. 6.1 Removing the Cleaning Solution Hydrim L110wd For Hydrim L110wd 1. Open the cleaning solution drawer by pulling it from the bottom. 2. Unscrew the cap and remove the level sensor assembly. -
Page 29: Removing The Kick Plate
6. Taking Apart and Reassembling the Unit 6.4 Removing the Kick Plate 1. Remove the screws on both ends of the kick plate. 2. Remove the kick plate. 6.5 Removing the Left Side Panel 1. Open the door of the unit. 2. -
Page 30: Removing The Dryer
6. Taking Apart and Reassembling the Unit 6.9 Removing the Dryer 1. Remove top cover. (see section 6.3) 2. Remove the side panel. (see section 6.6) dryer 3. Disconnect the hose. 4. Remove the two screws holding the bracket at the top of the unit. 5. -
Page 31: Removing The On / Off Switch
6. Taking Apart and Reassembling the Unit 6.10.1 Removing the On / Off Switch 1. Remove the control panel fascia. (see section 6.10) 2. Flatten the metal tab holding the switch in place. 3. When bending tabs back slide the switch up and out of place. -
Page 32: Removing Wash Tank
6. Taking Apart and Reassembling the Unit 6.12 Removing Wash Tank 1. Follow the directions for removing the following parts from the unit: • Back cover (see section 6.2) • Top cover (see section 6.3) • Kick plate (see section 6.4) •... - Page 33 14. Unscrew the dryer and frame from the back of the unit. 15. Disconnect the screw located on the top rim of the tank. NOTE: There are two tubes for the Hydrim L110wd, and one for 16. Turn and press the door spring assembly downward and then the Hydrim L110w.
-
Page 34: Removing Drain Pump
6. Taking Apart and Reassembling the Unit 6.13 Removing Drain Pump 1. Remove the wash tank. (see section 6.12) 2. Disconnect the wires attached to the pump. 3. Release the latch holding the pump in place. 4. Turn clockwise and remove the pump. 6.14 Removing Circulation Pump 1. -
Page 35: Removing The Hot And Cold Inlet Valve
2. Unscrew the bolt. 3. Detach the wire and pull the sensor out of the hole. outside view 6.18 Removing the Condenser (Hydrim L110wd) 1. Disconnect two air inlet tubes from the top of the condenser. 2. Disconnect two air outlet tubes from the bottom of the condenser. -
Page 36: Parts
7. Parts (subject to change: refer to my.scican.com/ for updates.) Description Part Number Note Switch 13488.00 flow heater O-ring 16939.00 temperature switch Box power-in 13454.00 Power switch 13459.00 Handle 16945.00 door lock Micro switch 16944.00 Chamber level / control unit O-ring 16938.00... - Page 37 Tube 13647.00 pump pot / level emitter Ring 13648.00 retaining ring with soft bearing Safety switch heater 13489.00 Heater, Hydrim L110w Safety switch heater 13423.02 Heater, Hydrim L110wd Dosing pump 13010.04 Master 13475.01 controller Slave 13475.02 controller Circulator pump 13549.00 Fascia L110wd 13790.04...
- Page 38 Carbon for blower motor 26668.01 Top face 50750.10 cladding Inlet hose 51005.03A 100. Air micro filter 13319.00 for Hydrim L110wd only 101. Air filter 13319.10 for Hydrim L110w only 102. Flow switch 17137.00 for Hydrim L110wd only 103. Flow Switch 17137.01...
Need help?
Do you have a question about the HYDRIM L110wd and is the answer not in the manual?
Questions and answers