Table of Contents
Advertisement
Quick Links
Advertisement
Table of Contents
Troubleshooting

Related Manuals for Fortinet FortiFone-350i


Summary of Contents for Fortinet FortiFone-350i
- Page 1 FortiFone-350i Telephone User Guide...
- Page 2 FortiFone-350i Telephone User Guide Revision 2 24 October 2011 © Copyright 2011 Fortinet, Inc. All rights reserved. Contents and terms are subject to change by Fortinet without prior notice. Trademarks The names of actual companies and products mentioned herein may be the trademarks of their respective...
-
Page 3: Table Of Contents
Provisioning the FortiFone-350i ........ - Page 4 RTP Start Port............... 26 Proxy Registration .
- Page 5 USING THE FORTIFONE-350I PHONE........
- Page 6 E-911 and use of the FortiFone-350i with Multi-Line Telephone Systems....... .
-
Page 7: Introduction
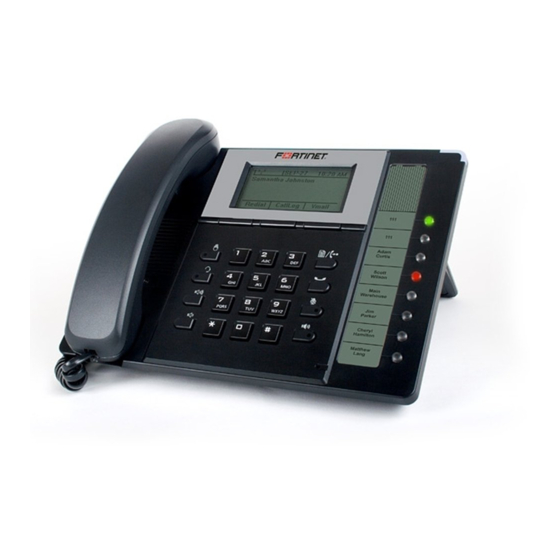
Congratulations on your purchase of the FortiFone-350i (FON-350i) phone! Rich with features and easy to use, the FortiFone-350i is a powerful business workhorse that suits a wide range of uses. It features six programmable multicolored LED appearance keys, superior audio quality speakerphone, dedicated headset support and much more. - Page 8 Figure 1: FortiFone-350i Front Item Function Softkeys — Softkeys are interactive and change function based on the state of the phone. Flexible keys — Multicolored LED keys that can be assigned to engage and monitor lines, extensions or queues. They can also be programmed as function and speed dial keys. Keys 1 and 2 are reserved for primary and secondary line appearance for the extension.
-
Page 9: Programmable/Flexible Key States
Flexible keys not assigned for line access may access features such as Speed dial, Intercom, Park and others. LCD LAYOUT The FortiFone-350i phone has a 140x48 dot graphic LCD arranged to show 5 lines of text and is used to display information to the user. The top-bar status line displays icons, date and time. The bottom line shows choices associated with the three context-sensitive softkeys located just below the LCD. -
Page 10: Installing The Fortifone-350I
The figure below shows the cable connections for your IP phone. The LAN and desktop PC connections employ standard Category 5 cables terminated with RJ-45 connectors. The FortiFone-350i supports PoE (Power over Ethernet) in accordance with the IEEE-802.1af Class 2 standard. When connected to a PoE compliant LAN port, the IP Phone derives power from the port. -
Page 11: Attaching The Stand
Wiring Chart Power If the LAN port supports PoE then the power adapter is not required. If PoE is not supported on the LAN, connect the power adapter to the power jack on phone. Headset Optionally connect a headset to the RJ22 headset jack on the phone. We strongly recommend the use of an amplified headset. -
Page 12: Wall Mounting
WALL MOUNTING The FortiFone-350i phone supports wall mounting via the base of the phone housing. Wall mount the FortiFone-350i using the instructions below in Figure 4. • Mark and drill two 7 mm (5/16”) holes for plastic wall anchors (not included) with a vertical separation of 10 cm (4”). -
Page 13: Provisioning The Fortifone-350I
PROVISIONING THE FORTIFONE-350i For instructions on programming your FortiVoice phone system for the FortiFone-350i, please refer to Adding IP Phones to FortiVoice included in the Start Menu on your PC. For internal use The FortiFone-350i phone supports ‘plug and play’ installation employing the automated provisioning process for discovering FortiVoice phone systems. -
Page 14: Personalizing Your Phone
PERSONALIZING YOUR PHONE HOW TO NAVIGATE THROUGH MENUS To access the configuration menu: • Press the button. To select an item: • Dial the digit associated with the menu item or • Use the Down softkey to move the cursor to the next item, then press the Select softkey to select an option. -
Page 15: Configuration Overview
Enter the hunt group you normally use to place outgoing calls (example: 9), then press the OK softkey. CONFIGURATION OVERVIEW The FortiFone-350i supports the access and configuration of many parameters directly from the Telephone User Interface. To access the Configuration menu, press the button while the phone is not in use. -
Page 16: Ip Address
IP Address By default the phone is configured to use DHCP to automatically assign an IP address and other LAN parameters. Assigning a static address for the Network Mode requires manual entry of an IP address and other parameters stated in the previous section. The phone requires a valid available IP address for proper operation. -
Page 17: Secondary Dns Address
ID assigned, only frames with the assigned ID are accepted, and all SIP and voice frames sent by the FortiFone-350i include the VLAN ID assigned to the LAN port. FortiVoice phone systems do not support VLAN tagging so this should not be used with FortiVoice phone system deployments. -
Page 18: Vlan Id (Lan)
Changing the VLAN Priority requires a reboot of the IP phone. When you leave the menu, you will receive a reboot notice. The recommended value for VLAN Priority (LAN) port is 5. To disable VLANs, assign the VLAN ID as zero (0). VLAN ID (LAN) The VLAN ID (LAN) assigns the identification for Ethernet frames for the phone LAN port including signaling and voice payloads. -
Page 19: Vlan Id (Pc)
To disable VLANs, assign the VLAN ID as zero (0). The FortiFone-350i can be assigned to employ the Cisco® Discovery Protocol to determine if VLANs are to be used and the associated VLAN ID. The CDP selection displays only if function_cdp is enabled in the configuration file. -
Page 20: Sip Configuration
SIP CONFIGURATION The SIP Configuration section contains parameters related to SIP accounts, line appearance, and other parameters that allow the phone to register and, if required, subscribe for the line appearance with the appropriate SIP server or PBX. Lines are assigned to the phone’s flexible buttons in consecutive order from the first button. For each line, the following parameters are available: •... -
Page 21: Proxy Port
Proxy Port The Proxy Port defines the UDP port number employed for SIP signaling transport. In common practice, the port number 5060 is used. To change the Proxy Port number: • Press the button, then 2. SIP Configuration, then 1. Line Configuration. •... -
Page 22: Authentication User Name
• Input the Name using the dial pad and press the OK softkey to save your entry. To enter alphanumeric characters, select the Mode softkey. Authentication User Name Authentication of the line with the SIP call server requires an Authentication User Name. To assign the Authentication User Name: •... -
Page 23: Registration Status
Registration Status The status of the line registration with the SIP call server can be viewed from this menu. The status is displayed as OK, NOK (Not registered) or undefined (not assigned). To view the Registration status for a line: •... -
Page 24: Extension For Dss Line
Extension for DSS Line A DSS Line requires entry of the associated extension number. Note do not assign a DSS extension number for a private or shared line type. To assign an extension number for a DSS line, • Press the button, then 2. -
Page 25: Backup Proxy Address
• Input the Outbound Proxy Port using the dial pad and press the OK softkey to save your entry. Changing the Outbound Proxy Port requires a reboot of the IP phone. Backup Proxy Address When using an outbound proxy, a backup proxy can be defined for use should the primary proxy fail to respond. -
Page 26: Rtp Start Port
• Input the Local UDP Port using the dial pad and press the OK softkey to save your entry. Changing the Local UDP Port requires a reboot of the IP phone. RTP Start Port When a SIP call is established, Real-Time Transport Protocol (RTP) packets transport media (voice). The default port used for RTP packets is 23000. -
Page 27: Voicemail Url
Voicemail URL The Voicemail URL is used to access the voicemail of a host service or PBX. If not configured by the host service or PBX, then it should be configured accordingly. To assign the Voicemail URL: • Press the button, then select 2. -
Page 28: Phone Settings
PHONE SETTINGS Under the Phone Settings menu item, the user parameters listed below can be changed. 1 — LCD Contrast 2 — Ring Settings 3 — Disable Ringer 4 — Headset Auto Mode 5 — Programmable/Flexible Key Settings 6 — Time Configuration 7 —... -
Page 29: Line Ring Setting
Disable Ringer The FortiFone-350i can be programmed not to ring when an incoming call is received. It will still light up the LCD, light up the Incoming Call Indicator and show the Caller ID. -
Page 30: Headset Auto Mode
Headset Auto Mode The FortiFone-350i supports the use of headsets that have a standard RJ22 jack. With Headset Auto Mode enabled, all calls automatically use the headset when engaging lines, redial, speed dials etc. To enable Headset Auto Mode: •... -
Page 31: Key Tone
Language The FortiFone-350i ships with 3 supported languages — English, Spanish and French. The default language is English. Languages are configured in the FortiVoice management software for the extension. Please contact your administrator. -
Page 32: Call Waiting
If Call Waiting is disabled, the phone will return a busy status to the phone system and it will handle the call accordingly. By default, Call Waiting is enabled on all FortiFone-350i phones. To enable/disable Call Waiting: •... -
Page 33: Message Waiting Tone
Access Code Prefix The FortiFone-350i phone can automatically prepend digits* to a phone number dialed from the Missed Calls log, Received Calls log or Phone Book. For example, you should program a Hunt Group (ie. 9) if you normally dial 9 to reach an outside line. -
Page 34: Directory
Note: If you use Direct Line Access (No Hunt Group required to place calls), then nothing needs to be programmed. * There is a configurable parameter in the web interface under Call Preferences to change the length of a number dialed before the phone will insert the Access Code. The default length is 6. Any numbers stored in a log or phone book will have the Access Code prepended if 6 or more digits in length. -
Page 35: To Add Entries To The Phone Book Using The Telephone Interface
• Once selected, click the Upload button. Once uploaded, the new data should be visible in the Phone Book table. • Check all entries to ensure they are properly imported. If the file did not upload, please check the file contents to ensure no conditions exist that might cause the phone to reject the file. -
Page 36: Deleting A Phone Book Record
• If required, edit the name of the contact and press the OK softkey. • If required, edit the name of the contact, press the More softkey, then the OK softkey. • Select the Ring Tone to use when receiving a call from this contact and press the OK softkey. -
Page 37: Searching The Phone Book
• Press the Yes softkey to confirm deletion of all contacts or No to retain the contacts and return to the Phone Book. Searching the Phone Book To search for the Phone Book using either Name or Number: • Press the button, then select 5. -
Page 38: Call Log
• Press the Dial softkey to place the call. Call Log The phone stores logs to track inbound and outbound calls. There are 3 separate logs that support 100 entries each. The memory for the logs is circular so if the logs are not cleared when the capacity reaches 100, the oldest entries are automatically overwritten by new entries. -
Page 39: Set To Defaults
• Press OK to store the current name or edit/add a name, then press OK. • Confirm the phone number or edit as is necessary. If an Access Code Prefix (hunt group number) has been configured for the phone, do not add a hunt group prefix. -
Page 40: Information
INFORMATION The FortiFone-350i phone provides the means to quickly view the network parameters (IP address, default gateway address, and subnet-mask), server IP addresses (SIP servers, TFTP server, and SNTP server), results of the last file download attempt, boot version, hardware and firmware version. -
Page 41: Using Web Manager For Configuration
LOGIN & SITE MAP • Open your browser and go to the IP address currently assigned to the FortiFone-350i phone. Example: http://10.10.10.1 • To confirm the address from the phone, press the button, then 8. - Page 42 • Once logged in, the following Site Map page is loaded. For illustration purposes, the following screens in this section do not show the left navigation menu. The Site Map page is divided into 2 sections: the left hand navigation menu and page content on the right side for the various sections.
-
Page 43: Voip Configuration
VOIP CONFIGURATION At the top of the VoIP Configuration page is a table indicating the SIP lines available. Selecting a line from the list will display the characteristics assigned for the line. If the phone is provisioned with a FortiVoice system, these values will automatically be assigned. F O R T I F O N E - 3 5 0 i T E L E P H O N E U S E R G U I D E... -
Page 44: Line Based Parameters
Line Based Parameters • Proxy Address: The IP address or FQDN of the phone system, SIP server or SIP proxy. • Proxy Port: The server port for incoming SIP requests and outgoing responses. • Display Name: The name used for outgoing Caller ID. The display name assigned for Line 1 also displays on the LCD display when idle. -
Page 45: Lan Configuration
• Start RTP Port: The starting port for used for Real-time Transport Protocol (voice) packets. • SRTP: Enable if required by the system or service provider. • Codec Priority: Select the priority for audio codecs. • Centralized Conference: This parameter enables or disables server control and processing of conferences. -
Page 46: Call Preferences
• Primary DNS: IP address of the primary DNS server. • Secondary DNS: IP address of an auxiliary DNS server. Optional • Domain Name: Domain name for the LAN. Optional • CDP: Enable or disable for the use of the Cisco Discovery Protocol used for VLAN ID. When complete, select the Save button to store the new values to the phone. - Page 47 • Call Waiting Tone: When enabled, a tone is played to the user along with Caller ID information to announce the new call. • Call Hold Ringback: When enabled, the phone rings if the user has taken a 2nd call then terminated the call with another caller still on hold.
-
Page 48: Dial Plan
DIAL PLAN The phone incorporates a dial plan, which monitors the user-dialed digits for patterns matching the dial plan number. If a match occurs, the phone modifies the digits and processes the call using the configured script in the dial plan. The phone supports a digit map plan or routing table plan. If used with the FortiVoice system, then these maps are automatically generated. -
Page 49: Simple Dial Plan
The following are examples of dial plans using the Routing Table. Simple Dial Plan Customer requirements Process the call after any seven-digit number is dialed or if the Operator is dialed - 0. Number TRNC Post Pause Extra 0?????? NULL NULL 0.0.0.0 ??????? -
Page 50: Digit Map Table
To delete an entry from the Current Routing Table: • Select the check box in front of the desired entry. • Click the Delete Entry button. To delete all the entries: • Enter all as the index. • Click the Delete Entry button. Digit Map Table Using the Digit Map Table, a string of 512 characters may be entered to define the dial plan. -
Page 51: Simple Dial Plan
The dial plan can include modification of a matching dialed number before call set-up. The Digit Map Process defines the modification procedures for a number. The process may include: • TRNC: Defines the number of digits to delete (truncate) from the number dialed. •... -
Page 52: Phone Information
Select the DEL check box. • Select the Save button. PHONE INFORMATION The Phone Information page displays useful information for the FortiFone-350i phone. In addition, it is possible to change the Web Manager password from this page. To change the phone name: •... -
Page 53: Phone Settings
PHONE SETTINGS The Phone Settings page contains a mix of parameters that should only be changed if familiar with the resulting change. Phone Settings • Frame Duration: Sets the interval to send/receive RTP packets in milliseconds. Do not change this value if you do not understand the settings. -
Page 54: Functions
used or depth per account. For example, selecting 2 lines but configuring the same phone number for both lines will allow for 2 calls per button to be handled for a total of 4 calls. Do not change this value if you do not understand the settings. -
Page 55: Phone Book
PHONE BOOK The phone includes an internal Phone Book with 80 contact records. Calls to a contact can be made using the Speed number (00–79). Records may be added, edited, deleted or searched from the phone interface via the Phone Book section under the Directory. To add a Phone Book entry: •... -
Page 56: Loading A Contact List Using A Web Browser
The Phone Book can be downloaded or uploaded to and from a comma-separated value (CSV) file. To upload/download: • Click the Browse button and locate the desired CSV file on your PC. • Select Upload or Download, as desired. Loading a contact list using a web browser Note: The contact list must use the following format: SpeedNumber,Name,PhoneNumber,Information (optional) Example:... -
Page 57: Multicast Paging
MULTICAST PAGING The phone supports multicast paging. It can be configured to listen for paging announcements made on a specific multicast IP address and port. Pages received on a matching multicast IP address and port will play through the speakerphone when the phone is idle. -
Page 58: Programmable Keys
PROGRAMMABLE KEYS The FortiFone-350i has 6 flexible keys that can be assigned to various functions. When programmed by a phone system, these keys are usually defined via the configuration file. For keys set to user defined in FortiVoice software (shown as None in the web interface of the phone), these keys can be programmed from the phone or web interface and will not be overwritten when a configuration file is loaded onto the phone via the FortiVoice system. -
Page 59: Call Log
CALL LOG The Call Log page provides a list of all calls (incoming, outgoing or missed) for the extension. The log is organized to show the type of call — IC (incoming/received), OG (Outgoing) and M (Missed), the contact name and contact information, date and time, duration, and state of the call — Connected (OK), no call established (NOK). -
Page 60: Network Time Configuration
NETWORK TIME CONFIGURATION The Network Time Configuration page allows you to configure the parameters required for proper maintenance of the time and date on the phone. If provisioned by FortiVoice, nothing needs to be changed on this page. Configurable Parameters •... - Page 61 • DST (Daylight Savings Time): Enable DST if applicable in your region. Ensure DST configuration parameters are properly configured for the start and end of the DST cycle. • Time Format: Sets the format of the LCD time display. Options include: Off, 12-hour or 24-hour. •...
-
Page 62: Upgrade Configuration
UPGRADE CONFIGURATION If using with FortiVoice, these parameters should never need to be altered. When performing a firmware update, follow the instructions provided in the Start Guide or support section of the website. On the Upgrade Configuration page, the results of the most recent download attempt are displayed at the top. - Page 63 • HTTPS URL: is the URL of the HTTP/HTTPS server where configuration and software files are located. Select the Received by DHCP on boot checkbox if the phone will use the DHCP Option defined to retrieve the URL. If the option is present, the provisioning type is changed automatically to HTTP/HTTPS using the URL from the DHCP option and default option 160.
-
Page 64: Qos Configuration
QOS CONFIGURATION Only make adjustments if you understand how these features work. Diffserv Configuration DiffServ Code Point (DSCP) or ToS establishes the priority of voice packets. Compatible routers apply the DSCP for packet priority, handling higher priority packets first. However, at congested routers, higher priority packets are discarded first. -
Page 65: Load Default
• When done making changes, press the Save button. Modifications made to the IEEE 802.1p/Q configuration require a reboot of the phone. If CDP is enabled, manual VLAN settings are overwritten during a reboot of the phone. To use manually defined VLAN settings, disable CDP. -
Page 66: Using The Fortifone-350I Phone
USING THE FORTIFONE-350i PHONE RECEIVING A CALL When you receive a call, the phone rings while the LCD displays the incoming call information and the associated extension button flashes. To answer an incoming call: • Lift the handset. You may press the button, line button or the Answer softkey to activate the speakerphone. -
Page 67: Putting A Call On Hold
PUTTING A CALL ON HOLD When placing a call on hold, the held party cannot hear you and you will not hear the held party. The held party will hear MOH (Music On Hold), if configured with the phone system. While a call is on hold, you can answer or place other calls and can toggle between held calls on the same dedicated extension key. -
Page 68: 3-Party Conference
Press the Answer softkey. The first call will be placed on hold and you will be connected to the second caller. REDIAL The FortiFone-350i saves the last number dialed and allows you to redial the number with the touch of a button. To redial a call: •... -
Page 69: Dialing Using A Speed Dial Number
DIALING USING A SPEED DIAL NUMBER The FortiFone-350i has a Phone Book that can store up to 80 contacts. Each record includes a name, contact information and a speed dial number (00–79). When you dial a speed dial number, the phone initiates a call to the contact. -
Page 70: Line/Extension Appearance Coverage
LINE/EXTENSION APPEARANCE COVERAGE The FortiFone-350i has BLF/DSS line functionality that addresses the special needs typically associated with an Attendant or Secretarial answering position but may be used for any employee. Options to monitor lines, extensions or queues are programmed on a key-by-key basis in the phone system. -
Page 71: Using Your Fortifone-350I Phone With Fortivoice
USING YOUR FORTIFONE-350i PHONE WITH FORTIVOICE ACCESS AN OUTSIDE LINE Dial hunt group 9 or 81–88 (Americas, UK), dial 0 or 81–88 (other countries). No hunt group is required if Direct Line Access is enabled. You can select a line directly if it has a programmed key. -
Page 72: Voicemail
Conference call Press the More softkey then press the Conf. softkey to put the first party on hold. Call the second party (for external calls, first access an outside line). Press the Join softkey to connect to all parties. Park a caller Press the programmed Park key. -
Page 73: Internet Update
Using the IP Phone Update Utility If your phones are on a closed network (no Internet access), or you are having problems with updating over the Internet, you can download the IP Phone Update Utility from the Fortinet Technical Support website for FortiVoice at: http://www.fortinet.com/fortivoice... -
Page 74: Troubleshooting
TROUBLESHOOTING INFORMATION The FortiFone-350i phone provides the means to quickly view the network parameters (IP address, default gateway address, and subnet-mask), server IP addresses (SIP servers, TFTP server, and SNTP server), results of the last file download attempt, boot version, and hardware and firmware version. This information may be useful if calling Fortinet Support. -
Page 75: Troubleshooting Guide
TROUBLESHOOTING GUIDE Symptom Corrective Action LCD Off 1. Ensure PoE cable or power adapter is properly connected. 2. Check/replace AC/DC adapter. Handset off-hook, no dial tone 1. Ensure the RJ-45 cable is correctly connected. 2. Make sure that the SIP Server IP Address is correct. Button LEDs flash Line not registered with the SIP server (FortiVoice phone system) alternating red/yellow... -
Page 76: Appendix A. Specifications - Fortifone-350I
APPENDIX A. SPECIFICATIONS — FORTIFONE- 350i HARDWARE SPECIFICATIONS Item FortiFone-350i Network Interface RJ-45 IEEE 802.3 Ethernet/Fast Ethernet switch port PC/Workstation Interface RJ-45 IEEE 802.3 Ethernet/Fast Ethernet switch port Power 802.3af or AC/DC Power Adapter Message Indicator, Speakerphone, Mute, DND, Headset, Red LEDs... -
Page 77: Appendix B. Character Table For Dial Pad Model
APPENDIX B. CHARACTER TABLE FOR DIAL PAD MODEL The FortiFone-350i supports a special character mode for entering non-numeric characters. The table below covers all possible character options. Digit DIal Pad Mode Upper Case Lower Case Symbols ‘[A]’ ‘[a]’ ‘[*]’ @ : /... -
Page 78: Regulatory & Safety Notices
REGULATORY & SAFETY NOTICES RADIO FREQUENCY EMISSIONS FCC Compliance Statement This device complies with Part 15 rules. Operation is subject to the following two conditions: 1. This device may not cause harmful interference, and 2. This device must accept any interference received, including interference that may cause undesired operation. -
Page 79: European Union Declarations Of Conformity
European Union Declarations of Conformity Fortinet declares that the equipment specified in this document, which bears the “CE” mark, conforms to the European Union Radio and Telecommunications Terminal Equipment Directive (R&TTE 1999/5/EC) including, • Electromagnetic Compatibility Directive (89/336/EEC) and •... -
Page 80: Limited Warranty
LIMITED WARRANTY For detailed warranty information, please visit Fortinet Technical Support at: http://www.fortinet.com/fortivoice WARRANTY REPAIR SERVICES Should the set fail during the warranty period: • In the United States and Canada, please call 1-866-393-9960 for further information. • Outside North America, contact your sales representative for return instructions. - Page 81 www.fortinet.com...
Need help?
Do you have a question about the FortiFone-350i and is the answer not in the manual?
Questions and answers