Table of Contents
Advertisement
Quick Links
Advertisement
Table of Contents
Troubleshooting

Related Manuals for Fortinet FortiFone FON-360i


Summary of Contents for Fortinet FortiFone FON-360i
- Page 1 FortiFone™ User Guide for FON-350i/360i...
- Page 2 Fortinet. For absolute clarity, any such warranty will be limited to performance in the same ideal conditions as in Fortinet's internal lab tests. In no event does Fortinet make any commitment related to future deliverables, features or development, and circumstances may change such that any forward-looking statements herein are not accurate.
-
Page 3: Table Of Contents
Contents Introduction....................... 1 Phone Features......................1 Requirements......................1 Flexible Key States ....................3 Display Layout ......................3 Installation......................4 Connecting the Phone ..................... 4 Attaching the Stand ....................5 Wall Mounting ......................6 Provisioning the Phone .................... 6 For internal use ....................6 For external use .................... - Page 4 User Name ....................16 Authentication User Name ................. 17 Authentication Password ................17 Registration Status..................18 Line Type....................18 Extension for DSS Line ................19 SIP Configuration, General Parameters ............19 Outbound Proxy Address................19 Outbound Proxy Port ................. 20 Backup Proxy Address ................
- Page 5 Access Code Prefix..................30 Directory ........................ 30 Phone Book ..................... 30 Adding a Phone Book Record ..............31 Loading a Contact List using a Web Browser ..........31 To add entries to the Phone Book using the telephone interface ....32 Editing a Contact ..................
- Page 6 Phone Book ......................54 Loading a contact list using a web browser ............ 55 Downloading the phone book to a file on a PC using a web browser..... 55 Multicast paging ....................56 Paging Prefix....................56 Priority Paging Group..................56 General Paging Group ..................
- Page 7 Using your Phone with FortiVoice ..............70 Access an outside line ................... 70 Accessing Features ....................70 Voicemail........................ 71 Updating the Firmware ..................71 Troubleshooting ..................... 72 Information......................72 Troubleshooting Guide ..................73 Appendix A. Specifications................74 Hardware Specifications..................74 Appendix B.
-
Page 8: Introduction
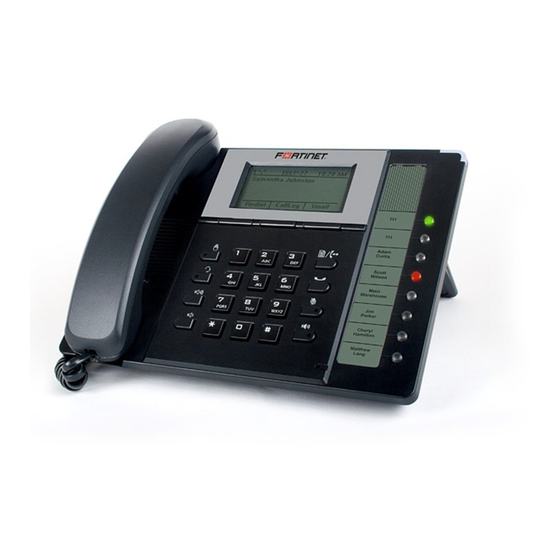
Introduction Phone Features • A 3.0” x 1.5” LCD display • 6 flexible keys with LEDs • Up to 6 line appearance options with LEDs • Message waiting with indicator lamp and tone • Full duplex speakerphone • Intercom paging •... - Page 9 Figure 1: Phone front Item Function Softkeys — softkeys change function based on the state of the phone. Flexible keys — multicolored LED keys that can be assigned to engage and monitor lines, extensions or queues. They can also be programmed as function and speed dial keys.
-
Page 10: Flexible Key States
Flexible Key States Flexible keys assigned for line, extension or queue appearances will monitor the status of those resources. Status LED Color LED Pattern Flashing approximately once every Incoming call Green 1/2 second Line in use on this phone Green On solid Call on hold at extension Green... -
Page 11: Installation
Installation Connecting the Phone The figure below shows the cable connections for your phone. The LAN and desktop PC connections employ standard Ethernet cables terminated with RJ-45 connectors. The phone supports Power over Ethernet (PoE) in accordance with the IEEE-802.1af Class 2 standard. When connected to a PoE-compliant LAN port, the phone derives power from the port. -
Page 12: Attaching The Stand
Wiring Chart Headset Optionally connect a headset to the RJ22 headset jack on the phone. We strongly recommend the use of an amplified headset. Handset Connect the handset cord to the handset and the handset jack on the phone. Attaching the Stand The angle of the phone is set by the attachment of the provided stand in one of two positions (30°... -
Page 13: Wall Mounting
Wall Mounting Wall mount the phone using the instructions below. • Mark and drill two 7 mm (5/16”) holes for plastic wall anchors (not included) with a vertical separation of 10 cm (4”). • Insert two anchors into the holes, then insert and tighten two screws (not included) leaving about 2.5 mm (1/8”) exposed. -
Page 14: For External Use
For external use When connecting your IP phone at a remote location for external use, perform the following steps: 1. Preconfigure the extension in the FortiVoice management software. 2. Power up the phone and press the button, then go to 3. Phone Settings. 3. -
Page 15: Personalizing Your Phone
Personalizing your Phone How to Navigate through Menus To access the configuration menu: • Press the button. To select an item: • Dial the digit associated with the menu item or • Use the Down softkey to move the cursor to the next item, then press the Select softkey to select an option. -
Page 16: Setting A Hunt Group As An Access Code Prefix
Setting a Hunt Group as an Access Code Prefix If you need to dial – to access an outside line, then you will want to program your phone to automatically insert a hunt group number before all calls placed from the Missed and Received call logs as well as from the Phone Book. -
Page 17: Network Mode
Network Mode The phone is capable of obtaining all of its IP configuration data from a DHCP server. When a DHCP server is not available, static address parameters can be used. Selecting Static requires the manual entry of other several network parameters including: •... -
Page 18: Default Gateway
Default Gateway Selecting static addressing for the Network Mode requires manual entry of a default gateway address. The IP Phone requires a valid default gateway address for proper operation. To assign the Default Gateway address: • Press the button, then select 1. Network Configuration, then 4. Default Gateway. •... -
Page 19: Vlan Settings
VLAN Settings VLAN settings define the Ethernet frame priority and VLAN identification in accordance with IEEE 802.1p/Q standards. Separate VLAN tags are assigned for the IP phone PC port and the LAN (voice) port. With a VLAN ID assigned, only frames with the assigned ID are accepted, and all SIP and voice frames sent by the phone include the VLAN ID assigned to the LAN port. -
Page 20: Vlan Priority (Pc)
Changing the VLAN ID requires a reboot of the phone. When you exit the menu, you will receive a reboot notice. To disable VLANs, assign the VLAN ID as zero (0). VLAN Priority (PC) The VLAN Priority (PC) establishes the priority for Ethernet frames for the phone PC port. Setting the VLAN ID to zero (0) disables VLAN framing and the phone will use only standard Ethernet frames. -
Page 21: Cdp (Fon-350I Only)
CDP (FON-350i only) The phone can be assigned to employ the Cisco® Discovery Protocol to determine if VLANs are to be used and the associated VLAN ID. The CDP selection displays only if function_cdp is enabled in the configuration file. As a default, the CDP parameter is disabled since FortiVoice does not use VLAN tagging. -
Page 22: Sip Configuration, Line Parameters
SIP Configuration, Line Parameters Assign parameters in this section for each SIP line. SIP Server Address The SIP Server Address is the IP address or FQDN of the SIP server or PBX. Different SIP servers can be defined for each line. To assign the Call Server address: •... -
Page 23: Display Name
Display Name When assigned, the Display Name is used in SIP calls as the Caller ID name. To enter the Display Name: • Press the button, then 2. SIP Configuration, then 1. Line Configuration. • Enter the line button number or move the cursor using the Down softkey and press the Select softkey to select a line. -
Page 24: Authentication User Name
Authentication User Name Authentication of the line with the SIP call server requires an Authentication User Name. To assign the Authentication User Name: • Press the button, then 2. SIP Configuration, then 1. Line Configuration. • Enter the line button number or move the cursor using the Down softkey and press the Select softkey to select a line. -
Page 25: Registration Status
Registration Status The status of the line registration with the SIP call server can be viewed from this menu. The status is displayed as OK, NOK (Not registered) or undefined (not assigned). To view the Registration status for a line: •... -
Page 26: Extension For Dss Line
Extension for DSS Line A DSS Line requires entry of the associated extension number. Note: do not assign a DSS extension number for a private or shared line type. To assign an extension number for a DSS line, • Press the button, then 2. -
Page 27: Outbound Proxy Port
Outbound Proxy Port With the Outbound Proxy Server defined, the associated port must be defined as the Outbound Proxy Port. All SIP requests are sent to the assigned port instead of the proxy port configured in the section “Proxy Port” on page •... -
Page 28: Local Udp Port
Local UDP Port The Local UDP Port defines the port, normally 5060, that the phone uses to send and receive SIP signaling packets. In some instances, particularly when behind a firewall, port 5060 may already be in use or problematic with SIP aware routers. To change the Local UDP Port: •... -
Page 29: Registration Expiry
Registration Expiry To ensure a regular connection, the phone periodically re-registers with the proxy or SIP server. Unless defined by the host server during registration, the Register Expires timer determines the interval between registration attempts and can be set from 0 to 86400 seconds. The default is 3600 seconds (1 hour). -
Page 30: Stun Server
STUN Server When the phone is located behind NAT and a STUN server is required, enter a STUN server IP address or FQDN to enable this feature that helps traverse firewalls in limited conditions. • To assign a STUN server: •... -
Page 31: Ring Settings
Ring Settings The IP phone has 9 ring tones and a no ring (Disable Ringer) option for incoming call notification. There is also the option to assign each phone book record one of the ring tones for inbound calls. The Default Ring Tone is used when a ring tone is Set as Default or not defined for a line or phone book record. -
Page 32: Delayed Ring
Delayed Ring The phone can delay when the audible ring tone is played for incoming calls by up to 10 seconds. To configure the Delayed Ring option: • Press the button, then select 3. Phone Settings then 2. Ring Settings. •... -
Page 33: Flexible Key Setting
Flexible Key Setting The flexible keys can be programmed with to access one of several functions. They include Line Appearance, Extension Appearance, Queue Appearance, Phone Book access, System and Personal Speed Dial, Park, Unpark, Call Pickup (any or specific extension), Intercom Page, Group Page and Overhead Page. -
Page 34: Key Tone
Key Tone If desired, a tone can be played out when a button on the phone is pressed. To enable/disable the Key Tone: • Press the button, then select 3. Phone Settings, then 9. Key Tone. • Press the On softkey to enable the Key Tone, or press the Off softkey to disable the Key Tone. -
Page 35: Call Waiting
To enable the DND operation: • Press the button, then select 4. Call Preferences, then 1. Do Not Disturb. • Press the On softkey to enable DND, or press the Off softkey to disable DND. Call Waiting With Call Waiting configured for a FortiVoice extension, notification of a new incoming call is indicated via several methods. -
Page 36: Call Hold Ringback
Call Hold Ringback With Call Hold Ringback enabled, the phone rings if the first call is placed on hold then a second call is taken and terminated by hanging up the phone. It is a reminder that there is still a call on hold. -
Page 37: Anonymous Call Block
Anonymous Call Block The phone can block incoming calls with an anonymous caller ID. To enable/disable Anonymous Call Blocking: • Press the button, then select 4. Call Preferences, then 7. Anonymous Call Block. • Press the On softkey to enable or press the Off softkey to disable Anonymous Call Blocking. •... -
Page 38: Adding A Phone Book Record
Adding a Phone Book Record To simplify the addition of many contacts to the Phone Book, a comma delimited contact list file can be uploaded directly to the phone using the web interface. Loading a Contact List using a Web Browser The contact list must use the following format: SpeedNumber,Name,PhoneNumber,Information (optional) Example:... -
Page 39: To Add Entries To The Phone Book Using The Telephone Interface
To add entries to the Phone Book using the telephone interface • Press the button, then select 5. Directory, then 1. Phone Book. • Press the More softkey twice to scroll to the additional softkey options. • Press the Add softkey. •... -
Page 40: Deleting A Phone Book Record
• If required, edit the name of the contact, press the More softkey, then the OK softkey. • Select the Ring Tone to use when receiving a call from this contact and press the OK softkey. • If required, enter a new Speed Dial Number for the contact and press the OK softkey. -
Page 41: Deleting All Records
Deleting All Records To delete all Phone Book records: • Press the button, then select 5. Directory then 1. Phone Book. • Press the More softkey 4 times to scroll to the additional softkey option DelAll. • Press the DelAll softkey. •... -
Page 42: Call Log
To dial a contact using a flexible button programmed for Phone Book access: • Press the button while the phone is idle. • Select a contact to dial using the Down softkey or search using the Find softkey. • Press the More softkey to scroll to the additional softkey options. •... -
Page 43: Saving An Entry To The Phone Book
Saving an Entry to the Phone Book To save an entry to the phone book: • While viewing an entry, press the More softkey twice, then press the Save softkey. • Press OK to store the current name or edit/add a name, then press OK. -
Page 44: Lock/Unlock Config
Lock/Unlock Config If required, some of the critical configuration parameters can be locked to prevent accidental changes. These include Network settings, SIP setting and Flexible key assignments. To lock portions of the configuration: • Press the button, then select 7. Lock/Unlock Config. •... -
Page 45: Reboot
Reboot After changing certain parameters, the phone will require a reboot to utilize the settings. These settings include the following: — Network Configuration settings — TFTP Server Address settings — Software Update settings — Default settings — After a FortiVoice phone system firmware update, new features might be enabled so a reboot is a good idea to ensure consistent behavior. -
Page 46: Using Web Manager For Configuration
Using Web Manager for Configuration The Web Manager is a web-based tool for configuring phone parameters. The Web Manager has access to all parameters including some not available through the LCD Configuration Menu. It also provides for an easier method to view, make changes or load a contact list to the phone book. - Page 47 • Once logged in, the following Site Map page is loaded. For illustration purposes, the following screens in this section do not show the left navigation menu. The Site Map page is divided into 2 sections: the left hand navigation menu and page content on the right side for the various sections.
-
Page 48: Voip Configuration
VoIP Configuration At the top of the VoIP Configuration page is a table indicating the SIP lines available. Selecting a line from the list will display the characteristics assigned for the line. If the phone is provisioned with a FortiVoice system, these values will automatically be assigned. Using Web Manager for Configuration Page 41 FortiFone™... -
Page 49: Line Based Parameters
Line Based Parameters • Proxy Address: The IP address or FQDN of the phone system, SIP server or SIP proxy. • Proxy Port: The server port for incoming SIP requests and outgoing responses. • Display Name: The name used for outgoing Caller ID. The display name assigned for Line 1 also displays on the LCD display when idle. -
Page 50: General Parameters
General Parameters • Outbound Proxy Address: The IP address or FQDN of the outbound proxy server to receive SIP requests in place of the line-based Proxy Server. • Outbound Proxy Port: The port of the outbound proxy server. • Backup Proxy Address: The IP address or FQDN of the backup proxy server, used when the connection with the primary proxy times-out. -
Page 51: Lan Configuration
LAN Configuration The LAN Configuration page is used to set the network parameters required for proper operation when connected to a LAN. If using DHCP, then the values should be automatically filled and no edits required. For manual configuration, see the network administrator for IP information. -
Page 52: Call Preferences
Call Preferences Most of the call preference parameters can be altered according to the user’s requirements. • Anonymous Call Block: When enabled, the phone blocks incoming calls with an anonymous Caller ID. • Call Waiting Function: When enabled, the phone will accept additional calls and notify the user visually of the incoming call while in a conversation. -
Page 53: Dial Plan
• Direct Call (Hotline/Warm-Line): When used with the FortiVoice system, the feature is controlled by the configuration in the software for this extension. No configuration is required. • Direct Call: when enabled, places a call to a predefined destination automatically when the phone goes off hook. -
Page 54: Simple Dial Plan
• Pause: Defines the position in the number where, if matched, the phone will pause for additional digits before processing the call. The pause duration is programmable under the Dial section of the configuration file and has a default of 5 seconds. •... -
Page 55: 2Nd Dial Tone
Number TRNC Post Pause Extra 91????????? NULL NULL NULL 0.0.0.0 0 9011~ NULL NULL NULL 0.0.0.0 2nd Dial Tone Customer requirements To provide second dial tone after a 9 is dialed, establish a Dial Plan as below. Number TRNC Post Pause Extra NULL... -
Page 56: Digit Map Table
Digit Map Table Using the Digit Map Table, a string of 512 characters may be entered to define the dial plan. Within the string, individual numbers are entered, separated by a '|'. In addition to dial pad digits, special characters may be entered as follows: matches any single digit (0 to 9). -
Page 57: Simple Dial Plan
Simple Dial Plan Customer requirement Process the call after any seven-digit number is dialed or if the Operator is dialed - 0. Digit map routing entry The digit map of this Dial Plan is (0T|xxxxxxx). From this map, if the user dials 0 as the first digit, the phone will wait for the pause time for additional digits. -
Page 58: Phone Information
Phone Information The Phone Information page displays useful information for the phone. In addition, it is possible to change the Web Manager password from this page. To change the phone name: • Enter the desired name. • When complete, press the Save button. To change the password: •... -
Page 59: Phone Settings
Phone Settings The Phone Settings page contains a mix of parameters that should only be changed if familiar with the resulting change. • Frame Duration: Sets the interval to send/receive RTP packets in milliseconds. Do not change this value if you do not understand the settings. •... -
Page 60: Functions
• Backlight: Set the duration that the backlight will remain on after any interaction with the phone. Functions • Download Flag: Enables the visibility of the S/W and configuration download flags functions under the LCD Configuration menu. • One-touch Pickup: When enabled, pressing a line button will connect the call to the speakerphone or headset. -
Page 61: Phone Book
Phone Book The phone includes an internal Phone Book with 80 contact records. Calls to a contact can be made using the Speed number (00–79). Records may be added, edited, deleted or searched from the phone interface via the Phone Book section under the Directory. To add a Phone Book entry: •... -
Page 62: Loading A Contact List Using A Web Browser
The Phone Book can be downloaded or uploaded to and from a comma-separated value (CSV) file. To upload/download: • Click the Browse button and locate the desired CSV file on your PC. • Select Upload or Download, as desired. Loading a contact list using a web browser The contact list must use the following format: SpeedNumber,Name,PhoneNumber,Information (optional) Example:... -
Page 63: Multicast Paging
Multicast paging The phone supports multicast paging. It can be configured to listen for paging announcements made on a specific multicast IP address and port. Pages received on a matching multicast IP address and port will play through the speakerphone when the phone is idle. -
Page 64: Programmable Keys
Programmable Keys The phone has 6 flexible keys that can be assigned to various functions. When programmed by a phone system, these keys are usually defined via the configuration file. For keys set to user defined in FortiVoice software (shown as None in the web interface of the phone), these keys can be programmed from the phone or web interface and will not be overwritten when a configuration file is loaded onto the phone via the FortiVoice system. -
Page 65: Call Log
Call Log The Call Log page provides a list of all calls (incoming, outgoing or missed) for the extension. The log is organized to show the type of call — IC (incoming/received), OG (Outgoing) and M (Missed), the contact name and contact information, date and time, duration, and state of the call —... -
Page 66: Network Time Configuration
Network Time Configuration The Network Time Configuration page allows you to configure the parameters required for proper maintenance of the time and date on the phone. If provisioned by FortiVoice, nothing needs to be changed on this page. Configurable Parameters •... - Page 67 • Date Format: Permits the configuration of the date format as will be shown on the LCD of the phone. • DST Configuration: If DST is enabled, then rules for when it is engaged and disengaged need to be configured. DST can be configured to start and end on specific dates or switch according to a day of the week in a certain month (typically used in North America).
-
Page 68: Upgrade Configuration
Upgrade Configuration If using with FortiVoice, these parameters should never need to be altered. When performing a firmware update, follow the instructions provided in the Start Guide or support section of the website. On the Upgrade Configuration page, the results of the most recent download attempt are displayed at the top. - Page 69 • ID: If required, enter the user name for HTTPS authentication. • Password: If required, enter the password for HTTPS authentication • MAC Cfg. Format: Define the format of the MAC (phone specific) configuration filename. $MAC is replaced with the MAC address of the phone and must be included as part of the file name or path to the configuration file on the HTTP/HTTPS server.
-
Page 70: Qos Configuration
QoS Configuration Only make adjustments if you understand how these features work. Diffserv Configuration DiffServ Code Point (DSCP) or ToS establishes the priority of voice packets. Compatible routers apply the DSCP for packet priority, handling higher priority packets first. However, at congested routers, higher priority packets are discarded first. -
Page 71: Load Default
delay voice packet processing and smaller values may produce more packet loss but quicker voice packet processing. We recommend you use the default settings. • When done making changes, press the Save button. Modifications made to the IEEE 802.1p/Q configuration require a reboot of the phone. If CDP is enabled, manual VLAN settings are overwritten during a reboot of the phone. -
Page 72: Using The Phone
Using the Phone Receiving a Call When you receive a call, the phone rings while the LCD displays the incoming call information and the associated extension button flashes. To answer an incoming call: • Lift the handset. You may press the button, line button or the Answer softkey to activate the speakerphone. -
Page 73: Putting A Call On Hold
Putting a Call on Hold When placing a call on hold, the held party cannot hear you and you will not hear the held party. The held party will hear MOH (Music On Hold), if configured with the phone system. While a call is on hold, you can answer or place other calls and can toggle between held calls on the same dedicated extension key. -
Page 74: Simple Method
Simple method If flexible keys are programmed to monitor extensions, the blind transfer process becomes a one-touch process. • To blind transfer while on a call, simply press a flexible key associated with an extension and the call is transferred. 3-Party Conference The phone supports conferencing with two other parties. -
Page 75: Preprogrammed Speed Dial Keys
Preprogrammed Speed Dial Keys Flexible keys can be programmed by the administrator for system or personal speed dial use. To place a call using a speed dial key: • Press the desired flexible key preprogrammed as a speed dial. The phone activates the speakerphone and places the call according to the outgoing line hunting rules programmed in the phone system for the extension. -
Page 76: Accessing Your Voicemail
Accessing Your VoiceMail When you have a message waiting, the Message LED flashes to indicate you have new messages in your mailbox. To access your voice mailbox: • Press the Vmail softkey. Follow the instructions from your voicemail system to listen to messages. -
Page 77: Using Your Phone With Fortivoice
Using your Phone with FortiVoice Access an outside line Dial hunt group – (Americas, UK), dial – (other countries). No hunt group is required if direct line access is enabled. You can select a line directly if it has a programmed key. -
Page 78: Voicemail
Conference call Press the More softkey then press the Conf. softkey to put the first party on hold. Call the second party (for external calls, first access an outside line). Press the Join softkey to connect to all parties. Park a caller _GA: Press the programmed Park key. -
Page 79: Troubleshooting
IP addresses (SIP servers, TFTP server, and SNTP server), results of the last file download attempt, boot version, and hardware and firmware version. This information may be useful if calling Fortinet Support. • Press the button, then select 8. -
Page 80: Troubleshooting Guide
Troubleshooting Guide Symptom Corrective Action Display Off 1. Ensure PoE cable or power adapter is properly connected. 2. Check/replace AC/DC adapter. Handset off-hook, no dial tone 1. Ensure the RJ-45 cable is correctly connected. 2. Make sure that the SIP Server IP Address is correct. Button LEDs flash alternating Line not registered with the SIP server (FortiVoice phone red/yellow... -
Page 81: Appendix A. Specifications
Appendix A. Specifications Hardware Specifications Item FON-350i/360i Network Interface RJ-45 IEEE 802.3 Ethernet/Fast Ethernet switch port PC/Workstation Interface RJ-45 IEEE 802.3 Ethernet/Fast Ethernet switch port Power 802.3af or AC/DC Power Adapter Message Indicator, Speakerphone, Mute, DND, Headset, Red LEDs LED Indicators 6 Programmable Buttons with Multi-colored LEDs Display 140 x 48 dot graphic... -
Page 82: Appendix B. Character Table For Dial Pad Mode
Appendix B. Character Table for Dial Pad Mode The phone supports a special character mode for entering non-numeric characters. The table below covers all possible character options. Digit DIal Pad Mode Upper Case Lower Case Symbols ‘[A]’ ‘[a]’ ‘[*]’ @ : / @ : / @ : / A B C... -
Page 83: Regulatory And Safety Notices
2. This device must accept any interference received, including interference that may cause undesired operation. European Union Declarations of Conformity Fortinet declares that the equipment specified in this document, which bears the “CE” mark, conforms to the European Union Radio and Telecommunications Terminal Equipment Directive (R&TTE 1999/5/EC) including, •... -
Page 84: Product Safety Instructions
Product Safety Instructions This product complies with and conforms to the following international Product Safety standards as applicable: • Safety of Information Technology Equipment, IEC 60950-1, including • Relevant national deviations as listed in Compliance with IEC for Electrical Equipment (IECEE) •... -
Page 85: Warranty
Warranty This phone is covered by a one-year hardware warranty against manufacturing defects as set forth in the EULA. www.fortivoice.com/support For warranty service: • In North America, please call 1-866-648-4638 for further information. • Outside North America, contact your sales representative for return instructions. You will be responsible for shipping charges, if any.
Need help?
Do you have a question about the FortiFone FON-360i and is the answer not in the manual?
Questions and answers