Table of Contents
Advertisement
Available languages
Available languages
Advertisement
Chapters
Table of Contents
Troubleshooting

Related Manuals for Hughes & Kettner TrilogyTM


Summary of Contents for Hughes & Kettner TrilogyTM
- Page 1 Manual 1.1...
- Page 2 Trilogy™ Manual 1.1 This is to certify that Trilogy™ complies with the provisions of the Directive of the Council of the European Communities on the approximation of the laws of the Member States relating to electromagnetic compatibility (EMC Directive 89/336/EEC) and the low voltage Directive (73/23/EEC).
-
Page 3: Things To Do Before Operating The Amp
Trilogy™ Manual 1.1 Foreword Even in the new millennium, classic rock, blues and metal sounds of last century’s great guitarists continue to shape musicians and audiences’ tastes in tone. Back in the day, flexibility wasn’t top on the list of amp attributes: Two channels were standard, three a luxury, and four MIDI switchable channels a dream at best. -
Page 4: Table Of Contents
Trilogy™ Manual 1.1 Table of Contents Front Panel Connections and Control Features ....5 1.1 Input ........5 1.2 Clean Channel . -
Page 5: Front Panel Connections And Control Features
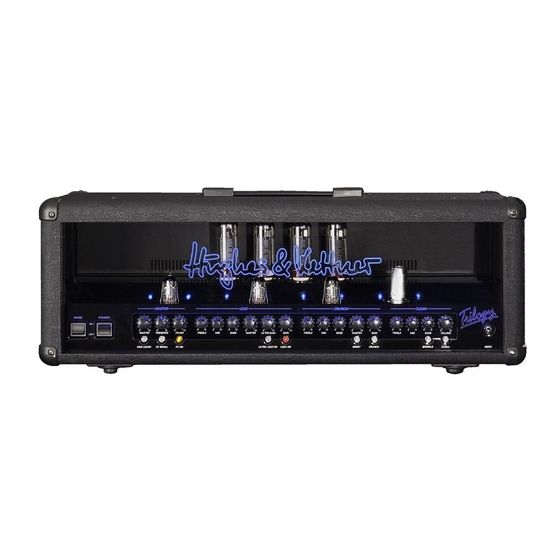
Trilogy™ Manual 1.1 MASTER PRESENCE FX-MIX Figure 1: Trilogy front panel Front Panel Connections and Control Features Trilogy™ features four channels: CLEAN, LEAD, ULTRA LEAD, CRUNCH. Press CLEAN ON, CRUNCH ON, LEAD ON and ULTRA LEAD ON to select channels. These buttons trigger reciprocally, meaning that engaging a button selects its assigned channel directly. -
Page 6: Lead Channel
Trilogy™ Manual 1.1 1.4 Lead Channel Articulate distorted tone plays a pivotal role in most players’ decision to buy an amp. A chief criterion for a top-notch guitar amp is its ability to retain the guitar’s character and deliver defined tone even with the GAIN knob cranked. Trilogy™ does this;... -
Page 7: Rear Panel Connections And Control Features
Trilogy™ Manual 1.1 Figure 2: Rear panel Rear Panel Connections and Control Features 2.1 Mains Socket Trilogy™ ships in two versions rated for 110/120V and 220-240V, respectively. The rating stamped on the mains socket (figure 3) indicates the version type. Both models offer two operating voltages that are selected using the voltage selector integrated in the mains socket. -
Page 8: Midi Port
Trilogy™ Manual 1.1 2.6 MIDI This port accepts a MIDI footswitch or another MIDI control used for switching channels. Switching options are the CLEAN, LEAD, ULTRA-LEAD and CRUNCH channels, effects loop on/off and serial/parallel, as well as the sound-shaping functions SPARKLE for the CLEAN and BOOST for the CRUNCH channel. -
Page 9: Factory Settings And How To Restore Them
Trilogy™ Manual 1.1 MIDI LEARN Stores your settings, quits the MIDI setup menu and returns the amp to normal operating mode. SERIAL: Press this button to check if all LEDs are working properly. All LEDs on Trilogy™’s front panel must light up for as long as you press and hold SERIAL. -
Page 10: Replacing Tubes, Service And Preventive Maintenance
Trilogy™ Manual 1.1 Replacing Tubes, Service and preventive Maintenance TRILOGY™ is factory-loaded with EL34 and 12AX7 tubes. Once they’ve been burned in – that is, operated continuously under a load – they are subjected to a rigorous selection process. Their electrical specs and mechanical status (microphonics) are checked, and then they are installed in an amp and sound- checked. -
Page 11: Troubleshooting
Trilogy™ Manual 1.1 Troubleshooting Trilogy™ won’t power up when you switch it on. • It‘s not getting AC power. Check the mains cord to see if it is connected and firmly seated. • The mains fuse is defective. Ensure it is replaced with another fuse of the same rating. -
Page 12: Technical Specifications
Trilogy™ Manual 1.1 Technical Specifications All level indications relate to 0 dBV (1V RMS). 7.1 Inputs INPUT Port: 6.3 mm (1/4") Type: unbalanced Input impedance: 1 MΩ Sensitivity: - 35 dB Max. input level: +8 dB FX RETURN Port: 6.3 mm (1/4") Type: unbalanced Input impedance: 48 kΩ... -
Page 13: Vor Der Inbetriebnahme
Trilogy™ Manual 1.1 Vorwort Zu keinem Zeitpunkt der Rock-History war der Sound- geschmack der Gitarristen so breit gefächert, wie im noch jungen 21.Jahrhundert. Klassische Rock-, Crunch- und Blues- Sounds gehen Hand in Hand mit bösartigen Metal-Staccatos. Effektdurchzogene, glockenklare Clean-Sounds lösen sich – ohne Vorwarnzeit –... - Page 14 Trilogy™ Manual 1.1 Inhalt Anschlüsse und Bedienelemente der Vorderseite ....15 1.1 Input ........15 1.2 Clean-Kanal .
-
Page 15: Anschlüsse Und Bedienelemente Der Vorderseite
Trilogy™ Manual 1.1 MASTER PRESENCE FX-MIX Abb. 1: Trilogy Vorderseite Anschlüsse und Bedien- elemente der Vorderseite Der Trilogy™ verfügt über vier Kanäle: CLEAN, CRUNCH, LEAD, ULTRA LEAD. Durch Drücken der Taster CLEAN ON, CRUNCH ON, LEAD ON und ULTRA LEAD ON wählst Du die Kanäle an. -
Page 16: Lead-Kanal
Trilogy™ Manual 1.1 1.4 Lead-Kanal Präzise HiGain-Distortionsounds spielen bei der Wahl eines Verstärkers eine entscheidende Rolle. Ein verbindliches Kriterium für einen Top-Class-Gitarrenverstärker ist, dass der individuelle Grundsound der jeweils verwendeten Gitarre selbst bei extremen GAIN-Einstellungen erhalten bleibt. Außerdem sollte der gelieferte Ton auch am Gain-Limit definiert und transparent rüberkommen. -
Page 17: Anschlüsse Und Bedienelemente Der Rückseite
Trilogy™ Manual 1.1 Abb. 2: Trilogy Rückseite Anschlüsse und Bedien- elemente der Rückseite 2.1 Netzanschluss Der Trilogy™ ist in zwei Modell-Varianten lieferbar: 110/120V und 220V-240V, zu erkennen am Gehäuseaufdruck über der Netzbuchse (Abb. 3). Beide Modelle bieten je zwei wählbare Betriebsspannungen, deren Anpassung mittels des in die Netz- buchse integrierten Voltage-Selectors erfolgt. -
Page 18: Midi-Buchse
Trilogy™ Manual 1.1 2.6 MIDI Hier kann ein MIDI-Fußschalter, oder ein beliebiger anderer MIDI-Sender zum Schalten der Kanäle angeschlossen werden. Verfügbar sind die Funktionen CLEAN, CRUNCH, LEAD, ULTRA- LEAD, Effektweg an/aus und seriell/parallel, sowie die Sound- Variationen SPARKLE im CLEAN-, und BOOST im CRUNCH- Kanal. -
Page 19: Werkseinstellung Und Deren Wiederherstellung
Trilogy™ Manual 1.1 Hinweis: OMNI=Empfang auf allen Kanälen. Diese Funktion ist hilfreich, wenn Du nicht sicher bist, auf welchem Kanal Dein Fußboard sendet. SERIAL Mit dieser Taste kannst Du überprüfen, ob alle LEDs funktionieren. So lange SERIAL gedrückt ist, müssen alle LEDs auf der Trilogy™-Front leuchten. -
Page 20: Röhrentausch, Wartung Und Pflege
Trilogy™ Manual 1.1 Röhrentausch, Wartung und Service Der TRILOGY™ ist ab Werk mit EL34 und 12AX7 Röhren be- stückt. Sie werden nach dem „Burn-In“ (ein erster Dauerlauf unter Last) in aufwändigen Selektionsverfahren auf ihre elektrischen Werte, mechanische Beschaffenheit (Mikrofonie), und darüber hinaus im akustischen Test am fertigen Gerät auf ihr Soundverhalten geprüft. -
Page 21: Mögliche Fehlerquellen/Troubleshooting
Trilogy™ Manual 1.1 Mögliche Fehlerquellen/ Troubleshooting Der Trilogy™ lässt sich nicht einschalten • Es liegt keine Netzspannung an. Überprüfe den korrekten Anschluss des Netzkabels. • Die Netzsicherung ist defekt. Achte beim Ersatz auf den für die Netzspannung vorgesehenen Sicherungswert! Der Trilogy™ ist korrekt verkabelt, aber es ist nichts zu hören •... -
Page 22: Technische Daten
Trilogy™ Manual 1.1 Technische Daten Alle Pegelangaben beziehen sich auf 0 dBV (1V RMS ) 7.1 Eingänge: INPUT Buchse: Klinke Bauart: unsymmetrisch Eingangsimpedanz: 1 MΩ Empfindlichkeit: - 35 dB max. Eingangspegel: +8 dB FX- RETURN Buchse: Klinke Bauart: unsymmetrisch Eingangsimpedanz: 48 kΩ max. -
Page 23: Avant-Propos
Trilogy™ Manual 1.1 Avant-propos L’orientation sonore du 21e siècle encore tout jeune est déterminée par les sons classiques Rock, Crunch, Blues et Metal des pointures de la guitare du siècle dernier. Mais aujourd'hui, il est aussi d’autres sons qui appartiennent au répertoire de tout groupe de rock comme le Nu Metal, les Songs aux guitares discrètes, les méchants staccatos ou les effets particulièrement clean. - Page 24 Trilogy™ Manual 1.1 Sommaire Raccordements et commandes en face avant ....25 1.1 Input ........25 1.2 Canal Clean .
-
Page 25: Raccordements Et Commandes En Face Avant
Trilogy™ Manual 1.1 MASTER PRESENCE FX-MIX Figure 2: Face avant de Trilogy™ Raccordements et com- mandes en face avant Le Trilogy™ dispose de quatre canaux : CLEAN, CRUNCH, LEAD et ULTRA LEAD. La sélection de ces canaux s’effectue par pression sur les touches CLEAN ON, CRUNCH ON, LEAD ON et ULTRA LEAD ON. -
Page 26: Canal Lead
Trilogy™ Manual 1.1 1.4 Canal Lead Dans la décision d’achat d’un amplificateur, la précision des sons de distorsion joue un rôle particulièrement important. Critère incontournable pour les amplis de guitares de catégorie supérieure : même en cas de réglage GAIN extrême, le caractère de la guitare doit rester audible et le son parfaitement défini. -
Page 27: Raccordements Et Commandes En Face Arrière
Trilogy™ Manual 1.1 Figure 2: Face arrière de Trilogy™ Raccordements et com- mandes en face arrière 2.1 Raccordement au secteur Le Trilogy™ est disponible en deux exécutions : 110/120V et 220V/240V, une spécificité qui figure sur l’étiquette située au-dessus de la prise secteur (figure 3). Les deux exécutions proposent deux tensions de fonctionnement librement sélec- tionnables, dont l’adaptation s’effectue via le sélecteur de tension intégré... -
Page 28: Prise Midi
Trilogy™ Manual 1.1 2.6 MIDI Cette prise permet de raccorder un pédalier MIDI ou un autre émetteur MIDI pour la commutation des canaux. Commutations possibles : CLEAN, CRUNCH, LEAD, ULTRA LEAD, unité d’effets activée/désactivée et série/parallèle ainsi que les variations sonores SPARKLE sur le canal CLEAN et BOOST sur le canal CRUNCH. -
Page 29: Réglages D'usine Et Remise Aux Réglages D'usine
Trilogy™ Manual 1.1 MIDI-LEARN Met un terme à la configuration MIDI et enregistre les para- mètres. L’ampli revient alors à l’état de fonctionnement préalable. SERIAL Cette touche permet de vérifier le bon fonctionnement de toutes les diodes. Concrètement, tant que la touche SERIAL est enfoncée, toutes les DEL en façade du Trilogy™... -
Page 30: Remplacement Des Lampes, Service Et Entretien
Trilogy™ Manual 1.1 Remplacement des lampes, service et entretien Le Trilogy™ est équipé d’usine de lampes EL34 et 12AX7 de marque RUBY. Après la phase de « burn-in » (premier fonctionne- ment continu sous charge), elles font l’objet d’une procédure de sélection complexe afin de vérifier leurs valeurs électriques et leur aptitude mécanique (microphonie), avant d’être soumises à... -
Page 31: Dépistage Des Pannes
Trilogy™ Manual 1.1 Dépistage des pannes Il est impossible de mettre le Trilogy™ sous tension • Il n’y a pas de tension secteur. Assurez-vous que le câble secteur est correctement branché. • Le fusible de secteur est défectueux. Vérifiez que la valeur du fusible de rechange est compatible avec la tension secteur. -
Page 32: Caractéristiques Techniques
Trilogy™ Manual 1.1 Caractéristiques techniques Toutes les indications de niveau se réfèrent à 0 dBV (1 V RMS). 7.1 Entrées INPUT Prise : Jack Type de connexion : asymétrique Impédance d'entrée : 1 MΩ Sensibilité : -35 dB Niveau d'entrée maxi : +8 dB FX-RETURN Prise : Jack Type de connexion : asymétrique... -
Page 33: Messa In Funzione
Trilogy™ Manual 1.1 Premessa In nessun momento della storia del rock, il gusto del sound dei chitarristi è mai stato così vario, come nel giovane XXI secolo. Sound classici rock, crunch e blues si affiancano agli aggressivi staccati metal. Sound clean ricchi di effetti pulitissimi passano la mano –... - Page 34 Trilogy™ Manual 1.1 Indice Collegamenti ed elementi di controllo sul pannello anteriore ....35 1.1 Input ........35 1.2 Canale Clean .
-
Page 35: Collegamenti Ed Elementi Di Controllo Sul Pannello Anteriore
Trilogy™ Manual 1.1 MASTER PRESENCE FX-MIX Illustrazione 1: Panello anteriore Collegamenti ed elementi di controllo sul pannello anteriore Il Trilogy™ dispone di quattro canali: CLEAN, CRUNCH, LEAD, ULTRA LEAD. Premendo i tasti CLEAN ON, CRUNCH ON, LEAD ON o ULTRA LEAD ON scegli i canali. Gli interruttori si escludo a vicenda. -
Page 36: Canale Lead
Trilogy™ Manual 1.1 1.4 Canale Lead Nella scelta di un amplificatore, i sound precisi HiGain distorti giocano un ruolo decisivo. Un criterio vincolante per un ampli- ficatore per chitarra della classe di punta è che il sound di base individuale della chitarra usata venga mantenuto anche con impostazioni GAIN estreme. -
Page 37: Collegamenti Ed Elementi Di Controllo Sul Pannello Posteriore
Trilogy™ Manual 1.1 Illustrazione 2: Panello posteriore Collegamenti ed elementi di controllo sul pannello posteriore 2.1 Alimentazione di rete Il Trilogy™ è disponibile in due modelli: 110/120V e 220V-240V, riconoscibili dall'etichetta dell'involucro, sopra alla presa di alimentazione (illustrazione 3). Su ciascuno dei due modelli è possibile scegliere tra due tensioni di esercizio, da impostare con il selettore di voltaggio integrato nella presa di alimenta- zione. -
Page 38: Presa Midi
Trilogy™ Manual 1.1 2.6 MIDI Qui è possibile collegare un footswitch MIDI o un qualsiasi altro trasmettitore MIDI per commutare i canali. Sono disponibili le funzioni CLEAN, CRUNCH, LEAD, ULTRA-LEAD, loop effetti ON/OFF e seriale/ parallelo, nonché le variazioni di sound SPARKLE nel canale CLEAN e BOOST nel canale CRUNCH. -
Page 39: Impostazioni Di Fabbrica E Il Loro Resettaggio
Trilogy™ Manual 1.1 Nota: OMNI=riceve su tutti i canali. Questa funzione è utile quando non sei sicuro dove trasmette il tuo pedale d'espressione. SERIAL Con questo tasto puoi verificare se tutti i LED funzionano. Tenendo premuto il tasto SERIAL tutti i LED del pannello anteriore del Trilogy devono illuminarsi. -
Page 40: Sostituzione Delle Valvole, Assistenza E Manutenzione Preventiva
Trilogy™ Manual 1.1 Sostituzione delle Valvole, Assistenza e Manutenzione preventiva Il TRILOGY™ è stato dotato in fabbrica di valvole EL34 e 12AX7. Dopo un "burn-in" (un primo test sotto carico) vengono sotto- poste ad un processo di selezione rigoroso in base ai loro valori elettrici, le caratteristiche meccaniche (microfonia), e ad un test acustico finale, per valutare il comportamento sonoro quando vengono integrate nell'amplificatore. -
Page 41: Possibili Anomalie E Rimedi
Trilogy™ Manual 1.1 Possibili Anomalie e Rimedi Il Trilogy™ non si accende • Manca l'alimentazione di tensione. Controlla il collegamento corretto del cavo di alimentazione. • Il fusibile principale è difettoso. Sostituendo il fusibile accertati che abbia il valore di protezione previsto per la tensione di alimentazione! Il Trilogy™... -
Page 42: Dati Tecnici
Trilogy™ Manual 1.1 Dati tecnici Tutti i valori dei livelli si riferiscono a 0 dBV (1V RMS ) 7.1 Ingressi INPUT Presa: jack Esecuzione: asimmetrica Impedenza d'ingresso: 1 MΩ Sensibilità: -35 dB Livello d'ingresso max.: +8 dB FX- RETURN Presa: jack Esecuzione: asimmetrica Impedenza d'ingresso: 48 kΩ... -
Page 43: Antes De La Puesta En Marcha
Trilogy™ Manual 1.1 Prefacio Los gustos en el sonido del todavía joven siglo XXI están marcados por clásicos como el Rock, Crunch, Blues y Metal de las guitarras del siglo anterior. Pero también el sonido NU-Metal, canciones con guitarras desafinadas, staccatos malignos y efectos de sonido limpios forman parte del repertorio actual de cualquier banda de rock. - Page 44 Trilogy™ Manual 1.1 Contenido Conexiones y elementos de mando de la parte delantera 1.1 Input ........45 1.2 Canal Clean .
-
Page 45: Conexiones Y Elementos De Mando De La Parte Delantera
Trilogy™ Manual 1.1 MASTER PRESENCE FX-MIX Figura 1: Panel delantera Conexiones y elementos de mando de la parte delantera El Trilogy™ tiene cuatro canales: CLEAN, CRUNCH, LEAD, ULTRA LEAD. Pulsando CLEAN ON, CRUNCH ON, LEAD ON y ULTRA LEAD ON puedes seleccionar los canales. Los inter- ruptores se anulan entre sí. -
Page 46: Canal Lead
Trilogy™ Manual 1.1 1.4 Canal Lead Los sonidos distorsionados precisos juegan un papel especial- mente importante al decidirse por un amplificador. Un criterio decisivo para un amplificador de guitarra de nivel superior es que los ajustes GAIN extremos permitan escuchar el carácter de la guitarra y mantener definido el tono. -
Page 47: Conexiones Y Elementos De Mando De La Parte Posterior
Trilogy™ Manual 1.1 Figura 2: Panel trasero Conexiones y elementos de mando de la parte posterior 2.1 Conexión de red Trilogy™ puede suministrarse en dos modelos diferentes: 110/120V y 220V-240V, que se distinguen por la impresión en la carcasa, sobre el conector hembra de red (Fig. 3). Ambos modelos ofrecen dos tensiones de servicio seleccionables cuya adaptación se realiza por medio del selector de voltaje integrado en el conector hembra de red. -
Page 48: Toma Midi
Trilogy™ Manual 1.1 2.6 MIDI Aquí puede conectarse un interruptor de pie MIDI u otro emisor MIDI cualquiera para conectar los canales. Pueden conectarse CLEAN, CRUNCH, LEAD, ULTRA-LEAD, vía de efectos activada/- desactivada y serie/paralelo, así como las variaciones de sonido SPARKLE en el canal CLEAN y BOOST en el canal CRUNCH. -
Page 49: Ajuste De Fábrica Y Su Restablecimiento
Trilogy™ Manual 1.1 SERIAL Con esta tecla puedes comprobar si funcionan todos los LEDs. Mientras se mantiene pulsada SERIAL, deben estar encendidos todos los LEDs de la parte frontal de Trilogy. BOOST, CRUNCH, SPARKLE y CLEAN sirven durante la confi- guración como indicación del canal MIDI en código binario. -
Page 50: Cambio De Válvulas, Mantenimiento
Trilogy™ Manual 1.1 CAMBIO DE VÁLVULAS, MANTENIMIENTO Y SERVICIO TRILOGY™ está equipado de fábrica con válvulas EL34 y 12AX7. Estas válvulas se prueban después del „Burn-In“ (un primer funcionamiento continuo bajo carga) en procedimientos de selección esmerados en cuanto a sus valores eléctricos, naturaleza mecánica (microfonía) y además en una prueba acústica en el aparato acabado, en cuanto a su comportamiento sonoro. -
Page 51: Posibles Fuentes De Fallos / Solución De Problemas
Trilogy™ Manual 1.1 POSIBLES FUENTES DE FALLOS / SOLUCIÓN DE PROBLEMAS No puede activarse el Trilogy™ • No hay alimentación eléctrica. Comprueba que el cable de alimentación está conectado correctamente. • El fusible de red es defectuoso. Comprueba el valor del fusible previsto para la tensión de red antes de realizar el cambio. -
Page 52: Datos Técnicos
Trilogy™ Manual 1.1 Datos técnicos Todos los datos de nivel hacen referencia a 0 dBV (1V RMS ) 7.1 Entradas: INPUT: Hembra: Jack Tipo: asimétrico Impedancia de entrada: 1 MΩ Sensibilidad: -35 dB Nivel de entrada máx.: +8 dB FX- RETURN Hembra: Jack Tipo: asimétrico Impedancia de entrada: 48 kΩ... - Page 53 united states IMPORTANT SAFETY INSTRUCTIONS BEFORE CONNECTING, READ INSTRUCTIONS • Read all of these instructions! • Save these instructions for later use! • Follow all warnings and instructions marked on the product! • Do not use this product near water, i.e. bathtub, sink, swimming pool, wet basement, etc. •...
- Page 54 english IMPORTANT ADVICE ON SAFETY! PLEASE READ BEFORE USE AND KEEP FOR LATER USE! • The unit has been built by Hughes & Kettner in accordance with IEC 60065 and left the factory in safe working order. To maintain this condition and ensure non-risk operation, the user must follow the advice and warning comments found in the operating instructions.
- Page 55 italiano IMPORTANTI AVVERTIMENTI DI SICUREZZA! LEGGERE ATTENTAMENTE PRIMA DELL’USO E CONSERVARE PER UN UTILIZZO SUCCESSIVO • L’apparecchio è stato costruito dalla Hughes & Kettner secondo la normativa europea IEC 60065 ed ha lasciato il nostro stabilimento in stato ineccepibile. Per garantire il mantenimento di tale stato e un utilizzo assolutamente privo di rischi l’utente è...
- Page 56 To find a local distributor please visit: www.hughes-and-kettner.com Hughes & Kettner ® • Postfach 1509 • 66595 St. Wendel • Tel. 0 68 51 - 905 0 • FAX 0 68 51 - 905 103 International Inquiries: Fax +49 - 68 51 - 905 200 • E-Mail: international@musicandsales.com Technische Änderungen vorbehalten Details subject to change without notice Copyright 2005 Music &...
Need help?
Do you have a question about the TrilogyTM and is the answer not in the manual?
Questions and answers